


.
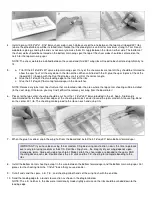
The nylon aileron connectors can be
moved up or down the torque rods to
adjust the amount of aileron throw.
Tape the servo wire to the wing to keep
it from getting tangled with the aileron
servo, as well as the servos in the
fuselage.
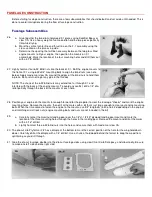
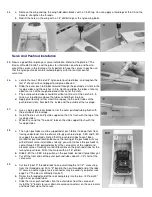
A typical radio installation is shown in the photo above. The receiver and battery on this model are wrapped in foam rubber
and positioned just forward of the servos. A scrap balsa stick keeps them from moving around during flight. If you use a
lightweight engine, you may need to install the battery under the fuel tank to achieve proper balance. Notice that the
aileron connector wire and the charging jack are left accessable, but are tucked away enough so that they can't interfere
with the servo arms and linkages. The antenna has been routed away from all other wiring and out the fuselage bottom.
Pre-Flight Checkout
Be certain to range check your radio equipment according to the manufacturer's instructions before attempting test flights.
A lot of problems can also be avoided if your engine has been well broken-in and the idle adjustments perfected on a test
stand or in another airplane before installation in the new model.
Before flying, you should adjust all of your push rod linkages so that the control surfaces are in their neutral position when
the transmitter sticks and trim levers are centered. Use the die-cut Lite-Ply Aileron Positioning Guide to set the ailerons in
neutral, as shown on the plans. When you get to the field, don't be surprised if the elevator and rudder are suddenly
misaligned. Temperature and humidity changes can cause the nylon push rod tubes to expand or contract slightly. Use the
trim levers on the transmitter to reneutralize the control surfaces, and do the final trimming in the air.
The control surface movements listed are recommended for the first flight of your FOUR-STAR 40. These movements will
provide the model with a fair degree of aerobatic capability if it's balanced correctly. Test flights may indicate a need for
slightly more or less movement, depending on individual model performance and personal preference.
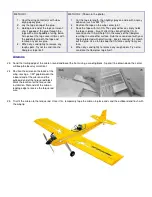
For first flights, make certain that the
model balances somewhere on the
main spar. If it balances further back,
add weight to the nose as necessary.
Trying to fly with the balance point too
far aft is much more dangerous than the
slight increase in wing loading caused
by adding lead to the nose. Always
balance the model with an empty fuel
tank.
RECOMMENDED CONTROL SURFACE MOVEMENTS
For test flying, the following are suggested:
ELEVATOR
1/2" UP and 1/2" DOWN
RUDDER
1" LEFT and 1" RIGHT
AILERON
5/8" UP and 1/2" DOWN
FLYING
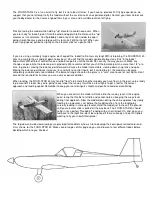
Like it said in the first paragraph of these instructions, the FOUR-STAR 40 was
designed with flight performance as one of its top priorities - and we weren't
disappointed! It's a very maneuverable and aerobatic model, but it still slows
down for soft, gentle landings. It can be flown off pavement or grass, and it
handles the wind well for such a light model.
Summary of Contents for Four-Star 40 SIGRC44
Page 1: ......