background image


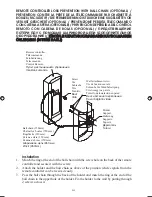
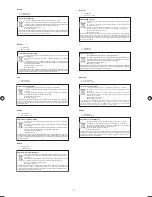
Installation

1. 

Faites correspondre l

ʼ

anneau de 

l

ʼ

extrémité de la chaînette à boules 

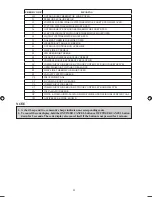
avec le trou de vis situé au dos de la 
télécommande et 

fi

 xez-le à l

ʼ

aide de 

la vis.

2.


Fixez le support et la chaînette à boules 
comme ci-dessus, dans une position 
permettant une réception facile des 
signaux de la télécommande.

3. 

Passez la chaînette à boules à l

ʼ

arrière 

du support et faites correspondre 
l

ʼ

anneau de l

ʼ

extrémité de la chaînette 

à boules avec le trou supérieur du 
support. Fixez le support au mur à 
l

ʼ

aide de 2 vis.


Installation

1. 

Legen Sie den Ring am Ende der 
Kugelkette auf die Schraubbohrung 
an der Rückseite der Fernbedienung 
und befestigen Sie ihn mit der 
Schraube.

2.


Montieren Sie die Halterung und 
die Kugelkette wie oben gezeigt 
an der Stelle, an der Signale von 
der Fernbedienung gut empfangen 
werden können.

3. 

Führen Sie die Kugelkette durch die 
Rückseite der Halterung und legen 
Sie den Ring am Kettenende auf 
das obere Loch in der Halterung. 
Befestigen Sie die Halterung mit 2 
Schrauben an der Wand.


Installazione

1. 

Far combaciare l

ʼ

anello all

ʼ

estremità 

della catena a sfera con il foro della 
vite sul retro del telecomando e 

fi

 ssare 

bene con la vite.

2.


Fissare il supporto e la catena a sfera 
al di sopra del punto in cui possono 
essere ricevuti facilmente i segnali dal 
telecomando.

3. 

Far passare la catena a sfera attraverso 
il retro del supporto e far combaciare 
l

ʼ

anello all

ʼ

estremità della catena con 

il foro superiore del supporto. Fissare 
il supporto alla parete mettendo 2 viti 
attraverso di esso.


Instalación

1. 

Una el anillo del 

fi

 nal de la cadena 

de bolas con el agujero del tornillo 
de la parte trasera del control remoto 
y fíjelo con el tornillo.

2.


Coloque el soporte y la cadena 
de bolas, como indica la imagen 
superior, en una posición en que las 
señales del control remoto se puedan 
recibir con facilidad.

3. 

Pase la cadena de bolas por la parte 
trasera del soporte y una el anillo 
del 

fi

 nal de la cadena de bolas con 

el agujero superior del soporte. Fije 
el soporte en la pared colocando 2 
tornillos a través del soporte.


Монтаж

1. 

Соотнесите кольцо на конце 
шариковой цепи с винтовым 
отверстием в задней части 
п у л ь та   д и с та н ц и о н н о го 
управления и закрепите его с 
помощью винта.

2.


Прикрепите держатель и 
шариковую цепь, как показано 
в ы ш е,   в   п ол оже н и и ,   гд е 
обеспечивается легкий прием 
сигнала ПДУ. 

3. 

Проденьте шариковую цепь 
через заднюю часть держателя 
и соотнесите кольцо на конце 
шариковой цепи с верхним 
о т в е р с т и е м   д е рж ат е л я . 
Прикрепите держатель к стене 
с помощью 2 винтов.


Montaj

Montaj

1. 

Zincirin sonundaki halkayla 
uzaktan kumandan›n arkas›ndaki 
vida deli¤ini efllefltirin ve vidayla 
sabitleyin.

2.


Tutucu ve zinciri uzaktan 
kumandadan gelen sinyallerin 
kolayca al›nabilece¤i yerin üzerine 
yerlefltirin.

3. 

Zinciri tutucunun arkas›ndan 
geçirin ve zincirin sonundaki 
halkay› tutucunun üst deli¤i 
ile efllefltirin. Tutucuyu her iki 
viday› içinden geçirerek duvara 
sabitleyin.

iv

EN-COVER-OM-GS02-0411(0)-Siesta.5   5

EN-COVER-OM-GS02-0411(0)-Siesta.5   5

5/19/11   2:48:38 PM

5/19/11   2:48:38 PM

Summary of Contents for ARCWLA

Page 1: ... Bedieningsaanwijzing Draadloos handapparaat Türkçe Kullanım Kılavuzu Kablosuz Kulaklık English Operating Manual Handset Wireless Français Deutsch Nederlands Español Pycckий Mode D emploi Combiné sans fil Bedienungsanleitung Drahtloses Handgerät Manual De Instrucciones Auricular Inalámbrico Εγχειρίδιο Οδηγιών Ασύρματη Χειροσυσκευή Ελληνικά Português Manual De Funcionamento Aparelho Sem Fios ...

Page 2: ...tion ARCWLA Remote Controller Anzeige Indication De Télécommande ARCWLA ARCWLA Indicatie afstandsbediening Indicación Del Mando A Distancia ARCWLA Пульт Дистанционного Управления ARCWLA Индикация ARCWLA Uzaktan Kumanda ARCWLA Uzaktan Kumanda Göstergesi Göstergesi Δείκτης τηλεχειριστηρίου ARCWLA Indicador do Controlo Remoto ARCWLA ...

Page 3: ...UNG AN DER WAND COMMENT INSTALLER SUR LE MUR MONTAGE OP DE MUUR MONTAJE SOBRE LA PARED КАКУСТАНОВИТЬ НА СТЕНУ DUVARA NASIL DUVARA NASIL YERLEfiT R L R YERLEfiT R L R ΠΩΣΝΑΤΟΤΟΠΟΘΕΤΗΣΕΤΕΠΑΝΩΣΤΟΝΤΟΙΧΟ FIXAÇÃO DO APARELHO NA PAREDE TO INSERT BATTERIES AAA R03 EINSETZEN DER BATTERIEN AAA R03 INTRODUIRE LES PILES AAA R03 BATTERIJEN INZETTEN AAA R03 INSERTE LAS PILAS AAA R03 УСТАНОВКА БАТАРЕЙ AAA R03 P LL...

Page 4: ...aube Vite Tornillo Винт Vida Wall attachment screw Vis de fixation murale Schraube für Wandbefestigung Vite fissaggio a parete Tornillo de instalación en pared Винт настенного крепления Duvar ba lant vidas Holder Support Halterung Supporto Soporte Держатель Tutucu Ball chain 350mm Chaînette à boules 350 mm Kugelkette 350mm Catena a sfera 350 mm Cadena de bolas 350mm Шариковая цепь 350 мм Zincir 35...

Page 5: ...porto e far combaciare lʼanelloallʼestremitàdellacatenacon ilforosuperioredelsupporto Fissare il supporto alla parete mettendo 2 viti attraverso di esso Instalación 1 Una el anillo del final de la cadena de bolas con el agujero del tornillo de la parte trasera del control remoto y fíjelo con el tornillo 2 Coloque el soporte y la cadena de bolas como indica la imagen superior en una posición en que...

Page 6: ...ÁÀ ÌÃÇ ÉÆ È ÈÀÌÀÈ ÂÈ Å ÐÃÇÃÒÀÌÅÉ É ØÆÀÇÀÈÍ ÉÈ ÉÂÈ Ò ÀÍ ÒÍÉ Í ËÀÀ ÌÉ ÀËÁ ÍÌÚ ÍÚÁÀÆÖÀ ÇÀÍ ÆÆÖ ÖÓÀ ÉÊËÀ ÀÆÀÈÈÉÄ ÅÉÈÑÀÈÍË ÑÃÃ ÌÍËÀÒ ÙÔÃÀÌÚ ÐÃÇÃÒÀÌÅÃÀ ÂÈ ÅÃ n 0B Ì ÃÈÀÑ ÍÃÆÃÂÃËÎÀÇÖÀ Í ËÀÃ ÉÆÁÈÖ ÊÀËÀË ÍÖ Í ÌÚ È ÌÊÀÑÃ Æ ÈÉÇ ÊÀËÀË ÍÖ ÙÔÀÇ ÊËÀ ÊËÃÚÍÃÃ ÆÚ ÃÐ ÊÉ ÍÉËÈÉ É ÃÌÊÉÆ ÂÉ ÈÃÚ ÀÌÊÀÒÃ ÊË ÃÆ ÈÎÙ ÎÍÃÆÃÂ ÑÃÙ Ö ÊÉÇÉÁÀÍÀ ÊËÀ ÉÍ Ë ÍÃÍ ÊÉÍÀÈÑÃ Æ ÈÖÀ ÈÀ ÍÃ ÈÖÀ ÊÉÌÆÀ ÌÍ ÃÚ ÆÚ ÉÅËÎÁ ÙÔÀÄ ÌËÀ Ö Ã Â ÉËÉ Ú ÆÙ ÀÄ ÆÚ ...

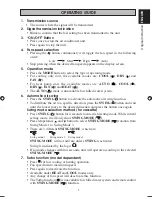
Page 7: ...tic air swing function To distribute the air to a specific direction press the SWING button and wait until the louver move to the desired direction and press the button once again Swing mode selection method for cassette Press SWING button for 4 seconds to enter field setting mode While in field setting mode it will only show SWING MODE Press temperature and button to select SWING MODE rotation fr...

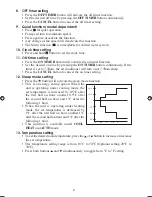
Page 8: ...30am the air conditioner will turn on at 7 30am sharp Press the CANCEL button to cancel the on timer setting 12 Sleep mode setting Press the button will activate the sleep mode function This is an energy saving option When the unit is operating under cooling mode the set temperature is increased by 0 5 C after the first half an hour another 0 5 C after the second half an hour and 1 C after the fol...

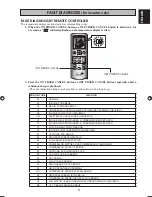
Page 9: ...NT E9 EXV ERROR EA 4 WAY VALVE ERROR F3 DISCHARGE PIPE OVERHEAT F6 HEAT EXCHANGER OVERHEAT HO COMPRESSOR SENSOR SYSTEM ERROR H3 HIGH PRESSURE SWITCH ERROR H6 COMPRESSOR FEEDBACK DETECTION ERROR H7 FAN MOTOR OVERLOADED OVERCURRENT SENSOR ABNORMAL H8 AC CURRENT SENSOR ERROR FAULT DIAGNOSIS BY REMOTE CONTROLLER The temperature display sections indicate corresponding codes When the ON TIMER CANCEL but...

Page 10: ...SUBCOOLING HEAT EXCHANGER THERMISTOR SHORT OPEN J8 LIQUID PIPE THERMISTOR SHORT OPEN J9 GAS PIPE THERMISTOR SHORT OPEN L1 INVERTER OUTDOOR PCB ERROR L3 OUTDOOR CONTROL BOX OVERHEAT L4 HEAT SINK OVERHEAT L5 IPM ERROR IGBT ERROR L8 INVERTER COMPRESSOR OVERCURRENT L9 COMPRESSOR OVERCURRENT PREVENTION LC COMMUNICATION ERROR OUTDOOR CONTROL PCB AND INVERTER PCB P1 OPEN PHASE OR VOLTAGE UNBALANCE P4 HEA...

Page 11: ...MEMO LE MÉMO MITTEILUNG PROMEMORIA EL MEMORÁNDUM ПАМЯТКА NOT ...

Page 12: ...n la interpretación de este manual y en su traducción a cualquier idioma prevalecerá la versión inglesa El fabricante se reserva el derecho a modificar cualquiera de las especificaciones y diseños contenidos en el presente manual en cualquier momento y sin notificación previa В случае противоречия перевода данного руководства с другими переводами одного и того же текста английский вариант рассматр...

Reviews: