


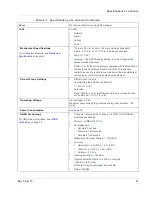


Rev 3 Dec.16
23
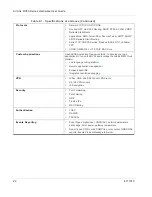
3
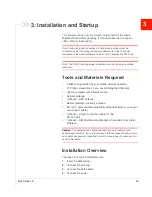
3: Installation and Startup
This chapter shows how to connect, install and start the Sierra
Wireless RV50 Series gateway. It also describes the front panel
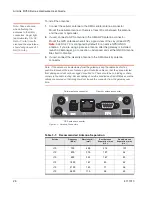
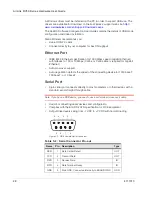
LEDs, and I /O functionality.
Note: Field wiring and connections in hazardous locations must be
connected as per the wiring methods requirement for Class 2 circuits
mentioned in the National Electric Code and the Canadian Electric Code.
Note: The RV50 Series gateway installation must be done by a qualified
technician.
Tools and Materials Required
•
A SIM card (provided by your mobile network operator)
•
#1 Phillips screwdriver (if you are installing the SIM card)
•
Laptop computer with Ethernet cable
•
Cellular antenna
•
Optional — GPS antenna
•
Recommended — diversity antenna
•
AC or DC power cable (available from Sierra Wireless or use your
own custom cable)
•
Optional — a 9-pin connection cable for the
RS-232 port
•
Optional — DIN Rail Mounting Bracket kit (available from Sierra
Wireless)
Caution:
The gateway has a hardened case for use in industrial and
extreme environments. If you are installing it in these types of environments,
use cables designed and specified for use in these types of environment to
avoid cable failure.
Installation Overview
The steps for a typical installation are:
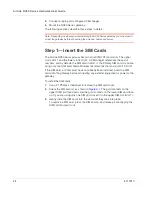
1.
Insert the SIM card(s).
2.
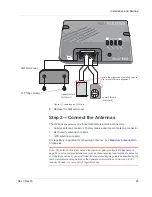
Connect the antenna.
3.
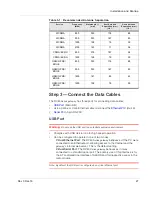
Connect the data cables.
4.
Connect the power.
Summary of Contents for AirLink RV50 Series
Page 1: ...AirLink RV50 Series Hardware User Guide 4117313 Rev 3 ...
Page 2: ......
Page 6: ...AirLink RV50 Series Hardware User Guide 6 4117313 ...
Page 10: ...AirLink RV50 Series Hardware User Guide 10 4117313 ...
Page 18: ...AirLink RV50 Series Hardware User Guide 18 4117313 ...
Page 50: ...AirLink RV50 Series Hardware User Guide 50 4117313 ...
Page 62: ...AirLink RV50 Series Hardware User Guide 62 4112895 ...
Page 66: ...AirLink RV50 Series Hardware User Guide 66 4117313 ...
Page 77: ......
Page 78: ......