33
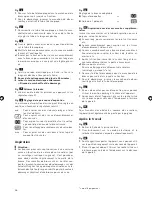
Fig.
10
Set the adjustable floor nozzle:
Rugs and carpets
==>
Hard floors/parquet
==>
Fig.
11*
Vacuuming with accessories
Attach the nozzles to the suction pipe or handle as re-
quired:
a)
Crevice nozzle for vacuuming crevices and corners,
etc.
b)
Upholstery nozzle for vacuuming upholstered furni-
ture, curtains, etc.
c)
Upholstery nozzle with attachable hard furnishings
brush for vacuuming window frames, cupboards,
cornicing, etc.
•
After use, reinsert the crevice nozzle and upholstery
nozzle into the accessories holder.
d)
Hard-floor nozzle
For vacuuming hard floor coverings
(tiles, parquet*, etc.)
•
Push the telescopic tube into the connecting piece
of the hard-floor nozzle until it locks in place.
•
To release the connection, press the locking collar
and pull out the telescopic tube.
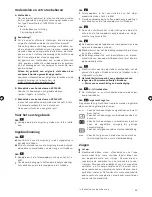
Fig.
12
•
You can use the parking aid on the back of the vacu-
um cleaner if you want to stop vacuuming for a short
time.
•
After switching off the appliance, slide the hook on
the floor nozzle into the recess on the back of the
appliance.
Fig.
13
To overcome obstacles, e.g. steps, the appliance can
also be carried by the handle on the appliance body.
After using the appliance
Fig.
14
•
Pull out the mains plug.
•
Briefly pull on the power cord and release it (the
cable retracts automatically).
Fig.
15
•
To store or transport the appliance, you can use the
storage aid on the underside of the appliance.
•
Stand the appliance upright on its end. Slide the
hook on the floor nozzle into the recess on the un-
derside of the appliance.
powerSensor technology*
If your appliance is fitted with powerSensor techno-
logy*, this automatically ensures that the appliance is
always working at its optimum power level. In conjunc-
tion with using original dust bags, this ensures minimal
dust bag use and additional energy savings.
powerSensor technology is always activated automa-
tically, and does not need to be activated by the user.
GALL type replacement bags (VZ4GXXLP2 / VZ41F-
GALL) are required to guarantee the optimum perfor-
mance of the powerSensor technology.
Changing the filter
!
Caution: Always switch off the appliance before
changing the filter.
Replacing the dust bag
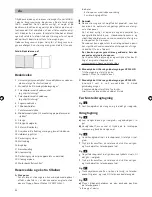
Fig.
16
a)
If the dust bag change indicator lights up conti-
nuously when the nozzle is lifted from the floor and
the highest power setting has been selected, the
dust bag must be changed, even though it may not
yet be full. In this case, it needs to be changed due
to the type of dust which has been vacuumed.
The nozzle, suction pipe and flexible hose must not
be blocked, even if this does not trigger the dust bag
change indicator.
b)
The handle can easily be detached from the hose to
remove blockages.
Fig.
17
Opening the lid
•
Open the lid by moving the locking lever in the direc-
tion of the arrow.
Fig.
18
a)
Close the dust bag by pulling on the locking tab, and
remove the bag.
b)
Push the new dust bag into the holder until it clicks
into place. When doing so, leave the dust bag folded
as it was when removed from the packaging. Do not
crease or kink the dust bag, and ensure that it is not
pinched when the lid is closed.
!
Caution: The lid will only close if a dust bag has
been inserted.
Motor protection filter
!
Caution: The vacuum must not be operated without
the motor protection filter.
Cleaning the motor protection filter
The motor protection filter should be cleaned regularly
by tapping out the dirt and rinsing.
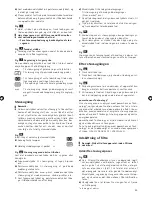
Fig.
19*
•
Open the dust bag compartment lid.
Fig.
17
•
Release the motor protection filter by pulling on the
side tabs and pull it out in the direction of the arrow.
•
Clean the motor protection filter by tapping out the
dirt.
•
If it is very dirty, the motor protection filter should
be rinsed.
The filter must then be left to dry for at least
24 hours.
•
After cleaning, refit the motor protection filter into
the appliance and lock it in place at the top. Close
the dust bag compartment lid.
* Depending on model
Summary of Contents for VS Q8
Page 95: ...94 ...
Page 96: ...95 ...
Page 97: ...96 ...
Page 98: ...A B 10 12 15 21 20 13 1 18 17 2 16 19 14 4 3 11 5 6 7 8 9 C 10 ...
Page 99: ...7 4 1 Click 2 3 5 8 Click 1 2 1 Click 1 1 2 1 2 a b 1 2 a c 6 b Click ...
Page 100: ...Click d a b 10 12 13 15 11 14 2 1 1 2 9 c ...
Page 101: ...18 17 16 1 2 b 18 b a a ...
Page 102: ...21 Micro 19 2 1 1 20 20 ...


