background image

Table of contents 
 

SIPIX MO/SD ZN 
Entry-ID: 109792654, 04/2021 


67 


©

 S

iem

e

n

s A

2021

 A

ll r

igh

ts 

re

se

rv

e

d


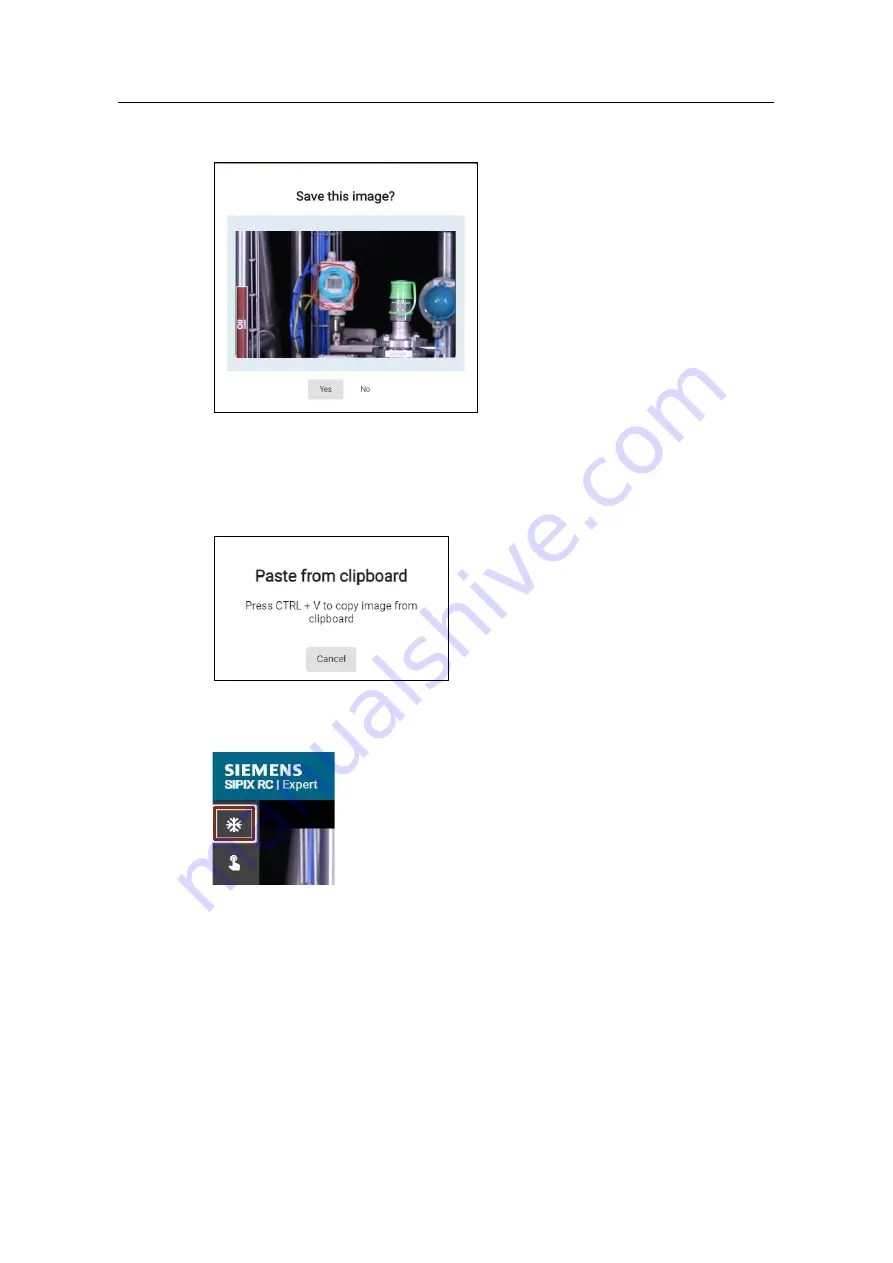
The still image is transferred to the SIPIX tablet and the service technician receives 
a request to save it.  


6.5.2.6 

Opening an Image from the Clipboard 

To open an object from the clipboard in the live stream area, proceed as follows: 

1.  Click the "Paste from Clipboard" button on the toolbar. 

A message is displayed. 


2.  Press the CTRL and V keys to insert an object. 

3.  To transfer the inserted object to the SIPIX tablet and continue the live stream, 

click the "Freeze" icon in the toolbar. 


The object is transferred to the SIPIX tablet and the service technician receives a 
request to save it.  


Summary of Contents for SIPIX MO/SD ZN

Page 1: ...SIPIX MO SD ZN Industry Tablet PC Operating Manual https support industry siemens com cs ww en view 109792654 Siemens Industry Online Support ...

Page 2: ...e of danger is present the warning notice representing the highest degree of danger will be used A notice warning of injury to persons with a safety alert symbol may also include a warning relating to property damage Qualified Personnel The product system described in this documentation may be operated only by personnel qualified for the specific task in accordance with the relevant documentation ...

Page 3: ...gainst cyber threats it is necessary to implement and continuously maintain a holistic state of the art industrial security concept Siemens products and solutions only form one element of such a concept Customer is responsible to prevent unauthorized access to its plants systems machines and networks Systems machines and components should only be connected to the enterprise network or the internet...

Page 4: ...N 24 5 Basic operation of the SIPIX MO SD ZN 25 5 1 Overview of HotTab 25 5 1 1 Using Shortcuts 26 5 1 2 Switching the Hardware Functions On and Off 27 5 1 3 Using the Camera 28 5 1 4 Customizing the settings 30 5 2 Establishing a wireless connection 31 5 2 1 Working with Wireless LAN Wi Fi 31 5 2 2 Working with Wireless WAN 3G LTE 32 5 2 3 Working with GPS 32 5 2 4 Working with Bluetooth 33 5 3 U...

Page 5: ...Network Connection 59 6 4 3 Setting up a connection using data goggles 60 6 5 Operation of the SIPIX RC Video Audio App 61 6 5 1 Overview of SIPIX RC Views 61 6 5 2 Operating the Expert View 62 6 5 3 Operating the Remote View 72 6 5 4 Operating the BT View 77 7 Service and maintenance 80 7 1 Maintenance 80 7 2 Cleaning 81 7 3 Maintenance intervals 82 7 4 Storage 82 7 5 Battery 83 7 5 1 Battery Rep...

Page 6: ...ning How can the SIPIX MO SD ZN be used for remote services and augmented reality functions Application This document is valid for SIPIX MO SD ZN with the following components SSL VPN client for cRSP V1 5 3 TightVNC V2 8 5 SIPIX RC V2 0 HotTab V50 1 22 Simatic PDM V9 1 SP4 SIPIX in Industry Online Support In addition to this manual we offer the following Industry Online Support https support indus...

Page 7: ... transmit important data about the device status for diagnostic purposes The two variants SIPIX MO ZN and SIPIX SD ZN give you the possibility to choose the service level that suits your needs The SIPIX MO ZN can be used to establish an internal real time audio video connection to an in house expert via the integrated web server An Internet connection as with similar audio video conferencing solut...

Page 8: ...s the remote expert to conveniently and easily guide the on site expert through the service process Modern interfaces enable the exchange of information with other devices in your company system The device communicates wirelessly via Wi Fi and Bluetooth To optimize its use in industrial environments the powerful 10 1 inch tablet PC can be combined with a wide range of accessories For example the c...

Page 9: ...ecific knowledge of process instrumentation can be supported in a timely manner by a remote expert Several experts can simultaneously access a SIPIX MO SD ZN via Desktop Sharing Training of a service field engineer aided by an expert during the service assignment training on the job 2 1 2 Characteristics The following table contains an overview of the features Configuration Execution Display 10 1 ...

Page 10: ...Description 1 10 1 Touch screen Display 2 Digital microphone with noise reduction Use in video recording and communication 3 Front camera 2 megapixel webcam 4 LED indications The LED indicators show the following status RF communication memory battery status power status 5 I O cover I O port protection 6 Fn1 Programmable function 7 Menu key HotTab quick access 8 On off button Switches the tablet o...

Page 11: ... is in use and battery level 10 Status indicator Blue The tablet is switched on No light Tablet is OFF Left and right side Position Name Description 9 Micro HDMI HDMI output to external display screen 10 Clear CMOS Hardware reset button 11 MicroSD Card Reader Port for MicroSD cards 12 USB 3 0 Type C High speed USB port for connecting USB devices such as USB flash drive mouse keyboard printer etc 1...

Page 12: ...ry eject slider Slider to open the battery slot 21 Slot for the stylus Storage for the stylus 22 Battery lock slider Locking the battery after inserting it 23 Loudspeaker Audio output 24 3G LTE Module SIM card slot Service window for inserting the micro SIM card Also allows access to the 3G LTE module 25 Fn2 key Programmable function key 26 Button for brightness volume control Brightness volume co...

Page 13: ...onnection for Kensington lock 30 Docking plug Docking port 2 2 Scope of Delivery Hardware The following components are included in the scope of delivery 1x SIPIX MO SD ZN Tablet PC 1 x Lithium polymer battery type BS101 1 x stylus 1 x hand strap 1 x charging power supply 1 x charging power supply EU 1 x charging power supply US 1 x spare cover for interface 1x manual 1 x short manual with safety i...

Page 14: ...d explosion protection is no longer guaranteed It cannot be guaranteed that externally procured parts have been designed and manufactured in a way that meets the load and safety requirements Before modifications or conversions contact manufacturer and obtain approval Only use original spare and wear parts Note SIEMENS AG assumes the complete warranty only and exclusively for the spare parts ordere...

Page 15: ...ions and test certificates required for the proper functioning of the device during operation The user manual is intended for all persons involved in the commissioning handling and maintenance of the product When carrying out this work the applicable directives and standards for areas with gas and dust atmospheres 99 92 EG EN 60079 17 EN 60079 19 IEC 60079 17 IEC 60079 19 must be observed Knowledg...

Page 16: ...pproved Use Any other use is not intended and can lead to damage and accidents The manufacturer is not liable for any use beyond the exclusive purpose 3 4 Obligations of the Operator The operator undertakes to only allow persons to work with the Tablet PCs who are familiar with the basic safety and accident prevention regulations and have been instructed in the use of the Tablet PC have read and u...

Page 17: ...e Pay attention to adjustable tables and seats Make sure you have a suitable working environment Workflows should be optimized When performing repetitive tasks switch between the left and right hand as often as possible 3 6 Safety Instructions for Operation Maintenance For electrical systems the relevant installation and operating regulations must be observed e g RL 99 92 EG RL 94 9 EG Industrial ...

Page 18: ...kage intense heat generation ignition or battery failure Only charge the battery in the manner described in this manual Failure to charge the battery as described herein could result in electrolyte leakage excessive heat generation ignition or failure If the battery pack is damaged it must be replaced with a new battery Continued use of a damaged battery may result in excessive heat generation ign...

Page 19: ... whether the security seal is intact Please contact Technical Support if the seal is broken Check the packaging and the package contents for visible transport damage Check the delivery for completeness see section on Scope of Delivery Inform your local Siemens sales point of any transport damage or irregularity you may notice Check delivery unit before operation Before putting the device into oper...

Page 20: ...ge the tablet PC and the battery To connect a tablet to the AC network 1 Open the I O protection cover by pulling the latch 2 Plug the DC cable of the AC adapter into the connector socket of the tablet PC 3 Plug the AC power cord into the AC adapter 4 Plug the AC power cord into the AC outlet The LED display of the battery shows different states Color Light Description Orange The AC adapter is plu...

Page 21: ...tery BS101 9 hours 2 5 hours High power battery BL101 16 hours 4 5 hours 4 3 Installing a SIM card Optional Insert SIM card for devices with 3G LTE The SIPIX supports 3G LTE data connection and can accept a micro SIM card 1 Remove the four screws and remove the service window 2 Remove the screw securing the 3G LTE module Carefully lift out the module Ensure that the connected cables are not damage...

Page 22: ...right Do not disconnect any cables 4 Insert the SIM card Chip contact face down 5 Carefully pull the cable out of the module card compartment manually to prevent the cable from being crushed when the module card is reinserted 6 Replace the 3G LTE module and tighten the screw Ensure that the cables are routed correctly Do not bend the cables Do not crush trap the cable ...

Page 23: ... that the cable is routed correctly Ensure that the cable module is not squeezed Insert micro SD card The SIPIX supports additional memory with an optional microSDXC card slot To install a microSD card 1 Open the I O protection cover by pulling the latch 2 Insert the microSD card into the slot with the contacts facing down 3 Press the card inward to ensure it is seated properly 4 Close the I O pro...

Page 24: ...ng the SIPIX MO SD ZN 1 To switch on press and hold the on off button until the LED 1 lights up When the tablet is booted the Windows login is displayed 2 Click on the text box and enter the default login password Siemens using the on screen keyboard 3 Confirm the entry with Enter Note If you use a SIM card a SIM card password may be requested if necessary after the Windows login Note Immediately ...

Page 25: ...lication Menu button on the front panel HotTab program icon The main user interface contains the following functions Icon Name Description Shortcuts This allows you to configure keyboard shortcuts for quick access to programs with just a few keystrokes Camera You can use it to take a picture or record a video Device ON OFF Enables disables the hardware functions of the tablet PC Configurable featu...

Page 26: ... panel 2 Press the Shortcuts button 3 Press the icon next to an empty memory location A file browser opens 4 Browse the files until you find the application you want to set up a shortcut for 5 Save the shortcut with Open Remove a saved keyboard shortcut 1 Open the HotTab menu by pressing on the front panel 2 Press the Shortcuts button 3 Press the button of the desired memory location to be removed...

Page 27: ...5 6 7 8 9 10 11 12 13 2 Position Description 1 External GPS antenna On Off 2 Light sensor On Off 3 Touch settings 4 Barcode reader On Off 5 RFID On Off 6 Extension port active inactive 7 Terminate Device ON OFF 8 Activate deactivate Wi Fi 9 Activate deactivate WWAN 10 Activate deactivate GPS 11 Activate deactivate Bluetooth 12 Activate deactivate camera 13 Enable disable indicators Note White icon...

Page 28: ...ont panel 2 Press Device ON OFF to see the status of the built in devices 3 Check the display color of the camera icon Element State color Description Camera Orange Camera is activated White Camera is deactivated 4 If the camera is deactivated it can be activated by pressing the camera symbol orange 5 Return to the main menu by pressing the menu button or by clicking on the back arrow at the top 6...

Page 29: ...ange check storage location for images Video Save Folder Change check storage location for video recordings Picture Quality Image compression quality Camera switch Switch between front and rear camera Flash Enables disables LED flash during image capture Video recording Tap to start recording tap again to stop recording Camera aperture Button for the camera shutter Tap to take a picture Exit Exits...

Page 30: ...erial number etc 2 Remaining capacity for main and back up battery 3 Expected recharge time for main battery 4 Assignment of the function keys Fn1 and Fn2 5 Brightness settings display 6 Alignment display Assignment of the function keys of the tablet Fn1 and Fn2 There are two variants regarding the use of the two function keys Fn1 and Fn2 Short Press Long Press Both settings can be simultaneously ...

Page 31: ...ct to the network follow the steps below 1 Open the HotTab menu by pressing on the front panel 2 Press the Device ON OFF button 3 Check the display color of the Wi Fi icon Status Description Wi Fi Orange Wi Fi is enabled White Wi Fi is disabled 4 If the Wi Fi function is deactivated white it can be activated by tapping on the Wi Fi icon can be activated orange 5 Click the network connection status...

Page 32: ...N 3G 4G is disabled 5 If the WWAN function is deactivated white it can be activated by pressing the WWAN icon orange 6 You can check the WWAN connection status using the network connection status icon in the Windows notification area The more bars that are displayed the better the signal 5 2 3 Working with GPS To activate the GPS 1 Open the HotTab menu by pressing on the front panel 2 Press the De...

Page 33: ...T Orange Bluetooth is activated White Bluetooth is disabled 4 If the Bluetooth function is deactivated white it can be activated by pressing the Bluetooth symbol orange 5 Click the Bluetooth icon in the Windows notification area A context menu for Bluetooth is displayed 6 To add a device press Add Bluetooth Device Windows automatically searches for Bluetooth devices 7 Select the Bluetooth device t...

Page 34: ...n 3 Press RFID the setting window is displayed as follows 4 Press the ON button 5 Check that the ON icon is green and the RFID icon in the HotTab menu is orange at the same time Status Description RFID Orange The HF RFID reader is activated White The HF RFID reader is deactivated Disconnect By pressing the Disconnect button the connection to the integrated HF RFID reader is disconnected To reconne...

Page 35: ...White Ext GPS antenna is deactivated internal antenna is used 4 If the external GPS antenna is disabled white press the external GPS antenna icon to enable it orange 5 5 Activating deactivating the Brightness Sensor for Display Contrast Adjustment The brightness sensor can be switched on and off in the HotTab menu To activate deactivate the brightness sensor proceed as follows 1 Open the HotTab me...

Page 36: ...he touchscreen supports input with the passive capacitive fine tip stylus included with the tablet The input is supported with Passive stylus with fine tip and palm rejection palm is ignored Active stylus with Palm Rejection palm is ignored Passive stylus with rubber tip Bare fingertips Glove In glove mode the touchscreen supports inputs that the user makes with gloved fingers The input is support...

Page 37: ...ogrammable function keys 1 Open the HotTab menu by pressing on the front panel 2 Press Settings 3 Press the F1 icon 4 Press the Long Press icon 5 Switch to Touch Mode using the Long Press function as shown below Once the touchscreen switching is set with the programmable function keys press and hold function key F1 to scroll through the different touchscreen modes When touchscreen mode is switched...

Page 38: ...s instructions via audio Desktop Sharing Desktop sharing gives the remote expert full access to the SIPIX Service Tool In addition data can be transferred to and from the SIPIX Service Tool in a secured manner 6 1 Remote Service Platform cRSP The Remote Service Platform cRSP from Siemens is used for remote assisted work Compared to a traditional point to point connection P2P communication via cRSP...

Page 39: ...lar to a network printer After the pre installed decentralized web server application SIPIX RC has been started on the SIPIX Tablet it can be accessed from any other client PC in the same network All you have to do is to enter the IPv4 address of the SIPIX Tablet in the browser of the client PC which establishes a point to point connection between the expert or operator PC and the SIPIX tablet Sub...

Page 40: ...o the tablet Accept desktop sharing 6 2 1 2 Setting up a Wireless Access Point To establish a connection between a local expert PC and the SIPIX Service Tool the existing company network can be used If this is not possible due to the company s IT requirements you can set up a stand alone simple wireless access point via a Wi Fi router a smartphone hotspot or a Wi Fi LTE router An internet connecti...

Page 41: ... access point set up Information on this can be found in the Section 5 2 3 Start the browser on the PC and call the IPv4 address of the SIPIX tablet using the following pattern https xxx xxx xxx xxx 5001 The connection between the devices is established For more information on how to operate the expert view please refer to Section 6 5 2 6 2 1 5 Starting an Audio Video Conference from your Tablet 1...

Page 42: ...checkbox on the tablet Note For information on extending communication with data glasses see Section 6 4 For more information on operating the remote view see Section 6 5 3 6 2 1 6 Desktop Sharing Desktop Sharing allows the remote expert full access to the SIPIX Tablet In addition data can be transferred to and from the SIPIX Tablet Requirement To access the tablet via desktop sharing you need the...

Page 43: ...n the expert PC 2 Enter the IPv4 address of the tablet in the Remote Host field 3 Enter the default password Admin and click the OK button A dialog box with an access request is displayed on the tablet Confirm this with the Accept button After confirming the access request the tablet can be operated by the remote expert via desktop sharing ...

Page 44: ...e Customer Web Portal CWP enables secure remote access to the connected systems as well as data transmission to various devices and systems The login to the CWP portal is done via a 2 factor authentication with a password and a PIN procedure via SMS or Email 6 2 2 1 CWP System Requirements The current system requirements can be found on the registration page of the CWP under https crsp fth siemens...

Page 45: ...sting Access Data for the CWP For the remote connection via the CWP you need access data that you can request from Siemens Technical Support Proceed as follows 1 Contact Siemens Technical Support and create a support request via the web page https siemens com supportrequest 2 Enter SIPIX in the search field and select your device from the list of suggestions Click on the Next button 3 Enter the ke...

Page 46: ...blet s home screen to launch the application The web page SIPIX RC Remote will be opened automatically in the Chromium browser Since the application is started in the background it may take several minutes before the browser is launched 6 2 2 5 Log on to CWP Expert After you receive the credentials for the CWP you can log into the CWP as an Expert and establish a remote connection to the tablet Re...

Page 47: ...le PIN within 2 minutes on your mobile phone by SMS or by email 3 Enter the mobile PIN and click the Sign In button In some cases it is necessary to check the system requirements by using the application Host Checker Juniper In this case click the appropriate link and follow the instructions to run the Host Checker application After a successful check of the system requirements you will be redirec...

Page 48: ...2654 04 2021 48 Siemens AG 2021 All rights reserved 4 Click the Continue button In the Customer Systems area the SIPIX Tablets for which you are activated are listed 5 Click the tablet to which you want to connect The corresponding detail view opens ...

Page 49: ...CWP help page provides up to date information on the browser settings required for the CWP to run smoothly 6 2 2 6 Establishing a Remote Connection to SIPIX MO SD ZN via CWP 1 Click the link SIPIX RC via Chrome in the Applications section of the CWP A window with the connection details opens 2 Click the pop ups icon in the address bar of the window ...

Page 50: ...09792654 04 2021 50 Siemens AG 2021 All rights reserved The SIPIX RC Expert application is started As soon as a video session is started from the tablet an incoming call is displayed When the call is answered an audio video conference is started ...

Page 51: ...t to start a video session The requirement for conducting the video session is that an expert has set up the connection to the tablet via the CWP Accepting the call starts a video conference To turn on audio transmission enable the corresponding checkbox on the tablet Further information on operation For more information on operating the remote view refer to the Section 6 5 3 For more information ...

Page 52: ...g VNC in the Applications area A window with the connection details opens and the TightVNC software is started 2 Enter the default password Admin and click the OK button A dialog box with an access request is displayed on the tablet The service technician must confirm this request with the Accept button After confirming the access request the tablet can be operated by the remote expert via desktop...

Page 53: ... Remote Service after consultation via the cRSP infrastructure and the SIPIX SD 6 3 1 Service Agreements and Remote Service Tickets To use a Remote Service you must first have a valid remote Service Agreement and a Remote Service Ticket are available These can be obtained from the Siemens Industry Mall via the following order numbers SIPIX Service Packages Service Level Starter SD 2 years BASIC 9L...

Page 54: ...h a remote connection to the tablet Prepare SIPIX SD ZN Start the SIPIX SD ZN Establish a wireless connection Start video audio conference via SIPIX RC 4 Start audio video conference Start desktop sharing Accept desktop sharing 6 3 3 Arranging a Service Call with Siemens Remote Services In order to communicate with a Siemens expert during a service call you must make an appointment with Siemens Re...

Page 55: ...he keyword Remote Service in the Topic field Enter the following information in the Details of the request field SIPIX serial number on the back Contact details last name first name email address mobile phone number Desired date date time Details of the service item e g level flow meter Simatic ET200 module etc Then click on the Next button 4 In the last step enter how you would like to be contact...

Page 56: ...nternet 2 Activate the SIPIX RC application on the tablet 3 Click the Start Call button on the tablet to start a video session A requirement for the video session is that an appointment has been made with Siemens Remote Services or the call has been registered Accepting the call starts a video conference To turn on audio transmission enable the corresponding checkbox on the tablet ...

Page 57: ... the SIPIX RC application on the tablet 3 Wait for the desktop sharing access request from the Siemens remote expert 4 If the access request has been started by the remote expert the Incoming TightVNC Connection dialog appears Confirm the access request by clicking the Accept button Only after confirming the access request on the tablet can it be operated by the remote expert via desktop sharing ...

Page 58: ...e expert PC 6 4 1 Preparations Commissioning of the data glasses 1 Connect the glasses by cable to the controller and to the AC adapter 2 Charge the device Note Observe the manufacturer s safety instructions Detailed information on commissioning and operation can be found in the manufacturer s documentation at https www epson de products see through mobile viewer moverio bt 300 1 2 2 3 3 Press the...

Page 59: ...etwork connection To connect to the SIPIX MO SD ZN ensure that both devices EPSON Movero and SIPIX MO SD ZN are on the same network A mobile hotspot for example is suitable for this purpose 1 Access the app list 2 Select the Settings app from the APP list 3 Select Wi Fi in the Wireless networks section 4 Enable the function and select the SSID of the router or mobile hotspot you are using ...

Page 60: ...th the same network ID Procedure 1 Start SIPIX RC on the SIPIX Tablet 2 Start the data glasses via the power button 3 Open the browser via the application view on the data glasses 4 Call the IPv4 address of the SIPIX tablet https xxx xxx xxx xxx 5001 bt 5 Allow access to the camera and microphone The data goggles are connected to the SIPIX MO SD ZN For more information on operating the BT view see...

Page 61: ...on At the same time a decentralized web server is started when the SIPIX RC application is started This web server can be reached by the expert view or the BT view both locally in an Intranet and via the secure communication platform cRSP over the internet Expert view The expert view can be opened on a PC You can do this in the following ways Calling the SIPIX IPv4 address in a web browser that su...

Page 62: ...the Android operating system To do this type the SIPIX Ipv4 address into a browser using the following pattern https xxx xxx xxx xxx 5001 bt Note To establish a local without internet remote connection all devices expert PC SIPIX Tablet data glasses must be in the same network 6 5 2 Operating the Expert View 6 5 2 1 Overview The expert view is divided into three main areas Range Description 1 Tool...

Page 63: ... mode Add note This tool allows you to insert a label This tool is only available in still mode Draw This tool allows you to draw using colored markers Undo This tool allows you to undo actions Delete You can use this tool to delete selected objects Open object from clipboard This tool allows you to open objects copied to the clipboard in the live stream area Open image This tool allows you to ope...

Page 64: ...IX MO SD ZN To create a still image proceed as follows 1 Click the Freeze button on the toolbar A still image is generated The live stream will still be displayed in a window in the upper right corner of the live stream area 2 To edit the image or to clarify details you can now use the toolbar 3 To transfer the image with its edits to the SIPIX tablet click on the Still image icon in the toolbar T...

Page 65: ...ll image follow the steps below 1 Click on the Add note button The Add tag window is displayed 2 Enter the desired text and click the Add button A text field is created 3 To transfer the still image to the SIPIX tablet and continue the live stream click the Still image icon in the toolbar The still image is transferred to the SIPIX tablet and the service technician receives a request to save it ...

Page 66: ... To draw marks in a still image freehand follow the steps below 1 Click the Draw icon A color selection is displayed in the live stream area 2 Select the desired color Hold down the left mouse button and move the mouse to create the desired drawing 3 To transfer the still image to the SIPIX tablet and continue the live stream click the Still image icon in the toolbar ...

Page 67: ...e Clipboard To open an object from the clipboard in the live stream area proceed as follows 1 Click the Paste from Clipboard button on the toolbar A message is displayed 2 Press the CTRL and V keys to insert an object 3 To transfer the inserted object to the SIPIX tablet and continue the live stream click the Freeze icon in the toolbar The object is transferred to the SIPIX tablet and the service ...

Page 68: ... is displayed in the live stream area 3 To transfer the inserted object to the SIPIX tablet and continue the live stream click on the Still Image icon in the toolbar The object is transferred to the SIPIX tablet and the service technician receives a request to save it 6 5 2 8 Open a YouTube video To open a YouTube video follow these steps 1 Click the Open YouTube Video button on the toolbar A wind...

Page 69: ...le of contents SIPIX MO SD ZN Entry ID 109792654 04 2021 69 Siemens AG 2021 All rights reserved The video will open in the live stream area 3 To resume the live stream click the Freeze icon in the toolbar ...

Page 70: ...wing button on the toolbar The Explorer opens 2 Select the desired file in STL format and click the OK button The 3D drawing is displayed in the live stream area 3 To transfer the inserted object to the SIPIX tablet and continue the live stream click on the Still Image icon in the toolbar The object is transferred to the SIPIX tablet and the service technician receives a request to save it ...

Page 71: ...sing Live Chat In the live chat you can write messages or use the short answers Yes No To send a message via live chat follow these steps 1 Click in the text input field and enter your text message 2 Click the button to send the message The message is sent to the SIPIX Tablet and appears in the live chat area ...

Page 72: ...emote View 6 5 3 1 Overview The remote view is divided into three main areas Range Description 1 Live stream The camera recording is displayed in this area 2 Toolbar In this area various call and video control functions are available 3 Live chat This area offers you the possibility to communicate via short messages 1 3 2 ...

Page 73: ...t and rear camera of the SIPIX tablet Full screen mode This command allows you to control the window display Transmitting a Remote Session If another device with Android operating system e g data glasses mobile phone is connected you can transfer the remote session to it Record video With this command you can start a video recording max 60 sec The recordings can be found under the following path W...

Page 74: ...ormed about the conference and is available for the call 1 Click the Start Call button to start a video conference Accepting the call starts a video conference 2 To end the remote session click the Call End button The remote session is terminated 6 5 3 4 Turn on audio By default the microphone for audio transmission is disabled when starting a video conference To switch on audio transmission enabl...

Page 75: ...let as a QR code proceed as follows 1 Click the QR Code button in the tablet s toolbar A window with the QR code is displayed 2 Open the selection list for the IP address of the tablet and select the desired connection type 3 Launch the QR reader of the target device and scan the QR code Note This feature is only available for devices with an Android operating system ...

Page 76: ...ote session to another device running an Android operating system follow these steps 1 Click on the Transfer Call button The running remote session is transferred to the connected device 6 5 3 7 Using Live Chat In the live chat you can write messages or use the short answers Yes No To send a message via live chat follow these steps 1 Click in the text input field and enter your text message 2 Clic...

Page 77: ... and video control functions are available Toolbar The following commands are available in the function bar Command Name Description Start call Use this command to call a remote expert End call Use this command to end a running remote session Full screen mode This command allows you to control the window display Transmitting a Remote Session With this command you can transfer the remote session to...

Page 78: ...ormed about the conference and is available for the call 1 Click the Start Call button to start a video conference Accepting the call starts a video conference 2 To end the remote session click the Call End button The remote session is terminated 6 5 4 3 Turn on audio By default the microphone for audio transmission is disabled when starting a video conference To switch on audio transmission enabl...

Page 79: ...ferring a Remote Session to SIPIX Tablet Requirement The device e g data glasses is connected to the SIPX Tablet see Section 6 4 3 Procedure To transfer a running remote session to the SIPIX Tablet proceed as follows 1 Click on the Transfer Call button The running remote session is transferred to the SIPIX Tablet ...

Page 80: ...from great heights Environment Do not expose the device to extreme temperatures Do not place the device in a dirty damp or wet environment Battery Discharge and charge the battery every 2 months For long term storage remove the batteries from the Tablet PC and store them in a cool environment at approximately 0 C to 10 C and a charge level of approximately 40 50 It is recommended that the battery ...

Page 81: ...cription Enclosure With alcohol wipes Keys and spaces between keys With alcohol wipes Display With alcohol wipes Avoid accumulation of liquids and rub with an abrasion free cloth Scanner window With cleaning product for optical devices Battery contacts To clean remove the battery from the unit Soak the cleaning swabs with cotton wool tip in alcohol solution to remove all grease and dirt deposits o...

Page 82: ...dustry standards However the operating time or storage time of a battery is limited The actual battery life is affected by a number of factors including heat cold harsh operating environments and falling from great heights If a battery is stored for more than 6 months its performance may deteriorate permanently Store batteries in a dry cool place To prevent self draining rusting of metal parts and...

Page 83: ...as follows 1 Turn on the tablet open the HotTab menu and check the auxiliary battery charge 2 If the auxiliary battery has a charge level of Low charge the tablet with the AC adapter until the auxiliary battery has a charge level of Medium or High Do not remove the main battery during this time 3 As soon as the auxiliary battery has a Medium or High charge level the main battery can be replaced 4 ...

Page 84: ...up 3 Locate the battery lock slide of the battery compartment and push it to the unlocked position 4 Locate the battery release slide which is spring loaded Pull and hold it back 5 Insert the battery with the terminal pins first then push it into the battery compartment Hold the battery release slide until the battery is fully inserted 6 Before releasing the battery release slide ensure the batter...

Page 85: ...own the tablet or put it to sleep Disconnect all cables from the computer 2 Turn the tablet PC over so that the back is facing up 3 Locate the battery compartment battery release slide and push it to the unlocked position 4 Locate the battery lock slider which is spring loaded Pull and hold it back 5 Remove the battery through the opening on the side of the battery compartment ...

Page 86: ...s AG 2021 All rights reserved 8 Recycling and disposal The devices described in this instruction manual can be recycled due to their low levels of pollutants Contact a certified disposal service company for environmentally sound recycling and disposal of your old devices ...

Page 87: ... running Wait until the download is finished Session already running A browser session is already running End existing session 9 2 Error Messages of the SIPIX Tablet Errors Possible troubleshooting Die Battery is not being charged Check that the AC adapter is properly connected and the battery is properly inserted No image appears on the screen The tablet PC may be in sleep mode Press the ON OFF b...

Page 88: ...ser to a window Check for interfering signals in the environment such as microwave ovens wireless phones etc Move the tablet PC away from objects that can cause interference No sound is produced Adjust the volume of the tablet PC using the volume control If an external audio device is used check that the cable is connected correctly The display on the tablet PC cannot be transferred to another mon...

Page 89: ...with microSDXC card slot Graphic Intel HD Graphics 504 Operating system Windows 10 IoT Enterprise 64 bit Wireless communication WLAN 802 11 a b g n ac Bluetooth Bluetooth 5 0 GNSS GPS GLONASS WWAN Optional 4G LTE or 3G Audio Microphone Integrated dual digital microphone with noise reduction Loudspeaker 2 x 1 Watt Interfaces Docking connector 1 x 19 pin docking connector HDMI 1 x Micro HDMI USB 1 x...

Page 90: ...Platform Module TPM 2 0 Kensington lock Mobile Device Management Compatible with SOTI MobiControl Power management Setting the voltage input 12 19V DC Battery Standard 7 4 V typ 5140 mAh Li polymer battery 2S1P High availability 7 4 V typ 10280 mAh Li polymer battery 2S2P optional AC adapter 110 240 AC to 19V DC Adapter Battery operating time Std battery 9 hours High capacity battery 16 hours Adap...

Page 91: ...ntracts Please send queries to Technical Support via Web form support industry siemens com cs my src SITRAIN Training for Industry We support you with our globally available training courses for industry with practical experience innovative learning methods and a concept that s tailored to the customer s specific needs For more information on our offered trainings and courses as well as their loca...

Page 92: ...l The Siemens Industry Mall is the platform on which the entire siemens Industry product portfolio is accessible From the selection of products to the order and the delivery tracking the Industry Mall enables the complete purchasing processing directly and independently of time and location mall industry siemens com ...

Reviews: