background image

Planning a wireless application 

16


Siemens AB


Security Products 


03.2014 


4.3  Door environments 


The configuration manual for the RF30-EM describes the mechanical requirements 

for installing the RF30-EM. RF30-EM is 

not

 suitable for use outdoors. 

NOTE! 
Do not mount two RF30-EM units to back on one door. They cannot both con-

trol the latch.


It is good practice to test the communication with the SR35i before permanently 

mounting the RF30-EM on the door. 


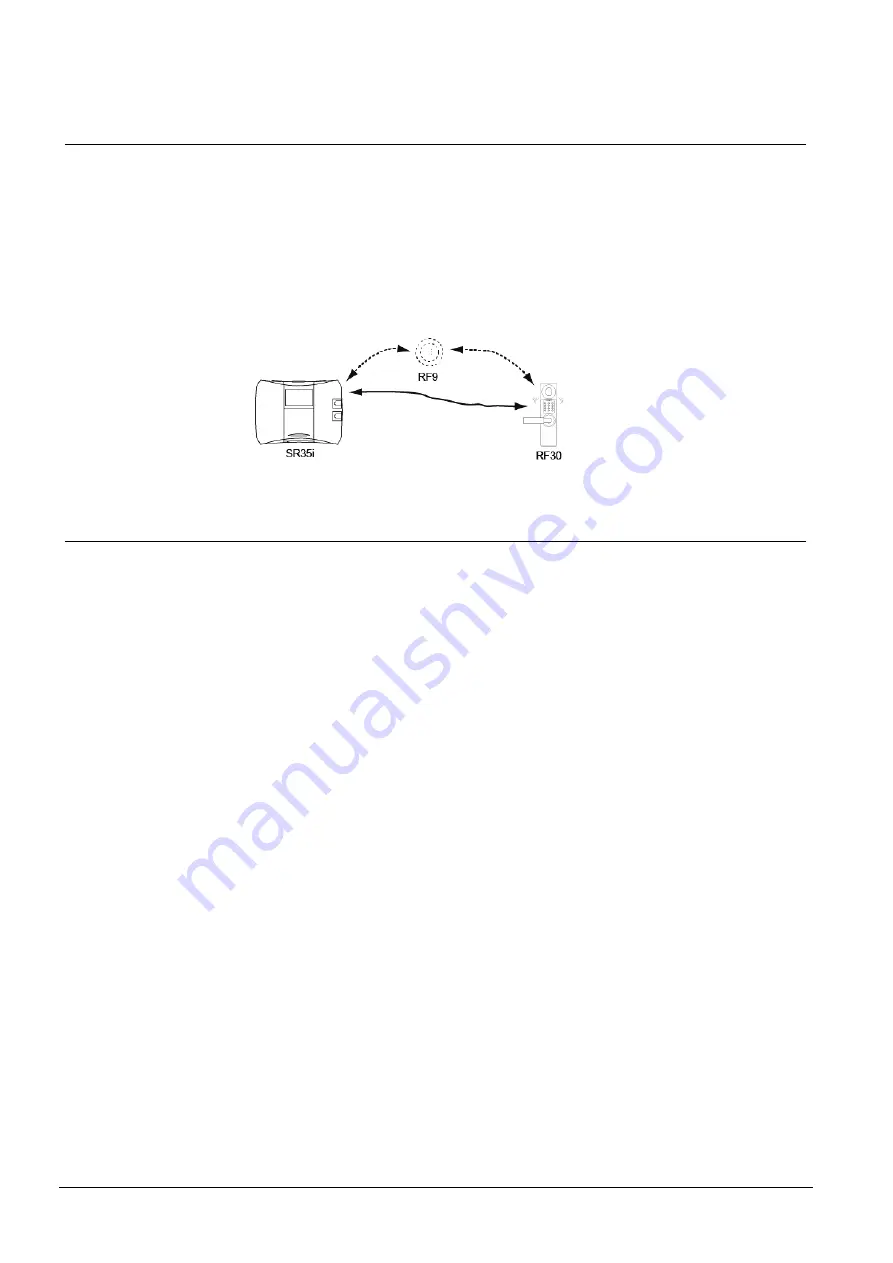
Fig. 4 

Example of RF30-EM with or without a RF9 installed. 

4.3.1  Alternative solutions 


Both Entry and Exit readers 

Doors that require readers on both sides of the doors cannot be equipped with 

RF30-EM (or other product on the Codoor family). The mechanical design does not 

allow this. Instead use hard-wired solutions like the door controller DC12 and two 

proximity readers. 

Bad signal quality 

If adjacent equipment interferes severely, a hard-wired solution must be consid-

ered. 

Summary of Contents for Bewator Entro Series

Page 1: ...Siemens AB Security Products Bewator Entro Wireless units Planning Version 2 4 ...

Page 2: ...vorgängige schriftliche Ermächtigung ganz oder teilweise Dritten zugänglich machen oder außerhalb des Zweckes verwenden zu dem es ihm übergeben worden ist We reserve all rights in this document and in the subject thereof By acceptance of the document the recipient acknowledges these rights and undertakes not to publish the document nor the subject thereof in full or in part nor to make them availa...

Page 3: ...ce Mode 14 4 Planning a wireless application 15 4 1 Noise 15 4 2 Networking guidelines 15 4 2 1 Frequency analyzers sniffers 15 4 3 Door environments 16 4 3 1 Alternative solutions 16 4 4 Placing the SR35i 17 4 5 Placing the RF9 17 4 6 Signal propagation 18 4 6 1 Overview 18 4 6 2 RF9 bad and good positioning 20 4 6 3 RF9 and RF30 EM on same wall 21 4 6 4 Special ceiling mounting of RF9 22 4 7 Mat...

Page 4: ...ems 35 10 2 Technical problems in earlier working site 36 11 Updating upgrading and expansion 38 11 1 Updating of firmware 38 11 1 1 SR35i and door controllers 38 11 1 2 RF30 EM 38 11 2 Upgrading 39 11 3 Expansion 39 11 3 1 More doors 39 11 3 2 More SR35i 39 11 3 3 More routers 39 11 4 Remove move or replace wireless units 40 11 4 1 Remove wireless units 40 11 4 2 Replace or move wireless units 40...

Page 5: ...5 Siemens AB Security Products 03 2014 ...

Page 6: ......

Page 7: ...an be used for increasing distances The document is a complement to the Bewator Entro manuals and separate in structions for the hardware components Trademarks All products or company names mentioned in this manual for purposes of identifi cation or description could be trademarks or registered trademarks of their respec tive owners Contact Please contact your local Siemens representative with que...

Page 8: ...uct or re placement parts Components of the product are not yet installed or need to be replaced or modified 2 2 General safety precautions Read the general safety instructions before operating the device Keep this document for later reference Keep this document with the product upon transfer Please also take into account any additional country specific local safety stand ards or regulations conce...

Page 9: ... devices RF30 EM in the door environment the wireless concept eliminates the need for cables from the host system to the door 3 2 System Components In a wireless application we currently use mainly three components SR35i the Bewator Entro Access Control Segment controller RF30 EM the door locking device RF9 the optional router Fig 1 Wireless system 1 Integrated aerial in SR35i for wireless communi...

Page 10: ...ted directly on an existing mechanical door lock It provides a card reader key pad and lock control The unit is powered by two 9V lithium batteries For a safe function we strongly recommend the use of our Lithium batteries with 9V 1200 mAh and sus taining minimum 400 mA peak current The unit provides not only wireless connection to an Entro system but also stand alone functionality It also include...

Page 11: ...ss doors Wireless The following limits apply to any one SR35i segment Up to nine RF9 routers may be addressed on each SR35i segment Up to 32 door units may be addressed on each SR35i segment requires at least two RF9 Up to 14 door units can communicate directly with each SR35i segment without a router Up to six routers can communicate directly with each SR35i Every RF9 router can communicate with ...

Page 12: ... unit in a Bewator Entro network must be identified by a unit address Each unit address is visible in the Bewator Entro software Each SR35i segment controller is shown as Cxx where xx is its address Each RF9 or RF30 EM is shown as Cxx Wyy or Cxx Ry where xx is the address of its SR35i and yy is the address of the wireless unit 3 4 3 Encryption and replay protection The Installation key which is fo...

Page 13: ... strength The Entro software can display the signal strength at SR35i controllers and at RF9 routers SR35i and RF30 EM Below picture shows how mounting of the RF30 EM can be influenced by distance Service Mode Signal strength Excellent Sufficient Marginal Improvement recommended Bad Improvement needed No connection RF30 EM in autonomous mode 25 m free air Fig 2 Example of how the signal becomes we...

Page 14: ...flection All radio based systems are influenced by attenuation and absorption as well as re flection of the radio signal More information is provided in Appendix A 3 4 8 RF30 EM Service Mode RF30 EM has an integrated Service Mode that makes the installation easier LEDs indicate the signal strength and quality Most problems can be solved by adding RF9 routers to the system as described in the RF9 c...

Page 15: ...equipment may interfere Do not mount any wireless units near these Avoid mounting routers in kitchens or similar because microwave ovens will in terfere Metal will attenuate but also reflect the signal Thick concrete structures usually include steel reinforcement bars which absorb and scatter the signal Human beings also absorb and reflect the radio signal If you hold a unit its sig nal will chang...

Page 16: ...est the communication with the SR35i before permanently mounting the RF30 EM on the door Fig 4 Example of RF30 EM with or without a RF9 installed 4 3 1 Alternative solutions Both Entry and Exit readers Doors that require readers on both sides of the doors cannot be equipped with RF30 EM or other product on the Codoor family The mechanical design does not allow this Instead use hard wired solutions...

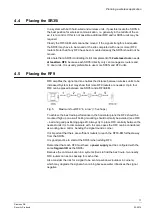
Page 17: ...ess units to be increased System test may show that more RF9 routers are needed Up to four RF9 can be placed between one SR35i and a RF39 EM Fig 5 Maximum four RF9 in a row five hops To achieve the best radio performance in the horizontal plane the RF9 should be mounted high up on a wall Ceiling mounting should normally be avoided see RF9 bad and good positioning page 20 Always try to place RF9 ce...

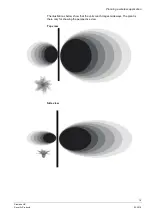
Page 18: ...ctions In Appendix B Radiation diagrams there are more detailed diagrams 4 6 1 Overview The illustration below shows in a schematic way a unit mounted in a door section Both the RF30 EM the RF9 and the SR35i propagates in a similar way Simplified one can assume that the front of a unit reaches longer The propagation is also less inside of a door because the unit propagates less at the back Fig 6 O...

Page 19: ...ng a wireless application 19 Siemens AB Security Products 03 2014 The illustrations below show that the units reach longest sideways The plant is there only for showing the perspective view Top view Side view ...

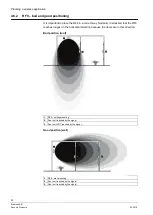
Page 20: ...rrect way Normally it is desired that the RF9 reaches longest in the horizontal direction because the doors are in this direction Bad position roof 1 RF9 ceiling mounting 2 Door unit reached by the signal 3 Door unit NOT reached by the signal Good position wall 1 RF9 wall mounting 2 Door unit reached by the signal 3 Door unit reached by the signal ...

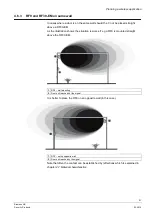
Page 21: ...M As the illustration shows the situation is worse if e g a RF9 is mounted straight above the RF30 EM 1 RF9 wall mounting 2 Door unit reached but the signal It is better to place the RF9 on an opposite wall in this case 1 RF9 on the opposite wall 2 Door unit reached by the signal Note that often the contact can be established by reflections which is explained in chapter 4 7 Material characteristic...

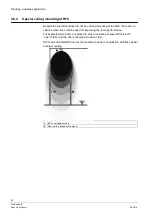
Page 22: ...e RF9 there are oc casions when this could be used for improving the radio performance For example when doors are placed in areas consisting of several floors with open stairs and the doors are closed to each other Other wall mounted RF9 can of course also be used in conjunction with this special ceiling mounting 1 RF9 ceiling mounting 2 Door units reached by the signal ...

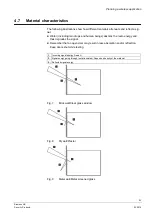
Page 23: ...ops and human beings absorbs the radio energy and thus degrades the signal Remember that an open door may result in less absorption and or reflection Keep doors shut while testing 1 Incoming signal energy free air 2 Signal energy going through not attenuated Depend on density of the material 3 Reflected signal energy Fig 7 Brick wall Clear glass window Fig 8 Drywall Plaster Fig 9 Metal wall Metal ...

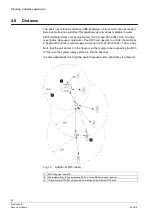
Page 24: ... of four RF9 can operate in a chain theoretically a Segment Controller could manage a door up to 20 25 25 25 25 120 m away Note that the unit at item 3 in the figure is on the margin to be reached by two RF9 In this case the system always strives to find the best way In some applications this might be useful because better redundancy is achieved Fig 10 Addition of RF9 ideal 1 SR35i Segment control...

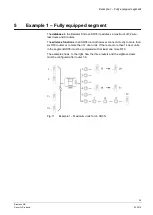
Page 25: ...nd 9 routers The wireless functions in an SR35i cannot however connect directly to more than six RF9 routers or to more than 14 door units If there are more than 14 door units in the segment SR35i must be completed with at least one more RF9 The example shows to the right how the three routers and the eighteen doors must be configured after router 1 6 Fig 11 Example 1 Maximum units for an SR35i ...

Page 26: ...16 wireless doors to the left in the drawing Routers A B link to 10 doors Router C links to 6 doors SR35i 2 Manages 8 wireless doors in the middle of the drawing Routers G H link to 8 doors SR35i 3 Manages 15 wireless doors to the right in the drawing SR35i controls 5 doors directly Router D amplifies the signal Routers E F link to 10 doors Tab 1 Example of distributing wireless units Fig 12 Examp...

Page 27: ...must be configured with these parameters and a unique address as described in the instal lation manual Similarly each RF9 must be configured with the Segment ID and a unique address The PC shows every RF9 and RF30 EM that it detects with their addresses This enables a name to be given to each unit Also check that the unit is intended to be in the network position shown System information Under the...

Page 28: ...mation is available especially unit addresses Have the Bewator Entro Installer manual and User manual at hand Read Appendix A regarding considerations for RF communication Have a temporary power source e g a battery available for any RF9 if needed 8 2 Power supply Ensure that the power supply is stable and within the rated voltage of the unit Use an uninterrupted power supply UPS to ensure a conti...

Page 29: ...lick the Wireless tab 7 Read off the Segment ID and make a note of that for later use in the RF30 EM RF9 Remember that each SR35i has a different Segment ID 8 Make a note of the Installation key for later use Each SR35i has a unique installation key 9 SR35i settings do not normally have to be changed 10 Repeat the above for each SR35i that will control any wireless doors 11 Mount the SR35i 8 4 2 R...

Page 30: ...after e g a power failure When the command has been performed verify that all door units are on line 4 ALTER SETTINGS 1 AUTO SET CHANNELS Automatic channel select 2 MANUALLY SET CHANNELS Manual set of channel 11 26 3 ENTER SERVICE MODE LEAVE SERVICE MODE Important see below Important Service mode The command Enter Service Mode is used when a SR35i or RF9 is replaced or moved It means that the wire...

Page 31: ...sing its memory and then configure the system parameters again from scratch NOTE We recommend that you configure each RF30 EM before you mount it Carefully enter the correct parameters so it will connect to the right SR35i Proceed as follows 1 Configure the RF30 EM as described in its Configuration manual 2 Control the signal strength between the SR35i and the RF30 EM using the Service Mode in the...

Page 32: ...indicates the strength of the signal received from the SR35i or intervening RF9 routers 4 Mount the RF9 temporarily and check that each RF30 EM is connected 5 Start service mode audio on the RF30 EM to be tested A falling tone sounding from the RF30 EM indicates the loss of connection A rising tone indicates a new connection 6 When the final position is found fix the RF9 and replace the temporary ...

Page 33: ... and printing the current status of the wireless units Proceed as follows 1 Start Installer and choose System System information 2 Click on Wireless The wireless units are listed in text format 3 Optionally save print or e mail the information 4 Close window 9 3 Priority cards and personal doors The system allows up to 100 priority cards persons to be stored in door control lers Each RF30 EM copie...

Page 34: ...eck the level of the batteries and warn in the PC If the batteries need to be changed RF30 EM will keep its system settings during the replacement It will return to its former function as soon as the new batteries are in place For a safe function we strongly recommend the use of our Lithium batteries with 9V 1200 mAh and sustaining minimum 400 mA peak current ...

Page 35: ...hree attempts with wrong PIN Activate the card again Check if some other person s card work If yes substitute card or correct authorizations If no this indicates a system error See event log The door settings are not correctly configured in the Entro The card is broken and has to be substituted The card does not work in a wireless door Investigate the overall door status in the PC program and corr...

Page 36: ...nal source of noise has been added If so try to min imise the effect of the noise by moving or adding RF9 routers Demount and reset the RF30 EM to stand alone mode and test e g by log ging a card into it Do not forget to reconfigure back to system mode with the correct parameters when finished Group codes do not work Check if the yellow LED lights for every key press If no open the Entro program s...

Page 37: ...the yellow LED flashes The system may have been rebuilt and the SR35i does not have correct door capacity Have any external source of noise been added Consider installing extra RF9 and or SR35i units Change batteries May be mechanical problems Change unit and configure the replacement with the same parameters ...

Page 38: ...ame connection networked or direct that is used for access control We recommend that only one controller at a time is updated The firmware version to be installed is selected explicitly 11 1 2 RF30 EM The RF30 EM may be updated with new firmware from the PC via the system s communication path The new version is read from the hard disk We recommend that all updates are performed step by step and ve...

Page 39: ...for the new doors and set the new RF30 EM Codoors with unused addresses Check that no more than 14 doors are directly linked to the controller or to a router 11 3 2 More SR35i There are various reasons for changing Segment controllers for example 1 SR35i controllers may be added to give capacity for more doors 2 Replacement of the SR35i with a model supporting more doors 8 16 or 32 3 Replacement o...

Page 40: ...e radio network exists both in PC and in different SR35i If a RF30 EM or RF9 are removed from the system wait approximately 5 minutes before deleting it from the Entro installation program Otherwise the SR35i may send the unit s information to the PC again and it is once again wrongly displayed in the list 11 4 2 Replace or move wireless units If e g a SR35i or RF9 are replaced or some RF9 or RF30...

Page 41: ... Absorption of the RF signal occurs when the signal encounters material which absorbs the signal at the working frequency Such materials include glass wood drywall and even foliage Dampness increases the absorption The angle between the incoming signal and the obstruction affects absorption A signal at an oblique angle to an absorbing slab has to go through more of the ma terial than if it were sq...

Page 42: ...adiation patterns show that much more signal is sent in some direc tions than in others Each plot is measured in the horizontal plane The colours in dicate different frequency channels 13 1 1 SR35i Fig 13 Top view with the front in the arrow direction 13 1 2 RF30 EM Fig 14 Top view with the front in the arrow direction ...

Page 43: ...Appendix B Radiation diagrams 43 Siemens AB Security Products 03 2014 13 1 3 RF9 Fig 15 Top view wall mounted with the front in the arrow direction ...

Page 44: ...tity Installation key binary string of characters which is used as the basis of encryption for the installer PIN Personal identification number a combination of numeric character that a person possesses for verification of identity Propagation energy transfer between two points without dis placement of matter Radio link telecommunication facility between two points provided by means of radio waves...

Page 45: ...Glossary 45 Siemens AB Security Products 03 2014 ...

Page 46: ...27 L Lithium batteries 10 Locking devices 9 M Menus 30 Mounting 28 N Node address See Address P PIR 10 Power supply 32 Problems 35 36 R Rebuild network 30 Reflection 41 RF status 30 RF30 EM 10 31 38 RF9 10 17 32 39 Router 10 RS485 11 S Segment controller 9 Segment ID 12 27 29 Service maintenance 36 Service Mode 14 Show install info 30 Signal strength 13 SR34i 39 SR35i 10 17 29 Stand alone 10 36 St...

Page 47: ......

Page 48: ...tional Headquarters Englundavägen 7 SE 171 24 Solna Tel 46 8 629 0300 www siemens com securityproducts 2014 Copyright by Siemens AB Data and design subject to change without notice Supply subject to availability Document no 82341 6 Edition 03 2014 ...

Reviews: