background image


IV405E Rev.000 SIEL S.p.A. 


Data di emissione: 2018-06-22   


                                  Pag. 3 di 50 + FR 


Contents 

1

Safety

 ............................................................................................................................................................ 4


1.1 Safety notes

 ....................................................................................................................................... 4


1.2 Symbols used in this guide

 ............................................................................................................ 5


2

Main Features

 ............................................................................................................................................. 5


2.1 Summarization

 ................................................................................................................................... 5


2.2 Functions and Features

 .................................................................................................................. 5


3

Installation

 ................................................................................................................................................... 6


3.1 Unpack checking

............................................................................................................................... 6


3.2 Cabinet Outlook

 ................................................................................................................................ 7


3.3 LCD control panel

 ........................................................................................................................... 10


3.4 Installation notes

............................................................................................................................. 10


3.5 External Protective Devices

 .......................................................................................................... 11


3.6 Power Cables

 ................................................................................................................................... 11


3.7 Power cable connect

 ...................................................................................................................... 13


3.8 Battery connection

 ......................................................................................................................... 14


3.9 UPS parallel Installation

 ................................................................................................................. 16


3.10 Computer access

 .......................................................................................................................... 17


4

Operation

 ................................................................................................................................................... 19


4.1 Operation Modes

 ............................................................................................................................. 19


4.2 Turn on/off UPS

 ............................................................................................................................... 20


4.3 The LCD Display

.............................................................................................................................. 26


4.4 Parameters setting

 ......................................................................................................................... 31


4.5 Parallel system commissioning

 .................................................................................................. 38


4.6 Display Messages/Troubleshooting

 ........................................................................................... 39


4.4 Options

 .............................................................................................................................................. 40


Appendix 1 Specifications

 .......................................................................................................................... 41


Appendix 2 Problems and Solution

 .......................................................................................................... 44


Appendix 3 USB communication port definition

 .................................................................................. 46


Appendix 4 RS232 communication port definition

 ............................................................................... 46


Appendix 5 RS485 communication port definition

 ............................................................................... 48


Appendix 6 Dry contact port communication port definition

 ............................................................ 49


Appendix 7 REPO instruction

 .................................................................................................................... 50


Summary of Contents for SAFEPOWER S 10KVA

Page 1: ...IV405E Rev 000 SIEL S p A Data di emissione 2018 06 22 Pag 1 di 50 FR 10 40kVA UPS INTALLATION USER MANUAL SAFEPOWER S KEEP FOR FUTURE REFERENCE for the entire life of the appliance ...

Page 2: ...ligent three phase in Three phase out high frequency online UPS designed by our R D team who is with years of designing experiences on UPS With excellent electrical performance perfect intelligent monitoring and network functions smart appearance complying with EMC and safety standards The UPS meets the world s advanced level Read this manual carefully before installation This manual provides tech...

Page 3: ...nect 13 3 8 Battery connection 14 3 9 UPS parallel Installation 16 3 10 Computer access 17 4 Operation 19 4 1 Operation Modes 19 4 2 Turn on off UPS 20 4 3 The LCD Display 26 4 4 Parameters setting 31 4 5 Parallel system commissioning 38 4 6 Display Messages Troubleshooting 39 4 4 Options 40 Appendix 1 Specifications 41 Appendix 2 Problems and Solution 44 Appendix 3 USB communication port definiti...

Page 4: ...ore starting it 3 Don t open or damage battery for the liquid spilled from the battery is strongly poisonous and do harmful to body 4 Please avoid short circuit between anode and cathode of battery otherwise it will cause spark or fire 5 Don t disassemble the UPS cover or there may be an electric shock 6 Check if there exists high voltage before touching the battery 7 Working environment and stora...

Page 5: ...ent is kept in balance No unbalance problem might occur ႷDigital Control This series UPS is controlled by Digital Signal Processor DSP enhance it increases reliability performance self protection and self diagnostics and so on ႷBattery Configurable 10 30kVA from 16 blocks to 20 blocks the battery voltage of this series UPS can be configured at 16 blocks 18 blocks or 20 blocks according to your con...

Page 6: ... battery and ambient temperature etc ႷIntelligent Monitoring Function Via optional SNMP Card you may remotely control and monitor the UPS ႷEPO Function The series UPS may be completely shut off when the EPO is pressed REPO function Remote EPO is also available in this series UPS 3 Installation 3 1 Unpack checking 1 Don t lean the UPS when moving it out from the packaging 2 Check the appearance to ...

Page 7: ...IV405E Rev 000 SIEL S p A Data di emissione 2018 06 22 Pag 7 di 50 FR 3 2 Cabinet Outlook Front View Side View ...

Page 8: ...r 1 LCD panel 2 RS485 port 3 Dry contact port 4 Parallel port 1 5 USB port 6 Parallel port 2 7 RS232 8 Power Switch 9 REPO port 10 I P Switch 11 Terminal block 12 Intelligent Slot 1 SNMP card Relay card 13 Maintenance switch its cover 14 Intelligent Slot 2 SNMP card Relay card 15 O P Switch 16 Ground 17 Bypass Switch ...

Page 9: ...D panel 2 Intelligent Slot 1 SNMP card Relay card 3 Intelligent Slot 2 SNMP card Relay card 4 Battery Power Switch 5 Dry contact port 6 USB port 7 RS485 port 8 REPO port 9 RS232 10 Parallel port 11 Maintenance switch its cover 12 I P Switch 13 O P Switch 14 Terminal block for Input output battery 15 Ground 16 Bypass Switch ...

Page 10: ...mperature can t be higher than 50ഒ ႷIf the UPS is dismantled under low temperature it might be in a condensing condition The UPS can t be installed unless the internal and external of the equipment is fully dry Otherwise there will be in danger of electric shock ႷBatteries should be mounted in an environment where the temperature is within the required specs Temperature is a major factor in determ...

Page 11: ...d batteries are protected against the effect of over current through a DC compatible thermo magnetic circuit breaker or a set of fuses located close to the battery ႷUPS Output Any external distribution board used for load distribution shall be fitted with protective devices that may avoid the risk of UPS overloaded ႷOver current Protection device shall be installed at the distribution panel of the...

Page 12: ...net Cable Dimension AC Input mm2 AC Output mm2 DC Input mm2 Grounding mm2 10KVA 4 4 10 4 15KVA 6 6 16 6 20KVA 8 8 20 8 30kVA 12 12 35 8 40kVA 16 16 35 10 CAUTION Protective earth cable Connect each cabinet to the main ground system For Grounding connection follow the shortest route possible WARNING Failure to follow adequate earthing procedures may result in electromagnetic interference or in haza...

Page 13: ...ft to right Input phase A L1 bypass phase A L1 input phase B L2 bypass phase B L2 input phase C L3 bypass phase C L3 input Neutral line bypass Neutral line output phase A L1 output phase B L2 output phase C L3 output and battery Neutral line battery positive battery negative There are 3 connectors of GROUND under the terminal block Warning In the case of split bypass operation make sure the copper...

Page 14: ...cordance with local and national codes of practice 3 8 Battery connection 10 30kVA The UPS adopts positive and negative double battery framework totally 16pcs optional 18 20 in series A neutral cable is retrieved from the joint between the cathode of the 8th 9th 10th and the anode of the 9th 10th 11th of the batteries Then the neutral cable the battery Positive and the battery negative are connect...

Page 15: ...pcs battery capacity 12V65AH charger current 9 75A When connecting 18 20 batteries please re set desired battery quantity and its capacity after UPS starts at AC mode Charger current could be adjusted automatically according to battery capacity selected All related settings can be done through LCD panel or monitoring software 40kVA factory setting of the long run unit is battery quantity 32pcs bat...

Page 16: ...lel cable installation Shielded and double insulated control cables available must be interconnected in a ring configuration between UPS units as shown below The ring configuration ensures high reliability of the control 3 9 3 Requirement for the parallel system A group of paralleled UPS behaves as one large UPS system but with the advantage of presenting higher reliability In order to assure that...

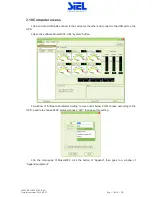
Page 17: ...her end connect to the USB port on the UPS ႷOpen the software Muser4000 click system button ႷA window of Software Parameter Setting comes out as below COM choose according to the UPS baud rate choose 9600 protocol choose HIP then save this setting ႷOn the main page of Muser4000 click the button of Append then goes to a window of Append equipment ...

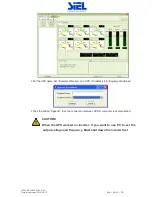
Page 18: ... name into Equipment Name and UPS ID address into Equipment address ႷClick the button Append then the connection between UPS computer is accomplished CAUTION When the UPS worked on inverter If you want to use PC to set the output voltage and frequency Must shut down the inverter first ...

Page 19: ... perform a transfer of the load from the inverter to the bypass with power interruption to the critical AC load This is to avoid paralleling of unsynchronized AC sources This interruption is programmable but typically set to be less than an electrical cycle e g less than 15ms 50Hz or less than 13 33ms 60Hz ႷECO Mode When the UPS is at AC Mode and the requirement to the load is not critical the UPS...

Page 20: ...r standard UPS CAUTION Check to see if the load is safely connected with the output of the UPS If the load is not ready to receive power from the UPS make sure that it is safely isolated from the UPS output terminals Ⴗ Switch ON UPS BYPASS breaker and MAINS breaker 10 20KVA 30 40KVA If the Rectifier input is within voltage range the rectifier will start up in 30 seconds then the inverter will star...

Page 21: ...the MAINS to simulate utility recovery the rectifier will restart automatically after 20 seconds and the inverter will supply to the load It is suggested to use Dummy loads for testing The UPS can be loaded up to its maximum capacity during load test 4 2 3 MAINTENANCE BYPASS To supply the load via Mains you may simply active the internal mechanical bypass switch CAUTION The load is not protected b...

Page 22: ...e bypass breaker then the output is supplied by the static bypass of the UPS Ⴗ Put on the maintenance switch cover The rectifier will operate normally after 30 seconds If the inverter works normally the system will be transferred from bypass mode to normal mode 4 2 4 Cold start procedure CAUTION Follow these procedures when the input AC Utility Failure but battery is normal Ⴗ Set the Battery Break...

Page 23: ...OFF to shut down the UPS waiting about 30s Ⴗ Open the BATTERY breaker for long run UPS Open the battery power switch for standard UPS Ⴗ Switch OFF the input breaker Ⴗ Open the OUTPUT breaker The UPS shuts down Ⴗ To completely isolate the UPS from AC Mains all input switches of Utility shall be completely off Ⴗ The primary input distribution panel which is often located far away from the UPS area s...

Page 24: ...it for about 5 minutes for the internal D C bus bar capacitors to be completely discharged 4 2 6 Parallel setting ႷConnect the UPS with computer Power on the UPS Ⴗ Open Muser4000 software after connecting with the UPS successfully click System User Set ႷClick Set at User Set window ...

Page 25: ...allel for the value then click Set as shown in below picture If the UPS sounds a beep that means the setting is correct ႷAt the window of Data Set click Ups ID write a value for the parallel UPS ID at the right side such as 1 then click Set as shown in below picture If the UPS sounds a beep that means the setting is correct ...

Page 26: ...N Parallel cable cannot be connected when setting the parallel parameters ႷAfter setting the UPS needed to be paralleled power off all the UPS Connect all the UPS according to parallel cable installation and then power on the UPS 4 3 The LCD Display Overview of the operating panel of the UPS 1 LED indicator 2 LCD display 3 Scroll button enter to next item 4 Off button 5 On button Introduction CAUT...

Page 27: ...L2 Voltage Frequency 10 Output C Output L3 Voltage Frequency 11 Load A Load 12 Load B Load 13 Load C Load 14 Total Load Load 15 Temperature battery temperature need to connect batter sensor Internal temperature and ambient temperature 16 Software version model Version of rectifier software version of inverter software model 17 CODE Alarm Code Warming Message 1 When the UPS is connecting with the U...

Page 28: ...IV405E Rev 000 SIEL S p A Data di emissione 2018 06 22 Pag 28 di 50 FR 2 Phase A L1 Input Frequency 3 Phase B L2 Input Frequency 4 Phase C L3 Input Frequency 5 Bat Positive 6 Bat Negative 7 Backup time ...

Page 29: ...emissione 2018 06 22 Pag 29 di 50 FR 8 Phase A L1 Output Voltage Frequency 9 Phase B L2 Output Voltage Frequency 10 Phase C L3 Output Voltage Frequency 11 Phase A L1 Load Capacity 12 Phase B L2 Load Capacity 13 Phase C L3 Load Capacity ...

Page 30: ...odel 17 Alarm Code If has battery charging above 2 13 interface windows will also display the charging status at the same time as below Boost Floating 3 Pressing scroll button you may circulate all messages from the first one to the last one then returns back to the first one and vice versa 4 All alarm codes are present when abnormal behavior s occur s 5 Charging Status ...

Page 31: ...t mode There are 3 different modes for setting ECO PAL NOR ཱPress ON to exit the mode setting and save the mode setting value and goes to output voltage setting ིPress OFF to exit the mode setting and goes to parallel redundancy quantity setting 4 4 2 Output voltage setting Output voltage setting Note Inside the broken line is the flashing part In the mode setting press ON or in frequency setting ...

Page 32: ...requency 50 60Hz ཱPress ON to exit the frequency setting and save the frequency setting value and goes to battery capacity setting ིPress OFF to exit the frequency setting and goes to output voltage setting CAUTION When powered by inverter it is necessary to turn off the inverter before setting voltage and frequency level 4 4 4 Battery capacity setting Battery capacity setting Note Inside the brok...

Page 33: ...ity setting and save the battery quantity setting value and goes to bypass voltage upper limit setting ིPress OFF to exit the battery quantity setting and goes to battery capacity setting 4 4 6 Bypass voltage upper limit setting Bypass voltage upper limit setting Note Inside the broken line is the flashing part In the battery quantity setting press ON or in bypass voltage lower setting press OFF i...

Page 34: ...ass voltage lower limit setting and save the bypass voltage lower limit setting value and goes to buzzer mute setting ིPress OFF to exit the bypass voltage lower limit setting and goes to bypass upper limit setting 4 4 8 Buzzer Mute Setting Buzzer Settings note red dashed box is the scintillation part In the bypass voltage low limit setting press ON or in battery self test setting press OFF it goe...

Page 35: ...to exit Periodically Self test setting and save the setting value and goes to battery temperature compensation sensor switch setting ིPress OFF to exit Periodically Self test setting and goes to buzzer setting 4 4 10 Battery temperature compensation sensor switch setting Battery temperature compensation sensor switch setting Note the information in the red box will be flashing Press ON under the p...

Page 36: ...setting and save the device address setting value and parallel ID setting Note Under single UPS mode until this device address setting save and exit single UPS setting is done ԚPress OFF to exit the device address setting and transfer to battery temperature compensation sensor setting 4 4 12 Parallel ID setting Parallel ID setting Note Inside the broken line is the flashing part When in device add...

Page 37: ...parallel quantity setting value and goes to parallel redundancy quantity setting ིPress OFF to exit the parallel quantity setting and goes to parallel ID setting 4 4 14 Parallel redundancy quantity setting Parallel redundancy quantity setting Note Inside the broken line is the flashing part When under the parallel quantity setting press ON it goes to the parallel redundancy quantity setting The pa...

Page 38: ...ult setting 4 Turn off the input breaker of Unit 1 and make sure the UPS is off Turn on the input breaker of Unit 2 access the LCD setting interface setting the parallel working mode ID NO 2 parallel 4 units redundant number The other setting are the same as UPS 1 operation 5 For Unit 3 and Unit 4 UPS the operation setting are all the same as Unit 1 and 2 6 Turn on Bypass input output breaker of a...

Page 39: ... Buzzer LED 1 Rectifier Fault Beep continuously Fault LED lit 2 Inverter fault Including Inverter bridge is shorted Beep continuously Fault LED lit 3 Inverter Thyristor short Beep continuously Fault LED lit 4 Inverter Thyristor broken Beep continuously Fault LED lit 5 Bypass Thyristor short Beep continuously Fault LED lit 6 Bypass Thyristor broken Beep continuously Fault LED lit 7 Fuse broken Beep...

Page 40: ...ED blinking 43 Inverter on invalid 44 Reserve 45 inverter not on 4 4 Options SNMP card internal SNMP external SNMP optional Ⴗ Loosen the 2 torque screws on each side of the card Ⴗ Carefully pull out the card Reverse the procedure for re installation The slot called SNMP supports the MEGAtec protocol We advise that NetAgent II 3 port is also a tool to remotely monitor and manage any UPS system NetA...

Page 41: ... Ground Rated Voltage 380 400 415Vac Voltage Range 208 478Vac Frequency Range 45 55Hz at 50Hz 54 66Hz at 60Hz auto sensing Power Factor 0 99 Current THDi 3 100 nonlinear load Bypass Voltage Range Max voltage 220Vac 25 optional 10 15 20 230Vac 20 optional 10 15 240Vac 15 optional 10 Min voltage 45 optional 10 20 30 Frequency protection range 10 Generator Input Support Output Phase 3 Phase 4 Wires a...

Page 42: ...Breaker 40A Short Circuit 120A peak 140A peak Overheat Line Mode Switch to Bypass Backup Mode Shut down UPS immediately Battery Low Alarm and Switch off Self diagnostics Upon Power On and Software Control EPO optional Shut down UPS immediately Battery Advanced Battery Management Noise Suppression Complies with EN62040 2 Alarms Audible Visual Line Failure Battery Low Overload System Fault Display S...

Page 43: ...Hz Crest Factor 3 1 THD 2 with linear load 5 with non linear load Battery Voltage Standard unit 120Vdc 3x20pcs 12V9AH Long run unit Optional Voltage 96V 108V 120Vdc 16 18 20pcs optional Long run unit Optional Voltage 192V 204V 216V 228V 2 40VDC 32 34 36 38 40PCS Charge Current A charge current can be set according to battery capacity installed Standard unit 4 5A Long run unit Max current 10A Long ...

Page 44: ...out any problem please consult with local agent right away and provide below information 1 Product model name and serial number 2 Try to describe the fault with more details such as LCD display info LED lights status etc Read the user manual carefully it can help a lot for using this UPS in the right way Some FAQ frequently asked questions may help you to troubleshoot your problem easily No Proble...

Page 45: ...9 fault code The UPS output is in short circuit Make sure the load is not in short circuit and then restart the UPS 8 The UPS only works on bypass mode The UPS is set to ECO mode or the transfer times to bypass mode are limited Set the UPS working mode to UPS type non parallel or to reset the times of transferring to bypass or re start the UPS 9 Cannot Black start Battery switch is not properly cl...

Page 46: ... DPLUS signal Pin 3 Pin 3 PC DMINUS signal Pin 4 Pin 4 Signal ground Available function of USB Ⴗ Monitor UPS power status Ⴗ Monitor UPS alarm info Ⴗ Monitor UPS running parameters Ⴗ Timing off on setting Communication data format Baud rate 9600bps Byte length 8bit End bit 1bit Parity check none CAUTION USB RS232 and RS485 interface cannot be used at the same time you can only use one of them at on...

Page 47: ...receive Pin 3 Pin 3 PC send UPS receive Pin 5 Pin 5 ground Available function of RS232 ٟMonitor UPS power status ٟMonitor UPS alarm info ٟMonitor UPS running parameters ٟTiming off on setting RS 232 communication data format Baud rate 9600bps Byte length 8bit End bit 1bit Parity check none CAUTION USB RS232 and RS485 interface cannot be used at the same time you can only use one of them at one tim...

Page 48: ...Vdc Pin8 Pin8 GND Available function of RS485 Ⴗ Monitor UPS power status Ⴗ Monitor UPS alarm info Ⴗ Monitor UPS running parameters Ⴗ Timing off on setting ႷBattery environment temperature monitoring ႷCharging voltage modulation depending on batteries temperature Communication data format Baud rate 9600bps Byte length 8bit End bit 1bit Parity check none CAUTION USB RS232 and RS485 interface cannot ...

Page 49: ...Appendix 6 Dry contact port communication port definition Definition of Male port Instruction UPS Instruction Pin1 UPS Battery Low Pin2 AC Power Failure Pin3 Turn off UPS Pin4 Common GND Function description Ⴗ Monitor UPS status Ⴗ Monitor UPS battery status Ⴗ Shutdown UPS ...

Page 50: ... between the button and UPS REPO port Button UPS REPO Description Pin 1 Pin 1 EPO Pin 2 Pin 2 GND ႷA remote emergency stop switch can be installed in a remote location and connection through simple wires to the REPO connector ႷThe remote switch can be connected to several UPS in a parallel architecture allowing the user to stops all units at once ...

Reviews: