background image


11 


Ordercode: 43725 

Helix S5000 Q4 

Installation 

Remove all packing materials from the Helix S5000 Q4. Check that all foam and plastic padding is 
removed. Connect all cables. 
Do not supply power before the whole system is set up and connected properly. 
Always disconnect from electric mains power supply before cleaning or servicing. 
Damages caused by non-observance are not subject to warranty. 
 

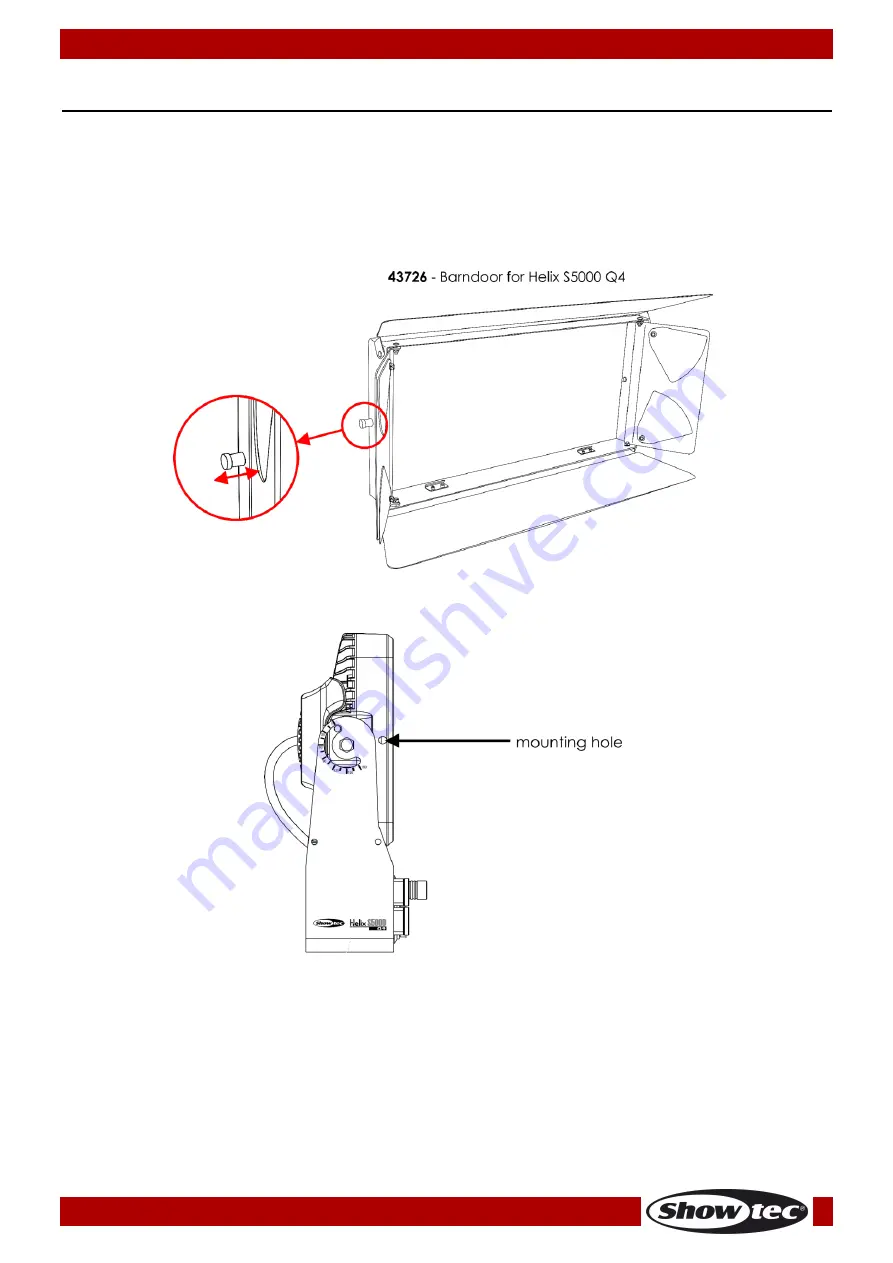
Installing the Barndoor (43726) 

01)


Pull on the spring-loaded locking screws, on both sides of the barndoor, to unlock the mechanism.  


Fig. 02 

 
02)


Place the barndoor on the Helix, to secure the barndoor’s screws in the Helix’s mounting holes.  


Fig. 03 

 
03)


Release both locking screws to lock the barndoor in position. 


Summary of Contents for Helix S5000 Q4

Page 1: ...Helix S5000 Q4 V1 Highlite International B V Vestastraat 2 6468 EX Kerkrade the Netherlands Ordercode 43725 MANUAL ENGLISH...

Page 2: ...ontrol 14 Multiple Helixes DMX Control 15 Multiple Helixes Wireless DMX Control 16 Wireless DMX Connection 16 Wireless DMX Problems 16 Example 1 17 Example 2 18 Fixture Linking 19 Data Cabling 19 Cont...

Page 3: ...4 6 11 Factory 32 7 Information 32 DMX Channels 33 4 Channels 33 6 Channels 33 8 Channels 34 20 Channels 36 24 Channels 37 Maintenance 39 Troubleshooting 40 No Light 40 No Response to DMX 40 Product S...

Page 4: ...3 Ordercode 43725 Helix S5000 Q4...

Page 5: ...True1 power cable 1 5 m 6 x quick locks 2 x quick lock brackets 4 x rubber feet 1 x mounting bracket User manual LED Expected Lifespan LEDs gradually decline in brightness over time HEAT is the domin...

Page 6: ...using is firmly closed and all screws are tightly fastened Only operate the device after having familiarized with its functions Avoid flames and do not put close to flammable liquids or gases Always k...

Page 7: ...perature of 40 C If this device is operated in any other way than the one described in this manual the product may suffer damages and the warranty becomes void Any other operation may lead to dangers...

Page 8: ...4 The Helix S5000 Q4 can be placed on a flat stage floor by means of the included mounting bracket or be mounted to any kind of truss with clamps and quick locks Improper installation can cause seriou...

Page 9: ...proper UPS packing or double boxing is always a safe method to use Note If you are given an RMA number please include the following information on a piece of paper inside the box 01 Your name 02 Your...

Page 10: ...x Refresh rate 3 0 kHz DMX modes 4 6 8 20 24 channels Dimmer 0 100 Strobe 0 20Hz Beam angle 10 Control mode Auto Built in programs Manual Master Slave DMX512 W DMX Housing Die cast aluminum Power conn...

Page 11: ...0 240V Neutrik PowerCON True1 power connector IN 06 OLED display control buttons 07 Pressure valve This valve manages the air pressure within the Helix s enclosure It allows the enclosure to breathe e...

Page 12: ...y Always disconnect from electric mains power supply before cleaning or servicing Damages caused by non observance are not subject to warranty Installing the Barndoor 43726 01 Pull on the spring loade...

Page 13: ...43727 43728 43729 01 In order to install the beamshaper place it on the lens of the Helix The beamshaper is equipped with multiple magnets which keep it firmly in position 02 In order to remove the b...

Page 14: ...1 Pull on the spring loaded locking screws on both sides of the tophat to unlock the mechanism Fig 05 02 Place the tophat on the Helix to secure the tophat s screws in the Helix s mounting holes Fig 0...

Page 15: ...least 0 5 meter on all sides for air circulation 02 Always use a safety cable ordercode 70140 70141 03 Plug the end of the electric mains power cord into a proper electric power supply socket 04 When...

Page 16: ...es 05 Link the units as shown in fig 08 Connect a DMX signal cable from the first unit s DMX out socket to the second unit s in socket Repeat this process to link the second and third units 06 Supply...

Page 17: ...x F 2 G5 Transceiver 50178 To control the status of the wireless communication please look at the green LED indicator light on the left side of the display Note When the Helix receives a wireless DMX...

Page 18: ...tures must always be connected via a DMX signal cable The Helix S5000 Q4 is only a WDMX receiver and never a WDMX transmitter When the Helix operates in DMX or Slave mode it can receive a wireless DMX...

Page 19: ...ers In order to pair the Helix with the wireless signal transmitter please check the manual of the wireless signal transmitter you use It is recommended to use the Wireless DMX BlackBox F 1 G5 Transce...

Page 20: ...and are less prone to electromagnetic interference DAP Audio DMX Data Cables DAP Audio Basic microphone cable for allround use bal XLR M 3 pin XLR F 3 pin Ordercode FL01150 1 5 m FL013 3 m FL016 6 m...

Page 21: ...ss of the third Helix should be 25 24 49 049 etc Please be sure that you do not have any overlapping channels in order to control each Helix correctly If two or more Helixes are addressed similarly th...

Page 22: ...21 Ordercode 43725 Helix S5000 Q4 Menu Overview...

Page 23: ...22 Ordercode 43725 Helix S5000 Q4...

Page 24: ...ure and the signal type 1 DMX Settings With this menu you can set the DMX address choose the desired DMX mode and activate deactivate the wireless DMX 01 While in the main menu press the UP DOWN butto...

Page 25: ...nu you can set the desired DMX channel mode 01 Press the UP DOWN buttons to set the desired DMX channel mode Choose one of the 5 options 4 channels 6 channels 8 channels 20 channels 24 channels 02 Pre...

Page 26: ...e one of the 4 colors Red Green Blue and White 04 Press the SET button to enter the menu 05 Press the UP DOWN buttons to set the intensity of the LEDs The adjustment range for each color is between 0...

Page 27: ...e of the 26 built in programs Press the SET button to confirm your choice 4 1 Program 01 01 If you have chosen program 01 the display will show 02 Press the UP DOWN buttons to choose one of the 2 opti...

Page 28: ...to save your settings 05 If you have chosen STROBE press the UP DOWN buttons to set the strobe frequency The adjustment range is between 0 99 from OFF to high frequency Press the SET button to save yo...

Page 29: ...the menu The display will show 03 Press the UP DOWN buttons to choose one of the 11 submenus CURVES SELECT DIMMER SPEED FAN SPEED PIXEL DIR PWM FREQUENCY BACKLIGHT TIME DMX FAIL DMX SYNC LOCK KEY BAC...

Page 30: ...the dimmer speed 01 Press the UP DOWN buttons to select FAST or SMOOTH 02 Press the SET button to confirm your choice 6 3 Fan Speed With this menu you can set the fan speed 01 Press the UP DOWN butto...

Page 31: ...cy With this menu you can set the PWM frequency 01 Press the UP DOWN buttons to select 12K 6K 4K or 3K 02 Press the SET button to confirm your choice 6 6 Backlight Time With this menu you can set the...

Page 32: ...can set the devices behavior while using multiple Helixes 01 Press the UP DOWN buttons to select ON all Helix devices will simultaneously perform the same action without any delays or OFF risk of ran...

Page 33: ...tore the default factory settings 01 Press the UP DOWN buttons to select YES or NO 02 Press the SET button to confirm your choice 7 Information With this menu you can view the device s current softwar...

Page 34: ...ls Channel 1 Dimmer 0 255 Dimmer intensity from dark to brightest Channel 2 Red CH1 must be open 0 255 Gradual adjustment Red from dark to brightest Channel 3 Green CH1 must be open 0 255 Gradual adju...

Page 35: ...tional 6 15 Color switch 1 16 25 Color switch 2 26 35 Color switch 3 36 45 Color switch 4 46 55 Color switch 5 56 65 Color switch 6 66 75 Color switch 7 76 85 Color switch 8 86 95 Color flow 1 96 105...

Page 36: ...Lighter Blue 125 130 Steel Blue 131 136 CT Blue 137 142 Full CT Blue 143 148 State Blue 149 154 Double CT Blue 155 160 Medium Blue 161 166 Just Blue 167 172 Deep Blue 173 178 Blue 179 184 Congo Blue...

Page 37: ...section 2 0 255 Gradual adjustment Red from dark to brightest Channel 6 Green section 2 0 255 Gradual adjustment Green from dark to brightest Channel 7 Blue section 2 0 255 Gradual adjustment Blue fr...

Page 38: ...slow to fast Channel 3 Color macros CH1 must be open CH4 must be closed 0 10 Not functional 11 16 Red 17 22 Flame Red 23 28 Deep Gold Amber 29 34 Millennium Gold 35 40 Gold Amber 41 46 Yellow 47 52 C...

Page 39: ...26 135 Color flow 5 136 145 Color flow 6 146 155 Color flow 7 156 165 Section switch 1 166 175 Section switch 2 176 185 Section switch 3 186 195 Section switch 4 196 205 Section switch 5 206 215 Secti...

Page 40: ...will be significantly reduced Disconnect the mains power supply and then wipe the cover with a damp cloth Wipe the front glass panel clean with glass cleaner and a soft cloth Do not use alcohol or sol...

Page 41: ...nnected Connect controller 5 pin XLR Out of the controller does not match XLR Out of the first fixture on the link i e signal is reversed Install a phase reversing cable between the controller and the...

Page 42: ...e 10 Dimmer 0 100 Strobe 0 20Hz Rigging Quick locks for fast rigging and mounting Wireless DMX Wireless Solutions IP rating IP65 DMX control via standard DMX controller Onboard OLED display for easy s...

Page 43: ...42 Ordercode 43725 Helix S5000 Q4 Dimensions...

Page 44: ...2018 Showtec...

Reviews: