background image


10 


Ordercode: 44110 

EventBAR 12/3 

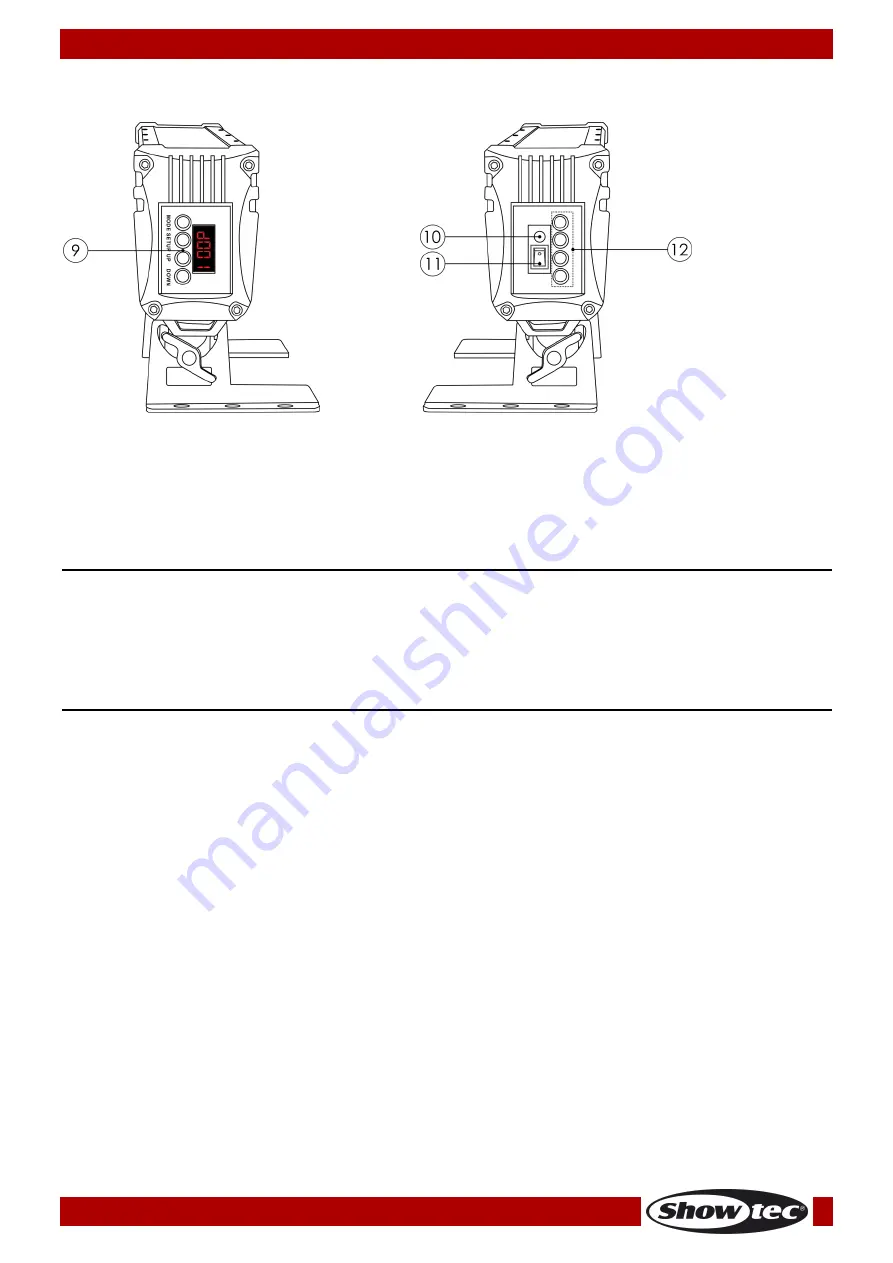
Sides 


Fig. 03


09)


Menu B LED display 

10)


Wireless DMX LED indicator 

11)


Power Switch On/Off 

12)


Power LED indicators 


Installation 

Remove all packing materials from the EventBAR 12/3. 
Check that all foam and plastic padding is removed. Connect all cables. 

Do not supply power before the whole system is set up and connected properly.


Always disconnect from electric mains power supply before cleaning or servicing. 
Damages caused by non-observance are not subject to warranty.


Set Up and Operation 

Follow the directions below, as they pertain to your preferred operation mode.  
Before plugging the unit in, always make sure that the power supply matches the product specification 
voltage. Do not attempt to operate a 120V specification product on 230V power, or vice versa. 
Connect the device to the main power supply. 
 

Charging the built-in battery 

01)


In order to charge the battery you’ll have to use the included power cable. 

02)


Turn off the power. 

03)


Connect the


power cable into an appropriate power supply. 

04)


The power LED indicators (on the side)


will light up in sequence. 

05)


It will take 8 hours to be fully charged. All power LED indicators will light up when the device is 
completely charged. 

06)


When the EventBAR is fully charged, you can use the EventBAR for approx. 6,0 hours at full RGB. 

07)


The power LED indicators show the energy level of the battery (100-75%, 50%, 25%, 25%-0). 


Important! 


Charge the battery when the red LED (energy level < 25%) of the power LED indicators flashes. 


You have to charge the battery at least every 3 months. 


Do not use the fixture in a high temperature environment, because the lithium battery could be 
damaged or it will reduce the lifetime of the battery. 


Summary of Contents for eventbar 12/3

Page 1: ...EventBAR 12 3 V1 Highlite International B V Vestastraat 2 6468 EX Kerkrade the Netherlands Ordercode 44110 MANUAL ENGLISH...

Page 2: ...ltiple EventBARs Wireless DMX Control 13 Connect the EventBAR 12 3 to the Wireless DMX signal transmitter 14 Disconnect from the Wireless DMX signal transmitter 14 Fixture Linking 15 Data Cabling 15 C...

Page 3: ...2 Ordercode 44110 EventBAR 12 3 Product Specifications 27 Dimensions 28 Notes 29...

Page 4: ...exhibit higher operating temperatures than in ideal or singular optimum conditions For this reason when all color LEDs are used at their fullest intensity life of the LEDs is significantly reduced If...

Page 5: ...he plug Never pull out the plug by tugging the power cord Make sure that the device is not exposed to extreme heat moisture or dust Make sure that the available voltage is not higher than stated on th...

Page 6: ...ns electric shock crash etc You endanger your own safety and the safety of others Rigging Please follow the European and national guidelines concerning rigging trussing and all other safety issues Do...

Page 7: ...he mains Connect the device to the mains with the power plug Always check if the right color cable is connected to the right place International EU Cable UK Cable US Cable Pin L BROWN RED YELLOW COPPE...

Page 8: ...e number 04 A brief description of the symptoms Claims The client has the obligation to check the delivered goods immediately upon delivery for any short comings and or visible defects or perform this...

Page 9: ...and vertical 16 Colormixing RGB Colour range 16 7 million additive colors LED source 12 x 3 in 1 RGB LEDs Power Supply 100 240V AC 50 60Hz Drive current 350 mA Refresh rate 7 8 KHz Control Mode DMX51...

Page 10: ...in 1 RGB LEDs Backside Fig 02 03 DMX signal connector OUT 3 pin XLR XX HD female 04 Wireless DMX receiving antenna 05 Adjustment screw mounting bracket for Truss mounting 06 Adjustment screw for posi...

Page 11: ...cification product on 230V power or vice versa Connect the device to the main power supply Charging the built in battery 01 In order to charge the battery you ll have to use the included power cable 0...

Page 12: ...is set to or then the fixture will play one of its built in programs or show its auto run mode Please see page 20 for more information about the Built in Programs or Auto Run mode Multiple EventBARs M...

Page 13: ...vices 05 Link the units as shown in Fig 05 Connect a DMX signal cable from the first unit s DMX out socket to the second unit s in socket Repeat this process to link the second and third units 06 Supp...

Page 14: ...blinking the fixture is searching for a connection 03 Connect the transmitter with multiple EventBARs In order to create a Wireless match please check the manual of your wireless signal transmitter 0...

Page 15: ...then dim for 100ms The LED will flicker quickly 03 Communication with an emitter but no DMX data The LED Indicator will light up for 900ms and then dim for 100ms The LED will flicker slowly When the...

Page 16: ...data grade cables that can carry a high quality signal and are less prone to electromagnetic interference DAP Audio DMX Data Cables DAP Audio Basic microphone cable for allround use bal XLR M 3 pin X...

Page 17: ...ing channels in order to control each EventBAR correctly If two or more EventBARs are addressed similarly they will work similarly Controlling After having addressed all EventBARs you may now start op...

Page 18: ...17 Ordercode 44110 EventBAR 12 3 Menu overview...

Page 19: ...operly In master slave mode the master fixture can execute the built in programs all the slave fixtures will work the same When operating the master slave chain you can identify the master fixture fro...

Page 20: ...UP and DOWN buttons to set the values of each individual color from 000 255 You can combine Red Green and Blue to create an infinite range of colors 4 Power Mode With this menu you can see the energy...

Page 21: ...he device until the display shows 02 You can choose 9 built in programs by pressing the UP and DOWN buttons 03 If you choose and you press SETUP you can choose between 9 programs and Off with the UP a...

Page 22: ...ode Sound controlled Mode Activate Sound controlled mode Speed Mode Activate Speed mode Strobe Mode Activate Strobe mode Dimming Mode Activate Dimming Mode Plus Increase button Minus Decrease button R...

Page 23: ...an choose between by using the and buttons 05 You can also set the strobe of the program by pressing the button 06 With the and buttons you can set the strobe between Note You can set only the strobe...

Page 24: ...set between 1 255 0 No function 1 30 Program 01 31 61 Program 02 62 92 Program 03 93 123 Program 04 124 154 Program 05 155 185 Program 06 186 216 Program 07 217 247 Program 08 248 255 Program 09 Chann...

Page 25: ...t be set between 1 255 0 255 Gradual adjustment Blue from 0 100 Channel 4 Dimmer 0 255 Gradual adjustment from dark to brightest 0 100 Channel 5 Shutter Strobe CH1 CH2 CH3 or CH4 must be set between 1...

Page 26: ...DMX and audio connections with a damp cloth Make sure connections are thoroughly dry before linking equipment or supplying electric power Troubleshooting No Light This troubleshooting guide is meant...

Page 27: ...e fixture disturbing the link Bad data link connection Inspect connections and cables Correct poor connections Repair or replace damaged cables Data link not terminated with 120 Ohm termination plug I...

Page 28: ...tal 22 and vertical 16 Max distance 10m Dimmer 0 100 Strobe 0 20Hz Color Range RGB 16 7 million additive colors Cooling convection Display LED display Housing Die Cast aluminum powder coat finish IP r...

Page 29: ...28 Ordercode 44110 EventBAR 12 3 Dimensions...

Page 30: ...29 Ordercode 44110 EventBAR 12 3 Notes...

Page 31: ...30 Ordercode 44110 EventBAR 12 3...

Page 32: ...2016 Showtec...

Reviews: