background image

-29

\

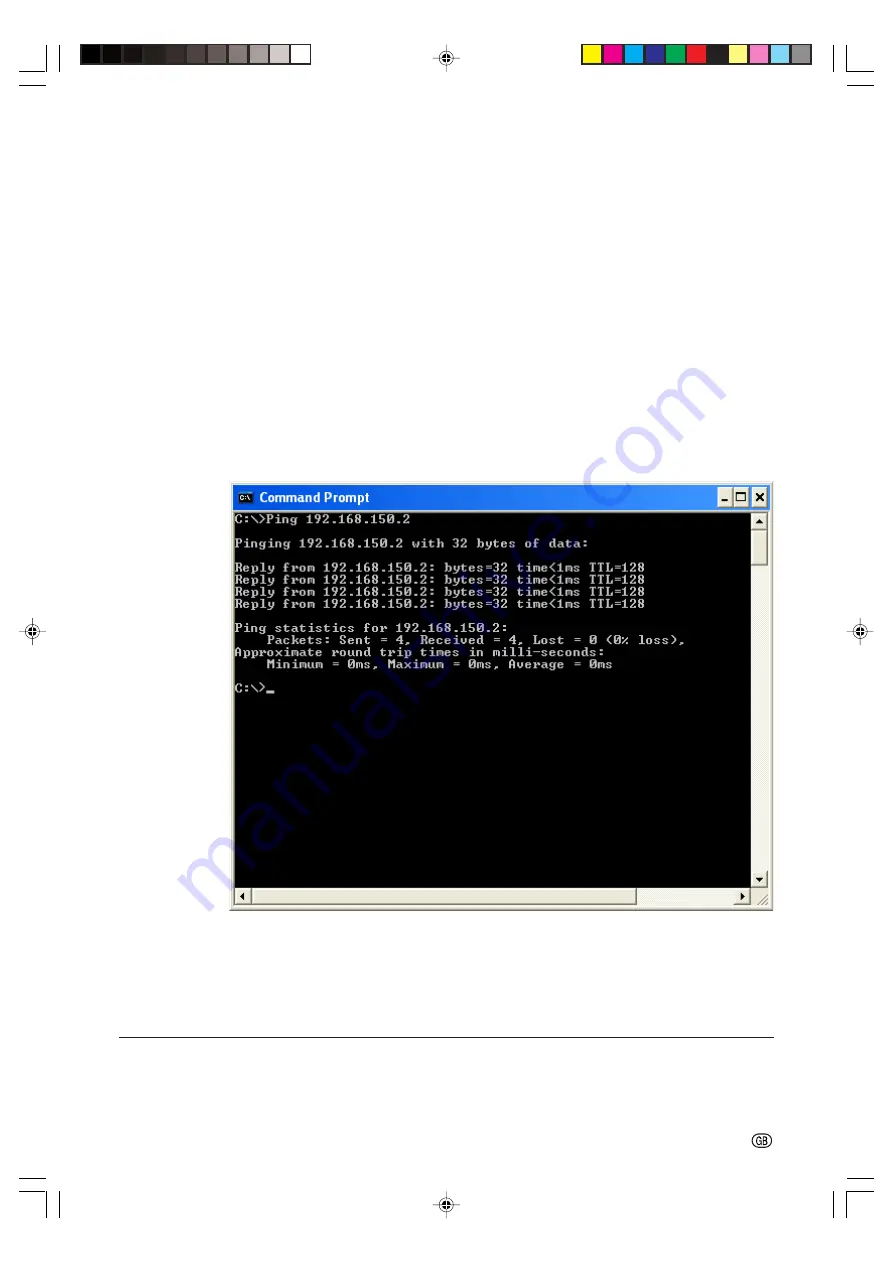
Check if the “TCP/IP” protocol is operating correctly using the “PING” command. Also, check
if an IP address is set.
1. Open a command prompt (MS-DOS Prompt).

In the case of Windows 98 or 98SE: click “START” 

 “Programs” 

 “MS-DOS Prompt” in

order.

In the case of Windows Me: click “START” 

 “Programs” 

 “Accessories” 

 “MS-DOS

Prompt” in order.

In the case of Windows 2000: click “START” 

 “Programs” 

 “Accessories” 

 “Command

Prompt” in order.

In case of Windows XP: click “START” 

 “Programs” 

 “Accessories” 

 “Command Prompt”

in order.

2. After launching the command prompt (MS-DOS Prompt) enter a command “PING”.

Entry example C:\>Ping XXX.XXX.XXX.XXX
“XXX.XXX.XXX.XXX” should be entered with an IP address to be connected to, such as
the projector.

3. When connecting normally, the display will be as follows.

(The screen may be slightly different depending on the OS type).
<Example> when the IP address connected to is “192.168.150.2”

4. When a command cannot be sent, “Request time out” will be displayed.

Check the network setting again.
If communication can still not be established properly, contact your network administrator.

5. To return to the Windows screen, enter “exit” and then press the “Enter” key.

A connection cannot be made because you have forgotten your user name or your password.

\

Initialize the settings.

\

After the initialization, carry out setting again.

Troubleshooting

XG-MB70X_E_P20_30.p65

04.8.6, 4:46 PM

29

Summary of Contents for XG-MB70X

Page 1: ...ing Using Telnet 18 SETUP MENU Main Menu 19 ADVANCED SETUP MENU 19 Controlling the Projector Using RS 232C or Telnet 20 View Setting Detail List V View All Setting 20 Set Items 20 Save Settings and Quit S Save Quit 21 Quit without Saving Settings Q Quit Unchanged 21 IP Address Setting 1 IP Address 22 Subnet Mask Setting 2 Subnet Mask 22 Default Gateway Setting 3 Default Gateway 22 User Name Settin...

Page 2: ...83 cm 146 cm 58 110 cm 43 2 2 m 7 2 3 3 m 10 9 2 4 cm 31 32 60 152 cm 122 cm 48 91 cm 36 1 8 m 5 11 2 7 m 8 11 2 0 cm 51 64 40 102 cm 81 cm 32 61 cm 24 1 2 m 4 0 1 8 m 6 0 1 4 cm 17 32 Distance from the bottom of the image to the lens center H The formula for picture size and projection distance m cm Feet inches L1 m 0 0302χ L1 ft 0 0302χ 0 3048 L2 m 0 0455χ L2 ft 0 0455χ 0 3048 H cm 0 034χ H in 0...

Page 3: ... CS 8 CS 9 CI 9 CI Note Depending on the controlling device used it may be necessary to connect Pin 4 and Pin 6 on the controlling device e g Computer USB Terminal 4 pin B type USB female connector LAN Terminal 8 pin RJ 45 modular connector Pin No Signal Signal Name Pin No Signal Pin No Signal 1 VCC USB power 1 TX 5 2 USB USB data 2 TX 6 RX 3 USB USB data 3 RX 7 4 SG GND 4 8 8 9 6 5 1 2 4 3 7 1 6 ...

Page 4: ...cross type commercially available to the projector See page 27 of the projector s operation manual for connection Communication conditions Set the serial port settings of the computer to match that of the table Signal format Conforms to RS 232C standard Parity bit None Baud rate 9 600 bps 115 200 bps Stop bit 1 bit Data length 8 bits Flow control None Set the projector s baud rate to the same rate...

Page 5: ... C S R A C S R B C S R B I R I S I R I S I A S I I A S I I A S I I B S I I B S I I B S I R A R E R B R E V A R E V B R E A A D J A A D J T L T T T L T L I M D I I M D I M E S Y M E S Y M E S Y M E S Y M E S Y M E S Y M E S Y M E S Y I M B G I M B G I M B G T H M D T H M D A P O W A P O W A T A F A T A F A T K S A T K S A S P K A S P K A O U T A O U T I M R E I M R E I M I N I M I N M O U T M O U T...

Page 6: ...ddress for the computer Adjust the IP settings of the computer to enable one to one communications with the projector Page 10 3 Setting up a network connection for the projector Adjust the projector network settings to conform to your network LAN cable commercially available Use Internet Explorer version 5 0 or later to make various projector settings Temporarily change the computer s IP address M...

Page 7: ...jector s LAN ter minal and connect the other end of the cable to the computer s LAN terminal 3 Turn on the projector 4 Turn on the Computer Info Confirm that the LINK LED on the rear of the projector illuminates If the LINK LED does not illuminate check the following The LAN cable is properly connected The power switches of both the projector and the computer are on LAN cable cross over type comme...

Page 8: ... s account for the computer 2 Click the Start button and click Control Panel 3 Click Network and Internet Con nections and click Network Connections in the new win dow This manual uses examples to explain the operations in Category View If you are using Classic View double click Network Connections 4 Right click Local Area Connec tion and select Properties from the menu 1 2 1 2 1 2 XG MB70X_E_P02_...

Page 9: ...dress for the setup computer 1 Confirm and note the current IP ad dress and Subnet mask Make sure to note the current IP ad dress and Subnet mask as you will be required to reset it later 2 The factory default setting for the pro jector IP address is 192 168 150 2 Set an IP address temporarily as fol lows IP Address 192 168 150 3 7 After setting click the OK but ton and then restart the com puter ...

Page 10: ...he computer and enter http 192 168 150 2 in Address and then press the Enter key 2 If a user name and a password have not yet been set just click the OK button If a user name and a password have been set input the user name and the password and click the OK button If the user name or password is entered incorrectly three times an error mes sage will be displayed 3 When the screen as shown on the r...

Page 11: ...ck the Confirm but ton After setting items wait for 10 seconds and then re access Setting up the Projector Network Environment This completes the network settings Change the IP address of the setting computer back to its original address and then con nect the computer and the projector to the network Setting example Remarks Factory default setting 192 168 150 2 Enter an IP address appropriate for ...

Page 12: ... followed by the projector IP address set by the procedure on page 11 followed by in Address and then press the Enter key The factory default setting for the projector IP address is 192 168 150 2 If you did not change the IP address in 3 Setting up a Network Connection for the Projector page 10 11 enter http 192 168 150 2 3 A screen for controlling the pro jector appears ready for per forming vari...

Page 13: ...operation manual Controlling the Projector via LAN Controlling the Projector Control On this screen you can perform projector control You can control the following items Power Input Select Volume AV Mute OFF ON Note If you click the Refresh button before the screen is displayed completely an error mes sage Server Busy Error will be displayed Wait for a moment and then operate again You cannot oper...

Page 14: ...ver Busy Error will be displayed Wait for a moment and then operate again You cannot operate this page while the pro jector is warming up For details about each item refer to the projector s operation manual Setting the Security Network Security On this screen you can make settings relat ing to security Note User Name and Password can be up to 8 characters You can input the characters below a z A ...

Page 15: ...mber used when searching for the projector from 1025 to 65535 Items Projector Name Auto Logout Time Data Port Search Port Setting for Sending E mail when an Error Occurs Mail Originator Setting On this screen you can make settings for sending e mail to report when the projector has generated an error Note SMTP Server Originator E mail Address and Originator Name can be up to 64 characters You can ...

Page 16: ...You can input the characters below a z A Z 0 9 _ You can input just one time For details about error items refer to the projector s operation manual Description Set addresses to which error notification e mail is sent You can set up to five addresses Error e mail is sent on the error items checked in their check boxes Send test e mail This allows you to confirm that the settings for e mail transmi...

Page 17: ...ter key If a user name has not yet been set just press the Enter key 6 Password is displayed Input the password and press the Enter key If a password has not yet been set just press the Enter key Connect the projector to a computer using RS 232C orTelnet and open the SETUP MENU on the computer to carry out various settings for the projector 7 Input setup and press the Enter key SETUP MENU will be ...

Page 18: ... Enter key If a password has not yet been set just press the Enter key 6 Input setup and press the Enter key SETUP MENU will be displayed Note If the IP address has been changed ensure to enter the new IP address in step 2 User name and password are not set in the fac tory default settings If the user name or password is entered incor rectly three times in steps 4 or 5 SETUP MENU will be quit SETU...

Page 19: ...nection of net work connection Page 24 2 Data Port Factory default setting 10002 Setting the TCP port number used when exchang ing data Page 24 5 Network Ping Test It is possible to confirm that a network connection between the projector and a computer etc is work ing normally Page 25 6 Accept IP Addr 1 7 Accept IP Addr 2 8 Accept IP Addr 3 9 Accept All IP Addr Factory default setting Ac cept All ...

Page 20: ...and press the En ter key Display IP address after change 2 3 3 3 3 3 Enter v and press the Enter key to verify setting detail list IP address is being changed 3 Note Verification of setting detail list can be omitted Setting details are not effective until they have been saved Page 21 If an invalid number is entered an error message Parameter Error will be displayed SETUP MENU SETUP MENU 1 IP Addr...

Page 21: ...Save Quit Q Quit Unchanged setup s All Connection will be disconnect Continue y n y Apply New setting Done 1 2 Quit without Saving Set tings Q Quit Unchanged Quit menu without saving setting values 1 1 1 1 1 Enter q and press the Enter key 2 2 2 2 2 Enter y and press the Enter key SETUP MENU SETUP MENU 1 IP Address 2 Subnet Mask 3 Default Gateway 4 User Name 5 Password 6 RS 232C Baud Rate 7 Projec...

Page 22: ...0 setup 1 IP Address 192 168 150 2 Please Enter 192 168 150 3 change 192 168 150 3 1 2 setup 2 Subnet Mask 255 255 255 0 Please Enter 255 0 0 0 change 255 0 0 0 1 2 Default Gateway Setting 3 Default Gateway Setting default gateway 1 1 1 1 1 Enter 3 and press the Enter key 2 2 2 2 2 Enter numerical value to be set and press the Enter key Display gateway address after change Note If the values for I...

Page 23: ...Baud Rate Set ting 6 RS 232C Baud Rate Setting of baud rate for RS 232C COMPUTER and PROJECTOR terminals 1 1 1 1 1 Enter 6 and press the Enter key 2 2 2 2 2 Select and enter the number 0 or 2 and press the Enter key Display set baud rate Note Set the projector s baud rate to the same rate as that used by the computer Projector Name Setting 7 Projector Name It is possible to assign a projector name...

Page 24: ... 1 Enter 1 and press the Enter key 2 2 2 2 2 Enter numerical value and press the Enter key Display set numerical value Note If the set value is made 0 the Auto Logout func tion is disabled If an invalid number is entered an error message Parameter Error will be displayed and returns the ADVANCED SETUP MENU Data Port Setting ADVANCED 2 Data Port Setting of TCP port number can be set in the range of...

Page 25: ...or 1 1 1 1 1 Enter 6 7 or 8 and press the Enter key 2 2 2 2 2 Enter numerical value and press the Enter key Display set numerical value Note To invalidate the Accept IP Address being cur rently set enter 0 0 0 0 If there is one or more Accept IP Addr being set no connections are allowed from IP addresses that are not yet set They can be cancelled using 9 Accept All IP Addr Accepting All IP Address...

Page 26: ...k or Gate way of the projector have been returned to the default settings via Telnet the computer for con trolling cannot be connected to the projector de pending on the computer s network settings Return to Main Menu ADVANCED Q Return to Main Menu Returns to the main SETUP MENU 1 1 1 1 1 Enter q and press the Enter key Returns to the SETUP MENU advanced 0 Please Enter Port Number for Search from ...

Page 27: ...e computer and the projector Check the following network settings for the projector IP Address Check that the IP address for the projector is not duplicated on the network Subnet Mask When the gateway setting for the projector is 0 0 0 0 Not Used or the gateway setting for the projector and the default gateway setting for the computer are the same The subnet masks for the projector and the compute...

Page 28: ...ams Accessories Command Prompt in order 2 After launching the command prompt MS DOS Prompt enter the command ipconfig and press the Enter key Note Communication may not be established even after carrying out the network settings for the computer In such cases restart your computer C ipconfig Enter Note Usage examples of ipconfig C ipconfig displays how to use ipconfig exe C ipconfig displays the s...

Page 29: ...g XXX XXX XXX XXX XXX XXX XXX XXX should be entered with an IP address to be connected to such as the projector 3 When connecting normally the display will be as follows The screen may be slightly different depending on the OS type Example when the IP address connected to is 192 168 150 2 4 When a command cannot be sent Request time out will be displayed Check the network setting again If communic...

Page 30: ... 8 3 25 11 7 64 282 1 16 1 5 2 11 64 55 05 12 13 64 310 1 29 32 48 5 3 1 2 89 13 64 5 2 3 16 55 5 3 15 16 99 95 5 3 32 129 5 5 3 32 129 5 39 64 15 5 35 64 14 4 3 16 106 3 8 9 32 210 3 8 7 8 225 3 1 7 32 30 9 1 9 64 29 1 1 7 32 30 9 1 47 64 44 1 M4 M4 M4 M4 XG MB70X_E_P20_30 p65 04 8 6 2 25 PM 30 ...

Reviews: