background image

X G - E 6 9 0 U B   ( E ) / p p .   2 2 - 2 7

G. K .   A s s o c i a t e s ,   To k y o

E-25

The lamp in the projector has a finite service life.
Replace the lamp when the picture starts becoming dark and color contrast deteriorates.
Purchase a replacement metal-halide lamp unit (lamp/cage module) of the current type BQC-XGE690UB1 from
your nearest Authorized Sharp Industrial LCD Products Dealer.
Then change the lamp by carefully following the instructions below.
If you wish, you may bring the projector to your nearest Authorized Sharp Industrial LCD Products Dealer.

IMPORTANT NOTE TO U.S. CUSTOMERS:

The lamp included with this projector is backed by a 90-day parts and labor limited warranty. All service of this
projector under warranty, including lamp replacement, must be obtained through an Authorized Sharp Industrial
LCD Products Dealer or Service Center. For the name of the nearest Authorized Sharp Industrial LCD Products
Dealer or Service Center, please call toll-free: 1-800-BE-SHARP (1-800-237-4277).   

U.S.A. ONLY

How to Change the Lamp

Precaution:

Take care not to touch either the lamp in the lamp cage, the inner surface of the reflector mirror, or
the mirrors in the optical unit with your bare hands.

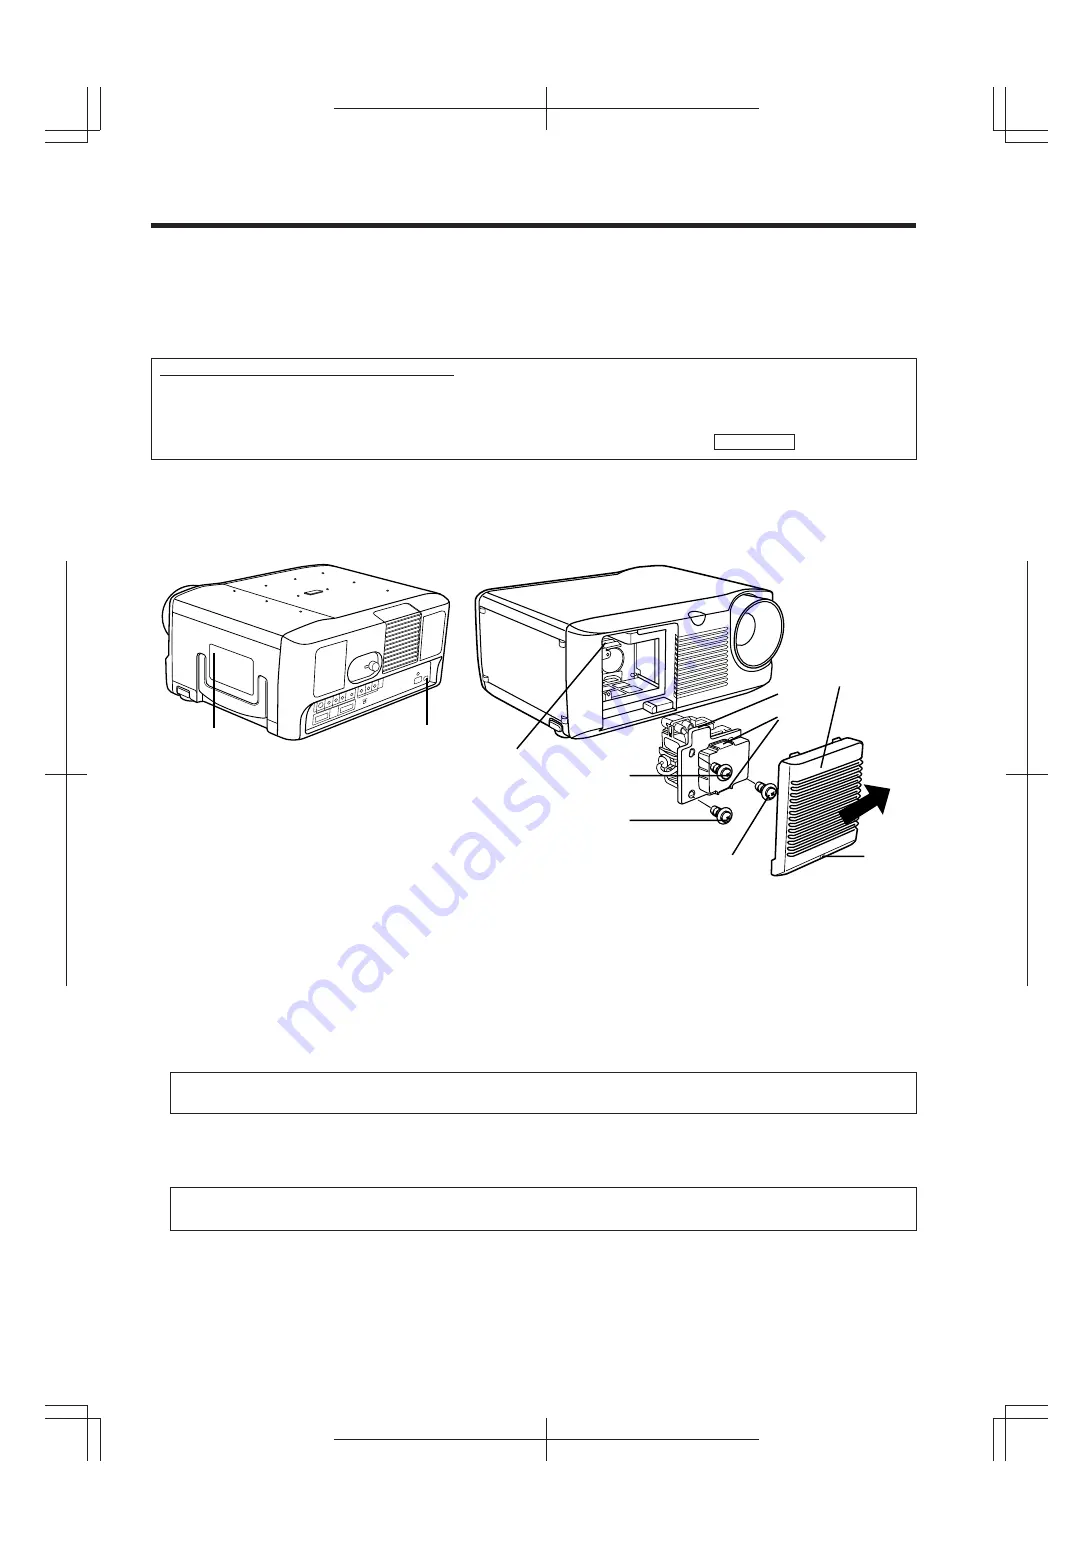
Removing the lamp unit (see figure)

1. Press the power button (a) off. After the cooling fan stops, press the MAIN POWER button (b) OFF. Remove the

power cord from the AC outlet.

2. The lamp may be extremely hot. Wait at least an hour after the power cord is disconnected before carrying out

the following procedures.

3. Unfasten the user service screw (d) that secures the lamp cage cover (c), shown in the above diagram, and

remove the cover by pulling it in the direction of the arrow.

4. After the lamp cage (i) has sufficiently cooled, remove securing screws (e), (f) and (g) from the lamp cage.

5. Hold lamp cage (i) by the handle (h) and pull it towards you.

When the lamp cage cover (c) has been removed, check that the surface of the lamp cage (i) has
fully cooled before proceeding with step 4.

Note:

Caution:

Because some parts may not be sufficiently cooled, be sure to remove the lamp cage by the
handle while taking care not to touch the metallic areas.

Installing the lamp unit

1. Hold lamp cage (i) by the handle (h) and press it in firmly while making sure that the lamp cage (i) properly

connects to the connector (j).

2. Tighten screws (e), (f) and (g), then perform the above instructions in the reverse order.

Lamp Replacement

(b)

(h)

(e)

(j)

(i)

(f)

(g)

(d)

(c)

(a)

1 9 9 8 / 5 / 2 1

Summary of Contents for XG E690E/U

Page 1: ... E690UB Serial No Important Information There are two important reasons for prompt warranty registration of your new SHARP LCD Projector using the REGISTRATION CARD packed with the projector 1 WARRANTY This is to assure that you immediately receive the full benefit of the parts service and labor warranty applicable to your purchase 2 CONSUMER PRODUCT SAFETY ACT To ensure that you will promptly rec...

Page 2: ...wash bowl kitchen sink or laundry tub in a wet basement or near a swimming pool and the like 8 Accessories Do not place this product on an unstable cart stand tripod bracket or table The product may fall causing serious injury to a child or adult and serious damage to the product Use only with a cart stand tripod bracket or table recommended by the manufacturer or sold with the product Any mountin...

Page 3: ...ck or other hazards 20 Safety Check Upon completion of any service or repairs to this product ask the service technician to perform safety checks to determine that the product is in proper operating condition 21 Heat The product should be situated away from heat sources such as radiators heat registers stoves or other products including amplifiers that produce heat Outstanding Features Allows easy...

Page 4: ...ONE SIZE CORRECTION knob S VIDEO INPUT 4 pin mini DIN VIDEO INPUT Video RCA Audio RCA VIDEO OUTPUT Video RCA Audio RCA COMPUTER AUDIO INPUT Stereo mini jack Cooling fan intake vent Air filter Speaker REAR VIEW POWER ON OFF button E ZOOM PANNING button ADJUSTMENT ƒ buttons ADJUSTMENT ß buttons VOLUME UP DOWN buttons MUTE button POWER indicator LAMP REPLACEMENT indicator TEMPERATURE WARNING indicato...

Page 5: ...e Slide out Slide in Press down Battery cover 30 30 Max distance 23 7m 45 30 Transmission range Reception range Remote control positioning Use the remote control as shown in the figures on the left Note The signal from the remote control can be reflected off the screen for easy operation However the effective distance of the signal may differ due to the screen material ADJUSTMENT TRANSMIT ON OFF M...

Page 6: ...ined in this manner use in these environments will not reduce the overall operation life Please note that all internal cleaning must be performed by an Authorized Sharp Industrial LCD Products Dealer or Service Center Do not expose to extreme heat or cold Operating temperature 41 F to 104 F 5 C to 40 C Storage temperature 4 F to 132 F 20 C to 60 C Do not tilt the projector more than 10 Position th...

Page 7: ...and using the reverse function the image reflected from the mirror can be projected onto the screen See E 21 Rear projection with a rear projection screen is also possible when using the reverse function 3 1 Turn ON the POWER See page 14 for turning on the power 2 Adjusting the Focus Rotate the focus ring until the top portion of the screen is in focus 3 Controlling keystone effects This projector...

Page 8: ...tes When adjustments are made with the adjusters the picture may become distorted depending on the relative positions of the projector and the screen After adjusting in some cases all of the adjusters feet may not be resting on the mounting surface To prevent the projector from wobbling adjust the adjusters feet so that they firmly contact the mounting surface Cautions Do not press the adjuster re...

Page 9: ...als left right The S VIDEO INPUT terminal is used when the AV equipment to be connected has an S VIDEO output terminal S VIDEO cannot be output from the VIDEO OUTPUT terminal If a connection is made to both the S VIDEO INPUT terminal and the VIDEO INPUT terminal the signal input from the VIDEO INPUT terminal will be output from the VIDEO OUTPUT terminal and the projector will display the S VIDEO i...

Page 10: ...x 480 resolution Q First connect the supplied Mac VGA adaptor to the RGB signal output terminal on your Macintosh Series computer as shown on the left and secure the plugs W Next firmly plug the supplied VGA signal cable into both the RGB input terminal on the projector and the Mac VGA adaptor on the computer and secure the plugs by tightening the thumb screws 832 x 624 resolution When connecting ...

Page 11: ...omputer input signal It will not display a digital or video input signal To split the composite video signal use a video distribution amplifier This is available from your local dealer The computer RGB output will only loop through the same signal connected to the computer RGB input VGA IN VGA OUT Mac IN Mac OUT Analog RGB Signal Input and Output Connector This unit uses a 15 pin mini D sub female...

Page 12: ...p 75Ω load R G B 40 128 88 800 1 056 26 400 25 000 37 879 40 000 TTL 1 4 23 600 628 16 579 60 317 TTL IBM SVGA 800 dot 600 line 0 7Vp p 75Ω load R G B 16 80 160 800 1 056 21 333 20 202 46 875 49 500 TTL 1 3 21 600 625 13 333 75 000 TTL 11 2 32 480 525 16 6832 59 9405 TTL 13 2 34 400 449 14 2681 70 0863 TTL 38 2 59 350 449 14 2681 70 0863 TTL TTL 13 2 34 400 449 14 2681 70 0866 TTL TTL 38 2 59 350 ...

Page 13: ...necting to Macintosh LC II Series Computers When connecting to a Macintosh II with 30 24 MHz Dot Frequency select MODE and set MODE to ON When connecting to a Macintosh LC Series computer with 31 33 MHz Dot Frequency set MODE to OFF When connecting to third party video cards and other Macintosh computers set MODE to ON or OFF to select the correct display mode When the input signal is automaticall...

Page 14: ...800 x 600 dot PAL or SECAM INPUT mode The picture size differs in RGB NTSC PAL and SECAM INPUT modes 5 ON SCREEN DISPLAY in 8 languages The on screen display is set to English at the factory The language for the unit s ON SCREEN DISPLAY can be set to English German Spanish Dutch Swedish Italian French or Japanese Setting the ON SCREEN DISPLAY language 1 Press the MENU button The menu will appear o...

Page 15: ...er RGB as shown on the left Refer to second example when connecting to Mac display When no signal is being received NO SIGNAL will be displayed When receiving a signal the projector is not preset to receive NON REG will be displayed This display function does not operate in Video mode 8 Adjust the volume Press the Volume Up Down buttons on the projector or on the remote control to adjust the volum...

Page 16: ...ons to select VIDEO ADJ then press the MENU button Each time you press the ADJUSTMENT ƒ buttons while the display is shown the mark will move to indicate the selected video status item for adjustment When the ADJUSTMENT ß or buttons are pressed the mark moves The adjustment mode is indicated for about 30 seconds Selected item PICTURE BRIGHT COLOR TINT SHARPNESS RED BLUE RESET ADJUSTMENT ß button T...

Page 17: ...e cursor to SEL and press the ADJUSTMENT ß buttons to choose ADJ If you do not want to adjust any settings select END The item selected will be highlighted in purple Then press the MENU button to go to the next screen Select the item you want to adjust by pressing the ADJUSTMENT ƒ buttons then use the ADJUSTMENT ß buttons to make the adjustments When adjustments are completed press the MENU button...

Page 18: ... left Select BALANCE TREBLE or BASS with the ƒ buttons Adjust the mode you want with the ß buttons To return to the factory preset mode press the ƒ buttons to select RESET then press the ß buttons Press the MENU button to select the normal screen mode Description of Adjustment Items Selected items BALANCE TREBLE BASS ADJUSTMENT ß button Increased audio from the left speaker Weaker treble Weaker ba...

Page 19: ...n and a compressed image decreases the number of lines displayed which may make characters difficult to read 2 Press the E ZOOM PANNING button on the remote control The E ZOOM PANNING button on the remote control can be used to select E ZOOM and NO E ZOOM PANNING modes Note In SVGA INPUT mode appears indicating that E ZOOM function does not operate in this mode 3 Press the MENU button anytime to e...

Page 20: ... ƒ buttons Then press the MENU button to change to the picture indicated on the left Select RED or BLUE with the ƒ buttons Adjust the mode you want with the ß buttons To return to the factory preset mode press the ƒ buttons to select RESET then press the ß buttons Press the MENU button to select the normal screen mode Note The Background Level is only adjustable for Video source The Background Lev...

Page 21: ...ss the MENU button With the MENU screen displayed press the ƒ buttons to select IMAGE ADJ Then press the MENU button to display the IMAGE ADJ screen The last MENU screen selected is indicated for about 30 seconds 2 Reversed Image Mode In the IMAGE ADJ menu press the ƒ buttons to select REVERSE Then press the ß buttons to select ON The reversed image will appear 3 Press the MENU button anytime to e...

Page 22: ...is turned off the indicators appear as shown Notes The Blue Screen Function does not operate in RGB mode When the power is turned off the POWER indicator will light red To turn the power on again press the POWER button to set it to OFF then press it again to set it to ON Using the On Screen Display Override Function The On Screen Displays VIDEO etc that appear during input select can be turned off...

Page 23: ...ter cover 6 Replace the FILTER COVER Insert the two tabs on the end of the filter cover into the filter cover opening and press the filter cover into position 2 Remove the FILTER COVER Press the arrow mark on the air filter cover and pull straight out Replace the AIR FILTER 5 Return the air filter to its original position in the filter cover 1 Turn OFF the MAIN POWER OFF ON Clean the AIR FILTER 4 ...

Page 24: ...p does not light up Problem Blocked air intake Clogged air filter Cooling fan breakdown Internal circuit failure Burnt out lamp Lamp circuit failure Possible Solution Relocate the projector to a proper location Clean the filter See E 23 Take the projector to your nearest Authorized Sharp Industrial LCD Products Dealer for repair Carefully change the lamp Take the projector to your nearest Authoriz...

Page 25: ...e reflector mirror or the mirrors in the optical unit with your bare hands Removing the lamp unit see figure 1 Press the power button a off After the cooling fan stops press the MAIN POWER button b OFF Remove the power cord from the AC outlet 2 The lamp may be extremely hot Wait at least an hour after the power cord is disconnected before carrying out the following procedures 3 Unfasten the user s...

Page 26: ...W 5 W Stereo 15 pin mini D sub connector RGB separate type analog input 0 7 Vp p positive 75 Ω terminated Stereo Minijack AUDIO 0 5 Vrms more than 22 kΩ stereo TTL level positive negative or composite sync Apple only Same as above 39 8 cm round AC 110 V 120 V 50 60 Hz 360 W 41 F to 104 F 5 C to 40 C 14 F to 132 F 120 C to 60 C Plastic 15 13 649 2 12 5 169 2 6 59 649 386 2 313 2 176 mm 15 0 lbs 6 8...

Page 27: ... 15 7 64 384 6 59 64 176 4 21 32 118 6 51 64 173 ø 4 3 32 104 6 17 32 166 6 17 32 166 3 13 32 87 4 5 64 104 3 13 32 87 12 5 16 313 Top View Front View Side View Bottom View Units inches mm XG E690UB E pp 22 27 G K Associates Tokyo 1998 5 21 ...

Reviews: