background image

E – 15

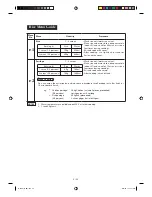
Cooking mode

Maximum cooking time

Microwave 100% cooking

20 min.

Grill cooking / Grill Mix-

Low cooking

10 min.

SERVICE CALL CHECK

Check the following before calling service:
1.  Does the display light ? 

Yes _______ No ______

2.  When the door is opened, is the oven lamp switched on? 

Yes _______ No ______

3.  Place one cup of water (approx. 250 ml) in a glass measure in the oven and close the door securely. 

Oven lamp should go off if door is closed properly. 
Programme the oven for one minute on 100% (HIGH). At this moment:

A. Does the oven lamp light? 

Yes _______ No ______

B.  Does the cooling fan work? 

Yes _______ No ______


(Put your hand over the rear ventilation openings.)

C.  Does the turntable rotate? 

Yes _______ No ______


(The turntable can rotate clockwise or counterclockwise. This is quite normal.)

D. Do the MICRO and COOK indicators light? 

Yes _______ No ______

E.  After one minute, did an audible signal sound? 

Yes _______ No ______

F.  Is the water inside the oven hot? 

Yes _______ No ______

4.  Remove water from the oven and programme the oven for 3 minutes on GRILL mode.
A. Does the GRILL and COOK indicators light? 

Yes _______ No ______

B.  After 3 minutes, does the heater become red? 

Yes _______ No ______

If “NO” is the answer to any of the above questions, please check your wall socket and the fuse in your 
meter box.
If both the wall socket and the fuse are functioning properly, CONTACT YOUR NEAREST SERVICE CENTRE 
APPROVED BY SHARP.

IMPORTANT:

 If the display shows nothing even if the power supply plug is properly connected, the Energy 

Save Mode may be in operation. Open and close the oven door to operate the oven. See “Getting Started” 
on page E-6.

NOTE: 

1.  If time in the display is counting down very rapidly, check Demonstration Mode.


(Please see E-13 for detail.)


2.  The following thing is not trouble; 


Each cooking mode has a maximum cooking time. If you operate the oven longer than the 


  maximum time, the power will automatically be reduced. The table below shows the 


maximum time for each cooking mode.

SPECIFICATIONS

AC Line Voltage 

:  Refer to the rating label.

AC Power Required 

:

 Microwave 

 1.25 

kW

 Grill 

 1.05 

kW 

Output Power 


Microwave 


800 W (IEC test procedure)


Grill Heater 


1000 W

Microwave Frequency  :  2450 MHz (Class B/Group 2)
Outside Dimensions 

:  460 mm(W) x 275 mm(H) x 389 mm(D)

Cavity Dimensions 

:  314 mm(W) x 187 mm(H) x 336 mm(D)

Oven Capacity 

:  20 litre 

Cooking Uniformity 

:  Turntable (272mm in diameter) system

Weight : 

Approx. 

13kg

R-678P(S) [01 EN].indd   15

R-678P(S) [01 EN].indd   15

9/23/09   12:24:53 PM

9/23/09   12:24:53 PM

Summary of Contents for R-678P

Page 1: ...Õ ËπÊ ë æ Ë ë â μ ø ë ªÑÕß π ËÕß ß π ë μ ß π ë μ Õπ 12 13 13 13 13 Ÿ Õ 14 μ Á 15 âÕ Ÿ æ 15 âÕ π π âß π ë π ª ÿßÕ À â μ ø ë âÕ π π à ßÕ À Õ μ π μ ë âÕ π π ª ÿßÕ À Õ μ π μ ë âÕ π π ÕÿàπÕ À Õ μ π μ ë âÕ π π Àÿß â ë âÕ π π π ËßÕ À ë âÕ π π ª ÿß πŸ æ ËÕ ÿ æ ë âÕ π π π Õ À à Áß 16 17 18 19 20 21 22 23 24 œ Õ Õ æ ÿ Ë à π â ß º μ å Õß åª æ ËÕ Àâ â μ ø ªìπ ªÕ à ß ª Õ ª æ ÿ Õà π Ÿà Õ âπ È Õ à ß Õ àÕπ âß π Á...

Page 2: ...Ëß À àÕ ÿß ß à ªìπμâÕß Õ à πª Õ Õß ËÕß æ ˪î μ π Ëπ 6 À μ ªí À à âß π π à â àÕ Ÿπ å åª æ π ˪ μŸ μ ªî à π à πª Õ μàÕ ªπ È À 6 1 ª μŸ âß ßÕ 6 2 πæ ª μŸÀ Õ πª μŸ μ À À ÕÀ 6 3 π π π Ëπ ˪î μ π Ëπ àÕß â πÀ ß Õß μ âßßÕÀ Õº Ÿª à ß 6 4 Õ À â Ë π πª μŸ 7 π Õ À ÕÕ μ ø μâÕß ßÕ à Àâ π ºâ π Õÿª å π ª Õ Õ À Õ ËπÊ π Ë ª μŸ μ 8 Õ à Ëπ ËßÀπ Ëß Ëß æ Õÿª å À â ª πμ ß À à ߪ μŸ μ μ ø Ë ËÕß ß πÕ Ÿà 9 Õ à À Õ πª μŸ 10...

Page 3: ...À ÕÕ ªÑÕß π Õ À À â â âπ π ª ÿßÕ À ª Õß À À Õ æ ËÕªÑÕß ππÈ âπÕÕ ÕÿàπÀ Õª ÿßÕ À Èß π â ªî Ω À Õ π ÿ Ëªî ºπ πÈ π Àâ âÕπ π π ª â μ π ÕÿàπÀ ÕÕ â Àâß ÿπ æ Õ â À Õ ÈÕºâ Ë ªï Èπ ªî Àâ μ ß π à Õ À π μ Õß À ËÕß Ë À μâÕß μâ À ÕÕÿàπ Õß À ª Ÿ μ Õπ Àπâ 1 æ ËÕªÑÕß π À Õ Õ æÿàß μ Èß Õÿàπ âπ π π ª Õ À ªÜÕß π Õ À ÕÕ ªÜÕß àÕπÕÿàπ âÕπ ÕÿàπÀ Õª ÿßÕ À Èß ªÜÕß à Õ À ÕÕ àÕπ â Õ â π æ æÿ Èß ª ÿßÕ À μ Ë π π À Õ À Ë ª πÈ μ...

Page 4: ...À Õ Èπ Ÿß μ Èß π Ë Ë Õ à â π π Õß μ Àà ß æ π Õ à ßπâÕ 40 â πÀ ß Õß μ ø à ºπ ß μ Èß ÀâÀà ß æ ßæÕ ÀâÕ à â 6 ºâŸº μ ºâŸ Àπà à º Õ π Ë À Õß μ ø øøÑ âÕß øμ ø π À Õ øº ª ß π øøÑ μâÕß à 220 μå 50 Œ μ å 7 μ øπ È μâÕßμàÕ π âÕ ß ø Õß μ ø μ À ßμàÕ ªπ È À Õß å πÈ ß π Neutral πÈ μ Live π ËÕß Õß ø Õß μ øÕ àμ ß Õß È ª Í Àâ μ μàÕ ªπ È μâÕßμàÕ ø À Õß â È ª Í Ë å Ÿªμ E À Õ å å À Õ È Ë À Õß μâÕßμàÕ ø πÈ ß π â È ª Í ...

Page 5: ... à ß π â ËÕßμ Èß πÕ À Õ Õπ ÕÀπâ ªí 1 Õ ªî ª μŸ 2 À Õ ø 3 πæ ª μŸ 4 ª μŸ 5 ª μŸ μ Õߺà π â 6 π πª μŸ º π π 7 âÕπ 8 øóÕß ß àπ Õß πÀ ÿπ 9 ºàπªî àÕßπ Ëπ Àâ ßÕÕ 10 ºßÀπâ ªí Ÿ Õ Àπâ 5 11 àÕß Õ 12 ø 13 πÀ ÿπ 14 àπ Õß πÀ ÿπ 15 ºπ ß μ π 16 Ω Õ 17 ªÑ ß âÕ Ÿ μ ß μ ß â À à ß º à ß â ª Õ μ π μ Õ ß ß π Ë Õ â R 678P S 02 TH indd 4 R 678P S 02 TH indd 4 10 28 09 12 11 38 PM 10 28 09 12 11 38 PM ...

Page 6: ...É μ Èß æ ËÕμ Èß π Ãî ªÿÉ μÿãπÕ À æ ËÕ Õ ª μÿãπÕ À ªÿÉ ÕÿàπÕ À Õ ÕÿàπÕ À π ÿª ËÕß Ë À Õ π ªíß ªÿÉ π ËßÕ À Õ π Ëߪ π ÈÕ À Õ ª ªÿÉ ª ÿßÕ À Õ μ π μ Õ ª ÿßÕ À Õ μ π μ â 4 ªÿÉ à ßÕ μ π μ Õ πŸ à ß â 3 ªÿÉ à ßÕ À æ ËÕ Õ ª à ßÕ À ªÿÉ æ Ë πÈ Àπ æ ËÕ àπÈ Àπ ÕßÕ À ªÿÉ ª ÿßÕ À π Ë ß π 1 Èß æ ËÕ Àâ ËÕß ß π 1 π ß ø 100 Ÿß æ Ë 1 π μàÕ æ Ë ÿ Èß À à ß Ë ËÕß ß πÕ Ÿà æ ËÕ Ë ß π À ß Ë âμ Èß ª â ªÿÉ Õ À à Áß Õ Õ À à Áß...

Page 7: ... Ë π Õ À ß ËÕ ß 0 å πÀπâ Õ ß ß Èπ Õ NOW COOLING ª Ø Èπ æ ªÉ æ ËÕ Àâ π μ Áπ ß âÕ À à ß Ë μ ß ß πÕ Ÿà Õ π Ëπ â ß π Èπ Àâ ªî Àπâ μà ß À Õ ªî æ Õ æ ËÕ ËπÕÕ ÀâÕß 4 ªî ª μŸ μ â æ ËÕ Àâ π μ Áπ ß âÕ ß ª μŸ μ ºπ ß μ â ππÕ π μ ß âÕπÕ Ÿà π Èπ À Ë ß º μ æ ËÕ à Àâ Ÿ âÕπ â μ Èß π Ãî ËÕμ Èß π Ãî À μ Èß π Ãî À ª À æ ßß π à ß π æ ËÕμ Èß ªí ÿ π àπ 11 34 π AM À Õ PM ÈπμÕπ 1 ªÿÉ μ Èß Àπ Ëß Èß 2 μ Èß ªÿÉ x1 x1 ÕÀπâ ªí...

Page 8: ... â π à 20 π â âÕπ 100 Ÿß ËÕß âÕπ ßÀ ß ºà π ª 20 π æ ËÕªÑÕß π âÕπ Ë Ÿß π ª À ª À æ ßß π øπ È À ª À æ ßß π À π È à ª À øøÑ π Ë à â Ÿ âß π π À ª À æ ßß π À ËÕß à â Ÿ âß π ªìπ 3 π À Õ à àπ À ß ªî ª μŸ μ À Õ ªÿÉ À ÿ À ÕÀ ß Èπ ÿ ª ÿßÕ À ÕÀπâ ªí à ß ª à ËÕß à ß π æ ËÕ Àâ ËÕß ß πÕ Èß Àâ ªî ªî ª μŸ μ ç 0é ß π Õ Àπâ ªí ËÕß æ âÕ À âß π À μ Èß π Ãî À ª À æ ßß π Ÿ æ ËÕ Ë âß π À ª À æ ßß π ª μ ªØ μ ßπ È æ ËÕ Ë ...

Page 9: ...ÿÉ ß âÕπ æ ËÕ Õ âÕπ ËμâÕß âÕπ 100 Ÿß 1 Èß x1 4 ªÿÉ μ æ ËÕμ Èß ª ÿßÕ À μ μâÕß x5 5 ªÿÉ ª ÿßÕ À π Ë ß π Ë π Õ À ß π ß Ÿπ å ËÕπ ß Ÿπ å â ª ß π Ë 2 ª Ø Èπ Ë π Õ À ß ß Ÿπ åÕ Èß ª ÿßÕ À π æ ËÕ Á ªÿÉ ª ÿßÕ À π Õß åª à Àâ ÿ ª ÿßÕ À ßà Ê â 1 π Ë âÕπ 100 Ÿß ÈπμÕπ 1 ªÿÉ ª ÿßÕ À π Ë ß π π 3 π À ß ªî ª μŸ μ Ë π Õ À ß ªÿÉ ª ÿßÕ À π Ë ß π π à ËμâÕß ª Ø Èπ π À à ߪ ÿßÕ À ËÕ ªÿÉ Àπ Ëß Èß æ Ë Èπ 1 π ß âªÿÉ π È æ Ë ...

Page 10: ...À À ß π Èπ Àâªî ª μŸ μ ªÿÉ ª ÿßÕ À π Ë ß π æ ËÕ Àâ ß πμàÕ 2 ÿ Õ â Èß âÕπ Ÿß âÕπμË Àâ ß πμàÕ π 2 ÈπμÕπ â ŸÀπâ 8 μà à â ª μÿãπÀ Õ Ë Õ À à ª ª ÿßÕ À Õ Ëπ 3 À μâÕß âÕπ Õß ª μÿãπÀ Õ Ë Õ À π À à ß ª ÿßÕ À Àâ ªÿÉ ß âÕπ Ë ªÿÉ â ß â âÕπ Õß ª μÿãπÀ Õ Ë Ë Õ â ª Ø Èπ π ÕÀπâ ªí π æ Õß ª μÿãπÀ Õ Ë Õ À æ ËÕ ª ÿßÕ À Àâ â μ Ëß Èπ ªØ μ ßπ È 1 À Ëπ à πº ªìπ Èπ Á Ê 2 μ πÈ Àâ æ ßæÕ Àâ à πº àÕ Ÿà ππÈ À ÕπÈ ÿª æ ËÕªÑÕß ...

Page 11: ... Ë À ÕÕ Ÿà à ß º Grill Mix à ß Õß μ ø 2 ª Ëߺ º π ß π Õ μ π μ â â âÕπ À à ß ø à ß º ß Ÿß ªìπ ß π Õß ø 50 μà à ß º ßμË ø ß π æ ß 10 à ß º ß Ÿß Àâ ªÿÉ à ß º 1 Èß å çHé ª Ø Èπ à ß º ßμË Àâ ªÿÉ à ß º 2 Èß å çLé ª Ø Èπ Õÿª å Ë π π μ ß Õ Ÿ π øÕ å π Ë π âÕπ àπ μâÕß à ß 6 π â à ß º ß Ÿß ÈπμÕπ 1 ªÿÉ º 1 Èß x1 2 ªÿÉ μ æ ËÕμ Èß ª ÿßÕ À x6 3 ªÿÉ ª ÿßÕ À π Ë ß π Ë â π ª ÿßÕ À Ë π Õ À ß À Àμÿ â à πμâÕß âÕπ Õß à...

Page 12: ...àÕ 5 À μâÕß æ Ë À Õ ª ÿßÕ À À Õ Õ À à Áß à μ π ªÿÉ ß âÕπ 1 Èß æ Ë æ ËÕ æ Ë À Õ 2 Èß æ ËÕ àÕπ ªÿÉ ª ÿßÕ À π Ë ß π ŸÀπâ 12 6 π ª ÿßÕ À Õ À ÿ À Õ à ÈπÕ Ÿà æ Õß Õ À â àπ Õÿ À Ÿ π ÕßÕ À àÕππ â μ Ÿª ß ÕßÕ À ÿ ÕßÕ À ªìπμâπ μ Á Õ À À ß ª ÿß Á â â Õ À à ÿ Àâ μ Èß π ª ÿßÕ À μàÕ ª ÿßÕ À â Õ μ π μ Auto Cook Õ μ π μ π π ª ÿßÕ À Õ μ π μ μ ÈπμÕπ π μà πŸ Ë π π â πÀπâ 17 24 àπ μâÕß ª ÿßπàÕß àπÈ Àπ 0 6 ÈπμÕπ 1 ªÿÉ ...

Page 13: ...æ ËÕ æ Ë ª ÿßÕ À À Õ 2 Èß æ ËÕ ª ÿßÕ À àπ μâÕß æ Ë πÈ ÁßπàÕß à à Áß 0 3 Àâπ π Èπ ÈπμÕπ 1 ªÿÉ Õ À à Áß 3 Èß x3 2 ªÿÉ æ Ë πÈ Àπ 2 Èß æ ËÕ àπÈ Àπ ËμâÕß x2 3 ªÿÉ ß âÕπ 1 Èß x1 Õ PLUS ª Ø Èπ π ÕÀπâ ªí 4 ªÿÉ ª ÿßÕ À π Ë ß π π ª ÿßÕ À Ë Àπ â π Õ μ π μ Ÿ μ Èß â Àâ À μ Õ À μ Ëπ À μâÕß ª ª ÿßÕ À μ Õ ªÿÉ ß âÕπ 1 Èß æ Ë æ ËÕ æ Ë ª ÿßÕ À À Õ 2 Èß æ ËÕ ª ÿßÕ À àÕπ ªÿÉ ª ÿßÕ À π Ë ß π R 678P S 02 TH indd 12 R 67...

Page 14: ...μ ÈßÕ À æ âμ âÕ π π ÿ ªÑÕπ â Ÿß ÿ à π 99 π 90 π À μâÕß μ Èß Ëμ ßπ Õ À ß Á æ ß μà ªÿÉ À ÿ ÕÀπâ ªí ß ªí ÿ πμ àπ ÿ μâÕß μ Èß 3 π æ ËÕμâ à π μ Àÿßμâ Õ À ÈπμÕπ 1 ªÿÉ μ æ ËÕªÑÕπμ ËμâÕß x3 ËÕ Ë μâ à π π ÿ ß Ë μ Èß 2 ªÿÉ μ Èß Ë π Õ À ß ËÕ ß 0 ß ç ͪé ß Èπ ªÑÕß π ËÕß ß π Child Lock À ªî ËÕß ß π à âμ Èß Èß Ë à Õ À ËÕß Ë π μ Õ Àâ μ ø À â æ ËÕªÑÕß π Õÿ μ Àμÿ ß à μ ø ß ªÑÕß π ËÕß ß π Ëß ÿ μ Èß â â π à ß Ë à â ...

Page 15: ...ºâ ÿà πÈ π π ª ºπ ß π Õ ºπ ß π â âºâ πÿà ÿ πÈ â ß π Á πâÕ â πÈ ÕÕ À μ ß ËÕ Ÿà π μ à π Èπ Àâ â ΩÕ ºâ πÿà Õ Àâ â ª μŸ â π π Á Õ π πà à πÈ Õ Ÿ Á ÕÕ À â À ß âß π Àâ Á ˪î μ π Ëπ π μ â ºâ πÿà æ ËÕ Õ À Ë ÁπÕÕ ÿ ÈßÀ ß âß π Á à àππ Èπ Õ À Ë àÕμ Õ Àâºπ ß π Èπ âÕπ π ª π πÀ Õ ÿ À â â Àâ ˪î μ π ËπÕÕ Àâ âπÈ Õ μ ø À ÕπÈ Ë ƒ Ï ÿπ ß Àâ Ÿ à π Ê Õß μ ø ÈßÀâ πÈ À ÕπÈ Ê ß π à πÀπ Ëß à π Õß μ μ ß Õ à â Ë Õ â ß π ÕπÈ ...

Page 16: ...âÕ ç à àé μ âÕ âÕÀπ Ëß â ßμâπ ª μ Õ Ë ª Í øøÑ π â π À ÿ Õ à ߪ μ ª μ μàÕ Ÿπ å Õß åª Ë â â π Ë ÿ âÕ â Õ ßº àª Ø âÕ Ê ÈßÊ Ëª Í ø Õ Ÿà ß à μ Õ Õ Ÿà π À ª À æ ßß π Àâ ªî ªî μ æ ËÕ âß π Ÿ ç Ë âß πé Àπâ 6 À Àμÿ 1 â π Õ ßº π Õ À ßÕ à ß Á ß à μ ø Ÿ μ Èß ª μ â ª Ÿ Õ Àπâ 13 2 â ÿ μ Èß ª ÿßÕ À π à Ë μà À Àπ â ËÕß âÕπ ß æ ËÕªÑÕß π âÕπ Ë Ÿß π ª À Õ À Ÿß ÿ ø 100 20 π à ß à ß º ßμË 10 π âÕ Ÿ æ ß π øøÑ Õâ ßÕ ß Ëª...

Page 17: ...π πÕ À Õ à æ Ëß ªî Ω Õ π π æ Õ À Èß â Ÿà æ ËÕ ÀâÕ À ÿ μÁ Ë μàÕ à Àâπ π π π ª μ Õ Õ À ß μ Õ À æ ËÕ Àâ à Õ À π Èπ ÿ â ßπ È Ÿ Õ âÕπ Ë À ÕÕ Õ À Ë π à æ ÿ ÿ Àπ Ëß Õ À ª ªì à μ ß âÕμàÕ âßà Èπ Õ À ª À Ÿ ªì à à Õ Õ À ª ª ÿàπ à À ÿ ßà Ë Õ À Ë Õ À ªìπ à πÀπ Ëß Õß ª Õ Õ À â μ ø Èπ ÕπÈ πÕ À º μàÕ æ Èπ π μ Ë ª â Õ À Ë Õ ªî â Ë â à μÁ Ë à Õ À Ë ªî Ω π â μ Õ Àâ πà à ªî Ω À Õ ªî àÕß Õ â π À ËÕ â π À À Õ ÿÕÿàπ âÕπ...

Page 18: ...ß π π æ ËÕ åø à ªìπμâÕßμ Èßæ â AG 2 πàÕß à ËÕߪ ÿß À πàÕß à 0 6 3 Èπ πÈ π 1 2 âÕπ μä Õ 1 2 âÕπ ºßª ª 1 âÕπ Ë 1 âÕπ 5 C 0 2 0 6 ë º à πº â â π Àâ Ë πàÕß à ë È Àπ ß à ë ßπàÕß à πμ ß ÀâÀπ ßÕ Ÿà â π à ß À π âÕ â μ ß ß ë ËÕ ß ß Èπ Àâæ â ß ë À ߪ ÿßÕ À Á π Õ À ÕÕ μ μ Èß æ ⪠3 π AG 3 à à ß 8 12 C 1 0 1 5 ë â ß à Àâ Õ μ à π πÕÕ ß Àâ Á πÈ ë À ËÕߪ ÿß Èß â Õ à ßπâÕ 30 π ë π à à π ß π πμ ß μ È à μâÕߪî Ω π ...

Page 19: ... 2 μ ë μ πÈ μâ ÿ Ë Áπ â Õÿ À Ÿ 20 25 C 1 Ë μ πÈ 500 2 Ë μ πÈ 800 ë ªî Ω À Õ ÿ â æ μ Áª ë ËÕÀ π Àâ Ë μ Èßæ ⪠1 π ë 1 Ë ª 50 À Õ 100 À À Ë Á Ÿª ë à À Ë ß π 1 Ë â π 0 75 μ 2 Ë â π 1 5 2 μ ë μ πÈ μâ ÿ Ë Áπ â Õÿ À Ÿ 20 25 C 1 Ë μ πÈ 500 2 Ë μ πÈ 800 ªî Ω À Õ ÿ â æ μ Áª ë ËÕÀ π Àâ Ë μ Èßæ ⪠5 π Õ Õ º ÀÕ ªìπ Èπ ÀπàÕ âΩ Ëß À Ëπ ªìπ àÕπ 5 º ßμÿâß ÈßμâπÀ ÕÀ Ëπ Ëß º À ßÀß å ºàπ º Ëßμâπ À ÀÕ À à ªÕ ª Õ Ë π ...

Page 20: ...250 ë π ÿª à π âÕπ À Õ ë àμâÕߪî Ω ë â ÿª 1 â ß â ß π â 2 4 â Àâ ß ß π ë À ß Õÿàπ â π Àâ Ë rH 3 ËÕß Ë 20 25 C Õÿ À Ÿ ÀâÕß 1 4 â 1 â ª 250 ë àμâÕߪî Ω ë â ÿª 1 â ß â ß π â 2 4 â Àâ ß ß π ë À ß Õÿàπ â π Àâ Ë rH 4 π ªíß 20 25 C Õÿ À Ÿ ÀâÕß 1 4 Èπ 1 Ë ª 50 ë â π ªíß 1 2 ºàπ ß π π ªî ÿ â Õ Èπ ë â π ªíß 3 4 ºàπ ß π π Ë π ÕßÕ Ÿà ªî ÿ â π â π ªíß 1 ºàπ Àâ ß ß πÀ ÿπ R 678P S 02 TH indd 19 R 678P S 02 TH in...

Page 21: ... μ Èßæ â À Àμÿ 1 Õÿ À Ÿ ÕßπÈ Ë ª ÿßÕ À Õ Ÿà ˪ 20 C 2 πÈ Àπ 1 μ ß π 38 π π â πÈ 1 Ë 1 2 π 150 250 μ 2 Ë 3 5 π 300 480 μ π π â πÈ 1 Ë 1 2 π 60 700 μ 2 Ë 3 5 π 140 1 400 μ πŸÕ ËπÊ ÿ ª ª Ë π μ Õ À â μ ËÕߪ ÿß ß π ß π â μâ À ß â μâ ÿ À Õ àÕπ â μâ ÿ 10 π μ Õ à ß â μâ à π ÈÕ à ÿ À Ëπ ÈπæÕ 200 À 3 5 π μâπÀÕ À Ëπ À Ëπ ª 3 â μâ ª π ÈÕª ÿ 250 À 3 5 π ß Õ ªìπ âπ R 678P S 02 TH indd 20 R 678P S 02 TH indd 20 ...

Page 22: ...Õß π ë Àÿâ â æ μ Áª ë ß π ª π πÀ ÿπ ë À ß ª ÿ â æ â 1 π ª à Áß μË à 10 C 1 2 Ë ë μ ª Èß 2 â π ÕßÀàÕÕÕ ë æ πÈ ë ß π ª π πÀ ÿπ ë À ß ª ÿ â æ â 1 π π π πÈ Àπ 1 Ë 130 199 2 Ë 200 300 3 Ë 301 420 π π πÈ Àπ 1 Ë 180 249 2 Ë 250 400 3 Ë 401 520 π π πÈ Àπ 1 Ë 100 199 2 Ë 200 370 π π πÈ Àπ 1 Ë 100 199 2 Ë 200 370 À Àμÿ 1 æ ËÕ ÀâÕ À ÿ Ë ß â MORE SETTING π π Ëß ª à Áß ŸÀπâ 12 2 π Ëß ª ÈßÀàÕ π Ëß â Èß 1 ÀàÕ â ...

Page 23: ...À Ëπ ß æ ß 75 Á ÕÕ À Ëπ ß μâπÀÕ 100 Õ Õ à 300 À Ëπ Ë À Ë Ÿ μã æ ºßæ À π À Õ å π 10 πÈ μäÕ π ÈÕ 250 2 Ë ë à â Èπ ß π âπμ Èπ À μ ø π Àâ â π ë º À ÀÕ æ ß μâπÀÕ Õ à â â π ª ÿß ß π â π â â π π ë πÈ μäÕ π ÈÕ ß ª ªî â æ μ Áª π â μ ø ª ÿß â ª πŸ ÿ æ HF 2 ç â Õ àμÿãπé ë À ߪ ÿß Á μ Èßæ â 5 π àÕπ åø HF 3 æ Õ à à πº â 100 πÈ μäÕ à 200 Áπ Èπ 1 2 âÕπ Õ à 100 À Ëπ Ë À Ë Ÿ μã Õ 50 À Ëπ Ë À Ë Ÿ μã ÿâß ÿ 125 ÀÕ ß ...

Page 24: ...πå ë â à πº ß πÀ Õ cannelloni ß cannelloni ªìπ Èπ π μß ë Õ æ μâ ß π cannelloni Àâ Ë μ Ÿ Àâ πà à â Õ ß π cannelloni π Ë ë â æ å π Ë æ Ëß Ÿ Á ß π cannelloni π â μ ø ª ÿß â ª πŸ ÿ æ HF 5 çº Ricotta Cannellonié àμâÕߪî Ω ë À ߪ ÿß Á μ Èßæ â 3 π àÕπ åø HF 6 æ ß â à πº æ ß 2 Á ª 450 à 1 øÕß Á π ªíß 10 15 Õ π Õ 75 Ÿ ΩÕ À ÀÕ 60 Õ ÀÁ À π 100 À Ëπ ß Àπà 1 âÕπ μä Õ º Ω Ëß 1 âÕπ μä Õ Õ æ π πå π À Õ å π À 10 à...

Page 25: ...π øÕ å μ Èßæ â 5 15 π π à πÈ Áß À Ed 3 πàÕß à 0 2 1 0 ë ß ÈππàÕß à ß π ß π ß â μ ß ß πÀ ÿπ ë ËÕ μ À ÿ ß π æ ß ÀàÕ π ÈÕ à π Ë ß ÿ ËÕÿàπ â Õ Ÿ π øÕ å ºàπ Á πÈ ÁßμàÕ ª ë À ß πÈ Áß ÿ Èπ π ÈÕ â Õ Ÿ π øÕ å μ Èßæ â 10 20 π π à πÈ Áß À ë â ßπàÕß à â πÈ ª ª Õ À Ë à â à â π âÕ π π Õ À à Áß Àâ â ß âÕπ 30 μË ª π ß À Àμÿ 1 πÈ Áß μÁ π ÈÕ μ åÀ Ëπ ªìπ Èπ ß π ÈÕ μ å ªìπ Èπ 2 πÈ Áß π ÈÕ Èπ π ÈÕ Àâ ß 3 À ßæ ÀàÕ à π ...

Page 26: ...8 Slow Cook E 9 Grill Cooking E 10 Grill Mix Cooking E 10 Automatic Operations Notes for Automatic Operations E 11 How to Use Automatic Operations E 11 Other Convenient Features Less More Setting E 12 Timer E 13 Child Lock E 13 Demostration Mode E 13 Alarm E 13 Care and Cleaning E 14 Service Call Check E 15 Specifications E 15 Cooking Guides Microwave Cooking Techniques E 16 Auto Grill Menu Guide ...

Page 27: ...y a qualified service technician trained by SHARP It is particularly important that the oven door closes properly and that there is no damage to 1 Door warped 2 Hinges and Latches broken or loosened 3 Door Seals Sealing Surfaces and oven cavity buckled or deformed 4 Burn marks on the door seal faces 7 Handle with care when removing items from the oven so that the utensil your clothes or accessorie...

Page 28: ...ntainers Deep fat fry Heat or dry wood herbs wet papers clothes or flowers Operate the oven empty except the directed case in the operation manual Liquids Beverages For boiling or cooking liquids see WARNING on page E 1 to prevent explosion and delayed eruptive boiling Heat for longer than recommended time Canned foods Remove food from can Heat or cook food while in cans Sausage rolls Pies Christm...

Page 29: ...ow space of at least 40cm from top of the oven for air ventilation This oven is not designed to be built in to a wall or cabinet 6 Neither the manufacturer nor the distributors can accept any liability for damage to the machine or personal injury for failure to observe the correct electrical connecting procedure The A C voltage and frequency must correspond to the one indicated on the rating label...

Page 30: ...uired This appliance is not intended to be operated by means of an external timer or separate remote control system 1 Door open handle 2 Oven lamp 3 Door hinges 4 Door safety latches 5 See through door 6 Door seals and sealing surfaces 7 Grill heater 8 Coupling 9 Waveguide cover 10 Control panel See page E 5 11 Ventilation openings 12 Power supply cord 13 Turntable 14 Roller stay 15 Oven cavity 16...

Page 31: ...ing menus TIME PADS Press to enter cooking time and clock time RICE MENU PAD Press to cook rice and porridge HEALTHY FOODS PAD Press to select 6 menus 3 LOW FAT menus and 3 VEGETARIAN menus POWER LEVEL PAD Press to select microwave power setting If not pressed 100 HIGH power is automatically selected Press to alter the cooking result for automatic operations less more setting GRILL MIX PAD Press t...

Page 32: ... will only show 0 when cooking is complete If the electrical power supply to your microwave oven is interrupted plug in the oven again then open and close the door The display will show 0 If this occurs during cooking the programme will be erased The time of day will also be erased The clock of the oven works based on the frequency of power source So it may gain or lose in some area where the freq...

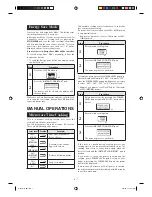
Page 33: ...and the display will show nothing WhiletheovenisinDemonstrationmode inChildLock or cooling fan is working Energy Save Mode will be cancelled temporary MANUAL OPERATIONS Microwave Time Cooking This is a manual cooking feature first enter the cooking time then the power level You can programme up to 99 minutes 90 seconds There are 6 different power levels Power level Display Examples 100 HIGH Raw me...

Page 34: ... press the POWER LEVEL pad once 4 Enter desired cooking time 5 Press the INSTANT COOK START pad The timer begins to count down to zero When it reaches zero the second sequence will appear and the timer will begin counting down to zero again For your convenience Sharp s Instant Cook allows you to easily cook for one minute at 100 HIGH power Step Procedure 1 Press the INSTANT COOK START pad Within 3...

Page 35: ... 2 You can only set any SLOW COOK programmes up to 2 stages as a sequence cooking see page E 8 3 If you wish to know the level of slow cook during cooking press the POWER LEVEL pad As long as your finger is pressing the POWER LEVEL pad selected slow cook setting will be displayed Slow Cook SPECIAL NOTES ON SLOW COOKING For better cooking result always try to 1 Cut the ingredients into smaller piec...

Page 36: ...L OPERATIONS Suppose you want to cook for 10 minutes on Grill Step Procedure 1 Press the GRILL pad 2 Enter desired cooking time 3 Press the INSTANT COOK START pad The timer begins to count down NOTES 1 Except as specified place food on the rack then set the rack on the turntable 2 Check the recommended cooking time given in the recipes 3 After two third of the cooking time turn the food over and g...

Page 37: ... time prior to pressing the INSTANT COOK START pad See page E 12 6 The final cooking result will vary according to the food condition e g initial temperature shape quality Check the food after cooking and if necessary continue cooking manually Automatic Operations will automatically compute the cooking mode and cooking time Follow the details provided in each Menu Guide on pages E 17 22 Suppose yo...

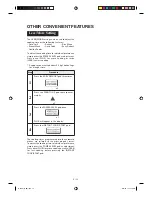
Page 38: ... time Step Procedure 1 Press the EASY DEFROST pad three times 2 Press the WEIGTH UP pad twice to enter weight 3 Press the POWER LEVEL pad once PLUS will appear in the display 4 Press the INSTANT COOK START pad The cooking times programmed into the automatic menus are tailored to the most popular tastes To adjust the cooking time to individual preference simply press the POWER LEVEL pad as adjustme...

Page 39: ...set the timer to 3 minutes for boiling an egg on the stove top Step Procedure 1 Enter the desired time Once the egg has come to the boil in the saucepan you can start the timer 2 Press the CLOCK pad The timer begins to count down When the timer reaches zero the oven will beep Timer Demonstration Mode If the oven is accidentally started with no food liquid in the cavity the oven could be damaged To...

Page 40: ... the use of excess water Interior walls Wipe spatters and spills with a little dishwashing liquid on a soft damp cloth For heavier stains inside the oven cavity only use a mild stainless steel cleaner applied with a soft damp cloth Do not apply to the inside of the door Wipe clean ensuring all cleaner is removed After use wipe the waveguide cover in the oven with a soft damp cloth to remove any fo...

Page 41: ...oes the heater become red Yes _______ No ______ If NO is the answer to any of the above questions please check your wall socket and the fuse in your meter box If both the wall socket and the fuse are functioning properly CONTACT YOUR NEAREST SERVICE CENTRE APPROVED BY SHARP IMPORTANT If the display shows nothing even if the power supply plug is properly connected the Energy Save Mode may be in ope...

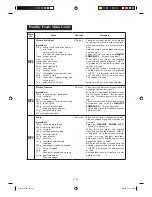
Page 42: ...eck for doneness Look for signs indicating that cooking temperature has been reached Doneness signs include Steam emits throughout the food not just at edge Joints of poultry can be torn apart easily Pork and poultry show no pinkness Fish is opaque and flakes easily with a fork Condensation A normal part of microwave cooking The humidity and moisture in food will influence the amount of moisture i...

Page 43: ...ate Turn it over and continue to cook Note Make sure the foil does not touch each other and the oven wall After cooking stand for 5 10 mins Auto Grill Menu Guide Ifthechickenhasjustbeendefrosted make sure it has stood for at least 6 hours at room temperature and defrosted completely before grilling NOTES Ingredients for 0 6 kg chicken legs 3 pieces 1 2 tbsp oil 1 2 tsp salt 1 tsp sweet paprika 1 t...

Page 44: ...g for Nissin Noodles Put the noodles in a bowl 1 piece 1 litre bowl 2 pieces 2 litre bowl Add in cooled boiled water 20 25 C 1 piece 500ml 2 pieces 800ml Cover with microwave wrap or glass lid After cooking stir and stand covered for 1 minute Put the noodles in a bowl 1 piece 750ml bowl 2 pieces 1 5 2 litre bowl Add in cooled boiled water 20 25 C 1 piece 500ml 2 pieces 800ml Cover with microwave w...

Page 45: ...ntre of turntable 1 bowl For 2 4 bowls place along the rim of turntable After reheating stir rH 3 Beverage 20 25 C Room temperature 1 4 cups 1 cup approx 250ml No cover Place on centre of turntable 1 cup For 2 4 cups place along the rim of turntable After reheating stir rH 4 Bread 20 25 C Room temperature 1 4 pieces 1 piece approx 50 g For 1 2 pcs put onto a paper towel and cover with another pape...

Page 46: ...ash rice until water runs clear Place rice and water into a deep casserole about 2 and soak for 15 mins stir rice a few times during soaking Stir and cook uncovered After cooking stir and stand NOTES 1 Water temperature should be about 20 C at initial cooking 2 1 tael 38 grams Menu Variation You can enjoy the variation by putting some ingredients into Porridge just after finish or 10 mins before f...

Page 47: ...s Arrange the dumplings from outside to inside of dish Cover with microwave wrap Place on the turntable After cooking stand covered for 1 minute Cut both ends of package Sprinkle with water Place the package on the turntable After cooking stand covered for 1 minute NOTES See recipes in cookbook Steam Menu Guide Serving s Weight 1 serve 130 199g 2 serves 200 300g 3 serves 301 420g Serving s Weight ...

Page 48: ...diced pepper paprika powder 10 g butter or margarine 250 ml meat stock cold 2 Serves Place the rice and tumeric into a shallow ovenproof dish and mix well Mix onions red pepper leek and chicken breast season to taste Place on top of the rice Distribute butter in flakes on top Pour the meat stock over and cover with microwave foil Cook on HEALTHY FOODS HF 2 Chicken Fricassee Aftercooking leavetosta...

Page 49: ...nto a square gratin dish Pour the pasta sauce evenly over the cannelloni tubes Please ensure that all sections of the tubes are covered with sauce Sprinkle the cannelloni with the freshly grated Parmesan cheese and cook on HEALTHY FOODS HF 5 Spinach and Ricotta Cannelloni Do not cover Aftercooking leavetostandfor3minutes before serving HF 6 Stuffed Peppers Ingredients 2 red peppers approx 450 g 1 ...

Page 50: ...tes until thoroughly defrosted Ed 3 Chicken Legs 0 2 1 0kg Place the chicken legs in a flan dish in the centre of the turntable When the oven stops turn over rearrange and shield thin parts and warm spots with small pieces of aluminium foil Continue to defrost After defrosting cover with aluminium foil and stand for 10 20 minutes until thoroughly defrosted Finally clean the chicken legs under runn...

Page 51: ... åª 952 Èπ 12 Õ π å ππæ Ë 4 ß ÿ ß å μ ß ÿß æœ 10500 0 2638 3500 E mail www sharpthai co th TINS A800WRRZ T91 R 678P S Cover TOC indd 2 R 678P S Cover TOC indd 2 10 9 09 2 11 53 PM 10 9 09 2 11 53 PM ...

Reviews: