background image

8

E

Connecting Peripheral Equipment

Caution

•  Be sure to turn off the main power switch and disconnect 

the plug from the power outlet before connecting/

disconnecting cables. Also, read the manual of the 

equipment to be connected.

•  Be careful not to confuse the input terminal with the output 

terminal when connecting cables. Accidentally reversing 

cables connected to the input and output terminals may 

cause malfunctions and the other problems.

TIPS

•  Images may not be displayed properly depending on the 

computer (video card) to be connected.

•  A screen with 1920 x 1080 resolution may not be displayed 

correctly on PC RGB. In this case, check the settings of 

your computer (video card) to verify that input signals 

conform to specifications of this monitor. (See Operation 

guide.)

•  If there is a check box to disable EDID in display control 

panel, check it when using PC RGB.

•  Use the automatic screen adjustment when a PC screen 

is displayed for the first time using PC D-SUB or PC RGB, 

or when the setting of the PC is changed. The screen is 

adjusted automatically when SELF ADJUST in the OPTION 

menu is set to ON.

•  If the audio output from the playback device is connected 

directly to speakers or other devices, the video on the 

monitor may appear delayed from the audio portion. 

Audio should be played through this monitor by connecting 

the playback device to the monitor’s audio input, and 

connecting the monitor’s audio output to the speakers or 

other devices.

•  The audio input terminals used in each input mode are 

factory-set as follows.

Input mode

Audio input terminal 

(Factory setting)

PC D-SUB, PC DVI-D, 


PC RGB

Audio input terminal

AV DVI-D

Audio1 input terminal

AV COMPONENT,  

AV S-VIDEO, AV VIDEO

Audio2 input terminal

PC HDMI, AV HDMI

PC/AV HDMI input terminal

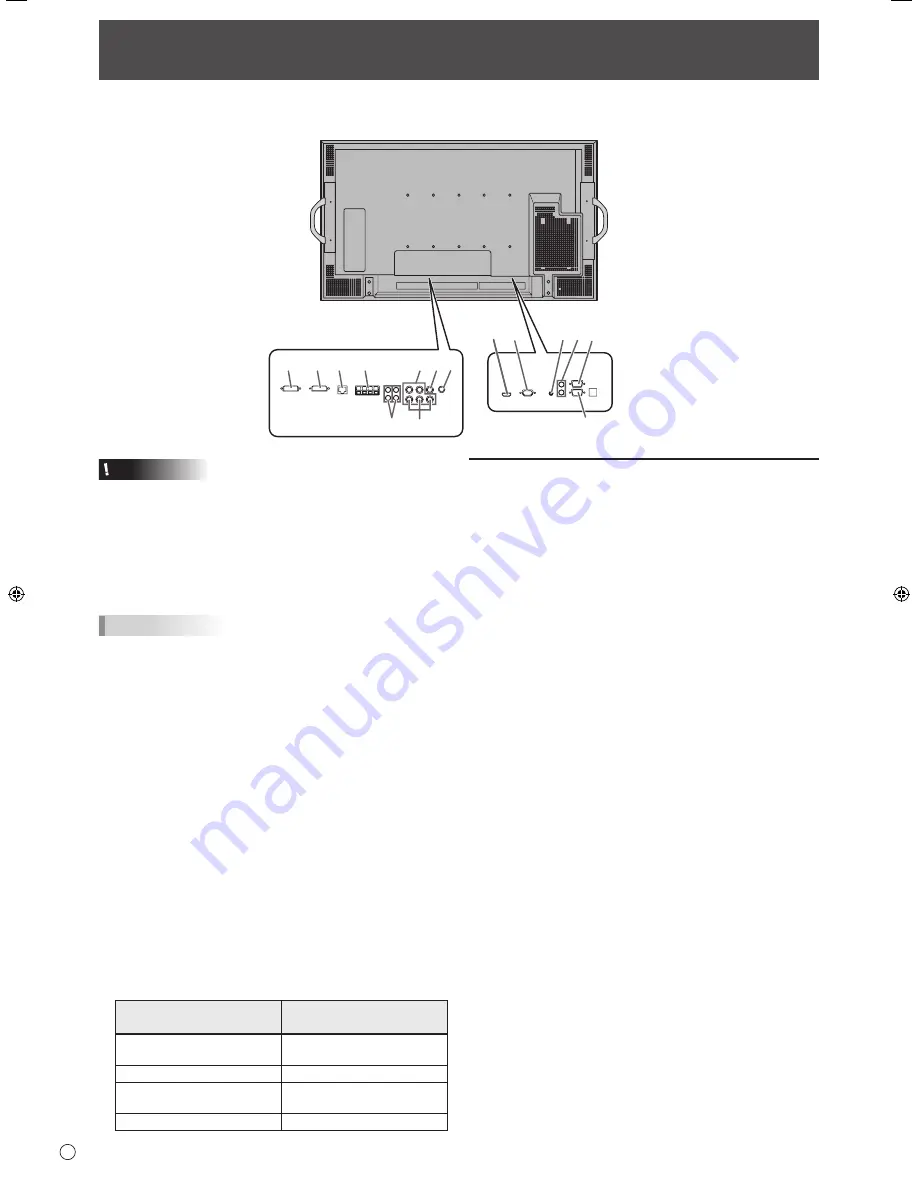
Connection with a PC or AV equipment

  1.


PC/AV HDMI input terminal

•  Use a commercially available HDMI cable (conforming to 

the HDMI standard) for PC/AV HDMI input terminal.

•  Set HDMI of INPUT SELECT on the OPTION menu 

according to the device to be connected.

•  Select the audio input terminal to be used in PC HDMI 

or AV HDMI of AUDIO SELECT on the OPTION menu. 

When HDMI is selected, connection to the audio input 

terminal is unnecessary.

  2.  PC D-sub input terminal

•  When the PN-ZB01 (optional) is attached, select the audio 

input terminal to be used in PC D-SUB of AUDIO SELECT 

on the OPTION menu.

  3.  Audio input terminal

•  Use an audio cable without resistance.

•  When the PN-ZB01 (optional) is attached, set the audio 

input terminal used for each input mode in AUDIO 

SELECT on the OPTION menu.

  4.  Audio output terminals

•  The output sound varies depending on the input mode.

•  The volume of the output sound can be fixed by setting 

AUDIO OUTPUT on the OPTION menu.

•  It is not possible to control the sound output from the 

audio output terminals with the AUDIO menu.

  5.   RS-232C input terminal  

RS-232C output terminal

•  You can control the monitor from a PC by connecting a 

commercially available RS-232 straight cable between 

these terminals and the PC.

When the PN-ZB01 (optional) 

is attached

13

12

14

6

5

3 4

2

8

11

7

10

9

1

5

Summary of Contents for PN-E421

Page 1: ...UR LCD MONITOR LCD LCD FARBMONITOR ЖК МОНИТОР OPERATION MANUAL MODE D EMPLOI MANUAL DE INSTRUCCIONES BEDIENUNGSANLEITUNG РУКОВОДСТВО ПО ЭКСПЛУАТАЦИИ ENGLISH E1 FRANÇAIS F1 ESPAÑOL S1 DEUTSCH D1 РУССКИЙ Р1 ﺍﳌﺮﻓﻘﺔ CD ROM ﺃﺳﻄﻮﺍﻧﺔ ﰲ ﻳﻮﺟﺪ ﺍﻟﻌﺮﺑﻴﺔ ﺑﺎﻟﻠﻐﺔ ﺍﻟﺪﻟﻴﻞ 香港電器安全規格 國際電工委員會規格適合 ...

Page 2: ... in the plug which is marked by the letter E or by the safety earth or coloured green or green and yellow The wire which is coloured BLUE must be connected to the terminal which is marked with the letter N or coloured black The wire which is coloured BROWN must be connected to the terminal which is marked with the letter L or coloured red Ensure that your equipment is connected correctly If you ar...

Page 3: ...dangerous voltage within the product s enclosure that may be of sufficient magnitude to constitute a risk of electric shock to persons The exclamation point within a triangle is intended to alert the user to the presence of important operating and maintenance servicing instructions in the literature accompanying the product CAUTION The AC outlet shall be installed near the equipment and shall be e...

Page 4: ... the implementation by member states private households within the EU states may return their used electrical and electronic equipment to designated collection facilities free of charge In some countries your local retailer may also take back your old product free of charge if you purchase a similar new one Please contact your local authority for further details If your used electrical or electron...

Page 5: ...Observe warnings All warnings on the product and in the instructions must be observed closely 4 Follow instructions All operating instructions must be followed 5 Cleaning Unplug the power cord from the AC outlet before cleaning the product Use a dry cloth to clean the product Do not use liquid cleaners or aerosol cleaners 6 Attachments Do not use attachments not recommended by the manufacturer Use...

Page 6: ...remove the batteries If leaked battery fluid gets on your skin or clothing rinse immediately and thoroughly If it gets into your eye bathe your eye well rather than rubbing and seek medical treatment immediately Leaked battery fluid that gets into your eye or your clothing may cause a skin irritation or damage your eye 20 Usage of the monitor must not be accompanied by fatal risks or dangers that ...

Page 7: ... power cord nor place heavy objects on it stretch it or over bend it Also do not add extension cords Damage to the cord may result in fire or electric shock Use only the power cord supplied with the monitor Do not use the power cord with a power tap Adding an extension cord may lead to fire as a result of overheating Do not remove or insert the power plug with wet hands Doing so could result in el...

Page 8: ...l a fan or take other measures to keep the ambient temperature within the required range Temperature condition may change when using the display together with the optional equipments recommended by SHARP In such cases please check the temperature condition specified by the optional equipments PN E471 cannot be used in vertical orientation Adhere to the following when installing the monitor in its ...

Page 9: ...connection and installation For other instructions refer to the instruction manuals in the manual folder on the included CD ROM Adobe Reader is required in order to view the instruction manuals Supplied Components If any component should be missing please contact your dealer Liquid Crystal Display Monitor 1 Remote control unit 1 Cable clamp 2 Power cord R 03 battery AAA size 2 CD ROM Utility Disk ...

Page 10: ...speakers or other devices The audio input terminals used in each input mode are factory set as follows Input mode Audio input terminal Factory setting PC D SUB PC DVI D PC RGB Audio input terminal AV DVI D Audio1 input terminal AV component AV S video AV video Audio2 input terminal PC HDMI AV HDMI PC AV HDMI input terminal Connection with a PC or AV equipment 1 PC AV HDMI input terminal Use a comm...

Page 11: ...le between this terminal and a network 13 External speaker terminals To use external speakers set SPEAKER SELECT on the SETUP menu to EXTERNAL Be sure to use external speakers with an impedance of 6 Ω or greater and a rated input of at least 10 W 1 3 2 Approx 3 15 16 inch 10 cm 1 Attach a speaker cable core included with the PN ZB01 to the end of the speaker cable connected to the monitor 2 While ...

Page 12: ...ached on the rear side Caution The removed handles and handle screws are for use with this monitor Do not use them for any other devices To attach handles be sure to use the handles and handle screws which were removed from the monitor Be sure the handles are attached securely Handle Handle screws Handle Handle screws PN E471 Cable clamp attachment PN E421 Cable clamp attachment The cables connect...

Page 13: ... the remote control sensor 10 10 10 10 Remote control sensor 16 4 feet 5 m TIPS Do not expose the remote control unit to shock by dropping or stepping on it This could lead to a malfunction Do not expose the remote control unit to liquids and do not place it in an area with high humidity The remote control unit may not work properly if the remote control sensor is under direct sunlight or strong l...

Page 14: ...the power LED alternately in red and orange in standby mode nDate time setting If the time has yet to be set when the monitor is first turned on the date time setting screen appears Set the date and time DATE TIME SETTING SET CANCEL 09 OK MENU 20 01 01 00 00 1 Press or to select the date and time and press or to change the numerical values 2 Select SET and then press Be sure to set the date and ti...

Page 15: ......

Page 16: ...Printed in China Imprimé en Chine Impreso en China Gedruckt in China Отпечатано в Китае 0NY42M184305B 1 Q41G42M1843 5B ...

Reviews: