background image

27

Basic

Operation

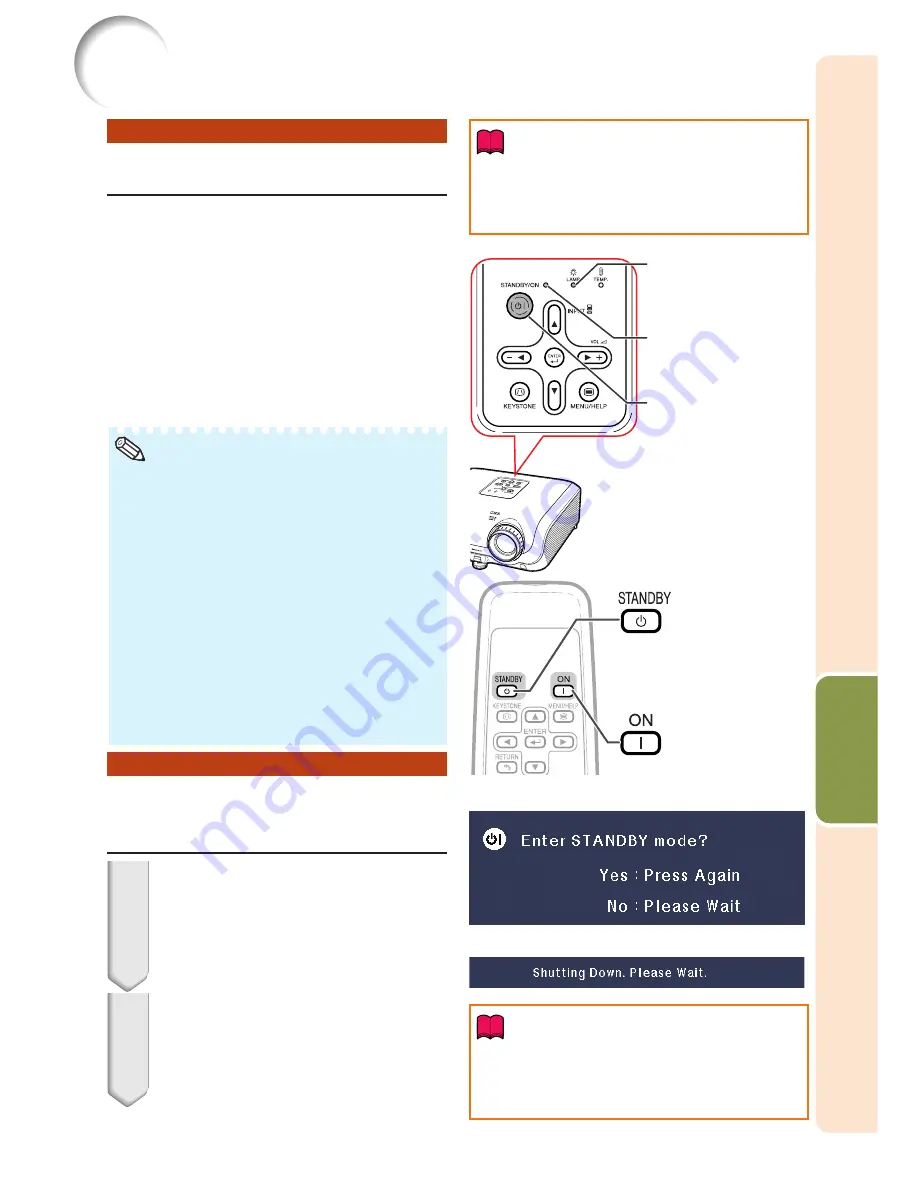
Turning the Projector On/Off

Remove the lens cap and press

S

STANDBY/ON on the projector or

f

ON on the remote control.

• When System Lock is set, the keycode input box

appears. To cancel the keycode setting, input the
keycode that you have already set. See page 

44

for details.

About the Lamp Indicator

The lamp indicator illuminates to indicate the status of the
lamp.

Green:

 The lamp is on.

Blinking in green:

The lamp is warming up or shut-
ting down.

Red: The lamp is shut down abnormally or the

lamp should be replaced.

• When switching on the projector, a slight flickering of the

image may be experienced within the first minute after the
lamp has been illuminated. This is normal operation as the
lamp’s control circuitry is stabilising the lamp output char-
acteristics. It should not be regarded as faulty operation.

• If the projector is put into standby mode and immediately

turned on again, the lamp may take some time to start pro-
jection.

On-screen Display (confirmation message)

STANDBY/ON button

1

2

Turning the Power off (Putting
the Projector into Standby Mode)

Press 

S

STANDBY/ON on the pro-

jector or 

e

STANDBY on the re-

mote control, then press that but-
ton again while the confirmation
message is displayed, to put the
projector into standby mode.

Unplug the power cord from the AC
outlet after the cooling fan stops.

• The power indicator on the projector

blinks in green while cooling.

• The power indicator changes to red when

the projector finishes cooling.

• Do not unplug the power cord during projection

or cooling fan operation. This can cause dam-
age due to rise in internal temperature, as the
cooling fan also stops.

Note

Lamp indicator

Info

• English is the factory default language. If you

want to change the on-screen display to another
language, change the language according to
the procedure on page 

42

.

Info

R

STANDBY
button

Turning the Projector on

Note that the connections to external equip-
ment and power outlet should be done be-
fore performing the operations written be-
low. (See pages 

23

 to 

26

.)

Power indicator

ON button

Summary of Contents for Notevision XR-10S

Page 1: ...MULTIMEDIA PROJECTOR MODEL XG MB65X L XG MB55X L XR 10X L XR 10S L OPERATION MANUAL Introduction Quick Start Setup Connections Basic Operation Useful Features Appendix ...

Page 2: ...lease record the Model and Serial Number located on the bottom of the projector and retain this information Before recycling the packaging please ensure that you have checked the con tents of the carton thoroughly against the list of Supplied accessories on page 10 Model No Serial No ...

Page 3: ...sewhere into a 13A socket outlet as a serious electric shock may occur To fit an appropriate plug to the mains lead follow the instructions below WARNING THIS APPARATUS MUST BE EARTHED IMPORTANT The wires in this mains lead are coloured in accordance with the following code Green and yellow Earth Blue Neutral Brown Live As the colours of the wires in the mains lead of this apparatus may not corres...

Page 4: ...franska svenska spanska italienska holländska portugisiska kinesiska och koreanska Läs noga igenom bruksanvisningen innan projektorn tas i bruk El CD ROM suministrado contiene instrucciones de operación en inglés alemán francés sueco español italiano holandés portugués chino y coreano Lea cuidadosamente las instrucciones de operación antes de utilizar el proyector Il CD ROM in dotazione contiene i...

Page 5: ... to operate this equipment The lightning flash with arrowhead sym bol within an equilateral triangle is in tended to alert the user to the presence of uninsulated dangerous voltage within the product s enclosure that may be of sufficient magnitude to constitute a risk or electric shock to persons The exclamation point within a triangle is intended to alert the user to the presence of important ope...

Page 6: ...s equipment generates uses and can radiate radio frequency energy and if not installed and used in accordance with the operation manual may cause harmful interference to radio communications However there is no guarantee that interference will not occur in a particular installation If this equipment does cause harmful interference to radio or television reception which can be determined by turning...

Page 7: ...set SEL ADJ ENTER END MENU HELP button Adjustment buttons P R O Q MENU HELP button ENTER button Press l RETURN to return to the previous screen when the menu is displayed How to Read this Operation Manual The specifications are slightly different depending on the model However you can connect and operate all models in the same manner In this operation manual the illustration and the screen display...

Page 8: ... 40 Setup Setting up the Projector 18 Setting up the Projector 18 Standard Setup Front Projection 18 Ceiling mount Setup 18 Projection PRJ Mode 19 Screen Size and Projection Distance 20 Connections Connections 21 Samples of Cables for Connection 22 Connecting to a Computer 23 Connecting to Video Equipment 24 Connecting to a Monitor with RGB Input Terminal 25 Controlling the Projector by a Computer...

Page 9: ...e Lamp 52 Lamp 52 Caution Concerning the Lamp 52 Replacing the Lamp 52 Removing and Installing the Lamp Unit 53 Resetting the Lamp Timer 54 Connecting Pin Assignments 55 RS 232C Specifications and Command Settings 56 Computer Compatibility Chart 60 Troubleshooting 61 For SHARP Assistance 63 Specifications 64 Dimensions 65 Index 66 ...

Page 10: ... or other similar surface This product should not be placed in a built in installation such as a bookcase or rack unless proper ventilation is provided or the manufacturer s instructions have been adhered to 11 Power Sources This product should be operated only from the type of power source indicated on the marking label If you are not sure of the type of power supply to your home consult your pro...

Page 11: ...e this indicates a need for service DLP and the DLP logo are registered trademarks of Texas Instruments Microsoft and Windows are registered trademarks of Microsoft Corporation in the United States and or other countries PC AT is a registered trademark of International Business Machines Corporation in the United States Adobe Reader is a trademark of Adobe Systems Incorporated Macintosh is a regist...

Page 12: ... altitude areas with thin air set Fan Mode to High Neglecting this can affect the longevity of the optical system Warning about placing the projector in a high position When placing the projector in a high position make certain it is carefully secure to avoid personal injury caused by the projector fall ing down Do not subject the projector to hard im pact and or vibration Protect the lens so as n...

Page 13: ...his does not indicate malfunc tion Do not unplug the power cord during projec tion or cooling fan operation This can cause damage due to rise in internal temperature as the cooling fan also stops Using the projector in other countries The power supply voltage and the shape of the plug may vary depending on the region or country you are using the projector in When using the projector overseas make ...

Page 14: ...or XR 10X L XR 10S L Supplied accessories For U S and Canada etc 6 1 8 m QACCDA007WJPZ For Europe except U K 6 1 8 m QACCVA011WJPZ For U K and Singapore 6 1 8 m QACCBA036WJPZ For Australia New Zealand and Oceania 6 1 8 m QACCLA018WJPZ 1 2 3 4 Use the power cord that corresponds to the wall outlet in your country Some of the optional accessories may not be available depending on the region Please c...

Page 15: ...cted or adjusted on the menu MENU HELP button For displaying adjustment and setting screens and help screen Front View Focus ring For adjusting the focus INPUT button P R For switching input mode 1 2 3 or 4 Remote control sensor HEIGHT ADJUST lever Numbers in Z refer to the main pages in this operation manual where the topic is explained Part Names and Functions Projector KEYSTONE button For enter...

Page 16: ...ng the Kensington Lock This projector has a Kensington Security Standard connector for use with a Kensington MicroSaver Security System Refer to the information that came with the system for instructions on how to use it to secure the projector AUDIO OUTPUT terminal Audio output terminal of equipment connected to the AUDIO INPUT terminal Intake vent AUDIO INPUT 1 2 terminal Shared for INPUT 1 and ...

Page 17: ...V MUTE button For temporarily displaying a black screen and turning off the sound PICTURE MODE button For selecting the appropriate picture ON button For turning the power on Adjustment buttons P R O Q For selecting menu items For adjusting the Keystone Correction when in the Keystone Correction mode MENU HELP button For displaying adjustment and setting screens and help screen ENTER button For se...

Page 18: ...nd then remove them using a cloth The batteries included with this projector may run down in a short period depending on how they are kept Be sure to replace them as soon as possible with new batteries Remove the batteries from the remote control if you will not be using the remote control for a long time Comply with the rules ordinance of each local government when disposing of worn out batteries...

Page 19: ... control Ensure that you do not drop it or expose it to moisture or high temperature The remote control may malfunction under a fluorescent lamp In this case move the pro jector away from the fluorescent lamp Usable Range The remote control can be used to control the projector within the ranges shown in the illustra tion Remote control sensor Remote control signal transmitters Remote control 23n 7...

Page 20: ...pages 24 and 25 3 Remove the lens cap and turn the projector on 2 Connect the projector to the computer and plug the power cord into the AC socket of the projector On the projector On the remote control KEYSTONE button INPUT button STANDBY ON button HEIGHT ADJUST lever Focus ring STANDBY button _PP 21 26 _P 27 ENTER button ENTER button 6 4 3 7 8 3 7 6 8 KEYSTONE button 4 4 ON button INPUT 1 button...

Page 21: ...teps in the Setup Guide and adjust the focus picture size and height angle 3 After adjusting the focus height angle and picture size press TENTER to finish the Setup Guide Correcting trapezoidal distortion using Keystone Correction Keystone Correction functions automatically on XG MB65X L XG MB55X L 7 Correct trapezoidal distortion _P 31 On the projector On the remote control Shrinks upper side Sh...

Page 22: ...image by setting Ceiling Front in PRJ Mode See page 42 for use of this function Setting up the Projector Setting up the Projector For optimal image quality position the projector perpendicular to the screen with the projector s feet flat and level Doing so will eliminate the need for Keystone correction and provide the best image quality See page 31 Side View Standard Setup Front Projection Place ...

Page 23: ...t the mode most appropriate for the projection setting in use You can set the PRJ mode in SCR ADJ menu See page 42 Table mounted front projection Ceiling mounted front projection Menu item Front Table mounted rear projection with a translucent screen Menu item Ceiling Front Ceiling mounted rear projection with a translucent screen Menu item Rear Menu item Ceiling Rear Indication of the Projection ...

Page 24: ...ction distance m ft L2 Maximum projection distance m ft H Distance from the lens center to the bottom of the image cm in S Adjustable range of image position cm in See page 41 Projection distance L Diag χ Width Height Minimum L1 Maximum L2 STRETCH Mode 16 9 250 635 cm 225 572 cm 200 508 cm 150 381 cm 133 338 cm 106 269 cm 100 254 cm 92 234 cm 84 213 cm 72 183 cm 60 152 cm 40 102 cm 553 cm 218 498 ...

Page 25: ...ting an audio cable Shared audio input terminal for INPUT 1 and 2 See pages 23 and 24 AUDIO INPUT 3 4 terminal Connecting an audio cable Shared audio input terminal for INPUT 3 and 4 See pages 24 and 25 COMPUTER RGB COMPONENT OUTPUT terminal Connecting the monitor when you want to simultaneously watch the projection image on the monitor See page 25 RS 232C terminal Connecting the computer to contr...

Page 26: ...to 15 pin D sub cable optional AN C3CP2 ø3 5 mm minijack to RCA audio cable commercially available INPUT1 2 AUDIO INPUT INPUT3 INPUT4 AUDIO INPUT INPUT1 2 INPUT3 Video Audio Cables for a camera or a video game Cables for a camera or a video game ø3 5 mm minijack to RCA audio cable commer cially available INPUT4 AUDIO INPUT 3 RCA Component to 15 pin D sub cable optional AN C3CP2 Compo nent video IN...

Page 27: ...nnections When using the ø3 5 mm mono audio cable the volume level will be half of when using the ø3 5 mm stereo audio cable See page 60 Computer Compatibility Chart for a list of computer signals compatible with the projec tor Use with computer signals other than those listed may cause some of the functions to not work A Macintosh adaptor may be required for use with some Macintosh computers Cont...

Page 28: ...PONENT terminal INPUT1 or INPUT 2 on the projector for video connection When using an S video cable INPUT3 To S video output terminal To audio output terminal S video cable commercially available RCA audio cable com mercially available When using a 3 RCA Component to 15 pin D sub cable INPUT1 or INPUT2 3 RCA Component to 15 pin D sub cable optional AN C3CP2 To AUDIO INPUT1 2 terminal To audio outp...

Page 29: ...onnecting to a Monitor with RGB Input Terminal You can display computer images on both the projector and a separate monitor using two sets of RGB cables To RGB input terminal To RGB output terminal To INPUT 1 terminal To OUTPUT INPUT 1 2 terminal RGB cable commercially available RGB cable RGB signals and Component signals can be output to the monitor For this connection another RGB cable commercia...

Page 30: ...oss type commercially available Note The RS 232C function may not operate if your computer terminal is not correctly set up Refer to the operation manual of the computer for details See page 55 for connection of an RS 232C serial control cable Info Do not connect the RS 232C cable to a port other than the RS 232C terminal on the computer This may damage your computer or projector Do not connect or...

Page 31: ... some time to start pro jection On screen Display confirmation message STANDBY ON button 1 2 Turning the Power off Putting the Projector into Standby Mode Press SSTANDBY ON on the pro jector or eSTANDBY on the re mote control then press that but ton again while the confirmation message is displayed to put the projector into standby mode Unplug the power cord from the AC outlet after the cooling fa...

Page 32: ...while watching the projected image Setup Guide screen The Setup Guide screen automatically high lights the items in the following order 1 FOCUS 3 ZOOM 4 ENTER 2 HEIGHT ADJUST However you can adjust the focus height angle or zoom regardless of the highlighted item If you do not want to display the Setup Guide for the next time set Menu SCR ADJ Setup Guide to Off See page 42 Note Focus ring Adjustin...

Page 33: ...ly while lifting or carry ing Do not hold by the lens area Use the rear adjustment foot to make the projector level The projector is adjustable 1 degree from the standard position Remove your hands from the HEIGHT ADJUST lever of the pro jector after its height has been finely adjusted The angle of projection is adjustable up to 8 degrees from the surface on which the projector is placed Lift the ...

Page 34: ...t the vol ume Pressing K O will lower the volume Pressing L Q will raise the volume When the projector is connected to external equipment the volume level of the external equip ment changes in accordance with the volume level of the projector Set the projector s volume to the lowest level when turning the projector on off or when changing the input signal When you do not want to output the sound f...

Page 35: ...u can also display the on screen dis play of the Keystone Correction mode with d KEYSTONE on the projector Press l RETURN while the on screen dis play of the Keystone Correction mode is on the screen to return to the default setting Note KEYSTONE button Adjustment buttons P R O Q RETURN button R On screen display Keystone Correction mode Shrinks upper side Move the slide bar in the direction Shrin...

Page 36: ... 3 aspect ratio 5 4 aspect ratio 16 9 aspect ratio Mode for projecting an image with the original aspect ratio without cutting any portions RESIZE button SVGA 800 K 600 XGA 1024 K 768 SXGA 1280 K 960 SXGA L 1400 K 1050 SXGA 1280 K 1024 1280 K 720 1024 K 768 800 K 600 J J 768 K 576 600 K 450 J J 1024 K 576 800 K 450 XG MB65X L 55X L XR 10X L XR 10S L XG MB65X L 55X L XR 10X L XR 10S L XG MB65X L 55...

Page 37: ...ded in the original signals Input Signal DVD Video Image type Output screen image NORMAL BORDER STRETCH 480I 480P 576I 576P NTSC PAL SECAM 540P 720P 1080I 4 3 aspect ratio Letter box Squeezed 16 9 image Squeezed 4 3 image 16 9 aspect ratio 16 9 aspect ratio 4 3 aspect ratio in 16 9 Mode for projecting an image with the original aspect ratio without cutting any portions ...

Page 38: ...ion Movie Game sRGB You can select the appropriate picture mode for the projected image such as movie or video game See page 39 for details on the picture mode Note FREEZE button AUTO SYNC button Adjustment buttons P R O Q BREAK TIMER button PICTURE MODE button Displaying and Setting the Break Timer Press k BREAK TIMER The timer starts to count down from 5 minutes 1 2 Press P R O Q to adjust the l...

Page 39: ...emp Bright Boost 0 1 2 Page 39 Page 40 Page 40 Page 40 Page 40 Page 40 Standard Presentation Movie Game sRGB 1 Picture Mode Main menu Sub menu SCR ADJ Page 41 Language Image Shift Resize Page 41 Page 41 Page 41 Page 41 Page 42 Page 42 Page 42 Page 42 Page 42 Keystone Auto Keystone On Off OSD Display On Off Background Setup Guide On Off PRJ Mode Normal Border Stretch Logo Blue None Front Ceiling Fr...

Page 40: ...nc On Off Auto Power Off On Off System Sound On Off Speaker On Off System Lock Lamp Timer Life Page 43 Page 43 Page 43 Page 43 Page 43 Page 44 Page 44 Old Code New Code Reconfirm Fan Mode Page 44 Normal High RS 232C Page 44 9600 bps 115200 bps Help menu The items you can set with the Help menu Help menu n Page 46 Vertical stripes or flickering image appear Auto Sync Adjust vertical noise Adjust ho...

Page 41: ... buttons P R O Q Example Picture screen menu for INPUT 1 RGB mode Press Q or O and select Picture to adjust 1 2 ENTER button RETURN button Menu item Picture Picture Mode Contrast 0 0 0 0 K 7 5 0 0 SCR ADJ PRJ ADJ Help Bright Red Blue 1 CLR Temp Bright Boost Lamp Setting Standard Bright Reset SEL ADJ ENTER END MENU HELP button Adjustment buttons P R O Q MENU HELP button ENTER button Press l RETURN ...

Page 42: ...SEL ADJ Single ADJ END Note Picture Picture Mode Contrast 0 0 0 0 K 7 5 0 0 SCR ADJ PRJ ADJ Help Bright Red Blue CLR Temp Bright Boost Lamp Setting Standard Bright Reset SEL ADJ Single ADJ END Picture Resize Image Shift 0 0 SCR ADJ PRJ ADJ Help Keystone Auto Keystone Off Normal 1 Items to be adjusted Menu buttons do not function while the projector is operating the Auto Sync Break Time FREEZE or A...

Page 43: ... press G PICTURE MODE on the remote control to select the picture mode See page 34 sRGB is an international standard of color reproduction regulated by the IEC International Electrotechnical Commission As the fixed color area has been decided by the IEC the images are displayed in a natural tint based on an original image when sRGB is selected For additional information about the sRGB function vis...

Page 44: ...pproximately 3 000 hours approxi mately 2 000 hours in the Bright mode Note Picture Adjustment Picture menu Continued 2 2 2 2 2 Adjusting the Image 1 Not adjustable selectable when selecting sRGB 2 Not displayed in the RGB input mode 3 Tone will appear on the menu screen only when PAL or SECAM signals are input including when forcibly changed to those input signals There is basically no need to ad...

Page 45: ... operated only when using XG MB65X L or XG MB55X L 3 3 3 3 3 Keystone Correction When the image is projected either from the top or from the bottom towards the screen at an angle the image becomes distorted trapezoidally The function for correcting trap ezoidal distortion is called Keystone Correction For Manual Keystone Correction Set Auto Keystone on the SCR ADJ menu to Off select Keystone and t...

Page 46: ...le items On Off Description Displaying the Setup Guide when turning the projector on Not displaying the Setup Guide 7 7 7 7 7 Reversing Inverting Projected Images English Deutsch Español Nederlands Français Italiano Svenska Português Adjusting the Projected Image SCR ADJ menu Continued 4 4 4 4 4 Setting the On screen Display Menu operation n Page 37 Selectable items On Off Description All On scree...

Page 47: ...djustment may take some time to complete depending on the image of the computer connected to the projector When the optimum image cannot be achieved with Auto Sync adjustment use manual ad justments See page 46 Note Selectable items On Off Description Auto Sync adjustment will occur when the projector is turned on or when the input signals are switched when connected to a computer Auto Sync adjust...

Page 48: ... 7 7 7 7 Fan Mode Setting Menu operation n Page 37 This function changes the fan rotation speed Selectable items Normal High Description Suitable for normal environments Select this when using the projector at altitudes of approximately 1 500 meters 4 900 feet or more 6 6 6 6 6 Selecting the Transmission Speed RS 232C Make sure that both the projector and computer are set for the same baud rate Se...

Page 49: ...New Code Setting the System Lock PRJ ADJ Old Code New Code Reconfirm System Lock 3 4 Note Menu operation n Page 37 Locking the Operation Buttons on the Projector Keylock Function Use this function to lock the operation buttons on the projector a Taking the Keylock off Hold down T ENTER on the projector for about 5 seconds ROn screen Display a Locking the Operation Buttons Hold down T ENTER on the ...

Page 50: ...p pears on Help menu then press hENTER Example When image flickering appears Operation to solve image flickering when pro jecting the computer RGB signal 3 4 5 6 There is no picture or audio Vertical stripes or flickering image appear Data image is not centered Color is faded or poor Picture is dark The image is distorted Reset all adjustments to default settings SEL ENTER END If there is no chang...

Page 51: ... use volatile agents such as insecticides on the projector Do not attach rubber or plastic items to the projector for long periods The effects of some of the agents in the plastic may cause damage to the quality or finish of the projector Wipe off dirt gently with a soft flannel cloth When the dirt is hard to remove soak a cloth in a mild detergent diluted with water wring the cloth well and then ...

Page 52: ...r to put the projector into standby mode Wait until the cooling fan stops Disconnect the power cord and unplug the power cord from the AC socket Remove the filter holders Turn the projector over To remove the fil ter holders press in the tabs while lifting up Clean the dust off the dust filters and the holders with a hand broom Info 1 2 3 Cleaning and Replacing the Dust Filters AC socket STANDBY O...

Page 53: ...horized Projector Dealer or Service Center After removing the filter holders see step 2 of Cleaning the Dust Filters remove the dust filters then replace with new ones Pick the dust filters up with your fingers and lift them out of the filter holders With the reinforcement seal facing down place the dust filters underneath the tabs on the filter holders Info Reinforcement seal Be sure the filter h...

Page 54: ...cooling fan will run and then the projec tor will enter standby mode After appears ensure you perform the measures described on page 51 Lamp indicator The warning lights power indicator lamp indicator and temperature warning indicator on the projector indicate problems inside the projector If a problem occurs either the temperature warning indicator or the lamp indicator will illuminate red and th...

Page 55: ...mp does not illuminate Time to change the lamp The lamp does not illuminate The power indicator blinks in red when the projector is on Cause Blocked air intake Cooling fan breakdown Internal circuit failure Clogged air intake The lamp is shut down abnormally Remaining lamp life becomes 5 or less Burnt out lamp Lamp circuit failure The dust filter holder or lamp unit cover is open Possible Solution...

Page 56: ...ded you contact your nearest Sharp Authorized Projector Dealer or Service Center to assure safe operation Should the lamp break the glass particles may spread inside the lamp cage or gas contained in the lamp may be vented into the room from the exhaust vent Because the gas in this lamp includes mercury ventilate the room well if the lamp breaks and avoid all exposure to the released gas In case o...

Page 57: ... standby mode Wait until the cooling fan stops Warning Do not remove the lamp unit from the projec tor right after use The lamp and parts around the lamp will be very hot and may cause burns or injury Disconnect the power cord Unplug the power cord from the AC socket Leave the lamp until it has fully cooled down about 1 hour Remove the lamp unit cover Turn the projector over Loosen the user servic...

Page 58: ...r vice screw 3 to secure the lamp unit cover 4 5 6 Connect the power cord Plug the power cord into the AC socket of the projector Reset the lamp timer While simultaneously holding down UMENU HELP TENTER and R on the projector press SSTANDBY ON on the projector LAMP 0000H is displayed indicating that the lamp timer is reset Make sure to reset the lamp timer only when replacing the lamp If you reset...

Page 59: ... Not connected Connected to internal circuit Not connected Connected to CS in internal circuit Connected to RS in internal circuit Not connected Receive Data Send Data Signal Ground Request to Send Clear to Send Input Output RS 232C Terminal 9 pin D sub male connector of the DIN D sub RS 232C adaptor optional accessory AN A1RS This adaptor is only supplied with XG MB65X L XG MB55X L RD SD SG RS CS...

Page 60: ... than one code is being sent send each command only after the response code for the previous command from the projector is verified POWR TABN _ _ _ 1 TLPS _ _ _ 1 TPOW _ _ _ 1 TLPN _ _ _ 1 TLTT _ _ _ 1 TLTL _ _ _ 1 TNAM _ _ _ 1 MNRD _ _ _ 1 PJN0 _ _ _ 1 When the projector receives a command shown above The on screen display will not disappear The Auto Power Off timer will not be reset Info Return ...

Page 61: ...K or ERR 1 Video1 INPUT3 2 Video2 INPUT4 ERR 1 RGB 2 Video 1 INPUT1 2 INPUT2 3 INPUT3 4 INPUT4 OK or ERR OK or ERR OK or ERR OK or ERR OK or ERR OK or ERR OK or ERR OK or ERR OK or ERR OK or ERR OK or ERR OK or ERR OK or ERR OK or ERR OK or ERR OK or ERR OK or ERR OK or ERR OK or ERR OK or ERR OK or ERR OK or ERR OK or ERR OK or ERR OK or ERR OK or ERR OK OK or ERR 0 0 Normal 1 Temp High 2 Fan Err...

Page 62: ...or ERR OK or ERR OK or ERR OK or ERR OK or ERR OK or ERR OK or ERR OK or ERR OK or ERR OK or ERR OK or ERR OK or ERR OK or ERR OK or ERR OK or ERR OK or ERR OK or ERR OK or ERR OK or ERR OK or ERR OK or ERR OK or ERR OK or ERR OK or ERR OK or ERR OK or ERR OK or ERR OK or ERR OK or ERR OK or ERR OK or ERR OK or ERR OK or ERR OK or ERR OK or ERR OK or ERR OK or ERR OK or ERR OK or ERR OK or ERR OK ...

Page 63: ...ERR OK or ERR OK or ERR OK or ERR OK or ERR OK or ERR OK or ERR OK or ERR OK or ERR OK or ERR OK or ERR OK or ERR OK or ERR OK or ERR OK or ERR OK or ERR OK or ERR OK or ERR OK or ERR OK or ERR OK or ERR OK or ERR OK or ERR OK or ERR OK or ERR OK or ERR OK or ERR OK or ERR OK or ERR OK or ERR OK or ERR OK or ERR OK or ERR OK or ERR OK or ERR OK or ERR OK or ERR OK or ERR OK or ERR OK or ERR OK or ...

Page 64: ...7 55 0 66 2 67 5 64 0 64 0 34 9 49 7 60 2 68 7 60 70 85 60 70 85 60 70 60 70 85 50 60 70 72 75 85 50 56 60 70 72 75 85 50 60 70 75 85 60 70 75 60 60 67 75 75 75 640 350 640 400 720 350 720 400 640 480 800 600 1 024 768 1 152 864 1 280 1 024 1 400 1 050 640 480 832 624 1 024 768 1 152 870 MAC 13 MAC 16 PC VGA SVGA XGA SXGA SXGA VGA XGA SXGA XG MB65X L 55X L XR 10X L XR 10S L PC MAC MAC 19 MAC 21 SV...

Page 65: ...et Make adjustments of Color and Tint in Picture Mode and lower the Bright Boost value Video Input only Video input system is incorrectly set Adjust the focus The projection distance exceeds the focus range There is fog on the lens If the projector is carried from a cold room into a warm room or if it is suddenly heated condensation may form on the surface of the lens and the image will become blu...

Page 66: ...rojector increases the cooling fan runs faster The lamp indicator is illuminating in red Replace the lamp Cables incorrectly connected to the projector or the connected equipment works improperly Select Vertical stripes or flickering image appear in the Help menu and make the necessary adjustments If this happens frequently replace the lamp The lamp will eventually need to be changed While the rem...

Page 67: ... Electronics Schweiz AG 0041 1 846 63 11 cattaneo sez sharp eu com http www sharp ch Sweden Sharp Electronics Nordic AB 46 8 6343600 vision support sen sharp eu com http www sharp se Austria Sharp Electronics Europe GMBH Branch Office Austria 0043 1 727 19 123 pogats sea sharp eu com http www sharp at Benelux SHARP Electronics Benelux BV 0900 SHARPCE 0900 7427723 Nederland 9900 0159 Belgium http w...

Page 68: ... Bright mode 229 W Eco Quiet mode with AC 100 V XR 10S L 288 W Bright mode 223 W Eco Quiet mode with AC 240 V 4 7 W AC 100 V 6 1 W AC 240 V XG MB65X L 1 315 BTU hour Bright mode 1 050 BTU hour Eco Quiet mode with AC 100 V XG MB55X L 1 240 BTU hour Bright mode 1 010 BTU hour Eco Quiet mode with AC 240 V XR 10X L 1 120 BTU hour Bright mode 860 BTU hour Eco Quiet mode with AC 100 V XR 10S L 1 080 BTU...

Page 69: ...nsions Units inches mm 12 13 32 315 3 1 16 77 5 3 5 32 80 1 55 64 47 2 7 8 73 4 19 64 109 11 1 32 280 23 64 9 13 64 5 7 16 11 ø9 7 64 69 2 2 19 32 65 5 1 53 64 46 2 2 61 64 75 1 11 32 33 8 1 7 8 47 5 4 7 64 104 7 16 11 ...

Page 70: ...l 25 INPUT buttons 30 Intake vent 11 12 47 Kensington Security Standard connector 12 Keycode 44 Keylock 45 KEYSTONE button 31 Keystone Correction 31 41 Index Lamp 10 52 Lamp indicator 50 Lamp Setting 40 Lamp Timer Life 44 Lamp unit 53 Language on screen display language 42 Lens Cap 11 MENU HELP button 37 46 NORMAL 32 33 ON button 27 Optional accessories 10 OSD Display 42 OUTPUT INPUT1 2 terminal 2...

Page 71: ......

Reviews: