background image

(Continued)

Track/disc name

Up to 255 tracks can be named on each disc, and each disc
can be given a disc name.

When naming discs and tracks, the characters should
be entered as follows:

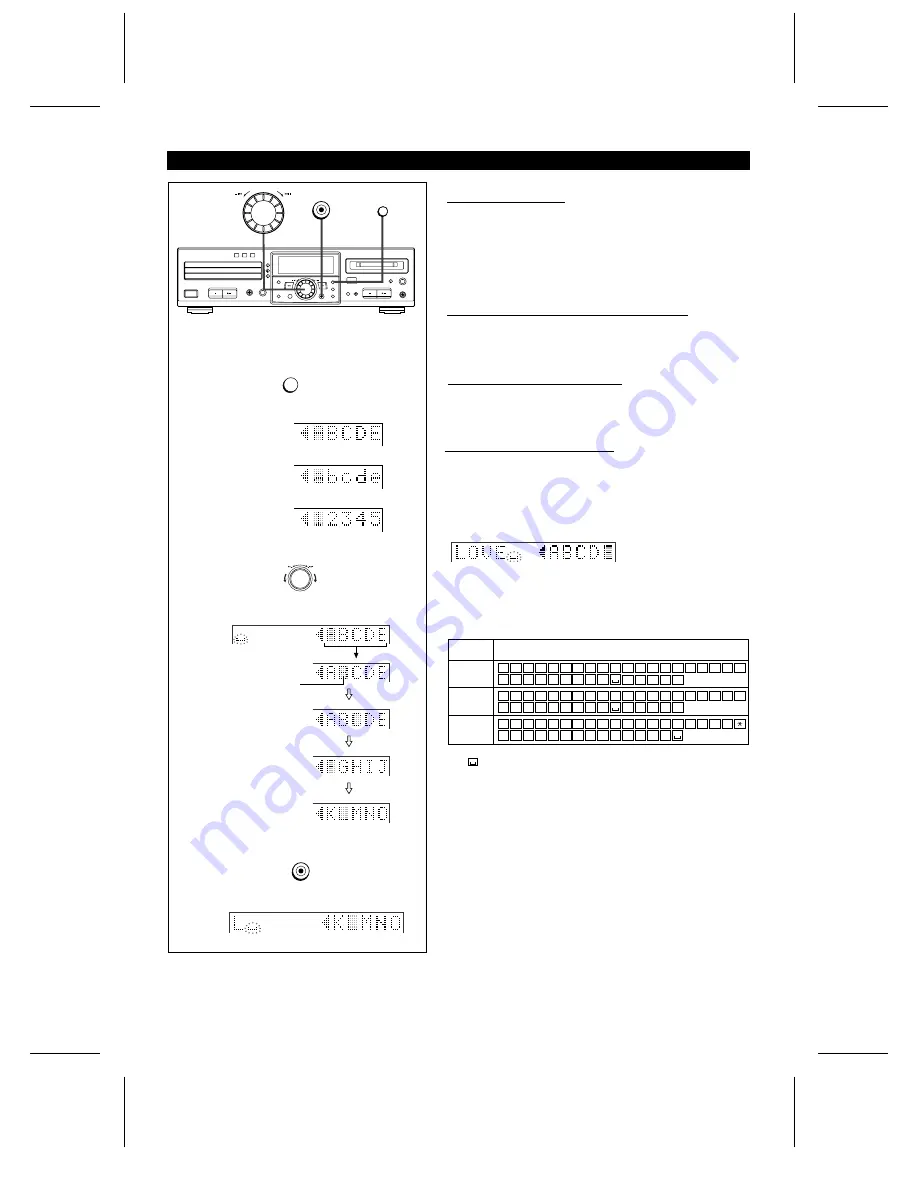
To select the type of characters: (STEP 1)

Press the DISPLAY/CHARACTER button.

To select characters: (STEP 2)

Select characters using the jog dial.

To enter characters: (STEP 3)

Press the ENTER button.

Repeat STEP 1 to STEP 3 as necessary to enter the characters
in the name.

Type of characters used:

Notes:
Number of characters you can enter

Disc names and track names
Up to 100 characters (including spaces) can be entered for
each name. If more than 100 characters are entered, “NAME
FULL” will appear.

Total number of characters per MiniDisc
A total of approximately 1700 characters can be used for all
of the disc and track names. If more than 1700 characters
are entered, “TOC FULL 1” will appear.

ENTER

DISPLAY/CHARACTER

DISPLAY/CHARACTER

STEP 1

Each time the button is pressed, the available characters
will switch as follows:

Alphabet
(capital letters)

Alphabet
(lower-case letters)

Numbers or symbols

Each time the dial is turned, the cursor (

) over

the character will move.

Previous character                  Next character

Cursor

Move the cursor to the 
character you want.

When the DISPLAY/
CHARACTER button is pressed
with the cursor at the edge
of the display, another 5
characters will be displayed.

STEP 2

The selected character will be entered in the
character input column.

ENTER

STEP 3

A

Capital
letters

Type of
characters

Characters <symbols>

Lower-case
letters

Symbols

B

C

D

E

F

G

H

I

J

K

L

M N

O

P

Q

R

S

T

U

V W X

Y

Z

.

,

/

a

b

c

d

e

f

g

h

i

j

k

l

m

n

o

p

q

r

s

t

u

v

w

x

y

z

.

,

/

1

2

3

4

5

6

7

8

9

0

!

"

#

$

% &

'

(

)

+

,

-

.

/

:

;

<

=

>

? @ _

`

!

"

#

$

,

!

"

#

$

,


means space.

MD-R3

31

Summary of Contents for MD-R3

Page 1: ... FIRE OR ELECTRIC SHOCK DO NOT EXPOSE THIS APPLIANCE TO RAIN OR MOIS TURE Note This equipment has been tested and found to comply with the limits for a Class B digital device pursuant to Part 15 of the FCC Rules These limits are designed to provide reasonable protection against harmful interference in a residential installation This equipment generates uses and can radiate radio frequency en ergy ...

Page 2: ...Sources The appliance should be connected to a power supply only of the type described in the operating instructions or as marked on the appliance 9 Power Cord Protection Power supply cords should be routed so that they are not likely to be walked on or pinched by items placed upon or against them paying particular attention to cords at plugs convenience receptacles and the point where they exit f...

Page 3: ...esponsible for any damage resulting from use of this unit with a voltage other than that which is specified Installation location Do not install the unit in the following places Otherwise it may cause unit malfunctions or accidents Places exposed to vibration Places exposed to direct sunlight for many hours Places where temperatures are excessively high or low Places exposed to high humidity Place...

Page 4: ...dicator 16 Repeat Indicator R 17 Remaining Time Indicator 18 Random Play Indicator 19 Timer Playback Timer Record ing Indicator 20 Clock Indicator 21 CD Trays 22 CD Direct Play Buttons and Indicators 23 CD Open Close Buttons 7 24 CD Track Select Button 25 Cue Review Buttons 3 2 26 Display Character Button 27 Remote Sensor 28 MD Loading Slot 29 Record Level Control 30 Microphone Jack 31 Power Butto...

Page 5: ...rminals and remove them Precautions for battery use Insert the batteries according to the direction indicated in the battery compartment Replace all batteries with new ones at the same time Remove the batteries if weak or if the unit is not in use for long periods to prevent potential damage due to battery leakage Do not mix old and new batteries Caution Do not use rechargeable batteries nickel ca...

Page 6: ...deo etc Played back or recorded from with analog signals Depending on the digital equipment the sampling frequency may be different DAT etc from this unit s sampling frequency This unit supports these digital devices using an automatic switching function Sampling rate converter 32 kHz 48 kHz 44 1 kHz automatically switched About the connecting cables The type of cables required to make connections...

Page 7: ...AD M3DC AD M1DC MD CD player etc When it s a round optical jack To the optical input jack When connecting this unit to other equipment for playback To the optical output jack When connecting this unit to a recorder player Stereo DAT MD recorder etc with an optical input output jack To the optical output jack IN COAXIAL Commercially available video coaxial cable To the digital output jack ANALOG LI...

Page 8: ...7 8 9 10 11 12 13 15 16 17 18 19 20 14 Area where track names and disc names are displayed During playback it becomes a level meter Display related to re cording Display related to playback Area where playing time track numbers and the time are displayed Display related to the timer Indicators of the playback and recording operations Music calendar Shows the number of tracks recorded on an MD and ...

Page 9: ...he jog dial and let go the year will change up or down by one The year 2000 or later is set as follows 00 indicates the year 2000 01 indicates the year 2001 The range of dates that can be entered is from January 1 1997 to December 31 2099 5 Press the ENTER button to set the year 6 Set the month repeating steps 4 and 5 7 Set the day repeating steps 4 and 5 The unit will enter the time setting mode ...

Page 10: ...al 11Press the ENTER button to set the minute When the ENTER button is pressed the clock will show the correct time Checking the date and time After pressing the TIMER button turn the jog dial until the date and time are displayed Resetting the date and time See Setting the clock Once you have set the date and time TIME ADJUST will not be displayed in step 2 Turn the jog dial to make the date and ...

Page 11: ...ally skip due to vibration you may hear a skip in the sound if there is a continuous vibration When you listen to MiniDiscs near a radio or a TV set the radio or the TV set may pick up noise Keep the unit as far away as possible from tuners TIME DISPLAY MD DISPLAY CHARACTER EJECT TRACK DATE PM Track name when a track name has not been programmed NO NAME will appear Date and time recorded Remaining...

Page 12: ...and DISC 3 will be played continuously in that order If you press the CD DIRECT PLAY 2 2 button after pressing the CD 06 button DISC 2 and DISC 3 will be played continuously If you press the CD DIRECT PLAY 3 3 button after pressing the CD 06 button only DISC 3 is to be played If you press the CD 06 button after selecting a track by turning the jog dial playback will begin on DISC 1 from the track ...

Page 13: ...he disc trays while they are moving Do not attempt to push the disc tray by hand This may cause malfunctions If the power fails while a tray is open wait until the power supply returns or gently push the tray manually to close it If the disc tray is stopped forcibly TRAY ERROR will appear in the display and the unit will not function If this occurs turn off the POWER button and turn it on again If...

Page 14: ... can play any track you wish directly 1 Select the desired program source CD or MD by pressing the CD or MD button 2 Select the disc to be played by pressing one of the 1 3 buttons Only for CD playback 3 Use the track number input buttons to enter the desired track number Direct selection play remote control operation A To enter track numbers 11 to 99 Press the Y10 button first then press the trac...

Page 15: ...all of the tracks have been played in random order the unit will stop automatically Press the CD or MD button Press the PLAY MODE button until R or RANDOM disap pears Enter the program for the tracks you want and start repeat play You can program a single track and play it repeatedly 12 4 0dB OVER 3 4 5 6 7 8 9 10 11 12 13 15 16 17 18 19 20 14 12 4 0dB OVER 6 7 8 9 10 11 12 13 15 16 17 18 19 20 14...

Page 16: ...hich tracks are programmed While the unit is stopped in the APMS mode turn the jog dial Or press the 5 or 4 button on the remote control When the jog dial is turned clockwise the next track number will appear When it is turned counterclockwise the previous track number will appear To add tracks to the APMS When a program has been entered PRGM will be lit perform steps 2 6 Additional tracks can be ...

Page 17: ... in memory 1 Select the desired program source CD or MD by pressing the CD or MD button 2 Press the PROGRAM button PRGM will flash 3 Press the MUSIC SCAN button M SCAN PRGM will appear 4 Press the PROGRAM button while playing the beginning of a track to be stored in memory 5 To halt the program press the CD or MD button When you have selected an MD the unit will enter the stop mode When you have s...

Page 18: ... operation Each time the TIME button is pressed while in the playback or pause mode the display will change as described below See the diagram to the left 1 The elapsed playing time for each track will be displayed 2 The remaining playing time for the current track will be dis played 3 The total remaining playing time for the disc from the point being played at that time will be displayed Notes Du...

Page 19: ...t may not be possible to perform playback properly if the TOC is not written correctly on the disc Track numbers are created automatically When recording from another CD or MD using the digital connectors When you make a digital recording from a CD player or another MD player new track numbers will be created au tomatically for each track regardless of the amount of si lence between tracks Synchro...

Page 20: ...ment The playback volume of the other equipment will not have any effect on the recording Recordings cannot be made in the following situ ations If you try recording on a playback only MiniDisc com mercially available music If a MiniDisc is protected against accidental erasure Page 39 If there is no more recording time left on the disc Page 20 When the TOC FULL message appears Page 42 If a disc s ...

Page 21: ... number of tracks that have already been recorded and the available time remaining will be displayed and five sec onds later the unit will return to the original display Continued To record for a long time in the monaural mode monaural long play mode When a recording is made in the monaural long play mode it can be twice as long as the recording time available for a stereo recording The monaural l...

Page 22: ... Load a recordable MiniDisc 3 Press the START button APMS playback will start and recording will start automati cally Programmed tracks will be recorded in order After the unit has finished recording the last track recording will stop au tomatically To stop recording Press the MD button To record without using One Touch Editing Without using one touch recording the following operation allows you t...

Page 23: ...l so that the maximum level does not exceed 0 dB After the level is adjusted stop the other equipment and go to step 3 Manual recording Select the input and then press the RECORD REC button The unit will enter the recording stand by mode Press the MD 06 button This unit will start recording The space cut function will not work Space cut function During sound synchro recording if there are more tha...

Page 24: ...rded track and start a new recording or start recording from any point within the old track If you start recording from within a track all of the tracks and track names that follow will be erased If you want to erase all of the tracks and re record the disc you can erase all of the tracks using the all erase function Then you simply perform the normal recording operations Page 30 1 During playback...

Page 25: ...aking digital recordings using a CD player or an MD player track numbers will be created automatically regardless of the setting of the auto marker function RECORD REC 12 4 0dB OVER 1 2 3 4 5 AUTO MARK 1 A MARK OFF will appear 12 4 0dB OVER 1 To cancel the selection currently being re corded Rec cancel While making the following recordings you can erase any tracks you don t want to record While ma...

Page 26: ...nce a track has been erased it cannot be recovered Double check the track number before erasing it Page 30 MOVE The order of the recorded tracks can be changed This feature is different from program play A new track order can be recorded directly on the disc When the power is turned off the revised order will not be changed Page 29 Program move function This function allows the track numbers to be...

Page 27: ...unction Cut using the erase function The tracks are combined using the combine function Digital recording from a CD Recording a broadcast Analog recording from tape The tracks are divided using the divide function This function Can be selected in the following conditions Disc name Track name Divide Combine Move Program move Erase All erase Each time the button is pressed the edit menu will appear ...

Page 28: ... which has been given a name is divided the two new tracks will have the same name and date If the TOC FULL message is seen the second track may not be given a name Page 42 Notes This unit can hold up to 255 tracks However even if the number of tracks assigned has not reached 255 it might not be possible to make any further divisions of tracks Page 40 This function cannot be used while in the prog...

Page 29: ... When only the second of the two tracks has a name That name will be used When both tracks have a name The name of the first track will be used To combine two non continuous tracks Example the first and third tracks Move the third track to the second track using the MOVE function Page 29 Then combine the first and second tracks using the COMBINE function Notes Tracks recorded from analog inputs ca...

Page 30: ...e program PRGM is lit Page 15 or random play mode RANDOM is lit Page 14 First cancel the program or random play mode before trying to use this function Programmed move 1 Select the tracks you want to move and enter them into a program Page 15 2 Make sure that the PRGM indicator is lit and then press the NAME TOC EDIT button PRGM MOVE will appear 3 Within 10 seconds press the ENTER button To cancel...

Page 31: ...be erased at the same time To erase all of the tracks at once 1 Press the MD button The total number of tracks and the total playing time for the MD will be displayed 2 Press the NAME TOC EDIT button and then select ALL ERASE using the jog dial 3 Within 10 seconds press the ENTER button To cancel the operation press the MD button 4 Press the ENTER button again All of the track numbers and track na...

Page 32: ...ely 1700 characters can be used for all of the disc and track names If more than 1700 characters are entered TOC FULL 1 will appear ENTER DISPLAY CHARACTER DISPLAY CHARACTER STEP 1 Each time the button is pressed the available characters will switch as follows Alphabet capital letters Alphabet lower case letters Numbers or symbols Each time the dial is turned the cursor over the character will mov...

Page 33: ...n be skipped 7 After entering all of the characters in the name press the NAME TOC EDIT button The disc name will be recorded Note This function cannot be used while in the program PRGM is lit Page 15 or random play mode RANDOM is lit Page 14 First cancel the program or random play mode before trying to use this function ENTER NAME TOC EDIT DISPLAY CHARACTER DELETE CLEAR TIMER TOC DISC TOTAL 1 2 3...

Page 34: ...e RANDOM is lit Page 14 First cancel the program or random play mode before trying to use this function The track name function can be used while in the stop mode when selecting a track in the pause mode or in the record ing mode Select TRACK NAME from the edit menu If you create a track name while recording the track make sure you finish entering the name before you finish recording the track If ...

Page 35: ...ase or add characters Page 35 To change track names 1 While in the stop mode select the track name you want to change using the jog dial 2 Press the NAME TOC EDIT button 3 Within 5 seconds press the ENTER button The unit will enter the character input mode To cancel this operation press the MD button Now you can erase or add characters Page 35 NAME TOC EDIT ENTER TRACK 4 5 6 7 8 9 10 11 12 13 15 1...

Page 36: ...s 1 to 3 on page 34 do the following to add additional characters Example To change BST to BEST 4 Press the 3 2button to make the character begin flashing at the place you want to add a letter 5 Select the character you want to add using the jog dial Then press the ENTER button 6 Press the NAME TOC EDIT button To correct a spelling After putting the unit in the character input mode erase the wrong...

Page 37: ...e setting display will appear 6 Enter the hour using the jog dial Then press the ENTER button 7 Enter the minute using the jog dial Then press the ENTER button The start and stop times are now set Before timer playback the following preparations are required Load a CD or MD Select a CD to be played 8 Select the source program using the jog dial MD CD 9 Press the ENTER button Setting for timer play...

Page 38: ...og dial Then press the ENTER button The start and stop times are now set 8 Select the source program using the jog dial ANALOG DIGITAL OPT DIGITAL COAX If you select the analog input adjust the recording level Page 22 9 Press the ENTER button Setting timer for recording 1 Press the TIMER button and then select T STANDBY using the jog dial 2 Press the ENTER button The settings will appear in order ...

Page 39: ...stop times will still be stored Notes When the CD or MD is played to the end playback will stop before the stop time If you wish to play to the stop time set repeat play for the CD or MD This timer in this unit cannot be used to control equipment connected to this unit You must use the timer in the other equipment if it has one The timer playback and timer recording functions cannot be used at the...

Page 40: ...irection indicated by the arrow The disc will then be protected against accidental era sure To add a recording to such a disc slide the accidental erase prevention tab back to its original position What is a MiniDisc A MiniDisc is a 2 1 2 64 mm diameter disc which is stored in a cartridge MiniDiscs are easy to handle com pared to compact discs because they are protected against dust and scratches ...

Page 41: ... tracks has not been reached If that happens further record ing will be impossible If you use the all erase function the MD can be reused as a blank MD Even if the maximum MiniDisc recording time has not been reached DISC FULL may be displayed If there is a flaw on the MiniDisc surface that area is auto matically excluded from the space available for recording Therefore the available recording tim...

Page 42: ...it on a firm level surface free from vibration Playback stops in the middle of a track or playback is not performed properly Is the unit located near excessive vibra tions Place the unit on a firm level surface free from vibration Playback sounds are skipped Has condensation formed inside the unit Remove the disc and leave the power turned on The unit should function prop erly in about 1 hour Remo...

Page 43: ...he POWER button to turn off the power and press the 7 button NAME FULL The number of characters for the disc name or track name exceeds 100 Shorten the disc or track name NO DISC A disc has not been loaded The disc data cannot be read Load a disc Reload the disc NOT AUDIO The data recorded on this disc is not audio data Select another track Replace the disc PLAYBACK MD You tried to record on a pla...

Page 44: ...if a foreign object falls into the unit turn off the power and unplug the AC power cord from the AC outlet im mediately Contact your nearest authorized Sharp ser vicer If a power failure occurs during recording If the AC power plug is disconnected from the AC outlet or a power failure occurs during recording before the TOC information has been recorded on the disc the audio portion being recorded ...

Page 45: ...ut level LINE IN Pin jack Over 22 kohms 680 mVrms 170 mVrms OPTICAL IN Optical Square optical connector COAXIAL Coaxial Pin jack 75 ohms 500 mVp p MIC Micro phone Stereo jack 600 ohms 6 mVrms Output jacks Jack name Jack shape Output level Load impedance PHONES Headphones 1 4 6 3 mm stereo jack 15 mW 32 ohms LINE OUT Pin jack 2 Vrms 50 kohms OPTICAL OUT Optical Square optical connector Timer clock ...

Page 46: ...MEMO MD R3 ...

Page 47: ...MEMO MD R3 ...

Page 48: ... be the sole and exclusive remedy available to the purchaser Correction of defects in the manner and for the period of time described herein shall constitute complete fulfillment of all liabilities and responsibilities of Sharp to the purchaser with respect to the Product and shall constitute full satisfaction of all claims whether based on contract negligence strict liability or otherwise In no e...

Reviews: