
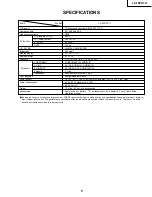


LC-15PX1U
7
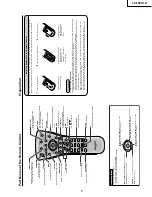
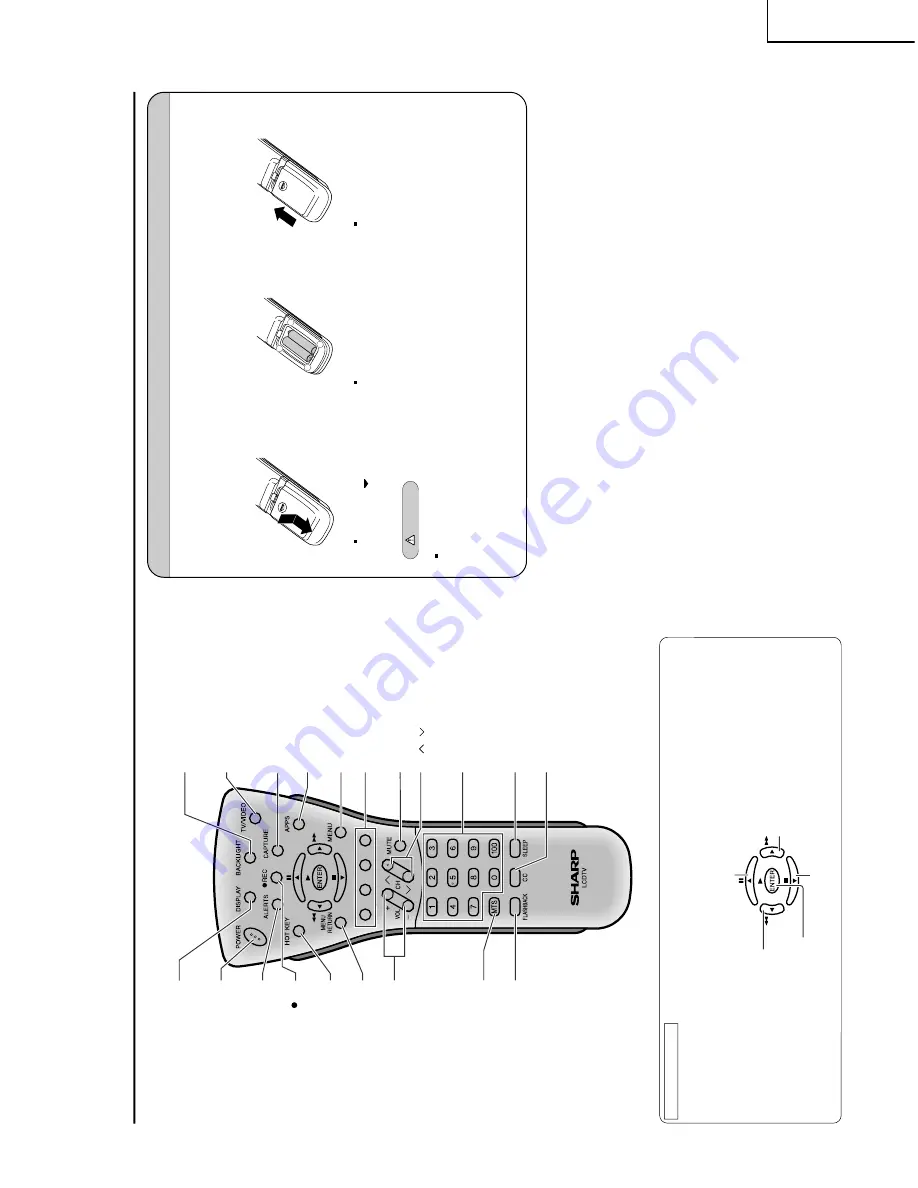
Part Names of the Remote Control
POWER
Turns the Liquid Crystal
Television power on or off.
ALERTS
Displays the Alerts Manager screen.
HOT KEY
Displa
ys the Hotk
e
y
Manager screen.
MENU RETURN
Returns to the previous screen.
VOL (+)/(
–
)
Sets the volume.
MTS
Selects audio settings.
FLASHBACK
Returns to the previous channel.
REC
Records the motion picture.
DISPLAY
Displays the receiving channel and
the current time for 10 seconds.
CAPTURE
Records the still picture
.
TV/VIDEO
Switches the input source between
AV1, AV2, COMPONENT
and TV mode.
MENU
Displa
ys the men
u screen.
MUTE
Mutes the sound.
CC
Displa
ys Closed Caption subtitles
.
Color Buttons
Directly r
uns the application
assigned b
y Hotk
e
y Manager function.
Channel Select
Selects the channel.
SLEEP
Sets the sleep timer.
APPS
Displa
ys the Application Manager
screen.
BACKLIGHT
Selects the brightness and
OPC of the screen.
CH (
)/(
)
Selects the channel.
Move the cursor upwards
(Select the menu items)
/
Still
(Pause the live TV, playback or recording)
Move the cursor to the right
(Select the menu items)
/
Fast-forward
(Fast-forward the picture)
Move the cursor downwards
(Select the menu items)
/
Stop
(Stop the playback or recording)
ENTER
(Set the menu or items by selecting the cursor)
/
Play
(Start the playback)
Move the cursor to the left
(Select the menu items)
/
Fast-reverse
(Fast-reverse the picture)
How to use the cursor
The cursor is used when:
Selecting a menu in the on-screen display
•
•
Operating PVR functions and Video Player application
Installing Batteries in the Remote Control
Before using the LCD TV set for the first time, install the two
“AAA
” size batteries supplied in the remote control. When the
batteries become depleted and the remote control fails to operate, replace the batteries with new
“AAA
” size batteries.
1
Open the battery cover.
2
Insert two
“AAA
” size batteries.
3
Close the battery cover.
Place batteries with their
terminals corresponding
to the (+) and (
–
)
indications in the battery
compartment.
Caution!
Precautions regarding batteries
Improper use of batteries can result in a leakage of chemicals and/or explosion. Be sure to follow the instructions below.
•
Place batteries with their terminals corresponding to the (+) and (
–
) indications.
•
Different types of batteries have different characteristics. Do not mix batteries of different types.
•
Do not mix old and new batteries. Mixing old and new batteries can shorten the life of new batteries and/or cause old
batteries to leak chemicals.
•
Remove batteries as soon as they are depleted. Chemicals that leak from batteries can cause a rash. If chemical
leakage is found, wipe it off with a cloth.
•
The batteries supplied with the LCD TV set may have a shorter operating time due to storage conditions.
•
If the remote control is not to be used for an extended period of time, remove the batteries from the remote control.
Preparation
Engaging the lower
claw with the remote
control, close the
cover.
Slide the cover while
pressing the (
) part.
+
–
+
–
Summary of Contents for LC-15PX1U
Page 27: ...LC 15PX1U 27 17 16 19 18 15 14 13 12 11 10 INVERTER Unit OPERATION Unit ANALOG Unit ...
Page 30: ...LC 15PX1U 8 7 10 9 6 5 4 3 2 1 A B C D E F G H 30 OVERALL WIRING DIAGRAM ...
Page 31: ...LC 15PX1U 31 17 16 19 18 15 14 13 12 11 10 ...
Page 33: ...33 6 5 4 3 2 1 A B C D E F G H LC 15PX1U SCHEMATIC DIAGRAM Ë OPERATION Unit ...
Page 34: ...LC 15PX1U 8 7 10 9 6 5 4 3 2 1 A B C D E F G H 34 ËMAIN Unit 1 14 ...
Page 35: ...LC 15PX1U 35 17 16 19 18 15 14 13 12 11 10 ...
Page 36: ...LC 15PX1U 8 7 10 9 6 5 4 3 2 1 A B C D E F G H 36 ËMAIN Unit 2 14 ...
Page 37: ...LC 15PX1U 37 17 16 19 18 15 14 13 12 11 10 ...
Page 38: ...LC 15PX1U 8 7 10 9 6 5 4 3 2 1 A B C D E F G H 38 ËMAIN Unit 3 14 ...
Page 39: ...LC 15PX1U 39 17 16 19 18 15 14 13 12 11 10 ...
Page 40: ...LC 15PX1U 8 7 10 9 6 5 4 3 2 1 A B C D E F G H 40 ËMAIN Unit 4 14 ...
Page 41: ...LC 15PX1U 41 17 16 19 18 15 14 13 12 11 10 ...
Page 42: ...LC 15PX1U 8 7 10 9 6 5 4 3 2 1 A B C D E F G H 42 ËMAIN Unit 5 14 ...
Page 43: ...LC 15PX1U 43 17 16 19 18 15 14 13 12 11 10 ...
Page 44: ...LC 15PX1U 8 7 10 9 6 5 4 3 2 1 A B C D E F G H 44 ËMAIN Unit 6 14 ...
Page 45: ...LC 15PX1U 45 17 16 19 18 15 14 13 12 11 10 ...
Page 46: ...LC 15PX1U 8 7 10 9 6 5 4 3 2 1 A B C D E F G H 46 ËMAIN Unit 7 14 ...
Page 47: ...LC 15PX1U 47 17 16 19 18 15 14 13 12 11 10 ...
Page 48: ...LC 15PX1U 8 7 10 9 6 5 4 3 2 1 A B C D E F G H 48 ËMAIN Unit 8 14 ...
Page 49: ...LC 15PX1U 49 17 16 19 18 15 14 13 12 11 10 ...
Page 50: ...LC 15PX1U 8 7 10 9 6 5 4 3 2 1 A B C D E F G H 50 ËMAIN Unit 9 14 ...
Page 51: ...LC 15PX1U 51 17 16 19 18 15 14 13 12 11 10 ...
Page 52: ...LC 15PX1U 8 7 10 9 6 5 4 3 2 1 A B C D E F G H 52 ËMAIN Unit 10 14 ...
Page 53: ...LC 15PX1U 53 17 16 19 18 15 14 13 12 11 10 ...
Page 54: ...LC 15PX1U 8 7 10 9 6 5 4 3 2 1 A B C D E F G H 54 ËMAIN Unit 11 14 ...
Page 55: ...LC 15PX1U 55 17 16 19 18 15 14 13 12 11 10 ...
Page 56: ...LC 15PX1U 8 7 10 9 6 5 4 3 2 1 A B C D E F G H 56 ËMAIN Unit 12 14 ...
Page 57: ...LC 15PX1U 57 17 16 19 18 15 14 13 12 11 10 ...
Page 58: ...LC 15PX1U 8 7 10 9 6 5 4 3 2 1 A B C D E F G H 58 ËMAIN Unit 13 14 ...
Page 59: ...LC 15PX1U 59 17 16 19 18 15 14 13 12 11 10 ...
Page 60: ...LC 15PX1U 8 7 10 9 6 5 4 3 2 1 A B C D E F G H 60 ËMAIN Unit 14 14 ...
Page 61: ...LC 15PX1U 61 17 16 19 18 15 14 13 12 11 10 ...
Page 62: ...LC 15PX1U 8 7 10 9 6 5 4 3 2 1 A B C D E F G H 62 ËANALOG Unit 1 4 ...
Page 63: ...LC 15PX1U 63 17 16 19 18 15 14 13 12 11 10 ...
Page 64: ...LC 15PX1U 8 7 10 9 6 5 4 3 2 1 A B C D E F G H 64 ËANALOG Unit 2 4 ...
Page 65: ...LC 15PX1U 65 17 16 19 18 15 14 13 12 11 10 ...
Page 66: ...LC 15PX1U 8 7 10 9 6 5 4 3 2 1 A B C D E F G H 66 ËANALOG Unit 3 4 ...
Page 67: ...LC 15PX1U 67 17 16 19 18 15 14 13 12 11 10 ...
Page 68: ...LC 15PX1U 8 7 10 9 6 5 4 3 2 1 A B C D E F G H 68 ËANALOG Unit 4 4 ...
Page 69: ...LC 15PX1U 69 17 16 19 18 15 14 13 12 11 10 ...
Page 70: ...70 6 5 4 3 2 1 A B C D E F G H LC 15PX1U ËR C LED Unit ...
Page 71: ...71 6 5 4 3 2 1 A B C D E F G H LC 15PX1U ËCARD LED Unit ...
Page 72: ...72 6 5 4 3 2 1 A B C D E F G H LC 15PX1U ËCARD DETECT Unit ...
Page 73: ...73 6 5 4 3 2 1 A B C D E F G H LC 15PX1U ËINVERTER Unit ...
Page 78: ...LC 15PX1U 8 7 10 9 6 5 4 3 2 1 A B C D E F G H 78 ANALOG Unit Side A ...
Page 79: ...LC 15PX1U 79 17 16 19 18 15 14 13 12 11 10 ...
Page 82: ...82 6 5 4 3 2 1 A B C D E F G H LC 15PX1U INVERTER Unit Side A ...


