background image

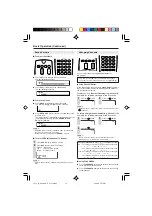
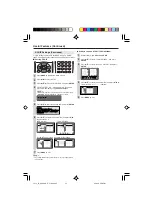
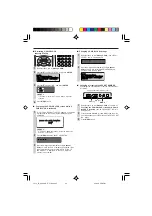
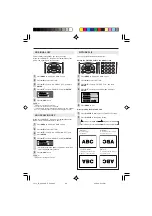
Changing V-CHIP BLOCK settings

Repeat steps 

1

 to 

3

 of 

Setting V-CHIP

, then “INPUT

SECRET NO.” will be displayed.

Input the 4-digit secret number by using 

Channel

Select

; the V-CHIP select mode will be displayed.

Set the V-CHIP BLOCK again.

M P A A

M P A A
T V   G U I D E L I N E S

T V   G U I D E L I N E S
C A N . E N G L I S H   R A T I N G S

C A N . E N G L I S H   R A T I N G S
C A N . F R E N C H   R A T I N G S

C A N . F R E N C H   R A T I N G S
S T A T U S

S T A T U S

Changing or clearing the SECRET NUMBER

If you forget the secret number, clear the secret number

as follows.

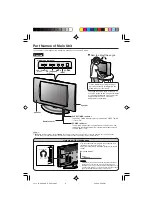
Upper control panel of the main unit

Repeat steps 

1

 to 

3

 of 

Setting V-CHIP

, or 

1

 and 

2

 of

Canceling the V-CHIP BLOCK screen while V-CHIP
BLOCK is activated

, then “INPUT SECRET NO.” will

be displayed.

Press and hold both 

CH ( )

 and 

VOL (+)

 on the main

unit simultaneously until the message “INPUT SECRET
NO.” blinks.

Press 

MENU 

to exit.

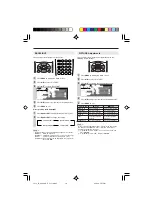
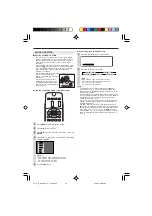
Activating V-CHIP BLOCK

 Setting STATUS


Repeat steps 

1

 to 

4

 of 

Setting V-CHIP

.

Press 

'

/

"

 to select “STATUS”, and press 

ENTER

.

M P A A
T V   G U I D E L I N E S
C A N . E N G L I S H   R A T I N G S
C A N . F R E N C H   R A T I N G S
S T A T U S

Press 

'

/

"

 to select “ON”, and press 

ENTER

.

    O N


    O F F

A

• If “STATUS” is set to “OFF”, V-CHIP BLOCK will not be

activated.

Press 

MENU 

to exit.

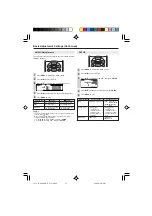
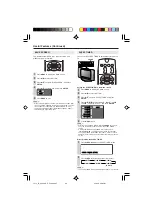
Canceling the V-CHIP BLOCK screen while V-
CHIP BLOCK is activated

“V-CHIP HAS BEEN ACTIVATED” appears if you watch
a program with the same Program Rating data you
configured.

      V

      V – C H I P   H A S   B E E N   A C T I V A T E D

C H I P   H A S   B E E N   A C T I V A T E D

                            T V

                            T V – 1 4
                            D L S V

                            D L S V

A

• “V-CHIP HAS BEEN ACTIVATED” will not be displayed if

“STATUS” is set to “OFF”.

Press 

MENU 

to display “INPUT SECRET NO.”.

Input the 4-digit secret number by using 

Channel

Select

; V-CHIP BLOCK is temporarily canceled. If you

input an incorrect secret number, “SECRET NO. IS
INCORRECT” is displayed. In this case, input the
correct secret number.

2

1

2

3

4

1

2

3

1

1

2

3

CH (

)

VOL (+)

MENU

LC13_15_20SH4U_E_P1

9

-2

3

.p65 05.4.26, 5:58 PM

2

2

Summary of Contents for LC 13SH4U

Page 1: ...CAUTION TO REDUCE THE RISK OF ELECTRIC SHOCK DO NOT REMOVE COVER OR BACK NO USER SERVICEABLE PARTS INSIDE REFER SERVICING TO QUALIFIED SERVICE PERSONNEL The lightning flash with arrow head symbol within an equilateral triangle is intended to alert the user to the presence of uninsulated dangerous voltage within the product s enclosure that may be of sufficient magnitude to constitute a risk of ele...

Page 2: ... AND UNEVEN SURFACES MAY CAUSE THE PRODUCT AND CART COMBINATION TO OVERTURN Note to CATV system installer This reminder is provided to call the CATV system installer s attention to Article 820 40 of the National Electrical Code that provides guidelines for proper grounding and in particular specifies that the cable ground shall be connected to the grounding system of the building as close to the p...

Page 3: ... person to perform repairs a When the AC cord or plug is damaged b When a liquid was spilled on the product or when objects have fallen into the product c When the product has been exposed to rain or water d When the product does not operate properly as described in the operating instructions Do not touch the controls other than those described in the operating instructions Improper adjustment of ...

Page 4: ...arges Section 810 of the National Electrical Code provides information with respect to proper grounding of the mast and supporting structure grounding of the lead in wire to an antenna discharge unit size of grounding conductors location of antenna discharge unit connection to grounding electrodes and requirements for the grounding electrode Lightning For added protection for this television equip...

Page 5: ... as they are depleted Chemicals that leak from batteries can cause a rash If chemical leakage is found wipe it off with a cloth The batteries supplied with the LCD TV set may have a shorter operating time due to storage conditions If the remote control is not to be used for an extended period of time remove the batteries from the remote control Align the tab on the battery cover 1 and place it whi...

Page 6: ... a good quality outdoor antenna is strongly recommended The following is a brief explanation of the type of connections that are provided with the various antenna systems ANTENNAS F type connector 75 ohm coaxial cable When connecting the RF cable to the LCD TV set do not tighten F type connector with tools If tools are used it may cause damage to your LCD TV set The breaking of internal circuit et...

Page 7: ...annels is used If this is unknown consult your cable TV company For more specific instructions on installing cable TV consult your cable TV company One possible method of utilizing the converter descrambler provided by your cable TV company is explained below Please note An RF switch provided with two inputs A and B is required not supplied A position on the RF switch not supplied You can view all...

Page 8: ...the headphone jack Do not set the volume at a high level Hearing experts advise against extended listening at high volume levels Controls Remote sensor SLEEP TIMER indicator The SLEEP TIMER indicator lights up red when the SLEEP TIMER is set to ON POWER indicator The POWER indicator lights up green when the power is on and red when in the standby mode the indicator will not light up when the main ...

Page 9: ... AUDIO L AUDIO R AUDIO OUT INPUT2 ANT Antenna terminal Headphone jack Stand POWER INPUT terminal Rear View Round lock for Kensington Security Standard slot Using the Kensington Lock This LCD TV set has a Kensington Security Standard slot for use with a Kensington MicroSaver Security System Refer to the information that came with the system for instructions on how to use it to secure the LCD TV set...

Page 10: ...volume AV MODE Selects preferred AV MODE FLASHBACK Returns to the previous channel BACKLIGHT Adjusts the brightness of the screen CC Displays Closed Caption subtitles CH Selects channel DISPLAY Displays the receiving channel and the current time for 10 seconds Cursor control Selects a desired item on the screen MENU Displays the menu screen Channel Select Sets the channel INPUT Switches the input ...

Page 11: ...d press ENTER A If you want to stop the EZ SETUP process once it has started press MENU and it will be canceled If you want to set up again please see CH SETTING Y E S N O C O N N E C T A N T E N N A O R C A B L E The tuner will automatically search for the broadcasting and cable TV channels The channel number will automatically increase when it appears P L E A S E W A I T P L E A S E W A I T A U ...

Page 12: ...ideo equipment Press INPUT to select the applicable input source The screen changes in order of INPUT1 INPUT2 and TV mode each time INPUT is pressed A INPUT1 Used for video equipment connected to the COMPONENT input terminals INPUT2 Used for video equipment connected to the INPUT2 terminal The S video input terminal is additionally provided for the INPUT2 If both the S video terminal and normal vi...

Page 13: ... the order shown below 1 2 3 125 1 2 3 Press CH and the channels change in the order shown below 3 2 1 125 3 2 1 Using FLASHBACK Press FLASHBACK to switch the currently tuned channel to the previously tuned channel Press FLASHBACK again to switch back to the currently tuned channel Sound Volume To adjust the volume Press VOL to increase the sound volume The bar indicator shifts right VOLUME 50 Pre...

Page 14: ...s and on screen displays in this manual are for explanation purposes and may vary slightly from the actual appearance Depending on the setting condition such as an input mode it may not be possible to adjust or set some items In such cases a message will be displayed on the menu setting screen PICTURE AUDIO SETUP OPTION 0 M E N U M E N U AUDIO PICTURE AUDIO SETUP OPTION T R E B L E T R E B L E B A...

Page 15: ...anging image settings to standard values For a clear cut image emphasizing high contrast for sports viewing Changing image settings to factory preset values No adjustments are allowed Controlling the contrast to enable easier viewing of dark images Controlling the brightness of video games and other images for easier viewing 2 COLOR TEMPERATURE You can adjust the color temperature to give a better...

Page 16: ...to your preference with the following picture settings Press MENU to display the Menu screen Press to select PICTURE Press to select a specific adjustment item 0 0 0 PICTURE PICTURE S AUDIO AUDIO SETUP SETUP OPTION OPTION A V M O D E D Y N A M I C A V M O D E D Y N A M I C B A C K L I G H T BRIGHT C O N T R A S T 4 5 B R I G H T N E S S B R I G H T N E S S C O L O R 5 C O L O R 5 T I N T T I N T S...

Page 17: ...to select SETUP Press to select desired item and press ENTER SETUP OPTION C H S E T T I N G M T S A U D I O O U T V C H I P B L O C K C L O S E D C A P T I O N L A N G U A G E Press to change the setting and press ENTER Press MENU to exit Selected item MTS AUDIO OUT LANGUAGE Factory setting STEREO Stereo audio OUT FAO Line Output is selected Output volume is fixed Speaker output is available ENGLI...

Page 18: ...aving broadcast TV channels in the memory Press MENU to display the Menu screen Press to select SETUP Press to select CH SETTING and press ENTER Press to select CH SEARCH and press ENTER E Z S E T U P A I R C A B L E C A B L E 1 C H S E A R C H C H M E M O R Y Press ENTER The tuner will search through all available channels in your area and add them to the TV memory S T E R E O S T E R E O S A P S...

Page 19: ...e higher ratings NC 17 and X content based FV V S L D Rating Fantasy Violence Sexual Adult Sexually Violence Situation Language Suggestive Dialog TV Y All children TV Y7 Direct to Older Children TV G General Audience TV PG Parental Guidance Suggested TV 14 Parents Strongly Cautioned TV MA Mature Audience Only age based RATING G GENERAL AUDIENCES All ages admitted PG PARENTAL GUIDANCE SUGGESTED Som...

Page 20: ...le for younger children under the age of 8 because it could contain controversial themes or issues Over 14 Years Could contain themes where violence is one of the dominant elements of the storyline but it must be integral to the development of plot or character Language usage could be profane and nudity present within the context of the theme Adults Intended for viewers 18 years and older and migh...

Page 21: ...Y 7 B L O C K T V G B L O C K T V P G B L O C K T V 1 4 B L O C K T V M A B L O C K B L O C K C O N T E N T D L S V F V Canadian English ratings Canadian French ratings C B L O C K C 8 B L O C K G B L O C K P G B L O C K 1 4 B L O C K 1 8 B L O C K G B L O C K 8 a n s B L O C K 1 3 a n s B L O C K 1 6 a n s B L O C K 1 8 a n s B L O C K Press MENU to exit A The setting automatically enters BLOCK f...

Page 22: ...ess MENU to exit Activating V CHIP BLOCK Setting STATUS Repeat steps 1 to 4 of Setting V CHIP Press to select STATUS and press ENTER M P A A T V G U I D E L I N E S C A N E N G L I S H R A T I N G S C A N F R E N C H R A T I N G S S T A T U S Press to select ON and press ENTER O N O F F A If STATUS is set to OFF V CHIP BLOCK will not be activated Press MENU to exit Canceling the V CHIP BLOCK scree...

Page 23: ...ta T1 TEXT mode for CH1 data T2 TEXT mode for CH2 data Press MENU to exit 1 2 3 5 Directly setting the CLOSED CAPTION Press CC to display the CC TEXT screen C C T E X T O F F Press CC to change the setting CC TEXT OFF CC TEXT T2 CC TEXT T1 CC TEXT CC1 CC TEXT CC2 A CC1 CLOSED CAPTION mode for CH1 data CC2 CLOSED CAPTION mode for CH2 data T1 TEXT mode for CH1 data T2 TEXT mode for CH2 data A If a b...

Page 24: ... 16 9 ZOOM and STRETCH Press MENU to display the Menu screen Press to select OPTION Press to select VIEW MODE and press ENTER Press to select desired setting and press ENTER 4 3 1 6 9 Z O O M S T R E T C H Press MENU to exit A The 4 3 image will be distorted on the screen when the VIEW MODE is set to 16 9 When the CLOSED CAPTION mode is set to CC1 CC2 T1 or T2 ZOOM and STRETCH cannot be set for VI...

Page 25: ...nute until the timer turns off the LCD TV set Directly setting the SLEEP TIMER Press SLEEP to display the SLEEP TIMER screen S L E E P T I M E R O F F Press SLEEP to set the sleep timer in minutes OFF 150MIN 120MIN 60MIN 30MIN 90MIN minutes A The SLEEP TIMER screen automatically disappears in 3 seconds 1 2 3 4 5 This function automatically turns the screen blue if no broadcast signal is received P...

Page 26: ...TER E N A B L E D I S A B L E 5 minutes before the power shuts down remaining time is displayed every minute Press MENU to exit A DISABLE is factory preset value 1 2 3 4 5 1 2 3 4 5 PICTURE FLIP You can set the orientation of the picture Setting the PICTURE FLIP on the MENU screen Press MENU to display the Menu screen Press to select OPTION Press to select PICTURE FLIP and press ENTER Press to sel...

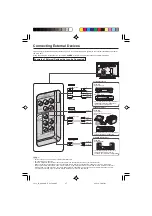
Page 27: ...d by connecting a VCR or a home video game system to the terminals located on the rear of the main unit When connecting an external device turn off the POWER of the main unit first to prevent any possible damage Connecting External Devices Audio Video cable Y PB PR Audio L Audio R Audio L Audio R S Video cable Component cable Audio cable S Video Audio cable INPUT1 INPUT2 AUDIO OUT Example DVD Play...

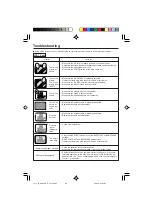
Page 28: ...dphones are not connected There is no picture or sound just noise Make sure the antenna cable is properly connected Bad reception could be the problem Picture is not clear Make sure the antenna cable is properly connected Bad reception could be the problem Picture is light or improperly tinted Check color adjustment The picture is too dark Press the BACKLIGHT button or set the BACKLIGHT or BRIGHTN...

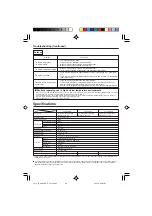
Page 29: ...alfunction and the unit will recover when the temperature returns to normal Do not leave the unit in a hot or cold location Also do not leave the unit in a location exposed to direct sunlight or near a heater as this may cause the cabinet to deform and the LCD panel to malfunction Storage temperature 4 F to 140 F 20 C to 60 C The picture is spotted There may be interference from automobiles trains...

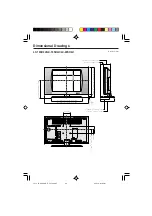
Page 30: ... 64 327 4 14 15 64 361 2 17 1 16 433 including rubber foot 1 13 16 45 7 2 1 64 51 1 2 1 64 51 7 17 32 191 7 17 32 191 7 27 32 199 2 5 53 64 148 3 5 53 64 148 3 5 3 32 129 3 15 16 100 2 25 64 60 7 2 25 64 60 7 2 3 32 53 3 15 316 100 10 7 16 265 12 1 8 307 6 15 57 64 403 3 7 53 64 198 7 9 7 64 231 2 11 27 32 300 8 3 41 64 92 1 3 45 64 93 8 3 35 64 89 8 1 31 64 37 7 1 27 64 36 1 25 32 45 LC13_15_20SH...

Page 31: ... for the period of time described herein shall constitute complete fulfillment of all liabilities and responsibilities of Sharp to the purchaser with respect to the Product and shall constitute full satisfaction of all claims whether based on contract negligence strict liability or otherwise In no event shall Sharp be liable or in any way responsible for any damages or defects in the Product which...

Page 32: ...ervice may be obtained upon delivery of the Sharp product together with proof of purchase and a copy of this LIMITED WARRANTY statement to an Authorized Sharp Service Centre or an Authorized Sharp Servicing Dealer In home warranty service may be provided at Sharp s discretion on any Sharp television with the screen size of 27 or larger and on any Sharp Over the Range Microwave Oven This warranty c...

Reviews: