background image

20

HT-X1

Pre

paration

 for Use

System connections (continued)

"

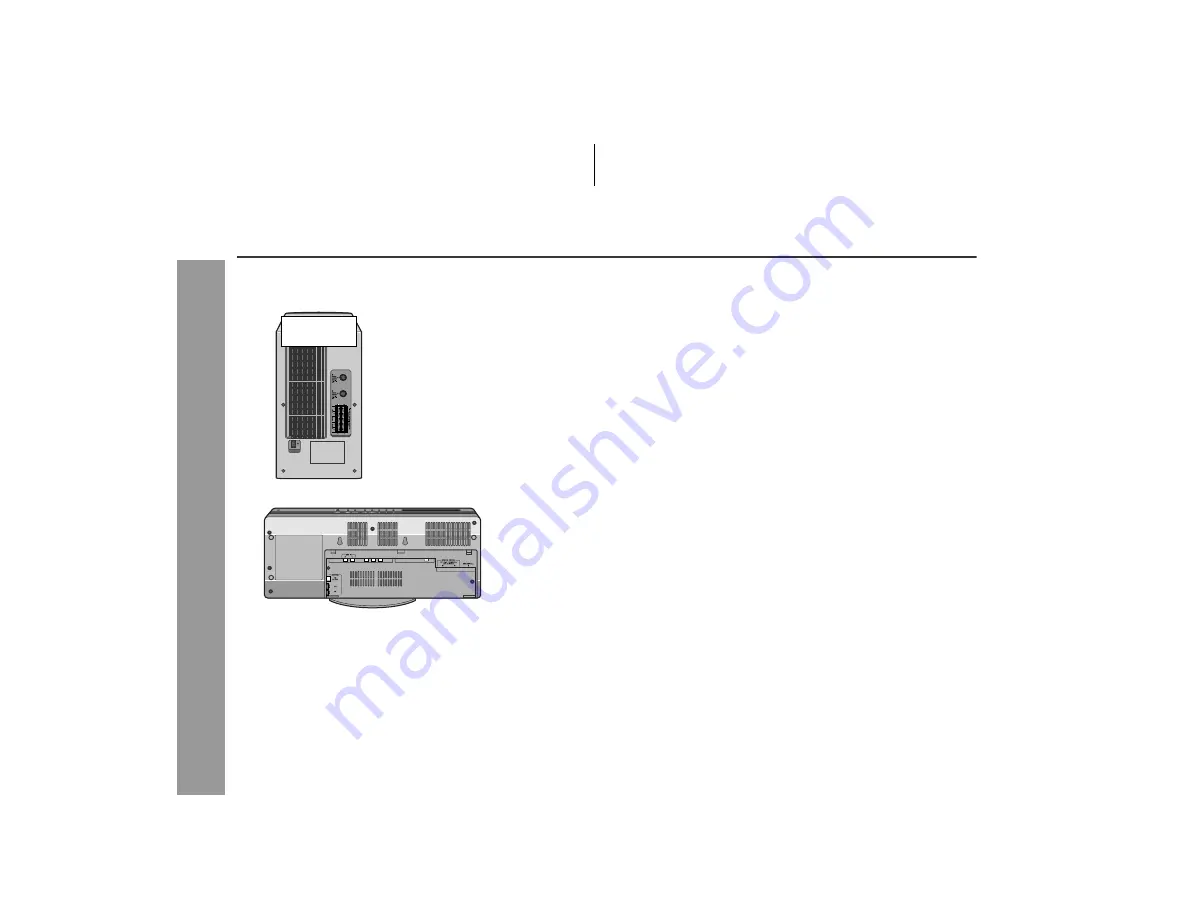
Connecting the system connection cable

Connect the main unit and subwoofer/amplifier unit as follows.

"

Antenna connection

Note:
Placing the antenna on the system or near the AC power cord may
cause noise pickup. Place the antenna away from the system for
better reception.

Installing the AM loop antenna:

Outdoor FM or AM antenna:
Use an outdoor FM or AM antenna if you require better reception.
Consult your dealer.
When using an outdoor AM antenna, be sure to keep the wire of the
AM loop antenna connected.

Subwoofer/
amplifier unit

Summary of Contents for HT-X1

Page 1: ...ance from this product please read this manual carefully It will guide you in operating your SHARP product HT X1 Home Theater with DVD consisting of HT X1 main unit and subwoofer amplifier unit CP X1F front speakers CP X1C center speaker and CP X1S surround speakers OPERATION MANUAL HT X1 U TINSEA050SJZZ ...

Page 2: ...ompanying the appliance WARNING TO REDUCE THE RISK OF FIRE OR ELECTRIC SHOCK DO NOT EXPOSE THIS APPLIANCE TO RAIN OR MOISTURE 0501 THIS PRODUCT IS A CLASS 1 LASER PRODUCT USE OF CONTROLS OR ADJUSTMENTS OR PERFORMANCE OF PROCEDURES OTHER THAN THOSE SPECIFIED HEREIN MAY RESULT IN HAZARDOUS RADIATION EXPOSURE AS THE LASER BEAM USED IN THIS PRODUCT IS HARMFUL TO THE EYES DO NOT ATTEMPT TO DISASSEMBLE ...

Page 3: ...not be placed in a built in installation such as a bookcase or rack unless proper ventilation is provided or the manufacturer s instructions have been adhered to 11 Power Sources This product should be operated only from the type of power source indicated on the marking label If you are not sure of the type of power supply to your home consult your product dealer or local power company For product...

Page 4: ... may expose you to dangerous voltage or other hazards Refer all servicing to qualified service personnel 21 Damage Requiring Service Unplug this product from the wall outlet and refer servicing to qualified service personnel under the following conditions a When the power supply cord or plug is damaged b If liquid has been spilled or objects have fallen into the product c If the product has been e...

Page 5: ...nter net intranets and or other networks other revenue generating content distribution systems pay audio or audio on demand appli cations and the like or on revenue generating physical media com pact discs digital versatile discs semiconductor chips hard drives memory cards and the like An independent license for such use is required For details please visit http mp3licensing com MPEG Layer 3 audi...

Page 6: ...CGA027SJZZ QANTL0008SJZZ QANTWA001SJZZ Video cable 1 AC power cord 1 System connection cable 1 QCNWGA004SJZZ QACCU0003SJ00 QCNWGA019SJZZ Pattern paper for main unit 1 Button name label 1 Speaker connection cord 5 TCAUZA010SJZZ HDECPA003SJZZ QCNWGA008SJZZ Green for center speaker approx 16 feet 5 m White for left front speaker approx 16 feet 5 m Red for right front speaker approx 16 feet 5 m Blue f...

Page 7: ...he angle 37 To zoom in on an image zoom 37 To play in the desired order programmed playback 38 To play repeatedly repeat play 39 To play the contents between the specified points repeatedly A B repeat 40 To change the display on the main unit 40 To change the display on TV screen 41 Page Audio CD Operation Playing an audio CD To play in random order random play 42 To start playback from the desire...

Page 8: ...with a higher voltage other than that speci fied is dangerous and may result in a fire or other types of accident causing damage SHARP will not be held responsible for any dam age resulting from the use of this system with a voltage other than that specified Volume control The sound level at a given volume setting depends on speaker effi ciency location and various other factors It is advisable to...

Page 9: ......

Page 10: ... data compressed in the MPEG 1 audio layer 3 format MP3 files have the extension mp3 Files with the exten sion mp3 may not play or noise may occur during playback if not recorded in the MP3 format WMA is an audio file format developed by Microsoft with the wma extension This type of audio file is recorded through Microsoft Win dows operating system A JPEG file is still image data compressed in the...

Page 11: ...c Display Description Format recorded on the DVD Select a type according to the connected TV type Type of subtitles recorded Recorded subtitle languages Example You can select a subtitle lan guage 1 English 2 German Number of camera angles Number of angles recorded on the DVD You can view scenes from dif ferent angles Number of audio tracks and au dio recording systems The number of audio tracks a...

Page 12: ...d by Button 25 9 Disc Compartment 28 10 Main Unit Stand 18 11 Remote Sensor 26 12 Volume Control 27 13 Headphone Jack 24 Rear panel Reference page 1 FM 75 Ohm Antenna Jack 19 20 2 Antenna Ground Terminal 19 20 3 AM Antenna Terminal 19 20 4 Auxiliary Audio Signal Input Jacks 61 5 Component Video Output Jacks 23 6 S video Output Jack 23 7 Video Output Jack 22 8 System Connection Jacks to subwoofer a...

Page 13: ...M Signal Indicator 48 7 DTS Signal Indicator 48 8 Dolby Digital Signal Indicator 48 9 Dolby Pro Logic Indicator 48 10 Audio Signal Speaker Indicators 49 11 Track Indicator 40 12 Chapter Indicator 40 13 Title Indicator 40 14 Pause Indicator 29 15 Play Indicator 29 16 Total Indicator 40 17 Angle Indicator 37 18 FM Stereo Mode Indicator 46 19 FM Stereo Receiving Indicator 46 20 Sleep Indicator 60 1 2...

Page 14: ...ip Down or Fast Reverse Button 31 12 Disc Eject Button 29 13 Multi Channel Select Button 51 14 Return Button 52 55 15 Stereo 2 channel Select Button 50 16 Chapter Track Skip Up or Fast Forward Button 31 17 Angle Button 37 18 DVD Audio Language Select or CD Audio Output Select Button 34 19 Gamma Button 34 20 Direct Button 32 21 Subtitle Button 33 22 Super Picture Button 35 23 Zoom Button 37 24 Prog...

Page 15: ...10 Stop Button 28 29 4 3 5 6 7 8 9 10 1 2 TV Operation Buttons You can operate some functions of SHARP s TVs with the remote control of this system However some models cannot be operated TV Channel Up Button TV Channel Down Button Switches the TV channel up Switches the TV channel down TV On Stand by Button TV Volume Up Button Sets the TV power to ON or STAND BY Turns up the TV volume TV VCR Input...

Page 16: ...nce page 1 Speaker 2 Speaker Stand 3 Speaker Terminals 19 21 4 Color Label Green Subwoofer amplifier unit Reference page 1 Bass Reflex Duct 2 Woofer 3 Cooling Fan 25 4 AC Power Input Jack 25 5 System Connection Jacks to main unit 19 20 6 Speaker Terminals 19 21 1 1 2 1 2 4 3 5 6 2 4 3 3 4 White Left Front Speaker Red Right Front Speaker Blue Left Surround Speaker Gray Right Surround Speaker ...

Page 17: ...n It is recommended to arrange the speakers as shown below Notes The default distance is set to 6 feet 2 m If speakers cannot be placed at equal distances refer to Speaker delay setting see page 53 Place the TV halfway between the front speakers It is recommended that the center speaker be placed near the television Place the surround speakers at a position just above the height of your ears Place...

Page 18: ...18 HT X1 Preparation for Use Main unit preparation ...

Page 19: ...e to disconnect the AC power cord from the wall outlet before you connect disconnect cables to from jacks inside the back cover of the main unit or jacks of the subwoofer amplifier unit After connecting cables attach the back cover and operate the main unit ...

Page 20: ... the antenna on the system or near the AC power cord may cause noise pickup Place the antenna away from the system for better reception Installing the AM loop antenna Outdoor FM or AM antenna Use an outdoor FM or AM antenna if you require better reception Consult your dealer When using an outdoor AM antenna be sure to keep the wire of the AM loop antenna connected Subwoofer amplifier unit ...

Page 21: ...n you face the subwoofer amplifier unit Do not stand or sit on the speakers You may be injured Do not allow any objects to fall into or to be placed in the bass reflex ducts of the subwoofer amplifier unit Attaching the optional floor speaker stand The front speakers and surround speakers support the optional floor speaker stand see page 65 Remove the original stand for each speaker using a screwd...

Page 22: ...isplays 30 frames of still images per second to complete sequential movement interlaced scanning Whereas progressive scanning displays one frame every 1 60th of a second 60 frames per second to realize less flicker high density images Set the video mode to Interlace default setting For the proce dure refer to Changing the video output mode Notes Change the TV input in accordance with the connected...

Page 23: ... equipped with component video input jacks purchase a component video cable to enjoy higher quality images Notes If your TV has different indications for the component video inputs Y CB and CR or Y B Y and P Y connect jacks with its matching color Some component video jacks designed for the high vision sys tem are not compatible with DVD Do not connect this unit to those component video input jack...

Page 24: ... unit Fit the claws into the holes Headphones Before plugging in or unplugging the headphones reduce the volume Be sure your headphones have a 1 8 3 5 mm diameter plug and impedance between 16 and 50 ohms The recommended impedance is 32 ohms Plugging in the headphones disconnects the speakers automati cally Adjust the volume using the VOLUME control ...

Page 25: ...fer amplifier unit will not be in use for a prolonged period of time To turn the power on Press the ON STAND BY button If the power does not turn on check if the AC power cord and sys tem connection cable are plugged in properly To set the system to stand by mode Press the ON STAND BY button again Note After the system enters the power stand by mode wait a few sec onds to turn on again Cooling fan...

Page 26: ...e main unit with a soft cloth Exposing the sensor on the main unit to strong light may interfere with operation Change the lighting or the direction of the main unit if this occurs Keep the remote control away from moisture heat shock and vibrations Test of the remote control Check the remote control after checking all the connections see pages 19 25 Point the remote control directly at the remote...

Page 27: ...d counterclockwise the volume will decrease Remote control operation Press the VOL or button to in crease or decrease the volume The volume is muted temporarily when pressing the MUTE button Press again to restore the vol ume The mute status is canceled when you adjust the volume After approx 5 seconds of DVD playback the display dims and the original brightness returns when you stop playback The ...

Page 28: ...28 HT X1 DVD Operation Playing a disc Turn on the TV and switch the input to the VIDEO 1 or VIDEO 2 etc accordingly ...

Page 29: ...or track number The sound mode in use appears during DVD playback Play indicator Playing time Caution when inserting disc Do not touch the playback side Do not insert two or more discs in the disc insertion slot Discs with labels stickers or glue attached may cause damage to the main unit Do not use discs of special shapes heart oc tagon etc or 3 8 cm discs with an adaptor Malfunction may result A...

Page 30: ...disc does not play if damaged dirty or loaded upside down Make sure to remove the disc before transporting the main unit Otherwise the disc inside may cause malfunction Do not let coins clips etc get into the disc insertion slot Mal function may occur When attempting to play discs with scratches or of a different region number or unplayable or restricted 1 discs an error message will appear on the...

Page 31: ...eversed in the search speed specified in this manual depending on the disc or the scene being played While a disc is playing press the or button Press the button to skip to the next chapter track On DVD Audio CD Press the button to skip to the beginning of the current chapter track Press the button again to skip to the begin ning of the previous chapter track On MP3 WMA JPEG discs Press the button...

Page 32: ...R button 1 Perform steps 1 3 of To select and play the desired title above 2 Within 10 seconds select the chapter by pressing the cur sor or button 3 Enter the desired chapter number by using the direct number buttons Chapter number 4 Within 10 seconds press the ENTER button 08 01 001 010 Entering title or chapter numbers using the direct number buttons If the number is 2 digits or more press 10 a...

Page 33: ...it changing the subtitle language If no subtitles are recorded on the disc is displayed It may take a little time to switch the subtitle language to the selected one When you set the unit to the stand by mode or replace the disc settings return to the default 1 While a disc is playing press the SHIFT button and then the SUBTITLE button 2 Repeat step 1 to select the de sired subtitle language You c...

Page 34: ...the AUDIO button Audio language information 2 Repeat step 1 to select the desired audio number When playing DVD the language changes as follows When playing audio CD and MP3 the sound changes as fol lows Audio 1 3 AC 3 5 1 English 1 Original English Dolby Digital 5 1 ch Surround 2 English Dolby Digital 2 ch Surround Audio 1 3 AC 3 5 1 English Audio 2 3 AC 3 2CH English Mono Left Mono Right Stereo ...

Page 35: ...35 HT X1 DVD Operation To improve the image quality To restore the original image quality In step 1 select OFF ...

Page 36: ...me discs Slow motion play You can slow down the playback speed Note On some discs slow motion play functions are disabled 1 In the stop mode or during play back press the SHIFT button and then the TOP MENU MENU button Example 2 Press the cursor or button to change the setting and press the ENTER button The selected title is played You can also use the direct number buttons for some discs 1 In the ...

Page 37: ...on the disc To zoom in on an image zoom You can magnify images during playback To return to normal view Press the SHIFT button and then the ZOOM button Repeat this to select Zoom off When you cancel the zoom function you cannot shift the view Notes An image may become distorted when zoomed Subtitles cannot be zoomed The position of the current part is indicated in the lower left of the screen 1 Wh...

Page 38: ...ogram List No Program Info Select 1 T 1 C 1 06 03 2 T 3 C 5 05 06 3 T 5 C Chapter 5 Chapter 4 Chapter 3 Chapter 2 Chapter 1 Menu 6 Press the cursor button to finish programming To delete the wrong number press the cursor or button to select it and press the CLEAR button 7 Use the cursor or button to select a number to start with and press the DVD CD button Playback starts from the select ed number...

Page 39: ...y Chapter Repeat on Title Repeat on Repeat off Repeats the chapter currently playing Repeats the title currently playing The normal playback File Rep Folder Rep Disc Rep Rep off 1 Disappear Repeats the file currently playing Repeats the folder directory currently playing Repeat play of all of the files The normal playback Track Repeat on Disc Repeat on Repeat off 1 Disappear Repeats the track curr...

Page 40: ...disc The playing time of the disc specified on the jacket etc may not include silence between tracks and may differ from that dis played on the main unit Elapsed time on the display does not indicate the actual time 1 While a disc is playing press the SHIFT button and then the A B REPEAT button TV screen Unit display This registers the start point A 2 Press the SHIFT button and then the A B REPEAT...

Page 41: ...ber of chapters Current chapter number Total number of titles Current title number Disc type Chapter playing time Remaining playing time of the current title Remaining playing time of the current chapter Angle information Repeat mode information Audio language information Subtitle information 1 8 2 10 00 38 58 1 8 2 10 01 09 50 1 8 2 10 00 07 43 1 8 2 10 00 02 38 DEF 1 9 DEF 1 3 1 3 1 19 03 14 L R...

Page 42: ... specified points repeatedly A B repeat 40 To change the display on the main unit 40 To change the display on TV screen 41 To play in random order random play The tracks on the disc can be played in random order automatically To cancel random play Press the button Notes On some discs this function cannot be used You cannot set the random play while in the playback or pause mode Random play is not ...

Page 43: ...number buttons to select the track number TV screen Unit display If the track number is 2 digits or more press 10 and enter the number Example To select track 14 press 10 and 4 To select track 24 press 10 10 and 4 To select track 112 press 10 eleven times and press 2 Select 14 1 While the disc is playing press the DIRECT button Time 2 Specify the time with the direct number buttons Enter minutes a...

Page 44: ...vert MP3 data to audio CD data when recording on a CD R RW play it as an audio CD The MP3 operation cannot be performed Notes Up to 20 characters can be displayed for a folder name and a file name Underlines asterisks and spaces may not be displayed Due to the structure of the disc information it takes longer to read an MP3 WMA or JPEG disc than a normal CD Insert a disc containing MP3 WMA and JPE...

Page 45: ...may not be zoomed or rotated appears 1 While a disc is playing press the SHIFT button and then the ZOOM button 2 Hold down the or button for 2 seconds or more Use the or button to switch the zoom setting as follows 3 To shift the view and display the desired part of a zoomed image press the cursor or button repeatedly Zoom on Zoom 150 Pct Zoom 025 Pct Zoom 050 Pct Zoom 100 Pct Zoom 150 Pct Zoom 20...

Page 46: ... signal stations To stop the auto tuning press the TUNING button again To receive an FM stereo transmission Press the TUNER BAND button to display the STEREO indica tor will appear when an FM broadcast is in stereo If the FM reception is weak press the TUNER BAND button to extinguish the STEREO indicator The reception changes to monaural and the sound becomes clearer ...

Page 47: ... channel number Store the stations in memory in order starting with preset channel 1 4 Within 5 seconds press the ENTER button to store that station in memory If the PROGRAM and preset number indicators go out before the station is memorized repeat the operation from step 2 5 Repeat steps 1 4 to set other stations or to change a pre set station When a new station is stored in memory the station pr...

Page 48: ...he sound quality is emphasized you can enjoy the re alistic sound effect in the home theater system When you set the audio output to DTS for a disc recorded in DTS the indicator lights up see page 34 Disc with this trademark Disc with this trademark Unit display Linear PCM A signal recording format without compression Used in DVD and CD featuring a musical or concert Dolby Pro Logic Stereo recorde...

Page 49: ...fier unit depending on the disc You cannot change the multi channel mode or stereo mode while listening to the radio If sound is unpleasant to listen to change the multi channel mode or stereo mode Settings for the multi channel mode and stereo mode are retained by input DVD AUX DIGITAL and AUX ANALOG When Dolby Pro Logic is activated 2 1 3 4 6 5 8 10 11 9 7 12 13 Audio signal indicator Speaker in...

Page 50: ...er and signals are digitally AUX DIGITAL IN sent to this unit the sound mode is changed to STEREO automatically The sound mode cannot be changed during playback While the disc is playing press the STEREO button Example DTS format You can enjoy 2 channel ste reo sound When you press once the last used setting appears To change it press the button repeatedly within 3 seconds STEREO You can enjoy the...

Page 51: ...le the disc is playing press the MULTI CH button Example DTS format A maximum of 5 1 ch surround sound is reproduced to provide three dimensional effect When you press once the last used setting appears To change it press the button repeatedly within 3 seconds STANDARD You can enjoy the original sound as it is MOVIE The bass level is increased for powerful sound ef fect MUSIC You can enjoy lively ...

Page 52: ...aker SR to 10 feet 3 3 m 2 In Speaker level setting slightly increase the level of the right surround speaker as it is a little farther than others see page 54 3 In Test tone check the sound from each speaker see page 54 FL FR SL Default setting 6 feet 2 m SR SW CT FL FR SL SR SW CT 10 feet 3 3 m Speaker type Delay range Level range FL Front speaker Left 1 to 29 ft 6 dB to 6 dB CT Center speaker 1...

Page 53: ...ange other settings begin from step 2 4 Press the RETURN button twice The setting is complete Speaker Delay Amplifier Setup Speaker Level Test Tone Select Enter Return ENTER Front Speaker Delay Center Front Select Change Return Surround Surround L 6 FT R 6 FT R 6 FT 6 FT L 6 FT 1 Press the SET UP AMP button 2 Within 10 seconds press the or button to select SP DELAY and then press the ENTER button ...

Page 54: ...4 Within 10 seconds press the or button to adjust the level You can adjust the level at 1 dB in tervals To set the level of other speakers repeat the operation from step 3 5 Press the RETURN button twice The setting is complete Speaker Delay Amplifier Setup Speaker Level Test Tone Select Enter Return ENTER Front Speaker Level Select Change Return L 0 dB Center 0 dB Front R 0 dB Surround R 0 dB Sur...

Page 55: ...55 HT X1 Advanced Features Changing the initial setting of DVD Note Settings are retained even if the system is set to the stand by mode ...

Page 56: ...des of the image are cut pan scan to display a natural looking 4 3 size image A 4 3 disc is played in 4 3 4 3 LB When playing a wide image 16 9 disc black bands are inserted at the top and bottom and you can enjoy full wide images 16 9 on a 4 3 size TV A 4 3 disc is played in 4 3 16 9 A wide image 16 9 is displayed when playing a wide image 16 9 disc When playing a 4 3 image disc the image size de...

Page 57: ... turn off the screen saver on the screen press any button on the main unit or remote control Off Cancel the screen saver setting Closed cap tion On Off Select whether to display the closed caption On or not Off On The closed caption data subtitles appear on the TV screen automatically You can see the closed caption data when playing DVD discs with CC on the jacket on this unit Off Cancel the close...

Page 58: ...on 2 Press the cursor or button to select Other and press the ENTER button 3 Press the or button to select H for the first letter 4 Press the or button to move cursor for entering the second letter 5 Press the or button to select U for the second letter 6 Press the ENTER button 7 Press the RETURN button twice The new setting is memorized OSD Language Language Setup Audio Subtitle Disc menu Japanes...

Page 59: ... ET Estonian KU Kurdish EU Basque KY Kirghiz FA Persian LA Latin FI Finnish LN Lingala FJ Fiji LO Laothian FO Faroese LT Lithuanian FR French LV Latvian Lettish Code Language name Code Language name MG Malagasy SN Shona MI Maori SO Somali MK Macedonian SQ Albanian ML Malayalam SR Serbian MN Mongolian SS Siswati MO Moldavian ST Sesotho MR Marathi SU Sundanese MS Malay SV Swedish MT Maltese SW Swahi...

Page 60: ...ress the ON STAND BY button while the sleep timer is set 1 Play back the desired sound source 2 Press the SLEEP button and within 8 seconds press the ENTER button To change the sleep time While the sleep time is displayed press the or button Maximum 3 hours Minimum 5 minutes 3 Within 30 seconds press the ENTER button 4 The system will enter the power stand by mode automati cally after the preset t...

Page 61: ...igital with the AUX DIG ITAL ANALOG button Insert the plugs fully to avoid fuzzy pictures or noise Connection for the analog sound VCR etc Connection for the digital tuner sound or other optical digital equipment such as an MD player If the digital equipment has an optical output jack you can enjoy better sound by connecting it to the optical digital input jack of the main unit using the optical d...

Page 62: ... Avoid placing on a bed sofa water tank sink and hallway wall SHARP is not responsible for accidents resulting from improper installation Sharp has designed the main unit so you can hang it on the wall Use appropriate screws not supplied See the il lustration on the right for size and type 1 Drive two screws into the wall for main unit as shown in the illustration Make sure that both the screw and...

Page 63: ...witched on The video output mode may not match the jacks you are using Change the mode as follows In the stop mode press the SHIFT button and SCAN SELECT button on the re mote control a few times see page 22 Symptom Possible cause Even though a disc is loaded No Disc is dis played Is the disc loaded upside down Is the disc very dirty Does the disc satisfy the standards Is the system located near e...

Page 64: ...lear all the memory by resetting it Clearing all the memory reset 1 Press the ON STAND BY button to enter the power stand by mode 2 While pressing down the button and the FUNCTION button press the ON STAND BY button until SYS RESTORE appears Caution When you reset all data is deleted and the settings return to the default DVD initial settings are retained Symptom Possible cause The radio makes unu...

Page 65: ...e Follow the guide lines below for maximum enjoyment from your disc collection and player Do not write on either side of the disc particularly the non label side from which signals are read Do not mark this surface Keep your discs away from direct sunlight heat and excessive moisture Always hold the discs by the edges Fingerprints dirt or water on the discs can cause noise or mistracking If a disc...

Page 66: ...ideo output RCA type 3 Y PB PR Audio output terminal Headphones 16 50 ohms recommended 32 ohms Audio input terminals Audio input AUX RCA type 2 Optical digital input Square type 1 Other terminal System control 2 Signal system NTSC color Supported disc types DVD region number 1 or ALL DVD R RW video mode DVD R RW video mode audio CD CD R CD RW Video signal Horizontal resolution 500 lines S N ratio ...

Page 67: ...kg Power source AC 120 V 60 Hz Power consumption 208 W Dimensions Width 7 7 8 200 mm Height 15 380 mm Depth 17 1 2 443 mm Weight 23 2 lbs 10 5 kg Speaker terminals Front speakers center speaker and surround speakers more than 4 ohms Other terminals System control 2 Power output FTC 50 watts minimum RMS per channel into 4 ohms from 150 Hz to 20 kHz 10 total harmonic distortion Subwoofer 50 watts mi...

Page 68: ...f any warranties beyond the time period described herein on behalf of Sharp The warranties described herein shall be the sole and exclusive warranties granted by Sharp and shall be the sole and exclusive remedy available to the purchaser Correction of defects in the manner and for the period of time described herein shall constitute complete fulfillment of all liabilities and responsibilities of S...

Reviews: