background image

26

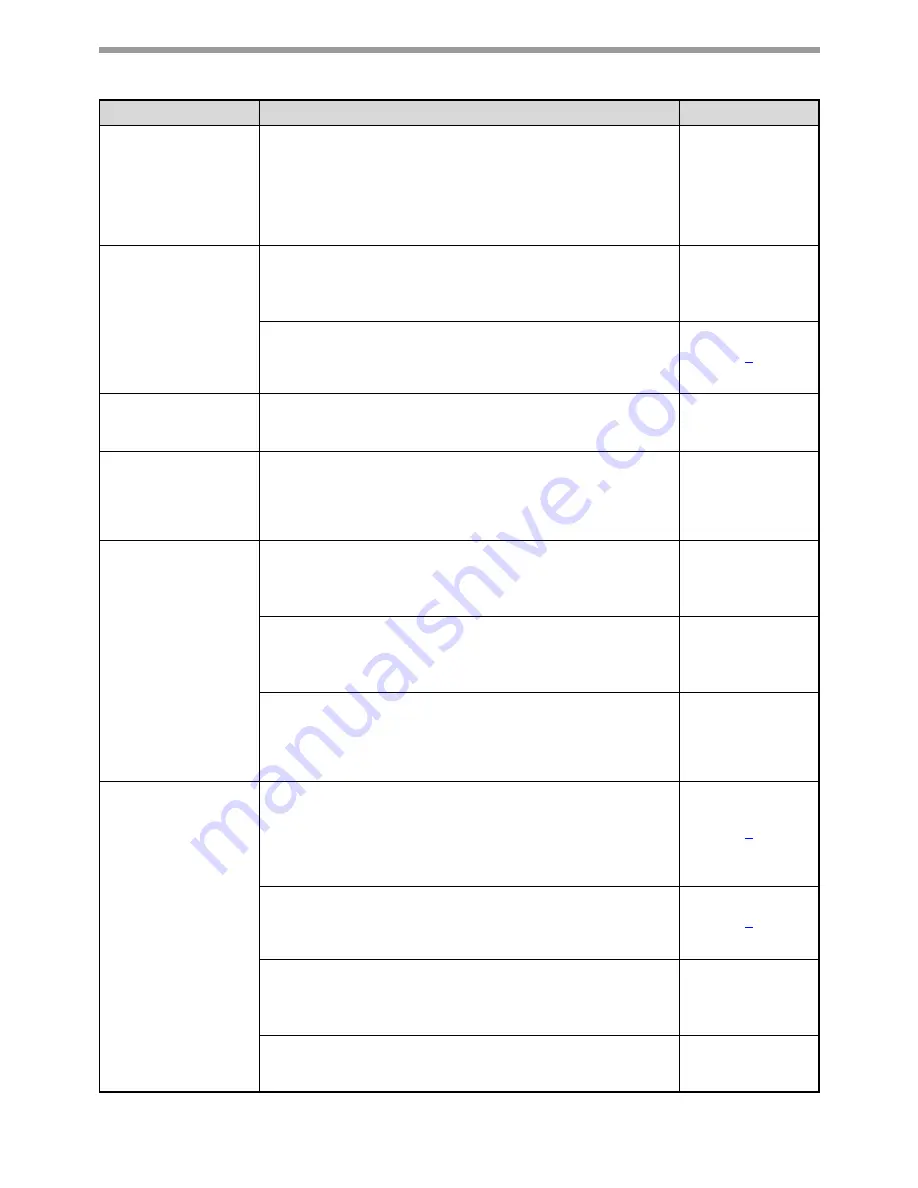
TROUBLESHOOTING

A Notice Page 
(NP-001) has been 
printed, but the 
print data has not 
been printed 
completely.

A print job containing more data than can be held in the 
print memory is sent to the machine.

Disable the ROPM function on the [Configuration] tab of the printer 
driver setup screen. If you need to use the ROPM function, divide the 
pages of the print data into two or more print jobs.

The memory allocated to the printer function can be changed in the 
system setting "MEM. FOR PRINTER".

System settings 

guide

Printing does not 
take place

(DATA indicator is 
blinking.)

There is no paper in the specified tray.

Load paper in the tray.

Operation manual 

(for general 

information and 

copier)

"FORCED OUTPUT OF PRINT" is disabled.

Add paper to the bypass tray, press the [PRINT] key on the machine 
to switch to printer mode, and then select "BYPASS-TRAY". Printing 
will resume.

4

Printing is slow.

Simultaneous use of two or more application software 
programs.

Start printing after quitting all unused application software programs.

The printed image 
is light and 
uneven.

The paper is loaded so that printing takes place on the 
back side of the paper.

Some types of paper have a front and a back side. If the paper is 
loaded so that printing takes place on the back side, toner will not 
adhere well to the paper and a good image will not be obtained.

The printed image 
is dirty.

You are using paper that is outside the specified size and 
weight range.

Use paper within the specified range.

Operation manual 

(for general 

information and 

copier)

The paper is curled or damp.

Replace the paper. During periods when the machine is not used for 
a long time, remove the paper from the tray and store it in a dark 
place in a bag to prevent moisture absorption.

Operation manual 

(for general 

information and 

copier)

You did not set sufficient margins in the paper settings of 
your application.

The top and bottom of the paper may be dirty if the margins are set 
outside of the specified print quality area.

Set the margins within the specified print quality area.

The printed image 
is skewed or it 
runs off the paper.

The paper size set in the printer driver is not the same as 
the paper size loaded in the tray.

Make sure that the paper size setting matches the size of the paper 
loaded in the tray. If the [Fit to Page] setting is selected, make sure 
that the paper size selected in the "Fit To Paper Size" drop-down list 
is the same as the size of the paper loaded in the tray.

6

The image orientation setting in the printer driver is not 
correct. 

Click the [Paper] tab in the printer driver setup screen and make sure 
the "Image Orientation" setting is correct. 

6

Paper is not loaded properly.

Make sure the paper is properly loaded.

Operation manual 

(for general 

information and 

copier)

The margins are not set correctly in the application.

Check the paper size and margin settings in the application. Also 
make sure that the print settings are correct for the paper size.

Problem

Cause and solution

Page

Summary of Contents for FS-C1020MFP

Page 1: ...OPERATION MANUAL for printer and scanner DIGITAL MULTIFUNCTIONAL SYSTEM Page INTRODUCTION 1 CONTENTS 2 PRINT 3 SCAN 12 SYSTEM SETTINGS 23 TROUBLESHOOTING 25 SPECIFICATIONS 29 ...

Page 2: ... of Windows some screen images may be different from those in this manual The explanations in this manual are based on American English and the North American version of the software Software for other countries and regions may vary slightly from the North American version This manual refers to the Reversing single pass feeder as the RSPF and the Single pass feeder as the SPF Unless specific menti...

Page 3: ...8 FITTING THE PRINT IMAGE TO THE PAPER 9 ROTATING THE PRINT IMAGE 180 DEGREES 10 PRINTING A WATERMARK 10 OUTLINE OF THE PRINT STATUS WINDOW 11 2 SCAN SCANNING OVERVIEW 12 SCANNING FROM A TWAIN COMPLIANT APPLICATION 13 SCANNER DRIVER SETTINGS 15 SCANNING FROM A WIA COMPLIANT APPLICATION WINDOWS XP Vista 17 SCANNING FROM THE SCANNER AND CAMERA WIZARD WINDOWS XP 18 SCANNING USING THE KEYS ON THE MACH...

Page 4: ...on to open the printer driver setup screen The printer driver setup screen will appear Windows 2000 does not have the Preferences button in this dialog box Select settings as needed on each of the tabs in the setup screen and click the OK button PRINTER DRIVER SETTINGS page 6 TWO SIDED PRINTING ONLY FOR MODELS THAT SUPPORT TWO SIDED PRINTING page 7 PRINTING MULTIPLE PAGES ON ONE PAGE page 8 FITTIN...

Page 5: ...achine the printing procedure will vary depending on the FORCED OUTPUT OF PRINT setting page 23 in the system settings When FORCED OUTPUT OF PRINT is disabled Add paper to the bypass tray press the PRINT key on the machine to switch to printer mode and select BYPASS TRAY Printing will resume When FORCED OUTPUT OF PRINT is enabled The closest size of paper in a tray other than the bypass tray will ...

Page 6: ...and then select Printer In Windows XP click the start button and then click Printers and Faxes In Windows 2000 click the Start button and point to Settings and then select Printers 2 Click the SHARP MX xxxx printer driver icon 3 Select Properties from the Organize menu In Windows XP 2000 select Properties from the File menu 4 Click the Printing Preferences button in the General tab The printer dri...

Page 7: ... of paper trays The tray selected in Paper Source in the Paper tab appears in blue You can also click on a tray to select it 7 OK button Click this button to save your settings and exit the dialog box 8 Cancel button Click this button to exit the dialog box without making any changes to the settings 9 Apply button Click to save your settings without closing the dialog box 10 Help button Click this...

Page 8: ...he Main tab To open the printer driver see BASIC PRINTING page 3 The following example shows the result when portrait data is printed on both sides of the paper Paper sizes that can be used for two sided printing are Ledger Letter Legal Foolscap A3 A4 A5 B4 and B5 The bypass tray cannot be used for two sided printing Print data Printing result 2 Sided Book 2 Sided Tablet The pages are printed so t...

Page 9: ...3 For example when 2 Up 4 Up or 6 Up is selected the result will be as follows depending on the selected order If you select the Border checkbox borderlines will be printed around each page The N Up Printing setting is not available when Fit To Paper Size is selected FITTING THE PRINT IMAGE TO THE PAPER page 9 N Up Left to Right Right to Left 2 Up N Up Right and Down Down and Right Left and Down D...

Page 10: ...n the printer driver setup screen 2 Select the original size Ledger or A3 of the print image in Paper Size 3 Select Fit To Paper Size 4 Select the size of the paper Letter or A4 that is loaded in the machine from Fit to Paper Size The size of the print image will be automatically adjusted to match the paper loaded in the machine The Fit To Paper Size setting is not available when N Up Printing is ...

Page 11: ...on your document To print a watermark open the printer driver setup screen click the Watermarks tab and follow the steps below To open the printer driver see BASIC PRINTING page 3 How to Print a Watermark From the Watermark drop down list select the watermark that you wish to print for example CONFIDENTIAL and start printing You can enter text to create your own custom watermark For details on wat...

Page 12: ...plained below Follow the instructions in the status window to solve the problem 3 Tab Click a tab to bring it to the front The Options tab allows you to select display options for the Print Status Window 4 Document Name Shows the name of the document currently being printed 5 Cancel Job button Printing can be canceled by clicking this button before the machine receives the job 6 Help button Click ...

Page 13: ...E MACHINE in the Software setup guide The environment in which the machine s scanning function can be used is subject to certain limitations For more information see 1 INSTALLING THE SOFTWARE THAT ACCOMPANIES THE MACHINE in the Software setup guide Caution Scanning from a TWAIN 1 compliant or WIA 2 compliant application Scanning from the Scanner and Camera Wizard Windows XP Using the machine to be...

Page 14: ...the Preview button The preview image will appear If you are using Windows XP Vista you can also select WIA SHARP MX xxxx to scan using the WIA driver SCANNING FROM A WIA COMPLIANT APPLICATION WINDOWS XP Vista page 17 Depending on your system SHARP MFP TWAIN W 1 0 32 32 or WIA SHARP MX xxxx 1 0 32 32 may appear in the above select source screen Note If you selected SPF Duplex Book or SPF Duplex Tab...

Page 15: ...When selecting the scan preferences lower the resolution or specify a suitable scanning area The scan resolution will vary depending on the scanning area and how much memory in the machine is free For example if a letter or A4 original is scanned in full color at 300 dpi with only the standard memory installed the machine will scan the original in full color at 150 dpi and the scanner driver will ...

Page 16: ...he settings click the Help button in the preview screen to display Help 3 Image Area menu Set the scanning area To scan the original size detected by the machine select Auto The scanning area can also be specified as desired in the preview window 4 Zoom Preview checkbox When this is selected the selected part of the preview image will be enlarged when the Preview button is clicked To return to the...

Page 17: ...ion shown in the preview window 3 Image Size button Click this button to open a dialog box that allows you to specify the scanning area by entering numbers Pixels mm or inches can be selected for the units of the numbers By initially specifying a scanning area numbers can be entered to change that area relative to the top left corner as a fixed origin 4 Auto Scan Area Adjustment button Auto Scan A...

Page 18: ...he Paper source If you placed the original in the SPF select Document Feeder for the Paper source and specify the original size in Page size 4 Click the Scan button Scanning begins and the image is acquired into Paint Use Save in your application to select a file name and folder for the scanned image and save the image To cancel scanning after the Scan button has been clicked click the Cancel butt...

Page 19: ...asks The Scanner and Camera Wizard will appear 4 Click the Next button 5 Select the Picture type and Paper source and click the Next button If you placed the original on the document glass select Flatbed for the Paper source If you placed the original in the SPF select Document Feeder for the Paper source and specify the original size in Page size You can click the Preview button to display the pr...

Page 20: ...canning click the Next button 7 When scanning ends the following screen will appear Select the next task you wish to perform and then click the Next button If you are ready to end the session click Nothing I m finished working with these pictures 8 Click the Finish button The Scanner and Camera Wizard closes and the scanned image is saved in the specified folder ...

Page 21: ...GS page 22 4 Press the OK key The selected destination appears 5 Press the START key Scanning begins Scanner mode cannot be used in the following situations A problem has occurred in the machine such as a paper misfeed or an open cover The system settings are being used The tray paper size is being set During copying or printing During scanning of an original for a fax transmission when the fax op...

Page 22: ...ing 1 Tab Select the desired destination The tabs contain scan settings for each of the scan destinations SC1 through SC6 on the machine 2 Application Selection area Select the application that starts up here 3 Show TWAIN setting screen when scanning checkbox Select whether or not the TWAIN screen is shown when scanning When the checkbox is selected the TWAIN screen appears when scanning is execut...

Page 23: ... If the Button Manager icon does not appear on the task bar click the start button select All Programs Programs in Windows 2000 select Sharp Button Manager W and then click Button Manager to start Button Manager The Button Manager icon appears on the task bar If the Show TWAIN setting screen when scanning checkbox is selected the setting screen will appear when scanning is executed to let you adju...

Page 24: ...n the checkbox A checkmark in the checkbox indicates that ENABLE is selected No checkmark indicates that DISABLE is selected For the initial administrator password set at the factory see PROGRAMMING AN ADMINISTRATOR PASSWORD in the System settings guide Mode System settings Settings Explanation Printer NOTICE PAGE ENABLE DISABLE Select whether or not a Notice Page is printed when printing is not s...

Page 25: ...the OK key To cancel a selection press the OK key once again to remove the checkmark and disable the function Go to step 9 When the OK key is pressed for a program that does not have a checkbox the settings for the program appear 8 Press the OK key and follow the instructions in the program screen 9 To use another program for the same mode select the desired program with the or key To use a progra...

Page 26: ... a fax is being printed when the fax option is installed Wait until copying scanning or fax printing is finished Has the printer driver been installed correctly Follow these steps to check and see if the printer driver is installed 1 Click the Start button click Control Panel and then click Printer In Windows XP click the start button and then click Printer and Faxes In Windows 2000 click the Star...

Page 27: ...hat is outside the specified size and weight range Use paper within the specified range Operation manual for general information and copier The paper is curled or damp Replace the paper During periods when the machine is not used for a long time remove the paper from the tray and store it in a dark place in a bag to prevent moisture absorption Operation manual for general information and copier Yo...

Page 28: ...To adjust the threshold automatically click the Auto Threshold button on the Image tab of the Custom Settings or Professional screen Poor scanning quality The brightness and contrast settings are not suitable If you are scanning with a TWAIN compliant application and the resulting image has unsuitable brightness or contrast for example it is too bright click the Auto Brightness Contrast Adjustment...

Page 29: ... your application Make sure that the machine s scanner driver is selected in your TWAIN WIA compliant application 13 You have not specified all scanning preferences appropriately Scanning a large area at high resolution results in a large quantity of data and a prolonged scanning time When selecting the scan preferences lower the resolution or specify a suitable scanning area 14 DISABLE USB SCAN h...

Page 30: ...d MX M200D 20 pages min MX M160D MX M160 16 pages min Resolution 600 dpi Memory Page memory MX M200D MX M160D 32 MB MX M160 16 MB IMC Memory 16 MB Emulation SPLC Sharp Printer Language with Compression Memory expansion 256 MB expansion memory board AR SM5 can be installed in one DIMM expansion slot Interface port USB 2 0 port Interface cables USB cable Shielded twisted pair cable max length 10 fee...

Page 31: ...ine Scanning colors Black and white 2 value Grayscale Full Color Protocol TWAIN WIA Windows XP Vista STI Interface port USB 2 0 port Drop out color Yes Supported operating systems Windows 2000 XP Vista For more information see 1 INSTALLING THE SOFTWARE THAT ACCOMPANIES THE MACHINE in the Software setup guide Void area Top and bottom edges 7 64 2 5 mm right and left edges 1 8 3 0 mm at the peripher...

Page 32: ...OPERATION MANUAL for printer and scanner MXM200D EN1 PRINTER ...

Reviews: