background image

F

UNC

TIONS

– 10 –

EN

Before:

 Turn on the TV, amplifier and any other equipments which 

are connected to this unit. Make sure the TV and audio receiver (com-
mercially available) are set to the correct channel.


(

 page 12

)

Hint

You can change the On-Screen language in “PLAYER MENU” setting. 
(Refer to pages 16, 17.)

DV- M X 1

PROGRESSIVE

LABEL-SIDE

STOP

POWER

PLAY

EJECT

1

3

4

2

RETURN

ZOOM

MODE

MENU

SKIP

PAUSE

A-B

REPEAT

ANGLE

AUDIO

SUB

TITLE

CLEAR

TOP MENU

STOP

PLAY

FWD

REV

SETUP

ENTER

EJECT

SEARCH

MODE

DISPLAY

1

2

3

4

5

6

7

8

9

0

+10

POWER

DVD VIDEO PLAYER

4

3

1

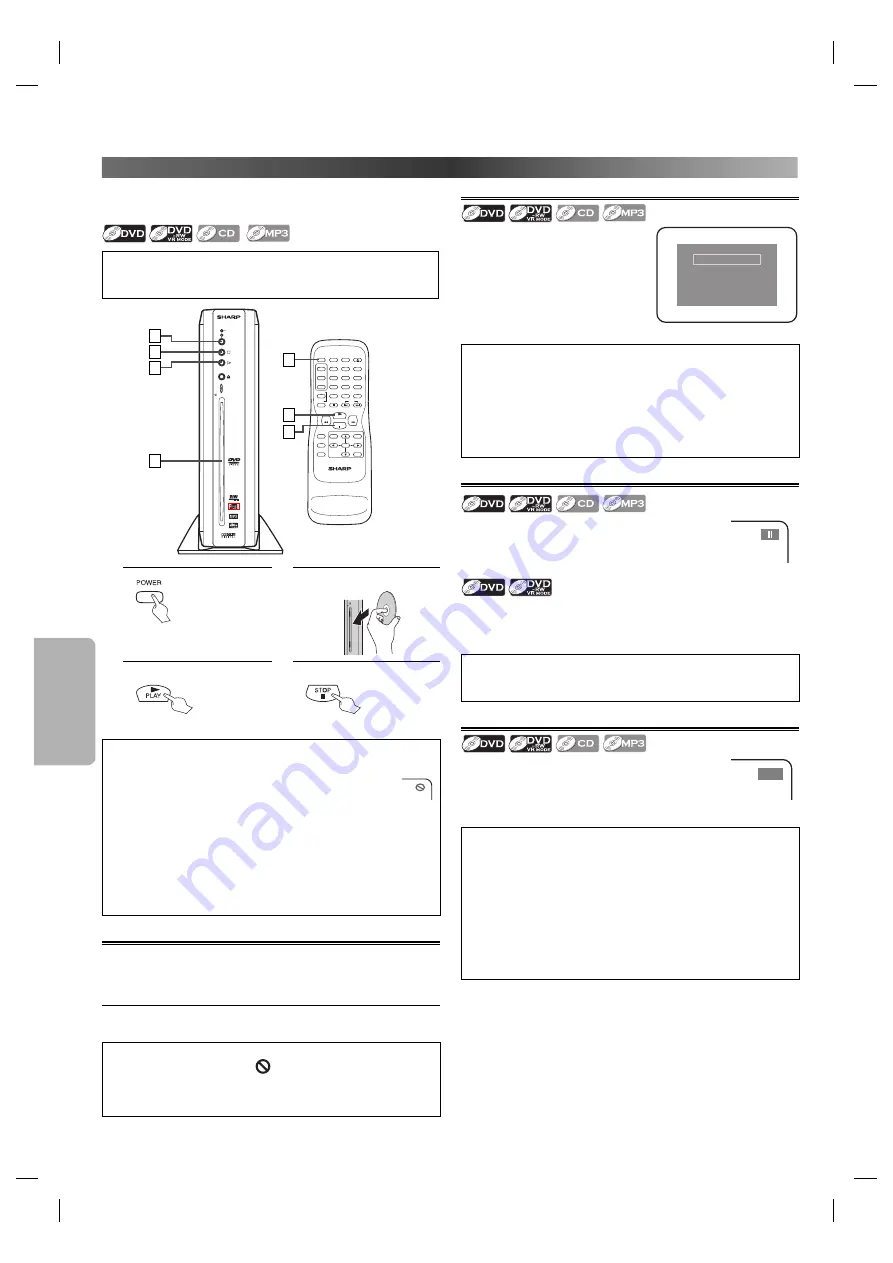
1. 

2.

Insert a disc with label 
facing to the left.

LABEL-SIDE

3.

To start playback.

4.

To stop playback.

Hint

• When you play MP3 files, details are on page 12.
•  A “prohibited icon” may appear at the top-right on the TV

screen when the operation is prohibited by the disc or this 
unit.  


• Some DVDs may start playback from title 2 or 3 due to specific 

programs.

• During the playback of a 2-layered disc, pictures may stop for a 

moment. This happens while the 1st layer is being switched to the 
2nd layer. This is not a malfunction.

• A DVD-RW disc recorded in the VR mode may freeze momentarily 

during playback depending on how the playlist was made and 
edited (deleted titles, repeated recording).

DISC Menu

Some discs contain menus which allow you to customize disc playback.

Use 

Cursor


K

 / 

L

 / 

s

 / 

B

 or 

the Number buttons

 to select an item, 

then press 

ENTER

 or 

PLAY


B

.

Calling up a Menu Screen (for playback of a DVD Video)

• Press 

MENU

 to call up the DVD menu.

• Press 

TOP MENU

 to call up the title menu.

Hint

• If the feature is not available, 

 symbol may appear on the TV 

screen.

•  Menu operations may vary depending on the disc. Refer to the 

manual accompanying the disc for more details.

Resume

Press 'PLAY' to play from here.
To play the beginning, 
press 'STOP' first and then 'PLAY'.

Resume ON

<Example : DVD>


Press 

STOP


C

 during playback. 

Resume message will appear on the 
TV screen.

Press 

PLAY


B

, playback will resume 

from the point at which playback was 
stopped.

Hint

•  To cancel resume, press 

STOP


C

 one more time during the stop 

mode. On some discs, 

STOP


C

 will not work while the Resume 

message appears. Please wait until the message disappears.

• For MP3, playback will resume from the beginning of the track at 

which playback was stopped.

•  The resume information will be kept even when the power is 

turned off.

Paused and Step-by-Step Playback


Press 

PAUSE


F

 during playback.

•  Playback will be paused and sound will be muted. 

To continue playback, press 

PLAY


B

.


The disc goes forward by one frame each time 

PAUSE


F

 is pressed 

during the pause mode.

To continue playback, press 

PLAY


B

Hint

•  On DVDs, set “STILL MODE” to “FIELD” in the DISPLAY menu if pic-

tures in the pause mode are blurred. (Refer to pages 16, 17.)

Fast Forward/Reverse Search


Press 

FWD


g

 or 

REV 

h

 repeatedly during play-

back to select the required forward or reverse speed.  

To continue playback, press 

PLAY


B

E


1

Hint

•  On DVDs, set “STILL MODE” to “FIELD” in the DISPLAY menu if pic-

tures during Fast Forward and Reverse Search are blurred.

•  For DVDs, Fast Forward or Reverse Search speed is different 

depending on the disc.

• For DVDs, approximate speed is 1(x2), 2(x8), 3(x20), 4(x50) and 5(x100).

•  For Audio CDs and MP3, approximate speed is 1(x2), 2(x8) and 

3(x30).

• For Audio CDs and MP3, sound will be output during Fast Forward 

or Reverse Search. 

FUNCTIONS

P

LAYBACK

E61U1UD_2.indd   10

E61U1UD_2.indd   10

8/8/2005   11:51:52 AM

8/8/2005   11:51:52 AM

Summary of Contents for DV-MX1U

Page 1: ...ase read this Operation Manual carefully before using your DVD Video Player INSTRUCCIONES EN ESPAÑOL INCLUIDAS 1 DV MX1 PROGRESSIVE LABEL SIDE STOP POWER PLAY EJECT P REFACE I NFORMATION S ETUP F UNCTIONS E SPAÑOL P RECAUTIONS E61U1UD_1 indd 1 E61U1UD_1 indd 1 8 8 2005 11 49 28 AM 8 8 2005 11 49 28 AM ...

Page 2: ...the limits for a Class B digital device pursuant to Part 15 of the FCC Rules These limits are designed to provide reasonable protection against harmful interference in a residential installation This equipment generates uses and can radiate radio frequency energy and if not installed and used in accordance with the instructions may cause harmful interference to radio communications However there i...

Page 3: ...not likely to be walked on or pinched by items placed upon or against them paying particular attention to cords at plugs convenience recep tacles and the point where they exit from the product 14 Lightning For added protection for this product during a lightning storm or when it is left unattended and unused for long periods of time unplug it from the wall outlet and disconnect the antenna or cabl...

Page 4: ...d Handling 5 Warning of Dew Formation 5 Maintenance 5 ABOUT THE DISCS 6 Playable Discs 6 Unplayable Discs 6 ABOUT THE REMOTE CONTROL 7 Installing the Batteries for the Remote Control 7 Operable Range 7 SETUP CONNECTIONS 8 Connection to a TV 8 RF Modulator Connection 8 Connection to an Audio System 9 Rear Terminals 9 FUNCTIONS PLAYBACK 10 DISC Menu Resume Paused and Step by Step Playback Fast Forwa...

Page 5: ...e temperature of the unit may increase slightly This is not a malfunction Keep the unit away from strong magnetic objects Do not place any object containing water or other liquids on the unit In the event that liquid should enter the cabinet unplug the unit immediately and contact the retailer or service center approved by SHARP immediately Do not remove the unit s cabinet Touching parts inside th...

Page 6: ...DVD recorder Refer to the manual accompanying the DVD recorder 7 Only the discs recorded in the video mode and finalized can be played back Unfinalized discs cannot be played back Depending on the recording status of a disc the disc may not be played back at all or the picture or sound may not be smooth etc 8 If the recorded portion of the disc is too small less than 2 3 16 inches 55 mm across it ...

Page 7: ...t To clear the markers CD To remove status number in program input To clear the numbers entered incorrectly To cancel the point for A B repeat CD 30 9 To display the current disc mode To display the current disc mode 4 To eject the disc To eject the disc 7 2 6 To search forward backward through a disc To begin slow forward reverse playback during the pause mode To search forward backward through a...

Page 8: ...d you want to enjoy that high quality picture You must select the connection Method 3 above and progressive scanning mode To set the mode set PROGRESSIVE to ON in the DISPLAY menu so that the PROGRESSIVE indicator on the front panel lights on See pages 16 17 for more details When PROGRESSIVE is ON video signals from the unit s VIDEO OUT and S VIDEO OUT jacks will be distorted or not be output at a...

Page 9: ...tting Analog recording is possible but not for DTS recorded audio Setting Connection SETUP QUICK DOLBY DIGITAL DTS Connecting to a Dolby Digital or DTS decoder for Dolby Digital or DTS audio output BITSTREAM Connecting to the other equipment an MD deck or DAT deck etc without Dolby Digital decoder DPCM OFF To complete these settings refer to pages 16 18 Hint The audio source on a disc in a Dolby D...

Page 10: ...screen Menu operations may vary depending on the disc Refer to the manual accompanying the disc for more details Resume Press PLAY to play from here To play the beginning press STOP first and then PLAY Resume ON Example DVD Press STOP C during playback Resume message will appear on the TV screen Press PLAY B playback will resume from the point at which playback was stopped Hint To cancel resume pr...

Page 11: ...l playback OFF No effects 3 To continue normal playback press PLAY B Hint Audio language setting cannot be changed while using this mode Virtual Surround and Black Level Setting cannot be changed while using this mode Virtual Surround does not function while using this mode This feature may not work at some point in a disc When using digital audio connection the DPCM sound will be output Playing t...

Page 12: ... time of the current track Remaining time of the current track Current playback status 1 3 4 12 0 13 45 0 45 40 T Current repeat setting appears only when the repeat setting is active T Track repeat A All tracks repeat A B A B repeat ALL Current track number Total tracks Elapsed time of the entire disc Remaining time of the entire disc 2 Hint When you are playing a disc in PROGRAM or RANDOM mode P...

Page 13: ...g played this function can also be performed by directly entering the desired chapter number with the Number buttons Refer to the manual accompanying the disc Time Search 1 1 29 00 TOTAL Press SEARCH MODE repeatedly until appears 2 within 30 seconds 1 29 00 TOTAL Hint When there is no need to enter a number 0 appears automati cally For example 0 0_ _ _ appears in the Time Search display if the tot...

Page 14: ...OTAL 0 00 00 1 1 1 3 T 1 3 31 T 2 4 28 T 3 4 19 T 4 3 58 T 5 4 12 T 6 4 02 T 7 3 55 T 1 3 31 Press once 2 PROGRAM ENTER PLAY CLEAR CD DA TOTAL 0 08 22 1 1 3 3 T 15 3 18 T 16 4 24 ALL CLEAR T 4 3 58 T 16 4 24 T 16 4 24 or Up to 99 tracks can be ordered If 8 or more tracks were in a program use SKIP H G to see all the tracks While a MP3 folder is open Press Cursor B when you want to go to the next h...

Page 15: ...the disc When NOT AVAILABLE appears on the TV screen it means no audio is recorded on the scene If you choose a language that has 3 letter language code the code will be displayed every time you change the audio language setting If you choose any other languages will be displayed instead Refer to page 19 For VR mode only Pressing AUDIO cycles the sound mode through MAIN SUB MAIN SUB DVD RW discs r...

Page 16: ...t QUICK on pages 17 18 indicates DVD Setup menus also accessible from the QUICK SETUP menu LANGUAGE menu LANGUAGE Setting p 17 DISPLAY Setting p 17 AUDIO Setting p 18 AUDIO menu DISPLAY menu PARENTAL Setting p 18 OTHERS Setting p 19 PARENTAL ENTER PARENTAL LEVEL ALL OTHERS ANGLE ICON AUTO POWER OFF ON ON ENTER PARENTAL menu OTHERS menu LANGUAGE AUDIO SUBTITLE DISC MENU PLAYER MENU ORIGINAL OFF ENG...

Page 17: ...ENTER DISPLAY menu Select the desired item or TV ASPECT QUICK Default 4 3 LETTER BOX See hint below TV ASPECT 4 3 LETTERBOX STILL MODE AUTO PROGRESSIVE OFF 4 3 LETTER BOX 4 3 PAN SCAN 16 9 WIDE TV ASPECT STILL MODE Default AUTO See hint below Select the desired setting or Select the desired setting or 9 3 EFORE PROCEEDINGx AKE SURE YOUR 46 HAS PROGRESSIVE SCAN ONNECT WITH COMPONENT VIDEO CABLE 4 F...

Page 18: ...s your children from viewing inappropriate mate rials Parental Levels Parental Level allows you to set the rating levels of your DVD discs Playback will stop if the ratings exceed the levels you set Follow the steps in the CUSTOM Menu on page 16 1 PARENTAL PASSWORD Please enter a 4 digit password ENTER Enter your desired four digit password except for 4737 PARENTAL menu PASSWORD Please enter a 4 d...

Page 19: ...4853 Burmese 5971 Byelorussian 4851 C E Cambodian 5759 Catalan 4947 Chinese CHI 7254 Corsican 4961 Croatian 5464 Czech 4965 Danish DAN 5047 Dutch DUT 6058 English ENG 5160 Esperanto 5161 Estonian 5166 F H Faroese 5261 Fiji 5256 Finnish FIN 5255 French FRE 5264 Frisian 5271 Galician 5358 Georgian 5747 German GER 5051 Greek GRE 5158 Greenlandic 5758 Guarani 5360 Gujarati 5367 Hausa 5447 Hebrew 5569 ...

Page 20: ...rwarding or rewinding This is not a malfunction Audio or subtitle language does not match the set up The selected language is not available for audio or subtitles on the DVD This is not a malfunction The camera angle cannot be changed The DVD does not contain sequences recorded from different camera angles This is not a malfunction Audio or subtitle language cannot be changed The DVD does not cont...

Page 21: ... digital de Clase B de conformidad con la Parte 15 de las reglas de la FCC Comisión Federal de Comunicaciones Estas reglas están diseñadas para asegurar una protección razonable contra interferencias perjudiciales en las instalaciones residenciales Este equipo genera utiliza y puede emitir energía de radiofrecuencia y si no se instala y utiliza debidamente es decir conforme a las instrucciones pod...

Page 22: ...abilidad de que sean pisados o aplastados por otros objetos sea mín ima Preste especial atención a las clavijas de los cables a los receptáculos y al punto por donde salen del producto 14 Tormentas eléctricas Como medida adicional de protec ción durante tormentas eléctricas o cuando el producto per manezca sin uso durante períodos prolongados de tiempo desconéctelo del tomoacorriente mural y desco...

Page 23: ... los marcadores CD Para eliminar el Nº de estado en la entrada de programa Para borrar los números mal entrados Para borrar el punto para la repetición A B CD Para mostrar el modo de disco actual Para mostrar el modo de disco actual Para expulsar el disco Para expulsar el disco 7 2 6 Para buscar en avance retroceso por un disco Para empezar la reproducción en avance lento retroceso durante el modo...

Page 24: ...he period of time described herein shall constitute complete fulfillment of all liabilities and responsibilities of Sharp to the purchaser with respect to the Product and shall constitute full satisfaction of all claims whether based on contract negligence strict liability or otherwise In no event shall Sharp be liable or in any way responsible for any damages or defects in the Product which were ...

Reviews: