background image

14

DK-A10P

DK-A10P (BK)

Basic Operation

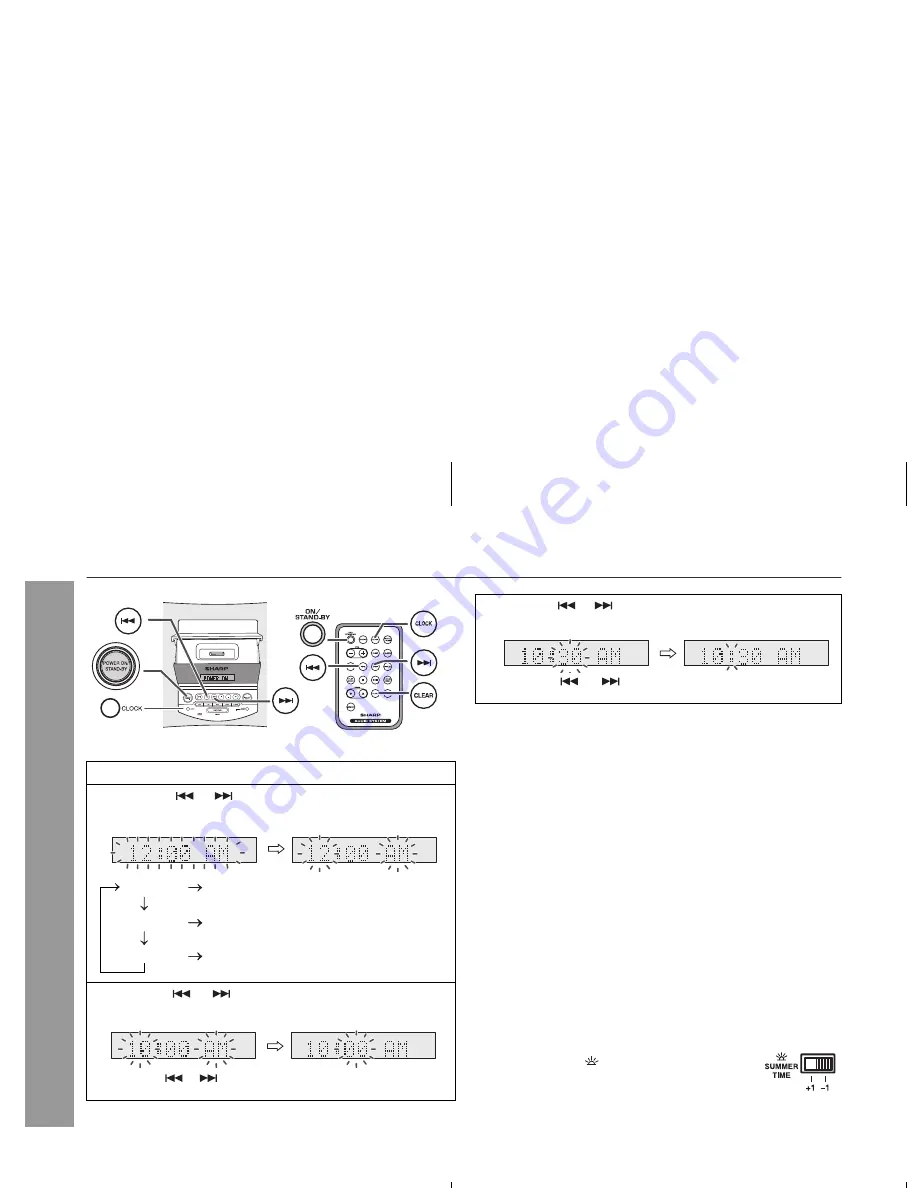
Setting the clock 

In this example, the clock is set for the 12-hour (12:00 AM) display.

To confirm the time display:

[When the unit is in the stand-by mode or demonstration mode.]
Press the CLOCK button to enter the clock function.

[When the power is on]
Press DISPLAY button on the remote control to toggle between the
function information and clock display.
 

Notes:

The clock will continue counting for 8 hours should there be a
power failure or the AC power cord becomes disconnected.
The “CLOCK ADJ” will appear or time will flash to confirm the time
display when the AC power supply is restored after a power failure
or unplugging the unit after 8 hours. If incorrect, readjust the clock
as follows.

To readjust the clock:

Perform “Setting the clock” from step 1 to step 4.

To change the 12-hour or 24-hour display:

Summer time:

The Summer Time switch is located on the rear of the unit.

1

Press the CLOCK button for more than 2 seconds.

2

Press the  

 or 

  button to select 12-hour or 24-hour

display and then press the CLOCK button.

The 12-hour display will appear.


(12:00 AM - 11:59 PM)

The 12-hour display will appear.


(0:00 AM - 11:59 PM)

The 24-hour display will appear.


(0:00 - 23:59)

3

Press the 

 or 

  button to adjust the hour and then

press the CLOCK button.

Press the 

 or 

 button once to advance the time by 1 hour.

Hold it down to advance continuously.

4

Press the 

 or 

 button to adjust the minutes and then

press the CLOCK button.

Press the 

 or 

 button once to advance the time by

1 minute. Hold it down to change the time in 5-minutes interval.

1

Clear all the programmed contents. [Refer to “Clearing all the
memory (reset)” on page 30 for details.]

2

Perform “Setting the clock” from step 1.

1

Slide the Summer Time switch to +1 to advance
the time 1 hour. 

 indicator will appear.

2

Slide the Summer Time switch to -1 to turn the 
clock back 1 hour.

“12:00 AM”

“0:00 AM”

“0:00”

Summary of Contents for DK-A10P

Page 1: ...nc Accessories Please confirm that only the following accessories are included Remote control 1 RRMCGA110AWSA DK A10P RRMCGA111AWSA DK A10P BK AM loop antenna 1 QANTL0010AWZZ FM antenna 1 QANTW0004AW09 DK A10P 92LFANT1535A DK A10P BK AC power cord 1 QACCD0025AW09 DK A10P QACCD0025AWZZ DK A10P BK iPod adaptor 8 UACRTA008AW01 GCOVAA196AWSA DK A10P GCOVAA196AWSB DK A10P BK iPhone adaptor 1 MUSIC SYST...

Page 2: ...ce pursuant to Part 15 of the FCC Rules These limits are designed to provide reasonable protection against harmful in terference in a residential installation This equipment generates uses and can radiate radio frequency energy and if not installed and used in accordance with the instructions may cause harmful interference to ra dio communications However there is no guarantee that interference wi...

Page 3: ...the power cord from being walked on or pinched particularly at plugs convenience receptacles and the point where they exit from the apparatus 11 Only use attachments accessories specified by the manufacturer 12 Use only with the cart stand tripod bracket or table specified by the manufacturer or sold with the apparatus When a cart is used use caution when moving the cart apparatus combination to a...

Page 4: ...r ceiling mounting When mounting the product on a wall or ceiling be sure to install the product according to the method recommended by the manufacturer 22 Power Lines An outside antenna system should not be located in the vicinity of overhead power lines or other electric light or power circuits or where it can fall into such power lines or circuits When installing an outside antenna system extre...

Page 5: ...Fraunhofer IIS and Thomson Contents Page General Information Precautions 6 Controls and indicators 7 9 Preparation for Use System connections 10 11 Remote control 12 Basic Operation General control 13 Setting the clock 14 iPod and iPhone Listening to the iPod or iPhone 15 18 CD or MP3 WMA disc Playback Listening to a CD or MP3 WMA disc 18 19 Advanced CD or MP3 WMA disc playback 20 21 MP3 WMA folde...

Page 6: ... on with the volume control setting up high or while continually listening at high volumes Excessive sound pressure from earphones and headphones can cause hearing loss Please ensure that the equipment is positioned in a well ventilated area and ensure that there is at least 4 10 cm of free space along the sides top and back of the equipment Use the unit on a firm level surface free from vibration...

Page 7: ...CD Eject Button 19 12 Disc Slot 19 13 Alarm Indicator 26 14 Alarm ON OFF Button 26 15 E Sound Demo Button 11 13 16 Play Pause Button 17 19 17 Skip Down Tuner Preset Down Button 14 17 19 25 18 Skip Up Tuner Preset Up Button 14 17 19 25 19 Disc Stop Button 19 20 Volume Down Button 13 21 Volume Up Button 13 4 3 2 5 11 12 14 15 13 1 16 17 18 19 20 21 6 7 8 9 10 The model name serial no label The iPod ...

Page 8: ...24 10 FM Stereo Receiving Indicator 24 11 Total Indicator 19 23 12 Random Indicator 20 13 Summer Time Indicator 14 14 Pause Indicator 17 19 15 Memory Indicator 21 16 Repeat Play Indicator 20 17 Play Indicator 19 Rear panel Reference page 1 FM 75 Ohms Antenna Jack 10 2 AM Antenna Ground Terminal 10 3 Summer Time Switch 14 4 AM Loop Antenna Terminal 10 5 Video Out Jack 10 6 Auxiliary Input Jacks 28 ...

Page 9: ... Up and Down select iPod Menu items Buttons 24 10 Memory iPod Enter Button 21 25 11 Clock Button 14 12 Snooze Dimmer Button 13 26 13 Sleep Button 27 14 Alarm Button 26 15 Skip Up Tuner Preset Up Button 14 17 19 25 16 Display Button 17 17 Play Pause Button 17 19 18 E Sound Demo Button 11 13 19 Clear iPod Menu Button 21 20 EQ Button 13 Note Before using remote control please remove plastic shield at...

Page 10: ...er connection After checking all the connections have been made correctly plug the AC power cord of this unit into the AC outlet If you plug in the unit first the unit will enter the demonstration mode Note Unplug the AC power cord from the AC outlet if the unit will not be in use for a prolonged period of time Make sure to unplug the AC power cord before making any connections Supplied FM antenna...

Page 11: ...c slot will blink To cancel the demonstration mode When the unit is in the demonstration mode press the E SOUND DEMO button The unit will enter the power stand by mode low power consumption mode To return to the demonstration mode When the unit is in the power stand by mode press the E SOUND DEMO button again Note When the power is on the E SOUND DEMO button can be used to select the E SOUND mode ...

Page 12: ...r if the operation becomes erratic Purchase CR 2025 coin lithium battery Periodically clean the transmitter on the remote control and the sensor on the unit with a soft cloth Exposing the sensor on the unit to strong light may interfere with operation Change the lighting or the direction of the unit if this occurs Keep the remote control away from moisture heat shock and vibrations Test of the rem...

Page 13: ... ON is selected the unit will enter the E SOUND mode and adjust low bass and high frequency automatically according to volume input Equalizer When the EQ button is pressed the current mode setting will be displayed To change to a different mode press the EQ button repeatedly until the desired sound mode appears Function When the FUNCTION button on remote control is pressed the current function wil...

Page 14: ...ur display Summer time The Summer Time switch is located on the rear of the unit 1 Press the CLOCK button for more than 2 seconds 2 Press the or button to select 12 hour or 24 hour display and then press the CLOCK button The 12 hour display will appear 12 00 AM 11 59 PM The 12 hour display will appear 0 00 AM 11 59 PM The 24 hour display will appear 0 00 23 59 3 Press the or button to adjust the h...

Page 15: ...turns on and the iPod function is activated button main unit and remote control The unit turns on and playback of the last function will start iPod CD TUNER AUX iPod and iPhone adaptor connection Choose the iPod or iPhone adaptor that fits your iPod or iPhone Your iPod or iPhone will fit snuggly into the correct adaptor If your iPod is not mentioned below an iPod adaptor may have been included wit...

Page 16: ...od or iPhone from the iPod dock It is safe to do so even during playback Dock connector iPod or iPhone bottom iPod or iPhone iPod adaptor iPod connector iPod dock 1 Press the ON STAND BY button to turn the power on The iPod terminal door will automatically open when the display is on 2 Press the iPod button on the main unit once or FUNCTION button on remote control repeatedly to select iPod functi...

Page 17: ...arm function System off stand by operation When the main unit is turned to stand by mode the docked iPod unit will automatically turn to stand by mode and iPod dock door will remain open iPod or iPhone playback detection function Once play button on iPod or iPhone unit is pressed the unit will automatically change to iPod function overriding the previous function selected Caution Unplug all access...

Page 18: ...s developed by Microsoft as an audio format file for Windows Media Player MP3 and WMA indicator will light up after the unit reads information on an MP3 or WMA disc Bitrate which is supported by WMA is 64 160 kbps Auto power on function When you press any of the following buttons the unit turns on CD button main unit The unit turns on and the CD function is activated button main unit and remote co...

Page 19: ...the button to start playback To remove the disc In the stop mode press the button 5 12 cm 3 8 cm Total number of tracks on the disc Total playing time of the disc Total number of files Disc Name CD MP3 WMA Disc play indicator Function Main unit Remote control Operation Play Press in the stop mode Stop Press in the playback mode Pause Press in the playback mode Press the button to resume playback f...

Page 20: ...uring random play you can move to the track selected next by the random operation However the button does not allow you to move to the previous track It will go to the beginning of the current track instead In random play the CD player will select and play tracks automatically You cannot select the order of the tracks Random and repeat play can be used at the same time Caution After performing rep...

Page 21: ...d the program is automatically canceled Even if you press the ON STAND BY button to enter the stand by mode or change the function from CD to another the programmed selections will not be cleared During the program operation random play is not possible 1 While in the stop mode press the MEMORY button to enter the programming save mode 2 Press the or button to select the desired track Selected trac...

Page 22: ...ck the files not according to your expected playback order Folder mode on off can be operated by the FOLDER button on the remote control Files that are played when folder mode is set to the on position may differ from those played back when folder mode is turned off Folder Mode Off case All the files starting from the selected folder or file will be played back If file 3 inside Folder C is selecte...

Page 23: ...lder press the TUNING or to select another folder 3 Select desired file to be played back by pressing the or button Proceed to step 5 TOTAL indicator MP3 indicator CD indicator WMA indicator FOLDER indicator FOLDER name FILE name 4 Select desired file to be played back by pressing the or button Folder mode off 5 Press the button Playback will start and file name will be displayed Title Artist Albu...

Page 24: ...indicator will be displayed will appear when an FM broadcast is in stereo If the FM reception is weak press the TUNER button main unit or FUNCTION button remote control to extinguish the ST indicator The reception changes to monaural and the sound becomes clearer 1 Press the ON STAND BY button to turn the power on 2 Press the TUNER button on main unit or FUNCTION button on remote control repeatedl...

Page 25: ...mory in order starting with preset channel 1 4 Within 1 minute press the MEMORY button to store that station in memory If the preset number indicators disappear before the station is memorized repeat the operation from step 2 5 Repeat steps 1 4 to set other stations or to change a preset station When a new station is stored in memory the station previously memorized for that preset channel number ...

Page 26: ...or off When the entire preset memory is erased page 25 source will automatically change to BUZZER 1 even if TUNER is pre selected step 2 1 Check that the clock is set to the correct time refer page 14 If it is not set you cannot use the alarm function 2 For iPod playback Insert iPod to the unit refer page 16 3 For TUNER Set preset memory refer page 25 4 For CD playback Insert disc to the unit refe...

Page 27: ...ng 1 Playback the desired sound source 2 Press the SLEEP button to select sleep time 3 Press the MEMORY button SLEEP will appear 4 The unit will enter the clock function automatically after the preset time has elapsed The volume will be turned down 1 minute before the sleep operation finishes 1 While SLEEP is indicated press the SLEEP button on the remote control once to select SLEEP XXX XXX is sl...

Page 28: ... the volume Be sure your headphones have a 1 8 3 5 mm diameter plug and impedance between 16 and 50 ohms The recommended impedance is 32 ohms Plugging in the headphones disconnects the speakers automatically Adjust the volume using the VOL or control During alarm activation sound will be output to the speaker even if headphones is plugged in Red White VCR DVD etc To the line output jacks RCA cord ...

Page 29: ...0 No sound is heard Is the volume level set to 0 Are the headphones connected iPod door not fully open close Set the unit to the power stand by and turn it on again Reset it Refer page 30 Symptom Possible cause The remote control does not operate Is the AC power cord of the unit plugged in Is the battery polarity correct Are the battery dead Is the distance or angle incorrect Does the remote contr...

Page 30: ... stored in memory including clock alarm settings and tuner preset Before transporting the unit Remove the iPod or iPhone and the disc from the unit Then set the unit to the power stand by mode Carrying the unit with iPod or iPhone left docked or disc left inside might damage both the unit and the iPod iPhone Maintenance Cleaning the cabinet Periodically wipe the cabinet with a soft cloth and a dil...

Page 31: ... channel into 8 ohms from 30 Hz to 250 Hz 10 total harmonic distortion Speaker 1 way type light up speaker system Front Speaker 2 1 2 6 5 cm 12 ohms Full Range Subwoofer 4 10 cm 8 ohms Woofer Speaker maximum input power Front Speakers 4W Channel Subwoofer 10W Channel Speaker rated input power Front Speakers 2W Channel Subwoofer 5W Channel Output terminals Headphones 16 50 ohms recommended 32 ohms ...

Page 32: ...ET FORTH BELOW make any warranties other than those described herein or to extend the duration of any shall constitute of all of to the l whether based on contract nce strict liability or otherwise In no event for incidental or economic or damage Some states HA A VARY FROM STA T T TE A A TO STA T T TE A A o have this information available when you need service for your Product ear parts and labor ...

Reviews: