background image

(Continued)

VOLUME

Jog dial

TUNING
 (        )

FUNCTION

MEMORY

TIMER

REVERSE
MODE

ON/
STAND-BY

2

3

4

5

7

8

9

6

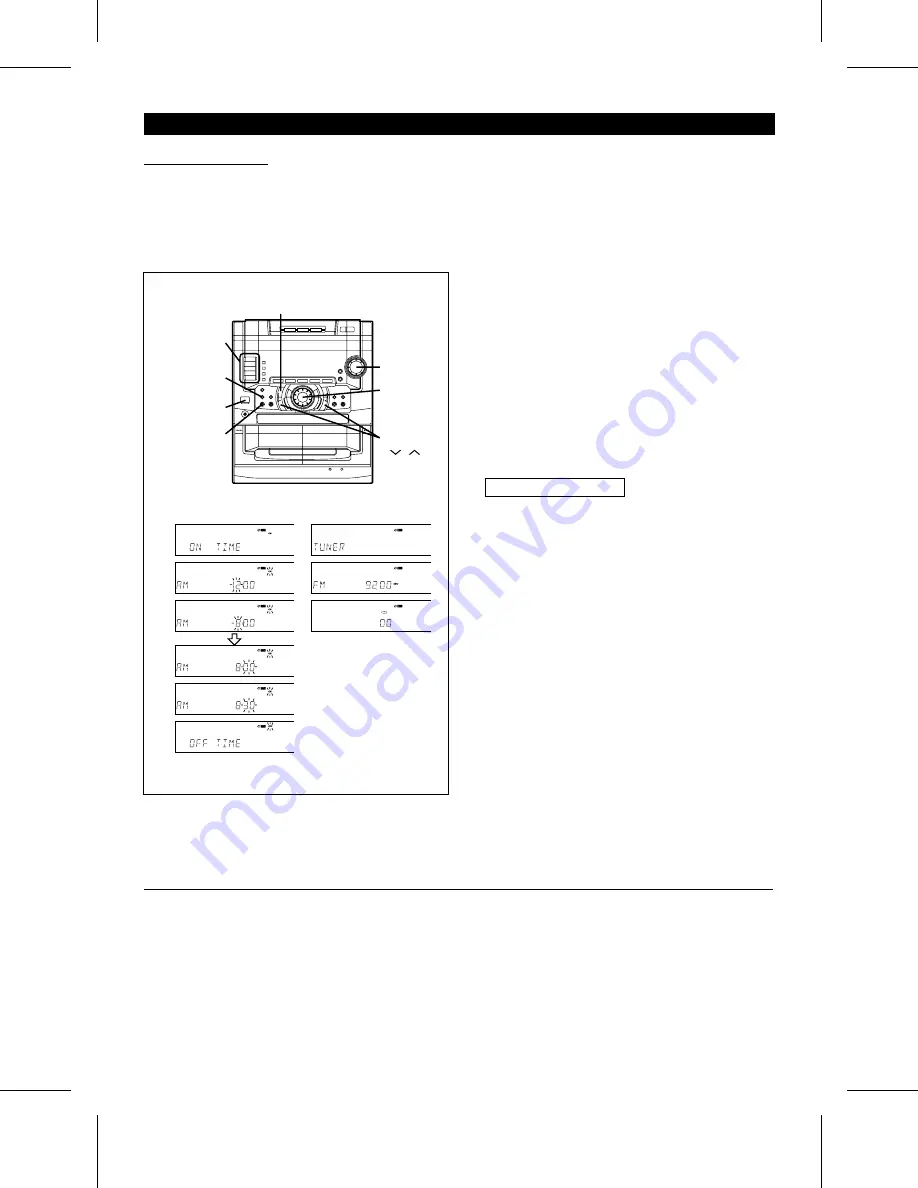
Timer recording

Before setting the timer, make sure that the clock setting
is correct. (Page 10)

Load a cassette for recording into the TAPE 2 cassette
compartment.

1

Press the ON/STAND-BY button to turn the power on.

2

Press the TIMER button to turn on the timer mode, "

f

REC" will appear.

3

Within 10 seconds, press the MEMORY button.

If more than 10 seconds have passed, start again from
step 1.

4

Turn the jog dial to set the hour at which to start, and
then press the MEMORY button.

5

Turn the jog dial to set the minute at which to start, and
then press the MEMORY button.

6

Set the hour and minute for the OFF time, the same as
described in steps 4 - 5.

7

Press the FUNCTION button to select the desired func-
tion (CD, TUNER, TAPE 1, TAPE 2, DVD 1, VCR 1, DVD
2, or VCR 2), and then press the MEMORY button.

When the TUNER function is selected, go to step 8.
When the CD, TAPE 2, DVD 1, VCR 1, DVD 2, or VCR
2 function is selected, go to step 9.
When the TAPE 1 function is selected, go to step 10.

8

When TUNER is selected

Turn the jog dial to select a previously programmed radio
station, and then press the MEMORY button.

9

Press the REVERSE MODE button to select the reverse
mode, and then press the MEMORY button.

10

After the setting has been performed whilst the unit is
on, press the ON/STAND-BY button to enter the stand-by
mode.

The unit will display the time.

11

When the timer start time is reached, timer recording will
start.

The volume will increase until it is at volume level 30.

12

When the timer end time is reached, timer recording will
stop.

"

f

 REC" will disappear, and the timer mode will be can-

celled.

Notes:

Once the time is set, the setting is retained until a new
time is programmed.

The timer cannot control the component connected to the
DVD 1, DVD 2, VCR 1/AUX 1 and VCR 2/AUX 2 sockets.

To confirm the timer setting:

Press the TIMER button once.

The turn-on time and the turn-off time will be displayed.

To cancel timer operation:

Press the TIMER button repeatedly to turn off the timer, "

f

REC" will go out.

To change the programmed contents:

Start again from step 1.

CD-C491H(SUK) TINSE0229AWZZ

37

Summary of Contents for CD-C491H

Page 1: ...t CONTENTS Page SPECIAL NOTES 1 2 ACCESSORIES 2 PRECAUTIONS 3 PREPARATION FOR USE 4 9 SETTING THE CLOCK 10 SOUND CONTROL 11 12 COMPACT DISC OPERATION 13 16 RADIO OPERATION 17 18 RDS Radio Data System OPERATION 19 24 CASSETTE OPERATION 25 RECORDING 26 27 DOLBY DIGITAL 28 Page SURROUND EFFECT CONTROL 28 30 QSOUND 30 SET UP 31 35 HOW TO USE THE BUILT IN TIMER 36 38 EXTERNAL UNIT CONNECTION 39 41 TRAN...

Page 2: ...nner Under no circumstances should the cut off plug be in serted elsewhere into a 13A socket outlet as a serious electric shock may occur To fit an appropriate plug to the mains lead follow the instructions below IMPORTANT The wires in the mains lead are coloured in accordance with the following code Blue Neutral Brown Live As the colours of the wires in the mains lead of this product may not corr...

Page 3: ...milar 2 Continued When the ON STAND BY button is set at STAND BY po sition mains voltage is still present inside the unit When the ON STAND BY button is set at STAND BY po sition and the clock is displayed the unit may be brought into operation by the timer mode or remote control Warning This unit contains no user serviceable parts Never remove covers unless qualified to do so This unit contains d...

Page 4: ...g up high or whilst continually listening at high volumes Condensation Sudden temperature changes storage or operation in an extremely humid environment may cause condensation in side the cabinet CD pickup tape heads etc or on the transmitter LED on the remote control Condensation can cause the unit to malfunction If this happens leave the power on with no disc or cassette in the unit until normal...

Page 5: ...n impedance of 8 ohms or more as lower impedance speakers can damage the unit Connect the black wire to the minus terminal and the red wire to the plus terminal Centre speaker Connect the centre speaker wire to the CENTER SPEAKER ter minals as shown Use a speaker with an impedance of 8 ohms or more as a lower impedance speaker can damage the unit Connect the black wire to the minus terminal and th...

Page 6: ...dance of 8 ohms or more as lower impedance speakers can damage the unit Connect the wire with the white line to the minus terminal and the plain wire to the plus terminal Caution Do not short out the speaker wires When the power is on and the speaker wires are shorted out PRO TECT will appear and the unit will enter the stand by mode See page 42 Do not reverse the right channel and left channel wi...

Page 7: ...ecommended that the centre speaker be placed on top of a television Sub woofer Place the sub woofer near one of the front speakers and orient it towards the listener as much as possible Surround speakers The surround speakers should be installed on the wall Install them 60 90 cm 23 35 above the height of your ears when seated if possible See page 7 When the surround speakers are installed vertical...

Page 8: ...nt the surround speakers on the wall The design of the surround speakers allows them to be hung on the wall Be sure to use the type and size of screw that is shown to the left 1 Make a hole in the wall using a drill 2 Drive a wall mount plug into the hole using a hammer Drive the wall mount plug in until it is flush with the wall surface 3 Drive one screw into the wall mount plug for each speaker ...

Page 9: ...e aerial wires are placed near the AC power lead they may cause interference External FM aerial Use an external FM aerial 75 ohm coaxial cable if you require better reception Consult your dealer Note When an external FM aerial is used disconnect the supplied FM aerial wire from the FM 75 OHMS socket Connecting the AC power lead After connecting the speakers and aerials plug the AC power lead into ...

Page 10: ...ghting or the direction of the unit Keep the remote control away from moisture excessive heat shock and vibrations P 009 Main unit operation buttons The main unit operation buttons are common to all functions CD Tuner Tape Some buttons may have no function depending on the mode selected When a button indicator is lit the corresponding button can be used To change the brightness of the display 1 Pr...

Page 11: ...e will decrease by 1 minute Keep turning the jog dial to change the time continuously The hour setting will not advance even if minutes advance from 59 to 00 9 Press the MEMORY button The clock starts operating from 0 seconds Seconds are not displayed Note In the event of a power failure or when the AC power lead is disconnected the clock display will go out When the AC power supply is restored th...

Page 12: ...n is pressed whilst in the Normal Phantom mode the Virtual Surround mode or the QSOUND mode the current surround mode will be cancelled Extra bass X BASS Main unit remote control operation When the power is first turned on the unit will enter the extra bass mode X BASS 1 which emphasises the bass frequencies When the X BASS button is pressed the current mode setting will be displayed To change to ...

Page 13: ...ng the SET UP W button will increase the right speaker level the left speaker level will decrease or pressing the SET UP Xbutton will increase the left speaker level the right speaker level will de crease If the jog dial is turned continuously or the SET UP W or X button on the remote control is held down the speaker level can be changed continuously The speaker balance as shown in the display can...

Page 14: ...not stack CDs in the tray This can damage the player and the CDs 5 When loading a third disc press the DISC SKIP button to turn the disc tray then place the CD in the open po sition 6 Press the 7 OPEN CLOSE button to close the disc tray The total number of tracks and the total disc playing time will be displayed At this time the disc number indicator is flashing 7 Press the desired disc number but...

Page 15: ...until the desired track number is shown To start playing at a desired track turn the jog dial on the main unit or press the 3 5 or 2 4 button on the remote control whilst in the stop mode to select the track number Then press the 0 R button Note APSS will move forward or backward from any point on the disc before playback begins It will not move forward during playback of the final track Caution D...

Page 16: ...ing repeat play be sure to press the CD button after you are through listening Otherwise the CD s will play endlessly Random play Remote control operation The tracks on the disc can be played in random order au tomatically 1 Load the CD s and close the disc tray 2 Press the RANDOM button to begin random play RANDOM will appear Note When using random play be sure to press the CD but ton or set the ...

Page 17: ...is being entered into memory 4 Repeat steps 1 3 for any other track Up to 32 tracks can be programmed If you make a mistake whilst in the programming mode MEMORY will appear or if you wish to change your selections the programmed tracks can be cleared by pressing the CLEAR button The tracks will be cleared sequentially starting with the last track entered 5 Press the 0 R button to start playback o...

Page 18: ...ing may stop automatically at that point If a weak station signal is found during auto scan tuning the station will skipped To stop the auto tuning press the TUNING X or W button again When an RDS Radio Data System station is tuned in the RDS indicator will light first and then the frequency will be displayed Finally the station name will appear 5 To receive an FM stereo transmission press the TUN...

Page 19: ... 5 seconds to select the desired station The contents preset channel number frequency and fre quency band which have been stored in memory will ap pear in the display in numerical order irrespective of the frequency bands Note When searching for a memorised station do not press the PRESET button for more than 0 5 seconds When the PRESET button is pressed for more than 0 5 sec onds the unit will en...

Page 20: ...tion Frequency Programme type will be dis played NO PTY appears if no signal is being sent Station frequencies With the CD C491H you can display two types of RDS ser vice To show them in the display press the DISPLAY MODE button Each time you press the DISPLAY MODE button the display will change to show the following information DISPLAY MODE Descriptions of the PTY Programme Type codes TP Traf fic...

Page 21: ... Only RDS stations will be stored in memory If the same station is broadcasting on different frequen cies the transmission with the strongest broadcast fre quency will be stored in memory Any station which has the same frequency as one which has been already stored in memory will not be stored again If a 40th station is stored in memory during a scan the scanning will stop at that station The numb...

Page 22: ...s flashing within 4 seconds press the PTY TI SEARCH button again After the name of the selected programme type has been lit for 2 seconds SEARCH will appear and the search operation will start Note If the programme type has changed from flashing to steadily lit and the PTY TI SEARCH button is pressed nothing will happen In this case start again from step 4 Each time a station of the programme type...

Page 23: ...operation If any of the following events occur it does not mean that the unit is faulty PS and a station name appear alternately and the unit does not operate properly If a particular station is not broadcasting properly or a sta tion is conducting tests the RDS reception function may not work properly When the station you are tuning in is not an RDS station or even if it is an RDS station but the...

Page 24: ...ate that the unit cannot enter the EON stand by mode Checking the stand by mode setting When in the EON stand by mode press the EON button Programme type WAITING To cancel the EON stand by mode When in the EON stand by mode press the EON button Within 4 seconds press it again The EON stand by mode will be cancelled PTY will go out Notes In the following cases the EON stand by mode will be can cell...

Page 25: ...ancelled TI will go out Note If neither TP nor TA appear then even if EON ap pears the unit cannot enter the EON TI stand by mode In this condition even if the EON button is pressed NO TI will flash for 4 seconds Notes During the same programme as the specified PTY or TA is being broadcast on the station you are receiving the unit will not switch to other network station If there are more than two...

Page 26: ... MODE button To listen to one side of the tape To listen to both sides of the tape For endless repeat play of both sides of the tape 6 Press the 0 R 0 button to listen to side A 1 or the 1 button for side B 2 To play both sides of the tape start from side A 1 When the tape starts playback from side B 2 side A 1 will not be played after side B 2 finishes To stop playback Press the TAPE button Fast ...

Page 27: ... cassette into the TAPE 2 cassette compartment Wind past the tape leader on which a recording can not be performed 4 Press the REVERSE MODE button To record on only one side To record on both sides 5 Press the CD button and load the desired disc Use the APMS function to store the tracks you want to record in memory See page 16 6 Press the NORMAL EDIT button At this point the HIGH EDIT button will ...

Page 28: ...ss the ON STAND BY button to turn the power on 2 Press the TAPE 1 V 2 button to select TAPE 1 3 Load a prerecorded cassette into the TAPE 1 cassette compartment Insert a blank tape into the TAPE 2 cas sette compartment It is recommended that the recording tape be the same length as the master tape 4 Press the NORMAL EDIT button to enter the normal speed dubbing mode Press the HIGH EDIT button to e...

Page 29: ... monaural Front L R centre Front L R When the surround mode is set to Normal or Phantom sound will also be heard from the surround speakers Front L R centre surround monaural Front L R surround monaural Front L R centre surround L R If a low frequency sound effect Low Frequency Effect contains a Dolby digital signal LFE will light in the display When this LFE is lit low frequency signals will be o...

Page 30: ...he surround signal only contains 1 channel the same monaural channel will be output from the left and right surround speakers For a Dolby digital 1 0 input sound will only be output from the centre speaker PHANTOM The difference between this mode and the normal mode is that no sound is output from the centre speaker The centre speaker signal is split equally and added to the sound for the front le...

Page 31: ...e EN HANCED appear Use this mode when playing back stereo music The patented QSOUND stereo enhancement uses high fidelity 3D audio processing to create superior audio imaging from ordinary stereo programme material Increased width depth and immersiveness provide a sur round like listening experience The two speakers widen the sound field of the stereo signals even further To listen to sound in the...

Page 32: ...at the operation in steps 2 and 3 above to make S SP C SP and S WOOFER appear Each of these items can be set separately S SP Surround speakers C SP Centre speaker S WOOFER Sub woofer YES When the speakers are connected NO When no speaker is connected When NO is selected the indicator for that speaker position will go out Notes When all 6 speakers have been connected set each of the items to YES If...

Page 33: ...to select a value Adjustable range CENTER 0 ms 5 ms SURROUND 0 ms 15 ms Can be changed in 1 ms steps Notes As a guide for setting the correct delay time 1 ms is equal to approximately 30 cm 12 from where the selected speakers are placed further away from the listener than the typical location If the delay time for the surround speakers is set to a large value a large sound space will be created If...

Page 34: ...ill decrease Remote control operation Within 10 seconds pressing the SET UP W button will increase the right speaker level the left speaker level will decrease or pressing the SET UP Xbutton will increase the left speaker level the right speaker level will de crease If the jog dial is turned continuously or the SET UP W or X button on the remote control is held down the speaker level can be change...

Page 35: ...est tone is being output the indicator for that speaker will flash The test tone will be heard until the current menu selection is changed by pressing the MENU button again or by selecting some other function 3 To adjust the speaker level whilst the test tone is being output from a particular speaker press the SET UP W or X button The speaker level can be adjusted within a range of 7dB to 7dB in 1...

Page 36: ...to hear the quiet sounds Three settings are available to control the dy namic range easily 1 Press the MENU button repeatedly to make D RANGE appear 2 Within 10 seconds press the ITEM button to select MAX STD or MIN MAX This setting does not compress the dynamic range of the Dolby digital signal allowing you to enjoy the full powerful sound of Dolby encoded digital signals STD This setting compres...

Page 37: ...inute for the OFF time the same as described in steps 4 5 7 Press the FUNCTION button to select the desired function CD TUNER TAPE 1 TAPE 2 DVD 1 VCR 1 DVD 2 or VCR 2 and then press the MEMORY button When the TUNER or TAPE 2 function is selected go to step 8 When any other function is selected go to step 9 8 When TUNER is selected Turn the jog dial to select a previously programmed radio station a...

Page 38: ...tion is selected go to step 9 When the TAPE 1 function is selected go to step 10 8 When TUNER is selected Turn the jog dial to select a previously programmed radio station and then press the MEMORY button 9 Press the REVERSE MODE button to select the reverse mode and then press the MEMORY button 10 After the setting has been performed whilst the unit is on press the ON STAND BY button to enter the...

Page 39: ...it will remain the same duration until the setting is changed To confirm the sleep timer setting Press the SLEEP button To cancel the sleep operation Press the SLEEP button until SLEEP disappears Simultaneous sleep and timer operation The sound source selected for the sleep operation will be used for the timer operation Different sound sources cannot be selected for the sleep operation and the tim...

Page 40: ... TV To the video output socket To the audio line output sockets To the audio digital output socket DVD player When connecting an audio signal using a coaxial digital lead To the video input socket TV To the video output socket To the audio line output sockets To the audio digital output socket DVD player Caution A DVD player allows you to select the PCM or DOLBY DIGITAL audio output mode Before pl...

Page 41: ... connecting the unit to a CS BS tuner or a CD player When connecting these units using an optical digital lead To the digital output socket CS BS tuner CD player When connecting the unit to a DAT deck or an MD deck When connecting these decks using an optical digital lead To the optical output socket To the optical input socket DAT deck MD deck Caution This product s digital input can sample at 32...

Page 42: ...epeatedly to make DVD 2 appear To select the unit connected to the VCR 2 AUX 2 sockets Press the DVD 2 VCR 2 button repeatedly to make VCR 2 appear Note When a function other than DVD 1 VCR 1 DVD 2 or VCR 2 is selected the video monitor output is not available Before plugging in or unplugging the headphones make sure the volume level is reduced Be sure your headphones have a 3 5 mm 1 8 diameter pl...

Page 43: ...at the speaker wires have been correctly connected to the speaker terminals 4 After checking items 2 and 3 above wait for 2 or 3 hours before trying to use the unit 5 Reconnect the AC power lead Note If PROTECT appears again during use please unplug the AC power plug and contact a SHARP authorised ser vice centre Caution The operation explained above will erase all data stored in memory including ...

Page 44: ...effects Matrix processing Dolby Surround Sound processing Discrete processing Dolby digital encoding decoding 16 bits Number of signal processing bits 20 bits 7 kHz Surround Sound high frequency playback limit 20 kHz L S C R S L S W L S C R R S Dolby Surround This is the encoding decoding system for general purpose Dolby Surround When the sound from films recorded in Dolby Surround are reproduced ...

Page 45: ...ut a centre speaker connected Connect the power to the DVD player Make sure the DVD player is output ting a digital signal The DVD player is not connected to the DVD 1 socket or the optical dig ital lead is unplugged Connect them correctly The DVD player is not connected to the DVD 2 socket or the coaxial dig ital lead is unplugged Connect them properly If the type of digital signal is not dis pla...

Page 46: ...e unit used at high volume for many hours Plug in the speaker wire properly Set the unit in the stand by mode and wait for a while No sound is heard from the sub woofer Were the headphones plugged in and then unplugged When the headphones are plugged in the sub woofer is cancelled After pulling out the headphone plug if sound can t be heard from the sub woofer press the equalizer button or set the...

Page 47: ...D 2 VCR 2 1 Vp p 75 ohms Tuner section Frequency range FM 87 5 108 MHz MW 522 1 620 kHz LW 153 281 kHz Cassette deck section Frequency response 50 14 000 Hz Normal tape Signal noise ratio 55 dB TAPE 1 playback 50 dB TAPE 2 recording playback Wow and flutter 0 15 WRMS Compact disc player section Type 3 disc multi play compact disc player Signal readout Non contact 3 beam semi conductor laser pickup...

Page 48: ...t was purchased Proof of purchase must be provided 4 The guarantee does not cover carriage costs jewelled styli audio tapes compact discs or batteries 5 In the unlikely event of this product requiring repair please contact the supplier from whom it was purchased Where this is not possible please contact the Sharp Customer Information Centre on the telephone number given below 6 No person has any a...

Reviews: