


LC-60/70LE360X
5 – 1
CHAPTER 5.
REMOVING MAJOR
PARTS
[1] REMOVING MAJOR PARTS
[1] REMOVING OF MAJOR PARTS
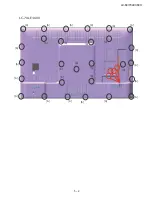
REMOVING OF THE STAND UNIT AND REAR CABINET
1.Remove the 4 lock screw [1] and detech stand unit [2].
2.Remove 1 lock screw [3] and detech the AC cord cover [4].
3.Disconnect AC Cord [5].
4.Remove the 20 lock screws [6],remove 4 screw [7],remove 4 screw [8]. (LC-60LE360X)
Remove the 28 lock screws [6],remove 4 screw [7]. (LC-70LE360X) refer next page.
5.Detech rear cabinet assmbly [9].
[1]
[1]
[2]
[2]
[3]
[4]
[5]
[6]
[6]
[6]
[6]
[6]
[6]
[6]
[6]
[6]
[6]
[6]
[6]
[6]
[6]
[6]
[6]
[6]
[6]
[6]
[7]
[7]
[7]
[7]
[6]
[8]
[9]
LC-60LE360X
Summary of Contents for Aquos LC-60LE360X
Page 12: ...LC 60 70LE360X 5 2 LC 70LE360X 6 6 6 6 6 6 6 6 6 6 6 6 6 6 6 6 6 6 6 6 6 6 6 6 6 6 6 6 7 ...
Page 34: ...LC 60 70LE360X 8 1 CHAPTER 8 SYSTEM BLOCK DIA GRAM 1 SYSTEM BLOCK DIAGRAM LC 60LE360X ...
Page 35: ...LC 60 70LE360X 8 2 2 SYSTEM BLOCK DIAGRAM LC 70LE360X ...
Page 61: ...LC 60 70LE360X 9 26 ...
Page 72: ...LC 60 70LE360X 11 ...


