background image

30


 Login and connect equipment 

You have logged in and connected all connected equipment in the initial 

start-up. If you want to connect other equipment or disconnect equip-

ment, call the connection wizard.

Call up the TV menu

Select “Connections”

Select “AV setup” and 

call up with 

OK

.

State what equipment you want to connect. The connection wizard then 

shows you which sockets you should connect this equipment to. Then 

connect the equipment to these sockets.

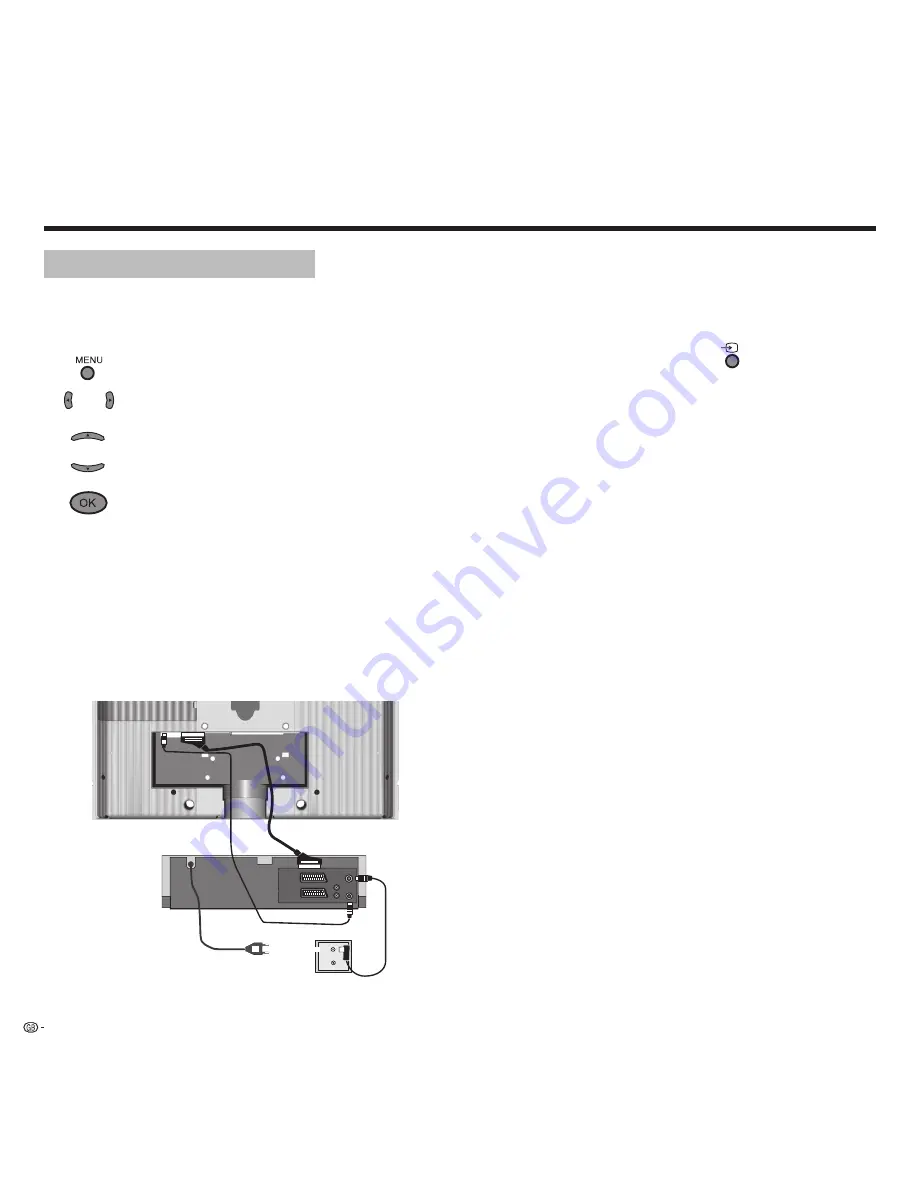
Connecting VCR/DVD recorders

In addition to the connection via the Euro-AV sockets you also have 

to connect the antenna (only for terrestrial antenna or cable systems) 

through the VCR/DVD recorder to the TV set. The antenna signal is then 

available to the VCR/DVD recorder and the TV set.

Note

: Use Euro AV cables with right-angled plugs as shown.

ENTREE

ANTENNE

EURO AV2
DECODER

EURO AV1

AUDIO/

VIDEO

SORTIE

ANTENNE

AERIAL

RF OUT

SORTIE

G

L

D

R

OUT

AUDIO

Search for and store the station of the video recorder (if no Euro AV

cable is available)

Switch on the test station on the VCR or insert a recorded tape and start 

playback. In some video recorders the station must be switched on by 

activating the modulator.

Then call the AV selection on the TV set with 

 or with button 

0

. Select 

the menu item “VIDEO” in the AV selection and call with 

OK

.

To prevent “normal” TV stations being found in the search, pull out the 

antenna plug from the antenna input of the VCR temporarily (the cable to 

the antenna system).

If you cannot see the test station or playback from the cassette, the VCR 

is transmitting on a different station. You then have to search for the 

station or set it manually.

Call the “TV menu” with the 

MENU 

button.

Select “Setup” with 

.

Select “Channels” with 


and press 

OK

.

Select “Manual tune” with 


and  press 

OK

.

Enter station “E30” under the “Channel” item (UHF range, select in this 

menu above if necessary).
Start search with the 

blue 

button.

If the station has been found, enter the name “VIDEO”, con

fi

 rm with 

OK 

and save with the 

red 

button.

A list of the stored stations is displayed
Select 

AV

 here and overwrite this programme place with the 

red

 but-

ton.
  Hide the menu with the 

END 

button.

Reconnect the antenna plug back in. 

If you now get interference because a TV station is transmitting on the 

same channel as the VCR station, you have to change the transmitting 

station on the VCR and repeat the steps 1 ... 10.

1.
2.
3.
4.
5.

6.
7.

8.
9.

10.

Operating additional equipment

Summary of Contents for Aquos LC-26GD7E

Page 1: ...LEUR À ÉCRAN À CRISTAUX LIQUIDES LCD TELEVISORE A COLORI LCD LCD KLEURENTELEVISIE TELEVISIÓN EN COLOR LCD OPERATION MANUAL BEDIENUNGSANLEITUNG MODE D EMPLOI MANUALE DI ISTRUZIONI GEBRUIKSAANWIJZING MANUAL DE MANEJO ENGLISH PIP PC ABC DEF JKL GHI MNO TUV PQRS WXYZ INFO END BACK TIMER RADIO ...

Page 2: ...sas atitinka ES Tarybos direktyvu 89 336 EEC ir 73 23 EEC paktikslintos direktyvos 93 68 EEC reikalavimus To urządzenie spelnia wymagania dyrektyw 89 336 EEC i 73 23 EEC wraz z poprawkami dyrektywy 93 68 EEC Tento prístroj je v súlade s požiadavkami smerníc rady 89 336 EEC a 73 23 EEC tak ako boli upravené smernicou rady 93 68 EEC Ta aparat je v skladu z zahtevami Direktiv Sveta 89 336 EEC in 73 2...

Page 3: ...ivate households 8 Information on Disposal for Business Users 8 First installation 9 Remote control 9 Connection 9 Switching on 10 Basics about the menu operation 10 Automatic station programming 11 Station sorting 12 DVB T antenna position 12 New station search 13 Manual station setting 14 Digital radio stations search 14 Daily operation 15 Switch on off 15 Changing stations 15 ENGLISH OPERATION ...

Page 4: ...d openings since insufficient ventilation can cause overheating and or shorten the life of the product Do not place the product on a bed sofa rug or other similar surface since they can block ventilation openings This product is not designed for built in installation do not place the product in an enclosed place such as a bookcase or rack un less proper ventilation is provided or the manufacturer ...

Page 5: ...D BACK TIMER RADIO LC 26GD7E LC 32GD7E LC 37GD7E Remote control unit x 1 Page 4 Bundling the cables AC cord x 1 Operation manual x 1 Product shape varies in some countries Page 9 Page 3 Page 9 AAA size battery x 2 Cable clamp x 1 Cable clamp Cable tie x 1 Page 3 Cable tie ...

Page 6: ...button menu Additional functions digital teletext 1 19 Wide mode 20 Freeze frame on off 21 Call up PC IN source 22 Analogue Teletext Hold 23 Analogue Teletext Zoom picture upper lower off 24 Select station up down 25 External sources selection 26 Analogue Teletext mode on off digital teletext 1 27 Show hide menu 28 Move picture up down Menu select PIP position of PIP picture up down 29 Menu select...

Page 7: ...5 Control unit MENU MENU Station selection P P Volume setting MENU button ON OFF button Remote control sensor Mode indicator green ON orange EPG Radio SAT recording red STANDBY ...

Page 8: ... left right analog Socket for power cable Service socket PC input PC IN HDMI input EXT 5 Digital audio output Digital audio input Component video inputs Cb Pb Cr Pr Y EXT 3 Satellite connection socket ANT SAT 13 18V 350 mA Antenna socket VHF UHF cable ANT TV DVB T 5V 80 mA Caution Only if you use an active terrestrial antenna switch on the supply voltage 5 Volt See page 9 under Antenna Euro AV soc...

Page 9: ...Common Interface Module and a Smartcard from the station provider Both are available from dealers Your TV set also allows reception of digitally broadcast radio stations if this feature is offered by the station providers Digital TV and radio stations usually offer not only a better sound and picture quality than conventional analogue stations but also provide numerous additional functions which a...

Page 10: ...hich could otherwise arise due to inappropriate waste handling In other Countries outside the EU If you wish to discard this product please contact your local authorities and ask for the correct method of disposal For Switzerland Used electrical or electronic equipment can be returned free of charge to the dealer even if you don t purchase a new product Further collection facilities are listed on ...

Page 11: ...also be used to improve the reception quality You can obtain more detailed information about receivable digital sta tions in your area from your dealer You can also receive an analogue cable station or an analogue terrestrial station and a satellite station at the same time and watch with the picture in picture PIP function Use the enclosed cable tie for laying the cables Remote control To insert ...

Page 12: ...further information regarding the CI module please refer to page 28 1 2 3 4 Switching on Switch on the set with the ON OFF button on the top of the screen The mode indicator on the TV set now lights green Further information can be found on page 15 Basics about the menu operation We will show you how to navigate through the menus using the TV menu as an example You ll be able to see which keys can...

Page 13: ...xt page 26 Automatic station programming The TV s automatic station programming is started after switching on for the first time Follow the menus and make the necessary settings one after another By pressing the buttons you select the setting and confirm with OK You then go to the next menu First you have to select the menu language e g English with the remote control Pressing the OK button takes ...

Page 14: ... if you want to connect log in a VCR DVD player etc Fol low the Connection wizard and connect the equipment to the TV set according to the connection diagram The menu is hidden if you select no Note You can repeat the initial start up at any time e g after moving The Repeat initial installation function deletes any stations already stored Press the INFO key Then select the item Repeat initial inst...

Page 15: ...ngs and confirm with OK Fol low the menus Otherwise continue with step 10 Select your Location of TV set and then indicate whether you are searching via Antenna cable analogue DVB T or in the Satel lite 1 DVB S by marking the appropriate selection with the yellow button 6 7 1 2 3 4 5 6 In DVB T you can select a channel search fast station search or a frequency search Change search settings Signal ...

Page 16: ... 9 10 11 12 13 14 15 16 17 18 19 20 HR INFO MDR INFO MDR FIGA NDR KULT SWR1 SWR2 WDR3 WDR5 OESTER 1 MDR JUMP JAZZ RAD BLUSAT20 END BACK MENU D D D D D D D D D D D D D D D D D 9 0 OK Screen off OK Use MENU to call up the Radio menu and select Channels 1 2 3 4 1 2 Radio menu Sound Channels Timer functions Search wizard Manual tune Change stations Confirm with OK With the Search wizard you can have t...

Page 17: ... changes immediately Switch on off Your TV is equipped with an eco standby power supply unit On standby the power consumption drops to low power see page 36 Weak electric power is still consumed even if the the unit is switched off by the ON OFF switch Attention If you want to switch the TV set completely off you have to remove the plug of the mains power cable from the mains power socket However ...

Page 18: ... and call with OK For bouquet display only for devices with DVB not with DVB T stations in UK Enter bouquet number select with and call with OK Digital stations are marked by D Coded stations are marked by Child protected stations are marked by Calling up external sources for playing AV equipment push the AV button see also from page 30 onwards External sources VIDEO EXT1 EXT2 EXT3 EXT4 EXT5 PC IN...

Page 19: ...ss more normal 10 10 3 and select set with Picture settings Picture adjustment Contrast Colour Sharpness Under more you will find Brightness Wide mode Move picture up down Auto format and Movie mode DMM Note In 16 9 or 4 3 mode Move picture up down does not work Operation on the TV set Switching station on the TV set For station down press For station up press P Changing volume brightness contrast...

Page 20: ... Dynamic Game User Status display When you change channel or press END a status display appears for a few seconds Show hide status END 2 ZDF Heute 13 51 23 00 19 00 19 20 Mono Sleep timer Language sound selection In the top line you can see the name of the programme Further display options which can be selected in the TV menu Setup Miscellaneous On screen displays are shown below it Time On screen...

Page 21: ...sired format is selected or select the format with Wide modes 16 9 4 3 Panorama Cinema Zoom TV menu Call up the TV menu TV menu Picture Sound Recording Connections Setup DYNAMIC Picture adjustment Contrast Colour Sharpness normal 18 12 4 You will find a description of the picture and sound settings on page 16 17 The TV menu offers settings for recording and connections and for TV settings Under Re...

Page 22: ...erefore here is a simple way to set the right menu language Press the INFO button Index select the first listing Call the Language selection by pressing OK button Now mark the desired language and confirm it by pressing the OK button Hide the menu again with the END button 1 2 3 4 Miscellaneous Setup On screen displays Define the content of the status display here and switch the automatic info tex...

Page 23: ...P picture The frame around the PIP must be green If it is not press the green button Then select the station as normal 2 ZDF Select the station of the TV picture The frame around the PIP must be white If it is not press the green button Then select the station as normal 3 RTL Interchanging PIP picture TV picture The frame around the PIP must be green If it is not press the green button Interchange...

Page 24: ...Setup PIP INFO END BACK Type Small PIP Split Screen Position bottom right PIP Parental lock Timer functions Language Miscellaneous Channels Position of the PIP picture Select Small PIP Select the desired PIP position TV menu Setup PIP INFO END BACK Type Small PIP Position upper left bottom left bottom right upper right PIP Parental lock Timer functions Language Miscellaneous Channels The frame aro...

Page 25: ...llite stations it may be the case that two identical EPG data are displayed in the EPG DVB menu for one station If you call up the EPG menu in EPG mode using the MENU button then select Station selection you can select the double listed station and deactivate it with OK is deselected You have direct access to the selection lines to pre select the day the time the station and the topic blue button ...

Page 26: ...tion with BACK Select the provider in the Select provider menu and press OK Then a programme range search is performed The programmes offered by the provider are displayed in a list If you want certain programmes to be omitted from the programme guide you can select and deactivate these in the Station selection Call the programme selection with OK Now all programmes are displayed the DVB programme...

Page 27: ... 400 Wirtschaft 700 Internet www ard text de Inhalt tagesschau Page selection OK View call up Scroll in multiple pages You can see which multiple pages can be called in the bottom menu line Zeitplan Fußball 1 2 3 4 5 6 7 8 9 10 11 12 Call contents page 100 INFO Call the TOP table The TOP table is a general list of teletext You can only call the table on stations which use the TOP operating system ...

Page 28: ...isplay of the latest messages e g page 111 Reveal concealed information e g VPS pages in the station table pages Programming a recording by teletext with the Recording wizard In the Setup you will find menus to define the Preview pages Sub title pages the Character set as well as HiText Digital Teletext UK only In the UK the teletext for digital terrestrical channels TV and Radio is digitally dist...

Page 29: ... the coloured buttons whilst the channel logo is displayed is described as on page 26 under Digital Teletext When the station list is shown you can switch off the screen with the red button The mode indicator on the TV lights orange You can switch the screen display on again with the OK button on the remote control Station switching with dark screen with P P on the remote control or with the numer...

Page 30: ...anguage and the selection in the DVB subtitles setup menu Hide the menu by pressing the END button 1 2 3 4 1 2 3 4 5 CI module Removing the CI module Switch off your TV set by pulling the main power plug out of the main power wall outlet Remove the cover on the upper back side of the TV set Press in the eject button on the slide in module the module jumps out Pull the module out of the set New CI ...

Page 31: ...menu Setup Update digital TV software Current Version V4 0 0 You can search for a new software version with OK If you start the search with OK a check is performed to see if a new software version is available If a new version is available an on screen message will appear TV menu Setup Update digital TV software Current Version V4 0 0 New Version V4 1 0 1 2 3 4 5 6 Downloading the software If you ...

Page 32: ...rders the station must be switched on by activating the modulator Then call the AV selection on the TV set with or with button 0 Select the menu item VIDEO in the AV selection and call with OK To prevent normal TV stations being found in the search pull out the antenna plug from the antenna input of the VCR temporarily the cable to the antenna system If you cannot see the test station or playback ...

Page 33: ...list without station numbers 1 2 Timer recording with video or DVD recorder You can programme timer recordings on the TV set Programming can be done with the EPG not with DVB T in UK analogue teletext or manu ally Call the AVL timer list menu TIMER 30 06 19 00 19 15 ZDF Heute AVL timer list Thu 30 06 13 51 press the red button for New recording Recording wizard Via EPG Via teletext VPS Manual Sele...

Page 34: ...s applied at the AUDIO DIGITAL OUT socket of the TV For example you can connect an external digital audio amplifier here An analogue audio signal from the TV set or another sound source which is received at one of the Euro AV sockets of the TV set is converted into a digital signal PCM and output at the AUDIO DIGITAL OUT socket Conversion from external analogue AV sources to PCM is not possible if...

Page 35: ...ut the pre amplifier centre output PREOUT FR FL SL SR SUB C L L R R AUX1 IN DIGITAL IN DIGITAL OUT AUX OUT AUX 2 C OUT AUDIO DIGITAL Select Audio transmission analogue for analogue audio amplifiers The sound for the analogue amplifier is transmitted via the AUDIO OUT L R connections of the TV to the audio amplifier Connect the amplifier with two cinch cables Specify under Type of Amplifier whether...

Page 36: ...e EXT 5 socket You do the other settings for the audio amplifier as described for the digital amplifier on page 33 The digital audio signal of the DVI audio source is fed in at the AUDIO DIGITAL IN socket on the TV The digital audio signal from the TV AUDIO DIGITAL OUT is fed to the amplifier PC connection You can connect a PC or a Set Top Box STB and therefore use the TV screen as an output devic...

Page 37: ...the component input in the AV selection Call AV selection External sources VIDEO EXT1 EXT2 EXT3 EXT4 EXT5 PC IN Select EXT 3 with and call up with OK Start playback on the connected device Set geometry Call the TV menu with the MENU button select Geometry with and set If the picture is not positioned correctly you can move the picture hori zontally and vertically here so that it fills the whole sc...

Page 38: ... R 2 x Cinch Audio OUT L R EXT 3 Cinch COMPONENT IN Cb Pb signal COMPONENT IN Cr Pr signal COMPONENT IN Y signal Cinch Digital Audio IN SPDIF Digital audio Cinch Digital Audio OUT SPDIF Digital audio EXT 4 Mini DIN Video IN Y C S VHS Hi 8 EXT 4 yellow Video IN CVBS VHS 8 mm Cinch white red Audio IN L R Jack 3 5mm Headphones 32 2000 ohm EXT 5 Digital Video Audio IN type A 19pin Digital video and au...

Page 39: ...dard Then the standard and the signal are set according to the specifica tions in the operating instructions of the external device a Follow the instructions in the connection wiz ard again and select the appropriate decoder programs b Follow the instructions in the connection wizard again and select the right audio source decoder TV or autom see instructions of the decoder Set your menu language ...

Page 40: ...ntitled Inserting the Common Interface module see page 10 If no information appears for the CI module smart card or CI software the module or card has not been installed correctly Possible solution a Replace the Euro AV cable b Restore the video recorder to the as deliv ered state see recorder manual c Resort the terrestrial and cable programmes so that they come to rest between 1 and 99 Set the r...

Page 41: ...ion search see page 13 a No suitable CI module is present or it isn t plugged in correctly b The smart card isn t plugged in c The station hasn t been released a The antenna cable isn t connected or isn t connected to the correct socket SAT A D b The antenna system is not set correctly Check your settings c The satellite antenna isn t aligned correctly or reception is impaired e g the antenna is i...

Page 42: ...SHARP CORPORATION 233 32414 003 ...

Reviews: