background image

40

[2] TV  GUIDELINES

 Setting TV GUIDELINES

Parent Control (V-CHIP Operation Continued)

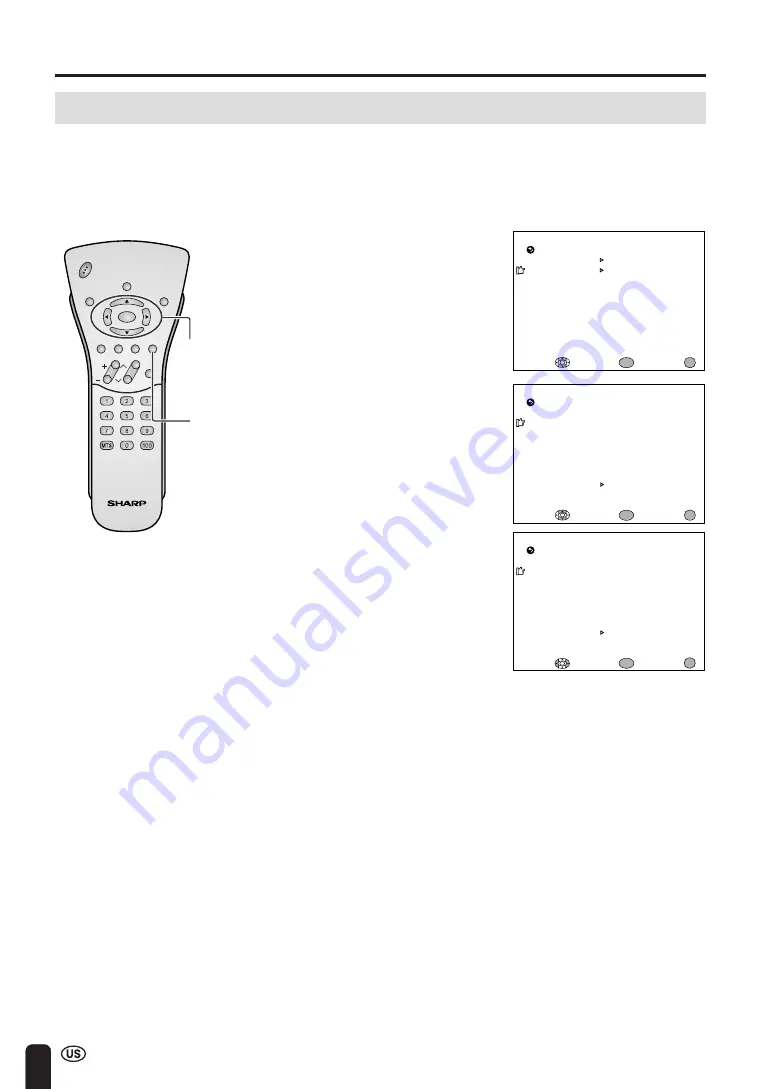
Adjusting V-CHIP Settings (Continued)

1

Repeat steps 

1

 to 

3

 of 

[1] MPAA

RATING

. (See page 39.)

2

Press 

a

/

b

 to move the cursor to

TV GUIDELINES, and press

ENTER

.

3

Press 

a

/

b

 to move the cursor to

TV-Y7, and press 

ENTER

.

4

Press 

c

/

d

 to select BLOCK, and

press 

ENTER

. If you set TV-Y7 to

BLOCK, TV-G, TV-PG, TV-14 and
TV-MA are automatically blocked.
In addition, D, L, S, V and FV in
CONTENT are automatically
blocked.

5

Press

 MENU 

to return to the main

screen.

ADJUSTMENTS (Continued)

MPAA

TV GU I DEL I NES

STATUS

SELECT :

EX I T :

RE TURN

V–CH I P BLOCK

[ OFF ]

ENTER :

ENTER

MENU

TV GU I DE L I NES

TV–Y   [ ––––– ]

EX I T :

BLOCK CONTENT

[ D L S V F V ]

RE TURN

TV–Y7 [ BLOCK ]
TV–G   [ BLOCK ]
TV–PG [ BLOCK ]
TV– 14 [ BLOCK ]
TV–MA [ BLOCK ]

ENTER :

ENTER

ADJUST :

MENU

CH

VOL

POWER

ENTER

DISPLAY

MUTE

SLEEP

PIC. FLIP

BRIGHT TV/VIDEO MENU

FLASH-

BACK

ENTER/

a

/

b

/

c

/

d

TV GU I DE L I NES

TV–Y   [ ––––– ]

SELECT :

EX I T :

BLOCK CONTENT

[                     ]

RE TURN

TV–Y7 [ ––––– ]
TV–G   [ ––––– ]
TV–PG [ ––––– ]
TV– 14 [ ––––– ]
TV–MA [ ––––– ]

ENTER :

ENTER

MENU

MENU

Summary of Contents for AQUOS LC-13B4U

Page 1: ...LISH FRANÇAIS ESPAÑOL PORTUGUÊS SHARP ELECTRONICS CORPORATION Sharp Plaza Mahwah New Jersey 07430 2135 SHARP CORPORATION LC 13B4U Printed on 100 post consumer recycled paper Imprimé sur 100 de papier recyclé Impreso en 100 de papel reciclado de postconsumo Papel 100 Reciclado Cuidado do Meio Ambiente Printed in Japan Imprimé au Japon Impreso en Japón Impresso no Japão TINS A689WJZZ 03P06 JKG A ...

Page 2: ...symbol within an equilat eral triangle is intended to alert the user to the presence of uninsulated dangerous voltage within the product s enclosure that may be of sufficient magnitude to constitute a risk of electric shock to persons The exclamation point within a triangle is intended to alert the user to the presence of impor tant operating and maintenance servicing instructions in the literatur...

Page 3: ...des guidelines for proper grounding and in particular specifies that the cable ground shall be connected to the grounding system of the building as close to the point of cable entry as practical CAUTION TO PREVENT ELECTRIC SHOCK MATCH WIDE BLADE OF PLUG TO WIDE SLOT FULLY INSERT U S A ONLY This product utilizes tin lead solder and fluorescent lamp containing a small amount of mercury Disposal of t...

Page 4: ...he product through vents or open ings High voltage flows in the product and inserting an object can cause electric shock and or short internal parts For the same reason do not spill water or liquid on the product Servicing Do not attempt to service the product yourself Removing covers can expose you to high voltage and other dangerous conditions Request a qualified service person to perform servic...

Page 5: ...re to follow the manufacturer s instructions Use only the mounting hardware recommended by the manufacturer When relocating the product placed on a cart it must be moved with utmost care Sudden stops excessive force and uneven floor surface can cause the product to fall from the cart Ventilation The vents and other openings in the cabinet are designed for ventilation Do not cover or block these ve...

Page 6: ...side antenna system extreme care should be taken to keep from touching such power lines or circuits as contact with them might be fatal ANTENNA LEAD IN WIRE ANTENNA DISCHARGE UNIT NEC SECTION 810 20 GROUNDING CONDUCTORS NEC SECTION 810 21 GROUND CLAMPS POWER SERVICE GROUNDING ELECTRODE SYSTEM NEC ART 250 PART H ELECTRIC SERVICE EQUIPMENT NEC NATIONAL ELECTRICAL CODE GROUND CLAMP EXAMPLE OF ANTENNA...

Page 7: ...IC OPERATION 20 24 TV signals in your region 20 Turning on POWER 21 Standby 21 Switching TV VIDEO AV1 AV2 COMPONENT TV Modes 22 Sound Volume 23 Changing Channels 24 SELECTING MENU ITEMS 25 Selecting Menu Items 25 ADJUSTMENTS 26 43 Adjusting SLEEP TIMER Settings 26 Adjusting BRIGHTNESS Settings 27 Adjusting PICTURE FLIP Settings 28 Adjusting PRESET Settings 29 Adjusting LANGUAGE Settings 30 Adjusti...

Page 8: ...SUM 4 Dry Battery 2 AC Adapter UBATU0026GEZZ QCNWG0003CEPA UADP 0212CEZZ TINS A689WJZZ Cable Clamp 2 QACCD3097CEPA Operation Manual Remote Control RRMCGA152WJSA LC 13B4US RRMCGA152WJSB LC 13B4UB LHLDWA002WJSA LC 13B4US LHLDWA002WJSB LC 13B4UB UADP A009WJPZ ENGLISH FRANÇAIS ESPAÑOL PORTUGUÊS A LC 13B4U E a 03 6 24 2 20 PM 7 ...

Page 9: ...e weak Chemicals that leak from batteries can cause a rash If chemical leakage is found wipe with a cloth The batteries supplied with the product may have a shorter life expectancy due to storage conditions If the remote control will not be used for an extended period of time remove the batteries from the remote control Using the Remote Control Use the remote control by pointing it towards the rem...

Page 10: ... Antenna terminal on the rear of the TV set B Separate VHF and or UHF Antennas F type connector 75 ohm coaxial cable round 300 ohm twin lead cable flat 1 A 75 ohm system is generally a round cable with F type connector that can easily be attached to a terminal without tools not supplied 2 A 300 ohm system is a flat twin lead cable that can be attached to a 75 ohm terminal through a 300 75 ohm adap...

Page 11: ... Some cable TV companies offer premium pay channels Since the signals of these premium pay channels are scrambled a cable TV converter descrambler is generally provided to the subscriber by the cable TV company This converter descrambler is necessary for normal viewing of the scrambled channels Set your TV to channel 3 or 4 typically one of these channels is used If this is unknown consult your ca...

Page 12: ...ator The SLEEP indicator lights up red when the SLEEP TIMER is set Upper control panel To change the vertical angle of the LCD TV set tilt the screen up to 5 degrees forward or 10 degrees backward The TV set can also be rotated 25 degrees to right and left Adjust the angle so that the TV set can be watched most comfortably Speaker Left POWER indicator A green indicator lights when the power is on ...

Page 13: ...TED ON THE MODEL LABEL DISPLAY AND CONTROL OVERVIEW Continued ANT Antenna terminal S VIDEO POWER INPUT DC12V PR AUDIO L PB VIDEO AUDIO R AUDIO L COMPONENT AV IN1 AUDIO L AUDIO R VIDEO Y AV IN2 OUT Carrying handle Hold the carrying handle and tilt the screen while steadying the stand with your other hand Adjusting the screen view angle Terminals AUDIO R HEADPHONE ...

Page 14: ...et and press on the upper part of the back cover until the tab locks in place with a click Removing the Back Cover Plug the headphone mini plug into the HEADPHONE jack located on the rear of the TV set Headphones A Headphones are not included in the supplied accessories No sound is heard from the main unit speakers when a headphone mini plug is connected into the HEADPHONE jack On screen display 2...

Page 15: ... Adjust the brightness of the screen 6 MUTE p 23 Mute the sound 7 VOL p 23 Set the volume 8 CH p 24 Select channel 9 MTS p 23 Select audio settings 10 PIC FLIP p 28 Set the orientation of the picture 11 a b c d Cursor control p 15 Select a desired item on the screen 12 TV VIDEO p 22 Select a Liquid Crystal Television input source 13 MENU p 17 Display the menu screen 14 FLASHBACK Return to the prev...

Page 16: ...NU 1 Press MAIN POWER located on the upper side of the main unit to turn on the TV The SELECT LANGUAGE mode will be dis played 2 Press a b to select ENGLISH ESPAÑOL SPANISH or FRANCAIS FRENCH and press ENTER 3 Press a b to select ON or OFF When you select ON the TV set will automatically memorize the broadcasting channels Press ENTER to access AUTO CLOCK mode 4 Press a b to select ON or OFF When y...

Page 17: ...s or the antenna signal is weak the AUTO CLOCK Setting may not operate In this case a EDS CH IS NOT AVAILABLE message will display and the mode will change to MANUAL CLOCK Setting Refer to page 19 to set the clock manually PLEASE WAI T NOW SEARCHING T IME STOP CH VOL POWER ENTER DISPLAY MUTE SLEEP PIC FLIP BRIGHT TV VIDEO MENU FLASH BACK ENTER a b c d MENU 6 Press a b to select YES and press ENTER...

Page 18: ...s ENTER 3 Press a b to move the cursor to CLOCK and press ENTER 4 Press a b to move the cursor to AUTO CLOCK and press ENTER There are two methods of setting the clock AUTO CLOCK and MANUAL CLOCK AUTO CLOCK uses EDS signals which are provided by some TV stations to automatically adjust the clock MANUAL CLOCK set the clock manually in areas where no channel carries EDS signals ENTER a b c d MENU A ...

Page 19: ... CLOCK Setting on page 19 to set the clock manually If you know the Channel of the EDS signal carrier in your area set EDS CH SET to MANUAL and select START In case the message EDS CH XXX EDS DATA IS NOT AVAILABLE displays set EDS CH SET to AUTO when the AUTO CLOCK Setting screen appears If broadcasting channels are not memorized EDS signals cannot be received even when the EDS CH SET is set to AU...

Page 20: ... to CLOCK and press ENTER 6 Press c d to set the time and press ENTER 4 Press a b to move the cursor to MANUAL CLOCK and press ENTER 7 Press MENU to return to the main screen 12 00AM 11 59AM 11 59PM 12 00PM 5 Press a b to move the cursor to TIME and press ENTER Daylight Saving Time DST Adjustment The Daylight Saving Time changes as shown below set the DST to ON to forward the clock by 1 hour To re...

Page 21: ...S ch US ch Auto System Not required or N A Canada Mexico Color NTSC NTSC N358 World Multi Latin America TV ch US ch US ch Auto System Not required or N A Brazil Color PAL M NTSC N358 World Multi Set color system to TV ch US ch US ch Auto System PAL M see page 32 Argentina Color PAL N NTSC N358 World Multi Set color system to Uruguay TV ch US ch US ch Auto System PAL N see page 32 The World Multi A...

Page 22: ...een display 2 STEREO SAP MONO Turning on POWER Notes A The On screen indicator disappears after a few seconds MAIN POWER CH VOL MENU MAIN POWER TV VIDEO Standby CH VOL POWER ENTER DISPLAY MUTE SLEEP PIC FLIP BRIGHT TV VIDEO MENU FLASH BACK To turn off the LCD TV Press POWER on the remote control The POWER indicator turns red To turn the LCD TV back on Press POWER again The POWER indicator turns gr...

Page 23: ...S video input terminal is additionally provided for the AV IN1 input If both the S video terminal and normal video terminals are connected with cables the S video input terminal takes priority AV2 AV2 mode is used to adjust the preset settings and IN or OUT can be selected AV2 indication is not displayed when OUT is selected For details on setting AV2 IN OUT see page 29 COMPONENT Video equipment c...

Page 24: ...e MUTE mark is displayed for 4 seconds 2 Press MUTE or VOL to turn the sound back to the previous level The mute function is automatically turned off when any of the following buttons are pressed POWER VOL or MTS MUTE VOL MTS 50 VOLUME 10 VOLUME 30 VOLUME To select MTS Multichannel TV Sound 1 Press MTS to display the MTS screen 2 Press MTS to select the MTS settings STEREO stereo audio SAP seconda...

Page 25: ...thin 4 seconds A When selecting a 1 digit channel number do not fail to press the button first Changing channels with CH on the remote control Air Press CH and the channels change in the order shown below 2 3 68 69 2 3 Press CH and the channels change in the order shown below 3 2 69 68 3 2 Cable Press CH and the channels change in the order shown below 1 2 3 125 1 2 3 Press CH and the channels cha...

Page 26: ...s below and then refer to the indicated page for details 1 Press MENU to display the MENU screen 2 Press a b to select the desired menu item and press ENTER 3 Press MENU to exit A The displayed items differ depending on the setting conditions The selected item changes to yellow Items in magenta cannot be selected TV mode This product is factory set to comply with the color system in the United Sta...

Page 27: ...e main screen CH VOL POWER ENTER DISPLAY MUTE SLEEP PIC FLIP BRIGHT TV VIDEO MENU FLASH BACK ENTER a b c d 60 REMAIN MENU SLEEP T IMER V IDEO ADJUST PRESET CLOSED CAPT ION V CHIP BLOCK SET UP SELECT ENTER EX I T ENTER MENU SLEEP T IMER SELECT EX I T RETURN SLEEP T IMER REMAIN ENTER ENTER MENU You can set the SLEEP TIMER to automatically turn off the TV A The SLEEP TIMER screen automatically disapp...

Page 28: ...O ADJUST ENTER ENTER MENU BRIGHTNESS BRIGHT MTS STEREO AUTO POWER OFF P ICTURE FL I P AV2 IN OUT EX I T RETURN OFF NORMAL IN PRESET ENTER ENTER ADJUST MENU Setting the BRIGHTNESS on the MENU screen 1 Press MENU to display the MENU screen 2 Press a b to move the cursor to PRESET and press ENTER 3 Press a b to move the cursor to BRIGHTNESS and press ENTER 4 Press c d to change setting and press ENTE...

Page 29: ...ting the PICTURE FLIP on the MENU screen 1 Press MENU to display the MENU screen 2 Press a b to move the cursor to PRESET and press ENTER 3 Press a b to move the cursor to PICTURE FLIP and press ENTER 4 Press c d to select the desired picture flip setting and press ENTER 5 Press MENU to return to the main screen MIRROR ROTATE NORMAL UPSIDE DOWN A The PICTURE FLIP screen automatically disappears in...

Page 30: ...S BRIGHT Maximum brightness NORMAL Brightness 60 Suitable for viewing in a well lit area Saves energy DARK Brightness 10 Sufficiently bright when viewing in dim areas MTS STEREO Stereo audio SAP Secondary audio program MONO Monophonic audio AUTO POWER OFF OFF This feature is inactive ON The power of the LCD TV set is turned off when there is only TV mode no signal for 5 minutes PICTURE FLIP NORMAL...

Page 31: ...ISPLAY MUTE SLEEP PIC FLIP BRIGHT TV VIDEO MENU FLASH BACK ENTER a b c d MENU SLEEP T IMER V IDEO ADJUST PRESET CLOSED CAPT ION V CHIP BLOCK SET UP SELECT ENTER EX I T ENTER MENU MENU SLEEP T IMER PRESET CLOSED CAPT ION V CHIP BLOCK SET UP SELECT EX I T V IDEO ADJUST ENTER ENTER MENU BLUE SCREEN OFF LANGUAGE SELECT EX I T ENTER RETURN SET UP CH SETT ING ENTER MENU CLOCK LANGUAGE ENGL I SH ESPAÑOL ...

Page 32: ...ECT ENTER EX I T ENTER MENU MENU SLEEP T IMER PRESET CLOSED CAPT ION V CHIP BLOCK SET UP SELECT EX I T V IDEO ADJUST ENTER ENTER MENU EX I T RETURN P ICTURE 50 ADJUST SELECT MENU A See page 32 for the settings CH VOL POWER ENTER DISPLAY MUTE SLEEP PIC FLIP BRIGHT TV VIDEO MENU FLASH BACK ENTER a b c d Video adjustments have different selection items depending on TV mode or AV mode signal from an e...

Page 33: ...d ADJUSTMENTS Continued TV mode AV COMPONENT mode Adjusting VIDEO ADJUST Settings Continued N358 PAL M PAL N Selected item Press c Press d PICTURE Decrease contrast Increase contrast TINT Toward purple Toward green COLOR Lower color intensity Higher color intensity BLACK LEVEL Less brightness More brightness SHARPNESS Soft picture Sharp picture RED BLUE Stronger red Stronger blue GREEN Weaker gree...

Page 34: ...ess ENTER 5 Press a b to move the cursor to the desired mode and press ENTER 6 Press MENU to return to the main screen MENU SLEEP T IMER PRESET CLOSED CAPT ION V CHIP BLOCK SET UP SELECT EX I T V IDEO ADJUST ENTER ENTER MENU BLUE SCREEN OFF LANGUAGE SELECT EX I T RETURN SET UP CH SETT ING ENTER ENTER MENU CLOCK CH SETT ING AI R CABLE EZ SETUP CH SEARCH CH MEMORY SELECT ENTER EX I T RETURN ENTER ME...

Page 35: ...hannel 2 to the TV memory Press c to erase channel 2 from the TV memory ADJUSTMENTS Continued CH SETT ING AI R CABLE CH SEARCH CH MEMORY RETURN EZ SETUP 4 Press d The tuner will search through all available channels in your area and add them to the TV memory START EX I T CH SEARCH A IR 2 MENU A To interrupt CH SEARCH press c CH SEARCH will stop at the current channel and will not add any higher ch...

Page 36: ... V CHIP BLOCK SET UP SELECT EX I T V IDEO ADJUST ENTER ENTER MENU BLUE SCREEN OFF LANGUAGE SELECT EX I T RETURN SET UP CH SETT ING ENTER ENTER MENU CLOCK BLUE SCREEN ON LANGUAGE EX I T RETURN SET UP CH SETT ING CLOCK ENTER ENTER ADJUST MENU A When received signals are weak or interfered with by some other signals the BLUE SCREEN function may be activated To watch the TV under such conditions set B...

Page 37: ... for the symbol to ensure that captions will be shown The Closed Caption broadcasts can be viewed in two modes CAPTION and TEXT For each mode two channels are available CH1 and CH2 The CAPTION mode shows subscripts of dialogs and commentaries of TV dramas and news programs while allowing a clear view of the picture The TEXT mode displays various information over the picture such as TV program sche...

Page 38: ...e control 1 MPAA RATING MPAA RATING Example 1 PG 13 in the age based rating is blocked this will also automatically block the higher ratings R NC 17 and X Example 2 R in the age based rating is blocked this will also automatically block the higher ratings NC 17 and X ote A The MPAA rating is only age based RATING G GENERAL AUDIENCES All ages admitted PG PARENTAL GUIDANCE SUGGESTED Some material ma...

Page 39: ... GUIDELINES Example 1 When TV Y7 in the age based rating is set to BLOCK this will automatically block the higher ratings TV G TV PG TV 14 and TV MA In addition D L S V and FV in CONTENT are automatically blocked unless you manually set BLOCK CONTENT Example 2 When no item in the age based rating is blocked D in the content based rating will be automatically blocked A Age based ratings can be modi...

Page 40: ...P BLOCK OFF ENTER ENTER MENU MPAA G EX I T RETURN PG BLOCK PG 13 BLOCK R BLOCK NC 17 BLOCK X BLOCK ENTER ENTER ADJUST MENU CH VOL POWER ENTER DISPLAY MUTE SLEEP PIC FLIP BRIGHT TV VIDEO MENU FLASH BACK MPAA G EX I T RETURN PG PG 13 R NC 17 X ENTER ENTER SELECT MENU 6 Press c d to select BLOCK and press ENTER If you set PG to BLOCK PG 13 R NC 17 and X are automatically blocked 7 Press MENU to retur...

Page 41: ...TV MA are automatically blocked In addition D L S V and FV in CONTENT are automatically blocked 5 Press MENU to return to the main screen ADJUSTMENTS Continued MPAA TV GUIDEL INES STATUS SELECT EX I T RETURN V CHIP BLOCK OFF ENTER ENTER MENU TV GUIDEL INES TV Y EX I T BLOCK CONTENT D L S V FV RETURN TV Y7 BLOCK TV G BLOCK TV PG BLOCK TV 14 BLOCK TV MA BLOCK ENTER ENTER ADJUST MENU CH VOL POWER ENT...

Page 42: ... T BLOCK CONTENT RETURN TV Y7 TV G TV PG TV 14 TV MA ENTER ENTER MENU D EX I T RETURN L BLOCK S V FV BLOCK CONTENT ENTER ENTER ADJUST MENU ENTER a b c d CH VOL POWER ENTER DISPLAY MUTE SLEEP PIC FLIP BRIGHT TV VIDEO MENU FLASH BACK MPAA TV GUIDEL INES STATUS SELECT EX I T RETURN V CHIP BLOCK OFF ENTER ENTER MENU D SELECT EX I T RETURN L S V FV BLOCK CONTENT ENTER ENTER MENU ADJUSTMENTS Continued A...

Page 43: ...If you select V CHIP BLOCK again by using MENU V CHIP BLOCK will be turned on again ADJUSTMENTS Continued CH VOL POWER ENTER DISPLAY MUTE SLEEP PIC FLIP BRIGHT TV VIDEO MENU FLASH BACK ENTER a b c d 4 Press MENU to return to the main screen V CHIP HAS BEEN ACT IVATED TV Y INPUT SECRET NO EX I T MENU CH VOL POWER ENTER DISPLAY MUTE SLEEP PIC FLIP BRIGHT TV VIDEO MENU FLASH BACK MENU Channel Select ...

Page 44: ...TING or 1 to 2 of 4 CANCELING THE V CHIP BLOCK SCREEN WHILE V CHIP BLOCK IS ACTIVATED then INPUT SECRET NO will be displayed 2 Press and hold both CH and VOL on the TV set simultane ously until the message INPUT SECRET NO blinks 3 Press MENU to exit ADJUSTMENTS Continued CH VOL POWER ENTER DISPLAY MUTE SLEEP PIC FLIP BRIGHT TV VIDEO MENU FLASH BACK INPUT SECRET NO EX I T MENU INPUT SECRET NO EX I ...

Page 45: ...minals and if you select AV IN1 you can only view pictures from the S VIDEO terminal To view the picture from the VIDEO terminal do not connect any external device to the S VIDEO terminal For more information about external device connections see the manuals of your external devices If HDTV 720P 1080I signals are input to the COMPONENT terminals NOT COMPATIBLE WITH THIS SIGNAL will appear and play...

Page 46: ... more external devices When connecting an external device use care to connect the video and audio cables to the corresponding terminals VIDEO AUDIO L Y PB PR R AUDIO L R COMPONENT AV IN2 OUT ANT VIDEO S VIDEO AUDIO L R HEAD PHONE POWER INPUT DC12V AV IN1 USE THE SUPPLIED AC ADAPTER PART NO LOCATED ON THE MODEL LABEL To AV IN2 terminal To audio video output terminal To S VIDEO input termi nal To S ...

Page 47: ...T to OUT See page 29 The factory setting for AV2 IN OUT is IN A AV2 IN OUT has 2 OUT modes see page 29 When using the S video input for AV IN1 or Y PB and PR input for COMPONENT no video output will be made to the AV output terminal but audio output will be made for connection to external audio systems Connect to a VCR audio amplifier etc Bundling Cables with Clamps Secure cables and cords with th...

Page 48: ...not set to mute Make sure that headphones are not connected There is no picture or sound just noise Make sure the antenna cable is properly connected Bad reception could be the problem Picture is not clear Make sure the antenna cable is properly connected Bad reception could be the problem Picture is light or improperly tinted Check color adjustment Check COLOR SYSTEM setting The picture is too da...

Page 49: ...es on the screen or colors fade Is the unit receiving interference from other devices Transmission antennas of radio broadcasting stations transmis sion antennas of amateur radios and cellular phones may also cause interference Use the unit as far apart as possible from devices that may cause possible interference Cautions regarding use in high and low temperature environments When the unit is use...

Page 50: ... IN1 AV IN1 S VIDEO IN AV IN2 AV IN2 AV OUT Terminals COMPONENT COMPONENT IN AUDIO IN Antenna F Type Headphone Mini jack for stereo ø3 5 mm OSD language English French Spanish Power supply DC 12V AC 110 240V 50 60Hz Weight 9 7 lbs 4 4 kg w o accessories Accessories Remote control Battery x2 Antenna cable AC adapter AC cord Cable clamp x2 Operation manual As a part of policy of continuous improveme...

Page 51: ...67 10 11 16 271 5 13 19 64 338 2 39 64 66 5 5 7 16 138 5 1 4 133 5 3 15 16 100 315 16 100 1 19 64 33 13 1 8 333 3 1 32 1 227 64 61 5 725 64 187 8 1 32 1 AV IN 2 OUT COMPONENT R AUDIO VIDEO L R AUDIO L PR PB Y POWER INPUT DC12V ANT HEAD PHONE S VIDEO R AUDIO VIDEO AV IN1 L USE THE SUPPLIED AC ADAPTER PART NO LOCATED ON THE MODEL LABEL ...

Page 52: ...he duration of any warranties beyond the time period described herein on behalf of Sharp The warranties described herein shall be the sole and exclusive warranties granted by Sharp and shall be the sole and exclusive remedy available to the purchaser Correction of defects in the manner and for the period of time described herein shall constitute complete fulfillment of all liabilities and responsi...

Page 53: ...g the warranty period warranty service may be obtained upon delivery of the Sharp product together with proof of purchase and a copy of this LIMITED WARRANTY statement to an Authorized Sharp Service Centre or an Authorized Sharp Servicing Dealer In home warranty service may be provided at Sharp s discretion on any Sharp television with the screen size of 27 or larger and on any Sharp Over the Rang...

Page 54: ...LISH FRANÇAIS ESPAÑOL PORTUGUÊS SHARP ELECTRONICS CORPORATION Sharp Plaza Mahwah New Jersey 07430 2135 SHARP CORPORATION LC 13B4U Printed on 100 post consumer recycled paper Imprimé sur 100 de papier recyclé Impreso en 100 de papel reciclado de postconsumo Papel 100 Reciclado Cuidado do Meio Ambiente Printed in Japan Imprimé au Japon Impreso en Japón Impresso no Japão TINS A689WJZZ 03P06 JKG A ...

Reviews: