AL-1661CS UNPACKING AND INSTALLATION 5 - 7
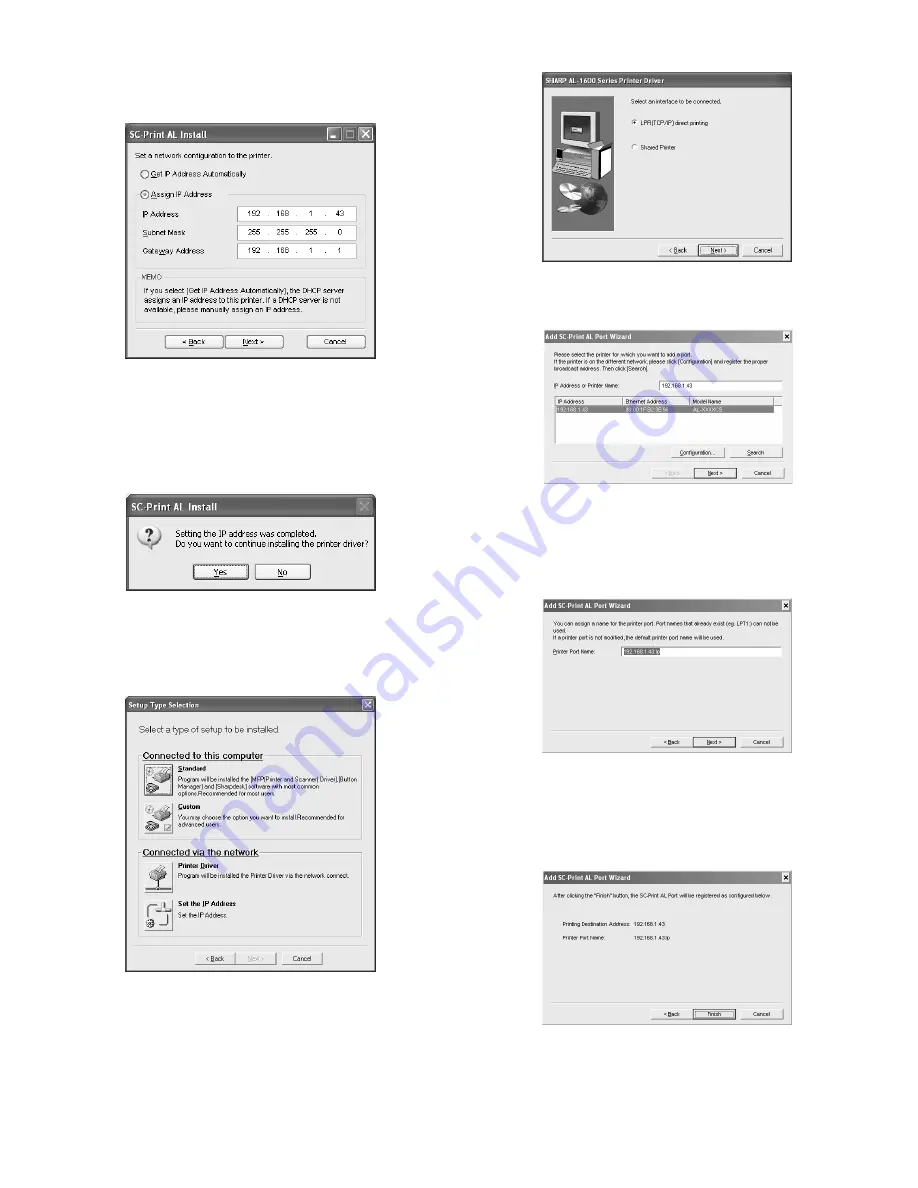
10) Enter the IP address, subnet mask, and default gateway.
The settings in the above window are examples.
Be sure to ask your network administrator for the correct IP
address, subnet mask, and default gateway to be entered.
Note: When "Get IP Address Automatically" is selected, the IP
address may at times change automatically. This will prevent
printing. In this event, select "Assign IP Address" and enter the
IP address.
11) Click the "Next" button.
12) Click the "Yes" button.
Go to step 11.
LPR (TCP/IP) direct printing
After step 1-7.
8) Click the "Printer Driver" button.
If you have not set the IP Address, click the "Set the IP Address"
button in first and go to step 8 on "Connecting a USB cable".
9) Read the message in the "Welcome" window and then click the
"Next" button.
10) Select "LPR (TCP/IP) direct printing" and click the "Next" button.
11) The printer or printers connected to the network will be detected.
Click the printer to be configured (the machine) and click the
"Next" button.
Note: If the machine's IP address cannot be found, make sure the
machine is powered on, make sure the network cable is
connected correctly, and then click the "Search" button.
12) In the window for setting the destination print port name, make
sure that ":lp" appears at the end of the IP address and click the
"Next" button.
Note: Any name can be entered in "Printer Port Name" (maximum of
38 characters).
13) A window appears to let you check your entries. Make sure that
the entries are correct and then click the "Finish" button.
If any of the entries are incorrect, click the "Back" button to return
to the appropriate window and correct the entry.
Summary of Contents for AL-1661CS
Page 201: ...AL 1661CS CIRCUIT DIAGRAM 13 40 6 7 8 9 10 11 12 6 7 8 9 10 11 12 A B C D E F G H 1 1 ...
Page 212: ...Memo ...
Page 213: ...Memo ...


