


17) Plug the power cord into the
WorkCentre and then into a grounded
outlet.
18) Turn on the power switch. In
approximately two seconds the ready
indicator will light. Copying is now
possible.
Note: Save the carton and packing
materials. They should be used to
repack the WorkCentre if it has to
be shipped for servicing or moved.
3. P Loading Paper
1) Lift and pull open the paper tray.
2) Push down on the pressure plate
until it locks in position.
Note: The procedures for loading paper
into tray 1 and tray 2 are identical.
3) Adjust the paper guides to the
desired paper size.
●
Squeeze the side guide.
●
Lift and insert the rear guide.
●
When adding paper larger than
8.5L11/A4, remove the rear guide and
store it in the pocket in front of the
side guide.
4) Fan the paper and insert it into the
tray.
●
Ensure that the paper corners are
under the corner snubbers.
●
Do not fill above the max fill line.
5) Close the paper tray.
6) If copying, press Start to continue. If
printing, the job will automatically
resume.
●
To cancel the flashing P without
restarting copying, press the Clear
button.
AL-1550
4 – 2
Summary of Contents for AL-1550
Page 12: ... 10 ELECTRICAL SECTION 1 Block diagram A Overall block diagram AL 1550 10 1 ...
Page 13: ...B Main PWB block diagram AL 1550 10 2 ...
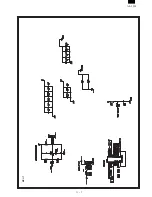
Page 16: ... 11 CIRCUIT DIAGRAM MCU 1 AL 1550 11 1 ...
Page 17: ...MCU 2 AL 1550 11 2 ...
Page 18: ...MCU 3 AL 1550 11 3 ...
Page 19: ...MCU 4 AL 1550 11 4 ...
Page 20: ...MCU 5 AL 1550 11 5 ...
Page 21: ...MCU 6 AL 1550 11 6 ...
Page 22: ...MCU 7 AL 1550 11 7 ...
Page 23: ...OPU AL 1550 11 8 ...
Page 24: ...ACTUAL WIRING DIAGRAM 1 AL 1550 11 9 ...
Page 25: ...ACTUAL WIRING DIAGRAM 2 DSPF UNIT AL 1550 11 10 ...


