background image

HOW TO USE THE FAX FUNCTION

87

8

Being Polled (Memory Polling)

To allow multiple fax machines to poll your fax, or in cases where you want to free up
the original feeder tray for other operations, use Memory Polling instead of Polling
Standby.

Programming a Memory Polling Operation

You can choose whether to allow polling only once, or an unlimited number of
times. In the later case, your fax can be used as an electronic “bulletin board”.
• Only one original can be stored at a time for memory polling, however, you

can store multiple page originals.

• If you allow polling only once, the original will be automatically cleared from

memory after polling. If you allow polling an unlimited number of times, the
original will remain in memory until you clear it using the procedure described
in “Clearing Originals” which follows.

• If you have an original stored in memory for polling, and you want to add to

it, following the procedure described in “Adding to Originals”.

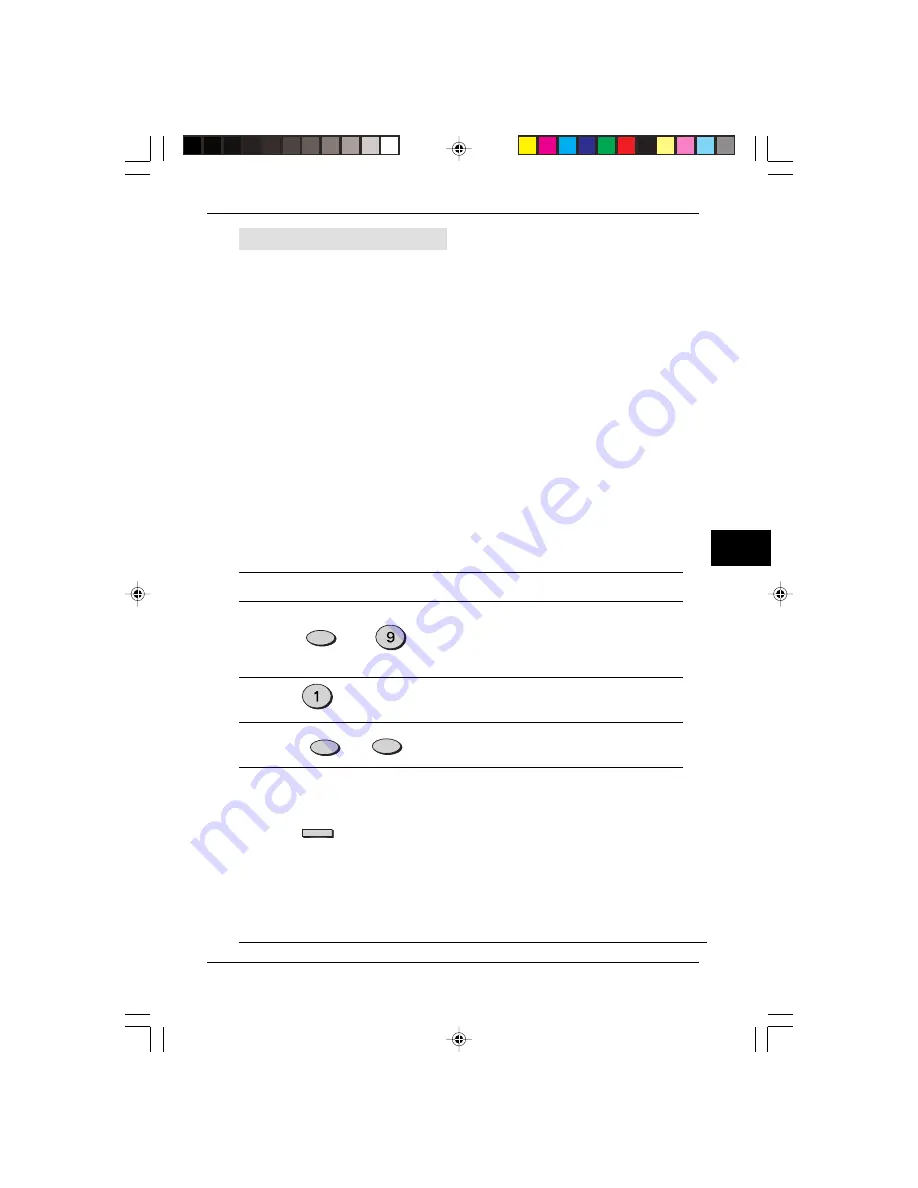
To program a Memory Polling operation, either load the original in the SPF or
use the original table as described below. Then, set the reception mode to
AUTO (Press the 

RECEPTION MODE

 key until the AUTO light comes on).

Step

Press these keys

Comments

1

“MEMORY POLL MODE” will
appear in the display. “1: 1 TIME
2: REPEAT” will appear at the
bottom of the display.

2

“SET RESOLUTION & CONTRAST”
will appear in the display.

3

Adjust the resolution and/or
contrast settings if desired.

4

When using the SPF, press

ENTER 

key. When using the

original table, follow steps 1-5
in the section “Setting the
Original” in this chapter.
“STAND-BY” will appear in the
display, and the original will be
scanned into the machine’s memory.

The date and time will return to the
display.

FUNCTION

WXYZ

ENTER

RESOLUTION

CONTRAST

Special Functions

SUK 08 USING FAX LEO.p65

30/03/00, 17:24

87

Summary of Contents for 3800M - B/W Laser - All-in-One

Page 1: ...FO 3800M DIGITAL LASER MULTIFUNCTION OPERATION MANUAL SUK COVER PAGE LEO p65 28 03 00 11 44 1 ...

Page 2: ...or when you are wet Take care not to spill any liquids on the machine DECLARATION The equipment has been approved in accordance with Council Decision 98 482 EC for pan European single terminal connection to the public switched telephone network PSTN However due to differences between the individual PSTNs provided in different countries the approval does not of itself give an unconditional assuranc...

Page 3: ...d or SHARP S Licensors if you fail to comply with any provision of this License Upon termination you must destroy the Software and related documentation and all copies thereof 4 Export Law Assurances You agree and certify that neither the Software nor any other technical data received from SHARP nor the direct product thereof will be exported outside the United States except as authorized and as p...

Page 4: ...COST OF ALL NECESSARY SERVICING REPAIR OR CORRECTION SOME JURISDICTIONS DO NOT ALLOW THE EXCLUSION OF IMPLIED WARRANTIES SO THE ABOVE EXCLUSION MAY NOT APPLY TO YOU 8 Limitation of Liability UNDER NO CIRCUMSTANCES INCLUDING NEGLIGENCE SHALL SHARP BE LIABLE FOR ANY INCIDENTAL SPECIAL OR CONSEQUENTIAL DAMAGES THAT RESULT FROM THE USE OR INABILITY TO USE THE SOFTWARE OR RELATED DOCUMENTATION EVEN IF ...

Page 5: ...5 Final Preparations 16 Connecting Other Devices 16 2 MAKING COPIES Normal copying 17 When using the SPF 17 When using the original table 18 Exposure adjustment photo copying 20 Automaticexposure adjustment 21 Reduction Enlargement Zoom 22 Two sided copying 23 3 SPECIAL FUNCTIONS Description of special functions 25 Toner save mode 26 User programs 27 4 SUPPLIES AND USER MAINTENANCE TD cartridge re...

Page 6: ...ion 52 Setting the Number of Recall Times 53 Setting the Recall Interval 53 Setting the Index Function 54 Setting Fine Resolution Priority 55 Setting Up the Machine for Use with a PC Modem 55 Using the Remote Reception Function 56 PBX Setting 57 Storing Numbers for Automatic Dialing 58 Chain Dialing for Long Numbers 60 Storing Numbers Under Group Keys 61 Using the Machine with a Answering Machine ...

Page 7: ...PEAKER key 75 Using the SEARCH key 76 Redialing 76 Receiving Faxes 77 Using AUTO Mode 77 Using MANUAL Mode 77 Using A M Mode 77 Optional Reception Settings 78 Receive Reduce 78 When using manual sending and receiving 79 Special functions 80 Memory 80 Memory backup 80 Subsitute Reception into Memory 80 DataTransfer 81 Transmission Reservation 82 Broadcasting 84 Polling 86 Setting the Polling key 86...

Page 8: ... 11 PRINTING Printing a page 111 Executing printing 111 Indicators on the operation panel 112 Setting print conditions from printer driver 113 Windows 95 Windows 98 Windows NT 4 0 113 Windows 3 1 x 114 Printing from an MS DOS application 115 Print setting from the MS DOS prompt 115 Settings on the front panel 116 Windows 95 Windows 98 Windows NT 4 0 116 Windows 3 1 x 116 Software printer setting 1...

Page 9: ... Parallel interface 128 Print area 129 Transport 130 15 QUICK REFERENCE Quick reference 131 16 GLOSSARY Glossary 133 17 INDEX Index 135 Material safety data sheet 137 Table of contents 13 TROUBLE Troubleshooting 119 Using other installed drivers 121 Windows 95 Windows 98 Windows NT 4 0 121 Windows 3 1 x 122 Uninstalling drivers 122 SUK 00 TABLE LEO p65 30 03 00 17 49 7 ...

Page 10: ...viii Notes SUK 00 TABLE LEO p65 30 03 00 17 49 8 ...

Page 11: ...is not designed for use on a line with call waiting call forwarding and certain other special services offered by your telephone company If you at tempt to use the machine in conjunction with one of these services you may experience errors during transmission and reception of facsimile messages This manual provides information for the set up and operation of your new machine It is designed to help...

Page 12: ...those shown above If anything is not included or is damaged contact your Sharp dealer Save the carton and packing materials These can be re used for transporting the machine should it be necessary Installation Warning Note Caution Conventions used in this manual In this manual the following icons are used to provide the user with information pertinent to the use of the machine Warns the user that ...

Page 13: ...ive paper on the original table Do not remove this part with the front cover closed Tape Push gently on both sides of the front cover to open the cover 3 Store the screw which has been removed in step 1 at the right side inside the front cover 4 Afterremovingprotectingmateriala gentlypullblackprotectivepaper b and protective material c together to your side and remove them Be careful not to tear t...

Page 14: ...n you set up or move the machine The machine must be installed on a level surface Use only the rated voltage from a properly grounded wall socket Keep the machine away from areas that are Dusty or smoky damp or humid Poorly ventiated On direct sunlight Subject to extreme temperature or humidity changes e g near an air conditioneror heater SUK 01 INSTALLATION LEO p65 30 03 00 17 45 4 ...

Page 15: ... at least 2 hours before use When moving the machine hold iton both sides as shown below Provide ample room for easy access to the front back and sides of the machine Leave enough space around the ventilation outlets for heat from the fan to dissipate properly Blocking these outlets could cause the machine to overheat which can cause serious damage to the internal parts Use of extension cords is n...

Page 16: ...e weighted average concentration However since the small amount that is emitted may have an objectionable odor it is advisable to place the machine in a ventilated area Cautions Be careful on handling the machine as follow to maintain the performance of this machine Do not drop the machine subject it to shockor strike it against any object Store spare supplies such as drum cartridges and TD cartri...

Page 17: ...o not remove any cover or attempt to gain access to the inside of product Refer all servicing to qualified personnel Use of controls or adjustments or performance of procedures other than those specified hereinmay result in hazardous radiation exposure Place the machine on a firm level surface Do not install the machine in a humid or dusty location When the machine is not used for a long time for ...

Page 18: ...ogramswhichallowsetting modificationoffunctionsforcustomer sneedsare provided 4 Scan once Print many The copier is equipped with a 1 page memory buffer This memory allows the copier to scan an original 1 time only and make up to 50 copies This feature allows for improved workflow reduced operating noise from the copier and reduced wear and tear on the scanning mechanism This feature provides for a...

Page 19: ...aper release lever Interface connector Power switch Paper guide Operation panel SPF exit tray Original guide Document feeder tray Fax control panel Power cord socket TEL LINE jack LINE TEL TD cartridge Drum cartridge Drum cartridge handles TD cartridge handle SUK 01 INSTALLATION LEO p65 30 03 00 17 45 9 ...

Page 20: ... Selected copy ratio is shown by a lit indicator p 22 Zoom indicator p 22 Copy ratio display key p 22 Display Displays the specified copy quantity zoom copy ratio user program code and error code ON LINE indicator Lights up when the machine is used as a printer or scanner Power save indicator Lights up when the copier is in a power save mode p 25 27 Zoom keys N L Use to select any reduction or enl...

Page 21: ... the TD cartridge into the copier along the guides in the direction indicated by the arrow Align the projections on both sides with the guides Close the front cover Be sure to remove the protective paper from the drum cartridge before installing the TD cartridge 1 4 or 5 times 2 3 4 Hold the handle of theTD cartridge so that the stamped markings on top of the cartridge are facing upward SUK 01 INS...

Page 22: ...per width The paper tray holds up to 250 sheets of standard paper 56 to 80 g m Do not set too many sheets Feed copy paper lengthwise only When copying onto special paper such as labels and transparency film feed one sheet at a time 1 2 Paper tray Paper release lever 3 If the paper is inserted without doing this paper misfeeds will occur When copying onto an envelope insert it so that the side to b...

Page 23: ... 4 Power to machine Ensure that the power switch of the machine is in the OFF position Insert the attached power cord into the power cord socket at the rear of the machine 1 2 If you use the machine in a country other than the country where the copier was purchased you will need to make sure that your local power supply is compatible with your model If you plug the machine into an incompatible pow...

Page 24: ...the set time has elapsedwithoutanycopieroperationafterthelastcopyofarunismade or power is turned on The settings of the power save modes can be modified See page 27 USERPROGRAMS The machine will return to the initial settings a preset amount of time after the last copy is made The preset amount of time auto clear time can be changed See page 27 USER PROGRAMS Initial settings of operation panel The...

Page 25: ...vice and in combination in serial connection with approved terminal equipment s To connect an extension telephone or an answering machine plug the extension line cordin the provided wall jack adaptator See Connecting Other Devices in this chapter for details Note If your area experiences a high incidence of lightning or power surges we recommend that you install surge protectors for the power and ...

Page 26: ... inform callers who want to send a fax to press their FAX START key Comments 1 It is advisable to keep the length of the message under 10 seconds If it is too long you may have difficulty receiving faxes sent by automatic dialing 2 Your callers can even leave a voice message and send a fax message on the same call Modify your outgoing message to explain that this can be done by pressing their FAX ...

Page 27: ...e SPF 1 Make sure that no original is left on the original table 2 Adjust the original guides to the size of original 3 Set the originals fae down in the document feeder tray Feed the originals narrow side into the slot Beforefeedingoriginalsinthedocumentfeedertray besuretoremove any staples or paper clips from them Before placing curled or wavy originals into the document feeder tray be sure to f...

Page 28: ...le and align it with the original scale Make sure the upper left corner of the original is set the position indicated by the Close the original cover When copying a book or an original which has been folded or a crumpledoriginal pressdowntheoriginalcoverlightly Iftheoriginal cover is not s ecurely closed the copies may be striped or blurred Print face mark Original scale SUK 02 MAKING COPIES LEO p...

Page 29: ...ns digit Press the left copy quantity key to set the tens digit from 1 to 5 Up to 50 copies can be set Tens digit Unit digit Press the print key 6 Todisplaythenumberofcopiesmadeinacontinuousrun pressthe left copy quantity key To stop copying in the middle of a run press the clear key Copying will stop and the number in the display will be reset to 0 When the print key is pressed while printing is ...

Page 30: ... steps manually Press the exposure mode selector key to select the manual or photo mode 1 2 Use the light and dark keys to adjust the exposure level If exposure level 2 is selected the two left handmost indicators for that level will light up simultaneously Also if level 4 is selected the two right handmost indicators for that level will light up simultaneously 3 Set the number of copies using the...

Page 31: ...en or darken the automatic exposure level as desired If exposure level 2 is selected the two left handmost indicators for that level will light up simultaneously Also if level 4 is selected the two right handmost indicators for that level will light up simultaneously When adjusting the automatic exposure level for copying from the SPF place an oriignal in thedocument feeder tray and make sure that...

Page 32: ... To reset the ratio to 100 press the copy ratio selector key repeatedly until the 100 indicator lights up In order to decrease rapidly the zoom ration press and hold down the N or L key But the value will stop on the preset reduction and enlargement ratios In order to go up to these values loose the key and then press and hold it down again To select a zoom ratio When a zoom N or L key is pressed ...

Page 33: ...original table and make a copy 1 Replace the first original with the second original on the original table and close the original cover Place the second original in the reverse orienta tion to the first original 2 When feeding copies to copy onto the back side be sure to feed them one sheet at a time Curled or wavy copies must be flattened before they are fed If not crumpling paper misfeeds or smu...

Page 34: ...er top to bottom as shown Feed the first copy into the paper tray Press the print key Two sidedcopying 3 Both the first and second originals ca be set in the SPF but they must be set separately 4 SUK 02 MAKING COPIES LEO p65 30 03 00 16 37 24 ...

Page 35: ...kedesiredcopierselectionsandpresstheprint key using the normal copying procedure Autopowershut offmode When the copier enters the auto power shut off mode the power save indicator will light up and other indicators will go out The auto power shut off modesavesmorepowerthanthepreheatmodebutrequiresalongertimebefore starting copying To copy from the auto power shut off mode press the print key Then ...

Page 36: ...o indicator will begin to blink The exposure indicator marked 5 will light up indicating the standard toner mode is active To enter the toner save mode press the light key The exposure indicator marked 1 will light up indicating the toner save mode is selected 4 Press the exposure mode selector key twice The photo indicator will stop blinking and the AUTO indicator will light up steadily The toner...

Page 37: ...redprogramnumberwillbesteadilylitand the currently selected parameter number for the program will blink on the right side of the display 3 4 Paper detection mode Ifthewidthofthepaperinthepapertrayislessthan210mm thewidthofscanning will be reduzed to 138 mm Select the desired parameter using the right copy quantity key The entered parameter number will blink on the right of the display Programno Mo...

Page 38: ...will be steadily lit and the entered value will be stored 6 Press the light or dark key to return to the normal copy mode Userprograms To change the setting or to set another mode press the clear key The copier will return to step 2 SUK 03 SPECIAL FUNCTIONS LEO p65 27 03 00 14 46 28 ...

Page 39: ...eTD cartridge Doing so will clear any facsimile or print data that has been stored in memory 1 2 Push gently on both sides of the front cover to open the cover After the copier stops it may be possible to make a few more copies bytakingtheTDcartridgeoutofthecopier shakingithorizontally then reinstallingit Ifcopyingisnotpossibleafterthisoperation replacethe TD cartridge If the indicator begins to b...

Page 40: ...four or five times Remove the protective tape and then the protective cover 4 or 5 times 5 Hold the handle of theTD cartridge so that the stamped markings on top of the cartridge are facing upward Close the front cover The s indicator will go out and the ready indicator will light up Gently insert the TD cartridge into the copier along the guides in the direction indicated by the arrow 6 Align the...

Page 41: ...over to open the cover Gently pull theTD cartridge out and place it on the scrap paper which was prepared in step 1 To remove theTD cartridge see page 30 step 3 Usingbothhandsholdthetabsonthedrumcartridgebetweenyourthumb and index finger and gently pull the cartridge up and out in a circular motion to lift it clear of the machine Dispose of the old drum cartridge in accordance with local regulatio...

Page 42: ...e machine 8 Pressingandholdingdownboththeexposuremodeselectorkeyandclear key close the front cover Continue to hold down these keys for five seconds drum initialization processing The drum replacement required w indicator will go out 9 Press and hold down the light and dark keys simultaneously for more than 5 seconds until all the alarm indicators w t s blink and appears in the display Press and h...

Page 43: ...et Do not use thinner benzene or other volatile cleaning agents Doing so may cause deformation discoloration deterioration or malfunction Cabinet Wipe the cabinet with a soft clean cloth Original table and original cover Dirtorstainsontheglassorcoverwillalsobecopied Wipetheglassandthecover with a soft clean cloth If necessary dampen the cloth with water or a glass cleaner Original table Original c...

Page 44: ...r to remove any particles of toner caking on the drum 5 6 Replace the drum cartridge See page 31 DRUM CARTRIDGE REPLACEMENT Replace the TD cartridge See page 30 TD CARTRIDGE REPLACEMENT 7 Close the front cover and turn on the machine power 8 When the machine is not in use Remove the power cord and the interface cable Do not touch the drum surface with the edges of rolled up paper Do not let the dr...

Page 45: ...ed or the clear key is pressed When the SPF misfeeds an original shet themachinewillstopandtheSPFmisfeed indicatorwillblink whilethemisfeed t indicator will remain off For a misfeed of originals in the SPF see D Misfeed in the SPF on page 38 A Misfeed in the paper tray Pull the paper release lever at the right of the paper tray toward you Paper release lever When the misfeed t indicator blinks or ...

Page 46: ...sh gently on both sides of the front cover to open the cover 3 4 Gently pull theTD cartridge out and place it on the scrap paper which was prepared in step 1 To remove the TD cartridge see page 29 step 2 Take a piece of scrap paper that is larger than the drum cartridge and fold itinhalf Keepthispaperreadytoshieldthelight sensitivepartofthedrum cartridge from light after it is removed from the mac...

Page 47: ... 9 C Misfeed in the exit area Push gently on both sides of the front cover to open the cover Remove the misfed paper from the exit area by holding the edge of the paper nearest you and pulling it gently in a straight line 1 2 Do not pull the misfed paper too hard with the front cover closed as you may tear it or damage the printing mechanism Be sure to open the front cover and then remove the misf...

Page 48: ...iginal cannot be easily removed proceed to C without pulling the original forcibly C If the original does not move easily into the exit area remove it in the direction of the arrow may appear in the display indicating that one original must be returned to the document feeder tray Clearthemisfeedandreturntherequirednumberoforiginals Thenpress the print key to resume copying misfed original followin...

Page 49: ...e not installed properly Is the copy paper too heavy Paper damp Solution Plug the copier into a grounded outlet p 15 Turn the power switch on p 16 Gently close the front cover Place the original face down on the original table or in the SPF p 17 Press the print key to cancel the auto power shut off mode p 25 Adjust the exposure manually p 20 Adjust the automatic exposure level p 21 Cancel the phot...

Page 50: ... let you adjust the margins to have around the edges of the paper that you will be printing on The area inside the margins then becomes the printable area The Windows Printer Driver specifies the minimum values that you can set for these page margins These minimum margin settings vary depending on whether you are printing from a Windows application or from a non Windows application in PCL emulatio...

Page 51: ...many features the printer is very compact Its footprint is no larger than a single A4 page and the total weight is approximately 5 kg meaning that it is easy to transport and set up The 100 sheet multipurpose tray is also located at the top of the printer to save space and to make inserting the paper easy Most software applications will let you adjust the margins to have around the edges of the pa...

Page 52: ...e TD cartridge must be replaced Replace it with a new one p 29 A misfeed has occurred Remove the misfed paper referring to the description of Misfeed removal p 35 An original misfeed has occured in the SPF Remove the misfed originals referring to the description of Misfeed in the SPF p 38 TheTD cartridge is not installed Check if the cartridge is installed p 30 Front cover is open Close the front ...

Page 53: ...ending faxes SPEAKER key Press this key to begin manual dialing To close the line press the SPEAKER key again AUTO light This light indicates that the machine will answer the machine automatically MANUAL light This light indicates that the machine must be answered manually A M light This light indicates the answering machine will answer the line if properly connected CONTRAST key Press this key to...

Page 54: ...s the or key to lower or raise the volume to the desired level 4 STORED will appear in the display 5 Press the STOP key twice to exit FUNCTION GHI JKL or ENTER STOP Adjusting the Beep Volume The left and right arrow keys on the operation panel of the machine are very useful for scrolling through the various function lists and settings Once you have pressed the FUNCTION key you can scroll through t...

Page 55: ... to exit Adjusting the Ringing Volume or You can select the length in seconds of the alarm beeps following the procedure below Factory setting 1 3SEC Step Press these keys Comments 1 OPTION SETTING will appear in the display 2 BEEP LENGTH will appear in the display 3 Press the or key to set the alarm beeps to the desired length or to turn them off 4 STORED will appear in the display 5 Press the ST...

Page 56: ...eeps Off You can select language of display and reports To do this follow the procedure below Step Press these keys Comments 1 OPTION SETTING will appear in the display 2 LANGUAGE will appear in the display 3 Press the or key to scroll the languages 4 Press the ENTER key twice to exit 5 Press the STOP key rwice to exit Note After changing the language settings it may take a few moments for the dis...

Page 57: ...low To enter two characters in succession which require using the same key press the right arrow key once after entering the first character and then enter the second character To change one individual character to another move the cursor to the character you want to change and enter the new one The new character will replace the old one Symbols can also be entered by pressing the and keys Pressin...

Page 58: ... these keys Comments 1 ENTRY MODE will appear in the display 2 ENTERYOUR FAX will appear in the display 3 Enter your own fax number maximum 20 digits by pressing the number keys To insert a space between digits press the key To insert a press the example 18002374277 key 4 ENTERYOUR NAME will appear in the display 5 Enter your name by pressing the appropriate number keys as shown on the left Press ...

Page 59: ...ODE will appear in the display 2 ENTERYEAR will appear in the display 3 Enter the last two digits of the year ENTER MONTH will appear in the example 2000 display 4 Enter the month 2 digits 01 for January 02 for February 12 for December etc ENTER DATE will appear in the example July display 5 Enter the day of the month 01 to 31 PRESS ENTER KEY will appear example the fifth in the display 6 ENTERTIM...

Page 60: ...s take place as shown below On the last Sunday of every March 02 00 03 00 On the last Sunday of every October 03 00 02 00 Use the procedure below to program the Auto Summer Time Setting Step Press these keys Comments 1 ENTRY MODE will appear in the display 2 AUTO SUMMERTIME will appear in the display 3 Press 1 to turn the Auto Summer Time Setting on or 2 to turn it off 4 Press the STOP key twice t...

Page 61: ... page You can also receive faxes however all calls must first be answered by picking up the receiver on the extension phone or telephone connected to the same line A M mode Select this mode when an answering machine is connected to the machine and you want the answering machine to answer all calls This allows you to receive both voice messages and faxes while you are out To set the reception mode ...

Page 62: ...NUAL mode can also be set If you do not want the machine to answer at all in MANUAL Mode select 0 in Step 3 below Factory setting 0 OFF Step Press these keys Comments 1 OPTION SETTING will appear in the display 2 OF RINGS MAN will appear in the display 3 Select the number of rings you would like to use 0 to 9 4 STORED will appear in the display 5 Press the STOP key twice to exit Setting the Number...

Page 63: ...e to exit Setting the Number of RecallTimes Setting the Recall Interval The recall interval the time the machine waits in between attempts to re send a fax to a busy number can be set from 1 to 15 minutes Follow this procedure Factory setting 05 5 minutes Step Press these keys Comments 1 OPTION SETTING will appear in the display 2 RECALL INTERVAL will appear in the display 3 Enter the recall inter...

Page 64: ...tput tray FUNCTION GHI Separate faxes with index marks Fax Setup Use the following procedure to set the index function Factory setting 2 OFF Step Press these keys Comments 1 OPTION SETTING will appear in the display 2 BATCH INDEXING will appear in the display 3 Press 1 to turn on the index function or 2 to turn it off 4 Press the STOP key twice to exit SUK 06 INITIAL LEO p65 30 03 00 17 00 54 ...

Page 65: ...X SIGNAL RCV will appear in the display 3 Press 1 to turn Fax Signal Receive on or 2 to turn it off 4 Press the STOP key twice to exit Setting Fine Resolution Priority For most faxing jobs you will most likely want to specify the resolution However you can also set a default resolution when no setting is made using the RESOLUTION key When Fine Resolution Priority is turned on all faxes will be sen...

Page 66: ...d If you want to receive a fax while you are on an extension telephone when you hear a fax tone press the one digit Fax Remote Number and To ensure proper fax reception hang up the extension phone only after you have confirmed that fax reception has begun Furthermore there is no sound when fax reception begins Turning on Remote Reception Factory setting 1 ON Step Press these keys Comments 1 OPTION...

Page 67: ...This parameter permits to define how connection of a call from a PBX to an external line is made For more details about this mode see operation manual of your PBX or contact support department of PBX dealer Press 1 for FLASH mode Press 2 for ID PBX mode 5 PBX ID CODE will appear in the display Enter identification number of your PBX max 3 digits 6 Press ENTER key to continue 7 Press the STOP key t...

Page 68: ... the access code Storing numbers Use the following procedure to store numbers for Rapid Key Dialing or Speed Dialing Step Press these keys Comments 1 ENTRY MODE will appear in the display 2 FAX NUMBER MODE will appear in the display 3 FAX NUMBER SET will appear in the display 4 To store a Rapid key number press a Rapid key To store a Speed Dial number press two number keys 00 to 99 PRESS ENTER KEY...

Page 69: ...s are entered by pressing the REDIAL PAUSE key 2 seconds per pause If necessary several pauses can be entered in a row Use the following procedure to clear numbers Step Press these keys Comments 1 ENTRY MODE will appear in the display 2 FAX NUMBER MODE will appear in the display 3 Select CLEAR FAX NUMBER CLEAR will appear in the display 4 To clear a Rapid key number press the appropriate Rapid key...

Page 70: ...you must break it into two parts 1 Store the first 20 digits into one Speed Dial number 01 for example using the storing procedure described in the preceding section and press 1 in Step 10 of that procedure to specify it as a Chain Dialing number this tells the machine to wait for the remainder of the telephone number when dialing 2 Store the remaining 16 digits into a separate Speed Dial number 0...

Page 71: ...ys and Speed Dial numbers can be stored in a Group key No full numbers can be stored Use the following procedure to store numbers under Group keys Step Press these keys Comments 1 GROUP ENTRY MODE will appear in the display 2 Press 1 SET to program a Group key or 2 CLEAR to clear a Group key 3 Setting Press the Rapid key you wish to use as a Group key GROUP XX will appear in the display followed b...

Page 72: ...o enter a name skip this step example 7 Setting GROUP SET will appear in the display Clearing GROUP XX CLEARED will appear in the display 8 Return to Step 3 to program clearanother Group key or press the STOP key a number of times until you exit Note If you have to change a number used in a Group key you must delete that Group key first Fax Setup ENTER STOP Step 3 or STOP ENTER SUK 06 INITIAL LEO ...

Page 73: ...uiet DetectTime of 5 seconds which gives the best performance for most answering machines However you may have to adjust the Quiet Detect Time depending on your answering machine s disconnect time the time before the machine disconnects the line after a period of silence If your machine has a short disconnect time you may have to shorten the Quiet Detect Time However if the machine is interrupting...

Page 74: ...your answering machine becomes full or when the answering machine itself malfunctions It is still possible to receive faxes even under these conditions however by turning on the Auto Receive function The machine will automatically answer all calls after five rings To use this function follow the procedure below Factory setting 2 OFF Step Press these keys Comments 1 A M MODE will appear in the disp...

Page 75: ...e When feeding in a long original grasp the original at the edges to guide it into the machine Note Note Note Note Note Whether you are using the faxing functions of the machine your originals are in effect being scanned through the machine The area of an original that is scanned by the machine while faxing is slightly smaller than the actual original size Any text or graphics outside this area wi...

Page 76: ... should not be transmitted The following kinds of originals should not be used Originals with a glossy coating Originals with static electricity Originals with tears folds or curls Originals that have become stuck together and cannot be easily separated Originals with holes windows or perforations Transparency films tracing paper or other transparencies Originals with plastic or metallic coatings ...

Page 77: ... Setting the Original This section describes setting originals in the SPF or on the original table When Using the SPF 1 Confirm that there are no originals on the original table and that copying is not in progress then gently close the original cover 2 Adjust the original guide to the size of originals 3 Place the original face down and push it gently into the original feeder tray Feed the origina...

Page 78: ... the original according to the original scale in the illustration below Make sure the upper left corner of the original is set to the position indicated by the mark as shown 3 Gently close the original cover Note When using the original table do not set originals in the SPF 4 Press the BOOK SEND key You can now make resolution or contrast settings as described in the next section 5 Press the BOOK ...

Page 79: ...rder to transmit with FINE or SUPER FINE resolution the receiving fax machine must also have that resolution If it doesn t the next best available setting will be used If you do not change the setting the original will automatically be sent in STANDARD mode Contrast The fax automatically controls the contrast but you can also control it manually To do this press the CONTRAST key one or more times ...

Page 80: ...etting 2 OFF Step Press these keys Comments 1 COVER SHEET MODE will appear in the display 2 Press 1 to turn the cover sheet function on or 2 to turn it off 3 If you pressed 1 in the previous step select a message by entering a number from 2 to 6 as shown below or enter 1 if you do not want to include a message 1 NO MESSAGE 2 URGENT 3 IMPORTANT 4 CONFIDENTIAL 5 PLS DISTRIBUTE 6 PLS CALL BACK Note T...

Page 81: ...ine An ideal method is to use both functions together by leaving the Auto Cover Sheet function on you can decide to use the Cover Sheet function for attaching a message before sending your fax Use the procedure below to turn the Auto Cover Sheet function on or off Factory setting 2 OFF Step Press these keys Comments 1 OPTION SETTING will appear in the display 2 AUTO COVER SHEET will appear in the ...

Page 82: ...edure below to turn the Reverse Sending function on or off Factory setting 1 ON Step Press these keys Comments 1 OPTION SETTING will appear in the display 2 REVERSE SENDING will appear in the display 3 Press 1 to turn the function on or 2 to turn it off 4 Press the STOP key twice to exit Note If you are adding to a group of previously scanned originals for example for memory polling keep the Rever...

Page 83: ...e Direct Keypad Dialing to manually enter it using the following procedure 1 Confirm that you have correctly set the original in the SPF or on the original table See Setting the Original in this chapter 2 Enter the number of the fax machine you want to send to by pressing the number keys 3 Check the display If the number of the receiving machine is shown correctly press the FAX START key If it is ...

Page 84: ...r you can dial it using the following procedure 1 Press the SPEED SEARCH key and then enter the 2 digit number by pressing the number keys see Storing Numbers for Automatic Dialing in Chapter 6 2 Check the display If the name or number shown is correct press the FAX START key If it is not correct press the STOP key and then repeat Step 1 SPEED SEARCH GHI PQRS ABC JKL TUV DEF MNO WXYZ FAX START Sen...

Page 85: ...key to begin transmission You can use this method for example when you have stored a long distance access code into a Rapid key and want to dial this in combination with a number that is not stored as an automatic dialing number Normal Dialing Using the SPEAKER Key To dial using the SPEAKER press the SPEAKER key and dial using the numeric keys You can hear the line and fax tones from the other mac...

Page 86: ...tter appears in the display If the name begins with a special character or number press 1 If you do not remember the first letter go to Step 3 and scroll through the list from the beginning 3 Press the left and right arrow keys to scroll through the names numbers if you pressed 0 Stop when the desired name appears in the display 4 Press the FAX START key The original will be automatically transmit...

Page 87: ...Using AUTO Mode Using MANUAL Mode MANUAL is the most convenient mode for receiving phone calls if you have an extension phone To have true manual mode the machine must be set to not answer while in MANUAL mode see Setting the Number of Rings for Manual Reception in Chapter 6 You can also receive faxes however all calls must first be answered by picking up the receiver on the extension phone or tel...

Page 88: ...w this procedure Factory setting 1 auto reduction Step Press these keys Comments 1 OPTION SETTING will appear in the display 2 RECEIVE REDUCE will appear in the display 3 Select one of the reduction settings listed below by pushing the corresponding number key 1 AUTO REDUCTION Automatic reduction depending on size of original and printing paper 2 NO REDUCTION No reduction STORED will appear in the...

Page 89: ...e If the SPEAKER key is used to answer a call you cannot converse Note You cannot use the SPEAKER key for fax transmission reception while copying is in progress 2 When the handset is off hook or the SPEAKER key is used press the START key When there are originals in the SPF the machine senses the presence of the originals and displays the message 3 Press 1 to send Press 2 to receive When using ma...

Page 90: ...or the paper jams The message FAX RCVD IN MEMORY will only appear in the display at the time the original is initially received into memory After reception is complete one of the following messages PAPER OUT XXX CAN NOT PRINT or PAPER JAM will appear in the display When you add paper and set the paper size replace the TD cartridge or clear the jam the stored originals will automatically be printed...

Page 91: ...e keys Comments 1 RX DATA TRANSFER will appear in the display 2 FAX NUMBER will appear in the display 3 Enter the transferring fax number maximum 20 digits by pressing the number keys example 18002374278 4 RX DATA TRANSFER will appear in the display 5 TRANSFER will appear in the display 6 If 1 is selected the data held in memory is sent to the fax selected in step 3 above If you press 2 and STOP k...

Page 92: ...ly close the original cover 2 Adjust the original guide to the size of originals 3 Place the original face down and push it gently into the original feeder tray Feed the original narrow side into the slot Adjust the resolution and or contrast settings if desired 4 Enter the number of the receiving machine using one of the following methods Press a Rapid key Press the SPEED SEARCH key and enter a S...

Page 93: ...own 3 Gently close the original cover Note When using the original table do not set originals in the SPF 4 Press the BOOK SEND key Adjust the resolution and or contrast settings if desired 5 Press the BOOK SEND key to scan the page into memory If you have more than one sheet to read into memory place the next page and press the BOOK SEND key to read each page 6 Continue with steps 4 and 5 in the p...

Page 94: ...d keys Speed Dial numbers or Group keys no fax numbers can be entered manually 1 Place the original face down and push it gently into the original feeder tray Adjust the resolution and or contrast settings if desired 2 Press the BROADCAST key 3 Dial the numbers of the receiving machine using one or more of the following methods Press one or more Rapid keys Enter Speed Dial numbers with the number ...

Page 95: ...ntly into the original feeder tray Adjust the resolution and or contrast settings if desired 2 Press the appropriate Group key Transmission will begin If the memory becomes full while the original is being scanned MEMORY FULL will appear in the display Press the FAX START key to transmit the pages that have been stored up to that point in memory Press the STOP key to cancel the entire transmission...

Page 96: ...ibed in Storing Numbers for Automatic Dialing in Chapter 6 Step Press these keys Comments 1 ENTRY MODE will appear in the display 2 POLLING FUNCTION will appear in the display 3 Press 1 to turn the polling function on or 2 to turn it off 4 Press the STOP key twice to exit Polling Others 1 Dial the number of the fax machine you want to poll using one of the following methods Enter the full number u...

Page 97: ...ls which follows If you have an original stored in memory for polling and you want to add to it following the procedure described in Adding to Originals To program a Memory Polling operation either load the original in the SPF or use the original table as described below Then set the reception mode to AUTO Press the RECEPTION MODE key until the AUTO light comes on Step Press these keys Comments 1 ...

Page 98: ... using the procedure below Step Press these keys Comments 1 MEMORY POLL MODE will appear in the display 1 ADD 2 CLEAR will appear at the bottom of the display 2 Continue with step 3 in the Programming a Memory Polling Operation section Clearing Originals Step Press these keys Comments 1 MEMORY POLL MODE will appear in the display 1 ADD 2 CLEAR will appear at the bottom of the display 2 The date an...

Page 99: ...ansmission Scanning the original into memory is convenient because you do not have to worry about original mix ups or forgetting to load the original If the memory becomes full while the original is being scanned MEMORY FULL will appear in the display Press the FAX START key to transmit the pages that have been stored up to that point in memory Press the STOP key to cancel the entire transmission ...

Page 100: ... using one of the following methods Press a Rapid key Enter a Speed Dial number with the number keys 8 SET RESOLUTION CONTRAST THEN ENTER will appear in the display 9 If this is a transmission operation adjust the resolution and or contrast if desired Otherwise skip this step 10 LOAD ORIGINAL S will appear in the display If the original is already loaded no message will appear in the display After...

Page 101: ...r it has been set follow the steps below If the timer operation is a transmission operation you will need to know the number assigned to it If you do not remember the number it appears in the display when you set the operation print out the Timer List See Printing Out Reports in this chapter for details on how to print out the Timer List Step Press these keys Comments 1 TIMER MODE will appear in t...

Page 102: ... of times until you exit To clear junk fax numbers use the following procedure Step Press these keys Comments 1 ANTI JUNK FAX will appear in the display 2 JUNK FAX MODE will appear in the display 3 JUNK FAX CLEAR will appear in the display 4 Enter the number of the fax number to clear CLEARED will appear in the display example 5 Return to Step 4 to clear another number or press the STOP key a numb...

Page 103: ...G 20 MAR 2000 MON 13 09 DATE 01 13 MAR 1 SEND 0 DOCUMENT JAM 05 39 00 00 START RECEIVER TX TIME TOTAL NOTE PAGES TYPE P 01 0 ACTIVITY REPORT RECEIVING 20 MAR 2000 MON 00 11 DATE 01 13 MAR RECEIVE RECEIVE RECEIVE RECEIVE 0 0 POWER FAIL CANCEL CANCEL CANCEL 05 40 05 41 05 42 05 44 05 31 12 12 START SENDER RX TIME NOTE PAGES TYPE 0 0 TOTAL 1 00 P 01 TIMER LIST 20 MAR 2000 MON 17 01 TIMER OPERATION 1 ...

Page 104: ...RX OF RINGS MANUAL RX AUTO LISTING PRINT SELECTION RECALL TIMES RECALL INTERVAL FAX REMOTE NUMBER REMOTE RECEPTION FAX SIGNAL RECEIVE AUTO COVER SHEET RECEIVE REDUCE BEEP LENGTH BEEP VOLUME KEY BEEPS INCOMING RING VOLUME REVERSE SENDING OFF 2 RINGS OFF OFF 2 TIMES ERROR TIMER 5 MINUTES 5 ON ON OFF AUTO 3 SECONDS MIN ON MEDIUM ON BATCH INDEXING OFF OPTIONAL SETTING LIST 21 MAR 2000 THU 00 11 SW ITE...

Page 105: ... twice to exit You can have the machine automatically print outTransmission and Reception Activity Reports at designated times for example daily every two days weekly etc Information about only the 50 most recent transmissions and receptions can be printed out Information about transmissions and receptions older than these are deleted from the unit s memory Factory setting 5 OFF Step Press these k...

Page 106: ...y setting 1 ALWAYS PRINT Step Press these keys Comments 1 OPTION SETTING will appear in the display 2 BROADCAST LIST will appear in the display 3 Selecting the report setting 1 ALWAYS PRINT After each transmission or error 2 ERROR ONLY After an error only 3 NEVER PRINT Never prints STORED will appear in the display 4 Press the STOP key twice to exit FUNCTION GHI MNO to DEF STOP STOP SUK 08 USING F...

Page 107: ...other end cause distortion Try sending the original again Make a copy of the original on the machine If the copy is also distorted the machine may have a problem The received original is faint Ask the other party to send higher contrast originals If the contrast is still too low make a copy with the machine to check it Received images are distorted Noise on the telephone line may cause distortion ...

Page 108: ...ROR The setting for the printing paper SET XXX SIZE PAPER size is incorrect Set it correctly In the area labeled XXX LTR LGL or A4 will appear CAN NOT PRINT TD cartridge empty TD cartridge not inserted TD cartridge or drum cartridge life expired See the copier chapter CHECK COPIER COVER Front cover open PAPER OUT XXX The paper has run out and the data is read into memory Set it correctly In the ar...

Page 109: ...dible Signals SoundType Duration Meaning Continuous tone 3 seconds Indicates the end of transmission reception or line error Continuous tone 1 second Warning tone Messages and Signals SUK 09 TROUBLE LEO P65 30 03 00 17 31 99 ...

Page 110: ...TROUBLESHOOTING 100 9 Notes SUK 09 TROUBLE LEO P65 30 03 00 17 31 100 ...

Page 111: ...edisk e Makedisk e Makedisk e Makedisk e Makedisk ex x x x xe e e e e 4 Follow the on screen instructions Windo Windo Windo Windo Windows 3 1x ws 3 1x ws 3 1x ws 3 1x ws 3 1x 1 Insert the installation CD ROM into the CD ROM drive 2 Double click the File Mana File Mana File Mana File Mana File Manag g g g ger er er er er in the Main window of Program Manager and select CD R CD R CD R CD R CD ROM OM...

Page 112: ...iting time during printing is short Scanning fr Scanning fr Scanning fr Scanning fr Scanning from om om om om Windo Windo Windo Windo Windows 3 1x ws 3 1x ws 3 1x ws 3 1x ws 3 1x windo windo windo windo windows 95 ws 95 ws 95 ws 95 ws 95 Windo Windo Windo Windo Windows 98 ws 98 ws 98 ws 98 ws 98 and and and and and Windo Windo Windo Windo Windows ws ws ws ws NT 4 0 appliacations NT 4 0 appliacatio...

Page 113: ...e and the computer are in the OFF position 2 Plug the parallel interface cable into the printer interface connector Fasten the two bail clips at the side of the printer connector to hold the interface connector in place 3 Plug the other end of the cable into the parallel interface connector on your computer Refer to your computer manual for details This machine sends and receives data bi direction...

Page 114: ... Windows 3 1x Windows 95 Windows 98 Windows NT 4 0 CPU 486DX 66MHz or better Physical RAM Windows 95 Windows 3 1x 8 MB 16 MB or more is recommended Windows NT 4 0 12MB 16MB or more is recommended Windows 98 16MB 32MB or more is recommended Virtual storage swap file 8 MB or more Display 640 x 480 dots VGA or better Hard disk free space 11 MB or more The software for your printer is provided on CD R...

Page 115: ... button If you use Windows 95 and the New Hardware Found window will appear click the Driver fr Driver fr Driver fr Driver fr Driver from Disk Pr om Disk Pr om Disk Pr om Disk Pr om Disk Pro o o o ovided b vided b vided b vided b vided by Har y Har y Har y Har y Hard d d d dware ware ware ware ware Man Man Man Man Manufacturer ufacturer ufacturer ufacturer ufacturer button and then click OK OK OK ...

Page 116: ...K OK OK OK button Follow the on screen instructions 6 The Install From Disk window will appear Insert the installation CD ROM into the CD ROM drive Type R R R R R if the CD ROM is designated as drive R and click the OK OK OK OK OK button Follow the on screen instructions If you have any problem with the test print see TR TR TR TR TROUBLESHOO OUBLESHOO OUBLESHOO OUBLESHOO OUBLESHOOTING TING TING TI...

Page 117: ...lug play the Add New Hardware Wizard window will appear Click the Ne Ne Ne Ne Next xt xt xt xt button and follow the on screen instructions If the Add New Hardware Wizard window does not appear proceed to step 8 Plug play For plug play information see page 105 Add New Hardware Wizard This wizard searches for new drivers for A device driver is a software program that makes a hardware device work Ne...

Page 118: ...h the test print see TR TR TR TR TROUBLESHOO OUBLESHOO OUBLESHOO OUBLESHOO OUBLESHOOTING TING TING TING TING on page 119 Installing the printer driver software 7 Add New Hardware Wizard Windows will search for new drivers in its driver database on your hard drive and in any of the following selected locations Click Next to start the search Floppy disk drives CD ROM drive Specify a location Microso...

Page 119: ...ndows on your computer Installing the printer driver software Before installing the printer driver be sure to close all other applications which may be open 3 Insert the installation CD ROM into a CD ROM drive 4 Choose File File File File File from the Menu bar in Program Manager and then choose the Run Run Run Run Run command 5 Type R SETUP R SETUP R SETUP R SETUP R SETUP if the CD ROM is designa...

Page 120: ...ver and the TWAIN driver is included in this note Read the Readme first Status Monitor HELP Status Monitor HELP Status Monitor HELP Status Monitor HELP Status Monitor HELP Status Monitor Status Monitor Status Monitor Status Monitor Status Monitor The printer state and information on current printing are displayed on the status monitor window When printing starts the status monitor screen will appe...

Page 121: ... INST INST INSTALLED DRIVERS ALLED DRIVERS ALLED DRIVERS ALLED DRIVERS ALLED DRIVERS on page 121 1 Ensure that paper of the desired size is loaded in the paper tray See the section on LO LO LO LO LOADING COPY P ADING COPY P ADING COPY P ADING COPY P ADING COPY PAPER APER APER APER APER on page 12 To print onto special papers such as transparency film labels thick paper and envelopes specify Manual...

Page 122: ...icator and the ready indicator indicate the state of the printer Read Read Read Read Ready indicator y indicator y indicator y indicator y indicator On Indicates the machine is ready for printing or scanning on line or printing is being performed Off Indicates copying is being performed scanner data is being read or the machine is in the auto power shut off mode ON LINE indicator ON LINE indicator...

Page 123: ...ault printer on the computer to be used Windo Windo Windo Windo Windows 95 Windo ws 95 Windo ws 95 Windo ws 95 Windo ws 95 Windows 98 Windo ws 98 Windo ws 98 Windo ws 98 Windo ws 98 Windows NT 4 0 ws NT 4 0 ws NT 4 0 ws NT 4 0 ws NT 4 0 1 Click the Star Star Star Star Start t t t t button of the computer and then select Printer Printer Printer Printer Printers s s s s from Settings 2 If you use Wi...

Page 124: ... selecting the Image Quality tab SHARP AL F_FO Properties Default All Default Help Apply Cancel OK Paper Output Image Quality Tricks DOS Emulation About Copies C Paper Source S Paper Size Z N Up N Paper Tray Portrait Landscape Collate Reverse Order A4 210mm x 297mmm 1 1 x 1 x 2 x 3 x 1 x 2 x 3 1 OK b OK b OK b OK b OK button utton utton utton utton All driver settings which have been selected by e...

Page 125: ... this setting is not selected the printer will not operate properly Use the following procedure to check the setting 1 Click the Star Star Star Star Start t t t t button 2 Select Settings Settings Settings Settings Settings and then click Printer Printer Printer Printer Printers s s s s 3 Right click the AL F_FO AL F_FO AL F_FO AL F_FO AL F_FO icon in the printer dialog box and click Pr Pr Pr Pr P...

Page 126: ... DOS Em DOS Em DOS Emulation Setup ulation Setup ulation Setup ulation Setup ulation Setup Windo Windo Windo Windo Windows 3 1x ws 3 1x ws 3 1x ws 3 1x ws 3 1x 1 Double click the DOS Em DOS Em DOS Em DOS Em DOS Emulation Setup ulation Setup ulation Setup ulation Setup ulation Setup icon in the SHARP AL F_FO SHARP AL F_FO SHARP AL F_FO SHARP AL F_FO SHARP AL F_FO in Pr Pr Pr Pr Program Mana ogram M...

Page 127: ...rom application programs When using the FO 3800M as a scanner you must make sure that your computer Printer Port is configured for ECP mode If the computer is set to a mode other than ECP mode change the mode ECP mode The method for setting ECP mode differs depending on your computer Refer to the documentation for your computer Refer to the TWAIN help for more information For information about the...

Page 128: ...RP AL F_FO TWAIN_xx SHARP AL F_FO TWAIN_xx 2 Choose Acquire Acquire Acquire Acquire Acquire from the File File File File File menu AL F_FO TWAIN software starts 3 Place the original and press the Preview Preview Preview Preview Preview button 4 Set scanning parameters as necessary 5 Press the Scan Scan Scan Scan Scan button You exit from AL F_FO TWAIN software and the scanned image appears in the ...

Page 129: ...nting a test page See page 104 The printer may be configured incorrectly Paper is not set correctly Delete unnecessary files and application software to increase hard disk free space The driver requires at least 11MB free space See page 104 Use Windows 3 1x Windows 95 Windows 98 or Windows NT 4 0 See page 104 Insert the paper correcly See page 12 Remove excessive paper from the paper tray For enve...

Page 130: ...ayout The page layout is too compex The machine does not print the full image Resolution is set to 600 dpi Set the resolution to 300 dpi See page 113 Page orientation setting may be incorrect Change the page orientation with the printer driver See page 113 There may be too many applica tions open Close all unnecessary applications before printing The paper in the machine may be larger than the pap...

Page 131: ...onfigured for right hand operation 4 Click the Details Details Details Details Details tab P P P P Por or or or orts ts ts ts ts tab on Windows NT4 0 in the Properties dialog box select FILE FILE FILE FILE FILE in the Print to the following port list box and click the OK OK OK OK OK button 5 Right click the icon of the printer to be used and click Pr Pr Pr Pr Proper oper oper oper operties ties ti...

Page 132: ...ninstalling driver Uninstalling driver Uninstalling driver Uninstalling driver Uninstalling drivers s s s s To use the AL F_FO again perform the same procedure but select the port to be used for example LPT1 in step 4 If the printer driver and the TWAIN driver are not installed correctly or if you no longer use this machine uninstall the printer driver and TWAIN driver from your computer using the...

Page 133: ...al at standard resolution Sending original size Maximun A4 minimum A5 One sheet at a time or several sheets at a time when using the SPF Maximum 216 mm x 355 mm Minimum 216 mm x 140 mm Recording paper size A4 SPF 30 sheets 52 to 90 g m2 Resolution in Text mode Standard 200 x 100 dpi Fine 200 x 200 dpi Super Fine 200 x 400 dpi Resolution in Half tone mode 200 x 20 dpi Grayscale method in Error diff...

Page 134: ...e Report Transaction activity send receive power fail receive Printable setting lists Anti Junk Fax numbers timer group phone number optional setting As a part of our policy of continuous improvement SHARP reserves the right to make design and specification changes for product improvement without prior notice The performance specification figures indicated are nominal values of production machines...

Page 135: ...slit exposure stationary platen with automatic exposure SPF Moving original Copy paper feed One paper tray with automatic feed 250 sheets Fusing system Heat pressure roller method Development system Nonmagneticmonocomponentdevelopment system Light source Fluorescentlamps Resolution 600dpi Power supply Local voltage 10 For this copiers power supply requirements see the name plate located on the bac...

Page 136: ...ich are designed engineered and tested to maximize the life and performance of SHARP copiers Look for the Genuine Supplies label on the toner package Do not use envelopes that have metal clasps plastic snappers string closures windows linings self adhesive patchesorsyntheticmaterials Thesewillcause physical damage to the copier Envelopes with bent corners may frequently misfeed They mustbe flatten...

Page 137: ... operating conditions such as power supply voltage and room temperature Also the time may differ depending on data quantity to be printed and applications Scanner specifications Scanning method Flatbed scanner with moving scanning head Light source Fluorescent lamps Sensor CCD Scanning range Max 21cm W x 35 cm H Resolution Standard 400 dpi Max 600 dpi pseudo resolution Output data 1bit Scanning sp...

Page 138: ...30 31 32 33 34 35 36 STB DATA1 DATA2 DATA3 DATA4 DATA5 DATA6 DATA7 DATA8 ACKNLG BUSY PE Paper End SLTC AUTO LF NC GND 0 V FG 5V GND STB RET GND DATA1 RET GND DATA2 RET GND DATA3 RET GND DATA4 RET GND DATA5 RET GND DATA6 RET GND DATA7 RET GND DATA8 RET GND ACKNLG RET GND BUSY RET GND PE RET INPRM FAULT NC NC 5V SLTC IN For specifications of the parallel interfaceof your computer see its operation m...

Page 139: ...8400 5100 7015 4960 6070 7800 7440 6400 8200 4900 6815 4760 5870 7600 7240 100 100 100 100 100 100 100 100 100 96 96 96 96 100 100 100 100 100 100 100 100 100 95 Paper size Dots Letter Legal Invoice A4 A5 B5 Folio Foolscap 300 dpi A B C D E F G 2550 44 2550 2550 2550 1650 2480 2456 2149 1748 2456 1552 2384 1648 2056 2456 2456 3300 4200 2550 3507 2480 3035 3900 3720 3200 4100 2450 3407 2380 2935 38...

Page 140: ...e machine Gently push the paper output tray back into the machine until it stops Attach to the left side of the machine the screw that has been saved See page 3 SET UP Close the front cover 3 4 5 6 7 8 When shipping the machine the screw must be reinstalled to prevent shipping damage This screw will secure the scanning head If the power has been turned off while an original was being scanned the s...

Page 141: ...E Set RESOLUTION CONTRAST MEMORY Direct Keypad Dialing Dial press NUM keys FAX START Rapid Key Dialing Press Rapid key Speed Dialing SPEED SEARCH Enter Speed Dial number FAX START Normal Dialing SPEAKER Dial Press NUM keys Wait for reception tone FAX START Redialing REDIAL Wait for reception tone FAX START Set Rapid 20 key as polling key FUNCTION key 3 4 1 STOP STOP And set RESOLUTION CONTRAST Dir...

Page 142: ...ORITY 03 NUMBER OF RINGS 04 AUTO LISTING MANUAL RECEPTION 05 TRANSACTION REPORT 06 BROADCAST LIST 07 RECALL TIMES 08 RECALL INTERVAL 09 FAX REMOTE NUMBER 10 REMOTE RECEPTION 11 FAX SIGNAL RECEIVE 12 AUTO COVER SHEET 13 RECEIVE REDUCTION 14 BEEP LENGTH 15 BEEP VOLUME 16 KEY BEEPS 17 INCOMINGRINGVOLUME 18 PBX SETTING 19 BATCH INDEXING 20 REVERSE SENDING 21 LANGUAGE SETTING 5 GROUP ENTRYMODE 1 GROUP ...

Page 143: ... allows the user to dial a long number up to 50 digits in length with a combination of Rapid keys Speed Dial numbers or Rapid keys and manually entered numbers Contrast The degree of difference between dark and light areas of a printed faxed or scanned original dpi dots per inch A standardized machine of measurement used for the resolution of a scanned or printed image Group Keys The term for mult...

Page 144: ... reception can be activated from an extension telephone by entering a one digit Fax Remote Number followed by Resolution The amount of space between lines of a printed faxed or scanned original Generally the higher the resolution the higher the quality of the original or image Speed Dialing A form of Automatic Dialing done by pressing the SPEED SEARCH key and then entering a programmed 2 digit Spe...

Page 145: ...ng 73 Display Messages 98 Document FeederTray 17 Drum Cartridge Indicator 10 42 Drum Cartridge Replacement 31 E Enlargement 22 Entering Characters 47 EnteringYour Name and Fax Number 48 Exposure Adjustment 20 F Fax Transmission Settings 69 Fax Setup 47 Features 8 Fine Resolution Priority 55 G Group Keys 61 Group List 94 I Initial Settings 14 Index Function 54 Installing the Printer Driver Software...

Page 146: ...dialing 76 Reduction Enlargement Zoom 22 Remote Reception 56 Resolution 69 Reverse Sending 72 RingingVolume 45 S Scanning an Image 118 SEARCH Key 76 Setting Date Time 49 Sending Originals 67 Single Pass Feeder SPF 17 Special Paper 126 Specifications 125 to 128 Speed Dialing 74 Status Indicators 42 Storage of Supply 126 T TD cartridge 10 29 42 Telephone Line Cord 15 Timer List 93 Timer Operations 8...

Page 147: ... 109125 50 0 84179 66 8 Polypropylene 25085 53 4 1 5 Not listed Not listed None Polyethylene 9002 88 4 1 5 Not listed Not listed None Section 4 Hazardous Identification Emergency Overview Toner is a fine black powder possessing no immediate hazard There are no anticipated carcinogenic effects from exposure based on animal tests performed using toner When used as intended according to instructions ...

Page 148: ...m3 exposure group and a minimal to mild degree of fibrosis was noted in 22 of the animals in the middle 4mg m3 exposure group but no pulmonary change was reported in the lowest 1mg m3 exposure group the most relevant level to potential human exposures Signs and Symptoms of Exposure Minimal irritation to respiratory tract may occur as with exposure to any non toxic dust Medical Conditions Generally...

Page 149: ...Control Ventilation Not required Work Hygienic Practice Inhalation should be minimized as with any non toxic dust Steps to be taken in case of Spill or Leak Sweep up or clean up with vacuum cleaner Waste Disposal Method Waste material may be disposed under conditions which meet all federal state and local environmental regulations Section 10 Regulatory Information NFPA Rating U S A Health 1 Flamma...

Page 150: ...License Agreements MATERIAL SAFETY DATA SHEET 140 Notes SUK SAFETY DATA SHEET LEO p65 30 03 00 16 23 140 ...

Page 151: ...gements should be made for access to emergency services ASA Required in Appendix ZB of BS 7002 En 60 950 United Kingdom MAINS PLUG WIRING INSTRUCTIONS The mains lead of this equipment is already fitted with a mains plug which is either a non rewireable moulded or a rewireable type Should the fuse need to be replaced a BSI or ASTA approved fuse to BS1362 marked or and of the same rating as the one ...

Page 152: ...T H E I D E A S C O M P A N Y Printed in France TINSE7346HSZZ SUK COVER PAGE LEO p65 28 03 00 11 44 4 ...

Reviews: