background image

E6

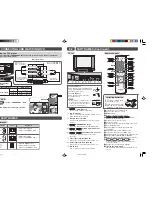
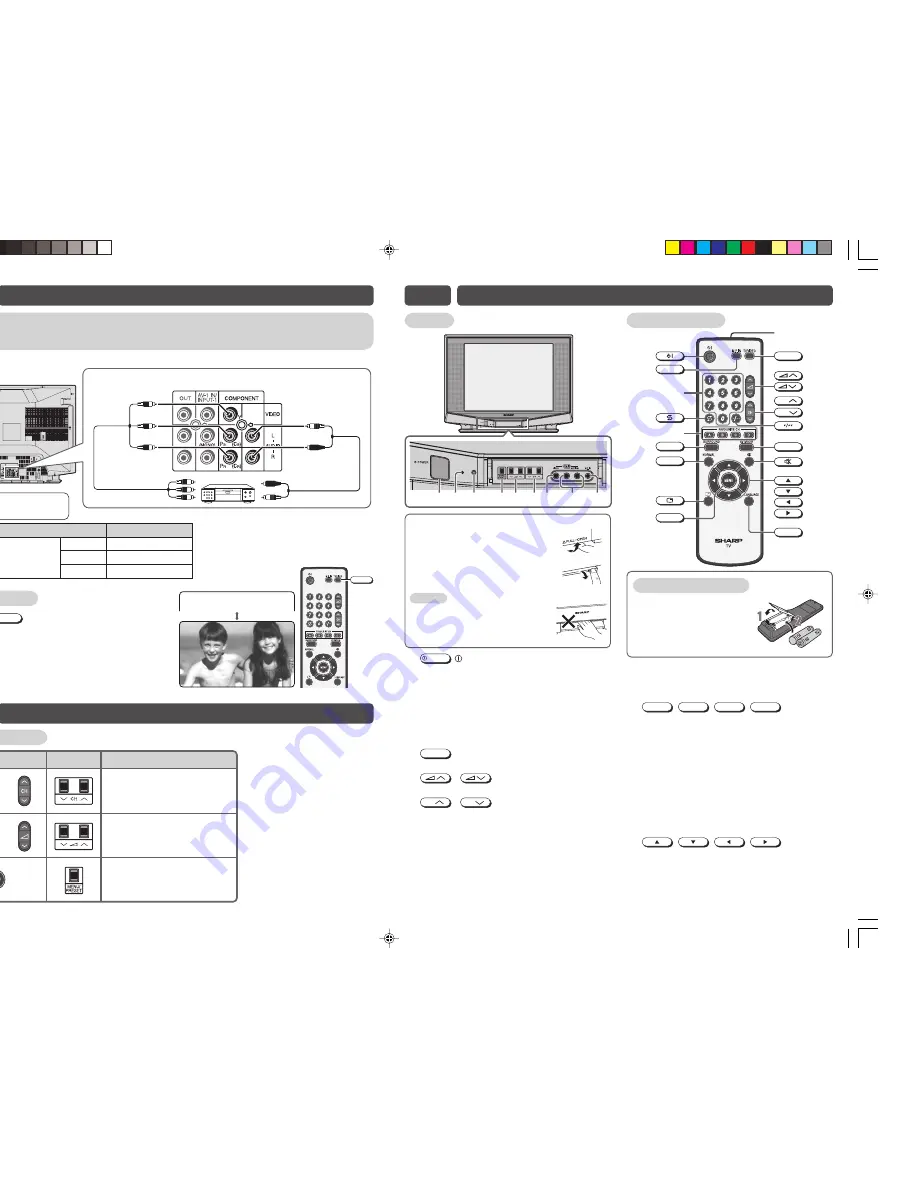
PART NAMES (Continued)

1

POWER


POWER

 switch

Turns on and off the main power.

2

Power indicator

Power can be turned on by the remote control
when the indicator is lit red.

3

Infrared sensor window

Receives the infrared wave from the remote
control.

4

MENU/PRESET

 MENU/PRESET button

Tunes the channels. Used for MENU setup.

5

 / 

 Volume up/down buttons

Adjusts the volume.

6

CH

 / 

CH

 Channel up/down buttons

Selects the channels. Tunes or sets the
channels.

7

Video input terminal (AV-2 IN)

Connects to a camcorder, video game, etc.

8

Audio input terminals (AV-2 IN)

Connects to a camcorder, video game, etc.

9

M.P. IN jack

Use to listen to external mobile player.

TV set

1

4 5 6

2 3

7

8

9

Remote control

Installing batteries

To open the door

Using the projection located under
the “

PULL-OPEN” indication, pull

and lift the door open.

To close the door

Using the projection, lower the
door until closed.

Caution:

• When opening or closing the door, do

not insert your fingers into the gap
between the door and front panel.
This may result in an injury.

1

Pull up or replace back
the battery cover.

2

Insert two batteries (size
AA). Be sure to match the
battery 

j

/

k

 terminals.

MENU

TV/VIDEO

)

AV MODE

R

T

Q

E

I

CH

CH

W

Y

U

SURROUND

LANGUAGE

NORMAL

!

#

%

M.P. IN

@

^

$

&

*

(

!

Turns the TV on or to Standby mode.

@

Switches M.P. IN mode on or off.

#

Number

 buttons

$

Returns to previously viewed channel.

%

A

B

C

D

 buttons

Operate the Favourite Channel.

^

Produces a more spacious sound.

&

Resets all settings.

*

Displays the channel and timer settings on the screen.

(

Calls the MENU screen.

)

Switches between TV broadcasts and AV input
programmes.

Q

Adjusts the volume. Used for MENU setup.

W

Selects the channel. Used for MENU setup.

E

Switches between one- or two-digit mode channel selection.

R

Switches between MOVIE, MUSIC and NEWS.

T

Mutes the sound and restores sound to previous level.

Y

 buttons

Selects the MENU items, adjusts the volume and
selects the channel.

U

Changes the on-screen display language.

I

Infrared transmitter window

Aim this window at the infrared sensor window on your
TV set.

E5

CONNECTING AND WATCHING DVD

Connecting to a DVD player

The DVD input terminals (COMPONENT-IN) on the rear of the TV can be used to input high-
quality images from a DVD player.

DVD input terminals

TV

Y

To audio out  
(L/R) terminals

To colour-difference 
(component video)  
out terminals

DVD player

Red  : To AUDIO IN (R)
White : To AUDIO IN (L)

Green : To Y
Blue : 

To 

P

B

 (C

B

)

Red : 

To 

P

R

 (C

R

)

Watching DVD

!

Press 

TV/VIDEO

 to select “COMPONENT”, DVD

input screen.

@

Turn on the DVD player and begin playback.

DVD input terminals

DVD player

COMPONENT-IN VIDEO

Y

Y or Y/Y

P

B

(C

B

)

P

B

(C

B

) or B-Y/Pb

P

R

(C

R

)

P

R

(C

R

) or R-Y/Pr

Connecting the video

terminals

TV/VIDEO

NT

NE

PO

O

C M

E6

PART NAMES

Quick reference

Remote control

Operation

TV set

• Selects the channels.
• Used to select MENU items.

or

or

• Adjusts the volume.
• Used to adjust MENU items.

• Calls the MENU screen.
• Used to return to previous  
  screen or exit MENU screen.

29Q-FG1M[EN]3-4.p65

28/12/06, 9:07 AM

3

Summary of Contents for 29Q-FG1M

Page 1: ...fined area such as on a bookshelf or in a built in case Leave adequate space behind the TV for proper ventilation Servicing To reduce the risk of electric shock do not remove the back of the cabinet This TV set contains dangerous voltage Power cord protection To prevent electrical shock do not subject the AC power cord to damage by bending or twisting it or by placing heavy items on top of it and ...

Page 2: ...iffer from those shown in the above diagram See the operation manual of your video equipment for connection details The above recording and editing connections are intended solely for personal use and not for the illegal copying of audiovisual material protected by copyright laws E4 CONNECTING OTHER EQUIPMENTS ACCESSORIES g accessories are included with this television Remote Control Size AA batte...

Page 3: ...s to previously viewed channel A B C D buttons Operate the Favourite Channel Produces a more spacious sound Resets all settings Displays the channel and timer settings on the screen Calls the MENU screen Switches between TV broadcasts and AV input programmes Q Adjusts the volume Used for MENU setup W Selects the channel Used for MENU setup E Switches between one or two digit mode channel selection...

Page 4: ...Behind the door AUTO SECAM PAL NTSC4 43 NTSC3 58 B G D K I CH CH MENU P O S I T I O N U S O N D K S I P M A N U L A SELE T C D A JUS T RETU N R MENU A U T O C O L O U R 2 1 B G F O F 1 6 8 2 5 M H z A U O T TV Set Bottom Power indicator POWER the power ower indicator is off press POWER ower indicator is red press on the remote control The power anges to green and a picture appears en display langu...

Page 5: ...ur intensity For less brightness For more brightness To move tint toward red To move tint toward green To more reddish background To more bluish background For less sharpness For more sharpness see note below ON OFF C O N T T R 5 0 A S PICTURE menu screen C O N T R A S T B R I G T I N T H T N E S S H A R P N E S S S W SELE T C D A JUS T RETU N R MENU H I T E T E M P P I C T U R E N R C O L 5 0 2 5...

Page 6: ...ls CHILD LOCK mode For the first time step 1 to 3 of AV MODE to select TV to select TV to OFF TV will lock the entire TV for viewing TV deactivated to select PASSWORD digits PASSWORD using Number 0 9 on the remote control For e 0000 NORMAL to reset the entered number to MENU until normal screen appears HILD LOCK mode will be activated after is turned off and on again or to change setting of CHILD ...

Page 7: ...til channel number turns white The display will disappear after four seconds and then the selected channel is preset To watch favourite channel press A The preset favourite channel will be displayed e g Channel 12 To preset another favourite channel repeat steps 1 and 2 above To change a preset favourite channel repeat steps 1 and 2 above S U R R O N O U N D S U R R O N O U N D S U R R O F F O U N...

Page 8: ...iving Frequency 44 25 MHz 863 25 MHz Channel Tuning 100 Channel Electronic Tuner with Full Auto Tuning System Picture Tube 29 Inch Flat CRT 74 cm 68 cm viewable screen size Terminals Audio video input 2 front 1 rear 1 Audio video output 1 rear M P IN jack 1 front DVD input COMPONENT IN 1 rear Sound Output 10 W RMS 2 total 20 W RMS Power Source AC 110 240V 50 60 Hz Power Consumption 123 W Dimension...

Reviews: