Shark HNG-3530 Operator'S Manual Download Page 9

97-610, 97-6152  •  REV. 7/04

9


 PRESSURE 

W

ASHER  


OPERA

T

OR’S MANU

AL

INSTALLATION

INSTALLATION

Place machine in a convenient location providing ample
support, drainage and room for maintenance (see page
6).

Location:

The location should protect the machine from damaging
environmental conditions, such as wind, rain and freez-
ing.

1. The machine should be run on a level surface

where it is not readily influenced by outside sources
such as strong winds, freezing temperatures, rain,
etc. The machine should be located considering
accessibility for the replacing of components and
the refilling of detergents, adjustments and main-
tenance. Normal precautions should be taken by
the operator of the machine to prevent excess
moisture from reaching the power unit or electri-
cal controls.

2. It is recommended that a partition be made be-

tween the wash area and the machine to prevent
direct spray from the spray gun from coming in
contact with the machine. Excess moisture reach-
ing the power unit or electrical controls will reduce
the machine’s life and may cause electrical shorts.

3. During installation of the machine, beware of poorly

ventilated locations or areas where exhaust fans
may cause an insufficient supply of oxygen. Suffi-
cient combustion can only be obtained when there
is a sufficient supply of oxygen available for the
amount of fuel being burned. If it is necessary to
install a machine in a poorly ventilated area, out-
side fresh air may have to be piped to the burner
and a fan installed to bring the air into the area.

  4. Do not locate near any combustible material. Keep

all flammable material at least 20 feet away.

Allow enough space for servicing the machine.

Local code will require certain distances from floor
and walls. (Two feet away should be adequate).

WARNING: Avoid small areas or near exhaust fans.

Gas Codes:

Confer with local gas company and with proper mu-
nicipal officials regarding any specific code or regula-
tions governing the installation. The installation must
conform to local codes.

Electrical:

The machine, when installed, must be electrically
grounded in accordance to local codes. Check for
proper power supply using a volt meter; check the se-
rial plate for the correct requirements.
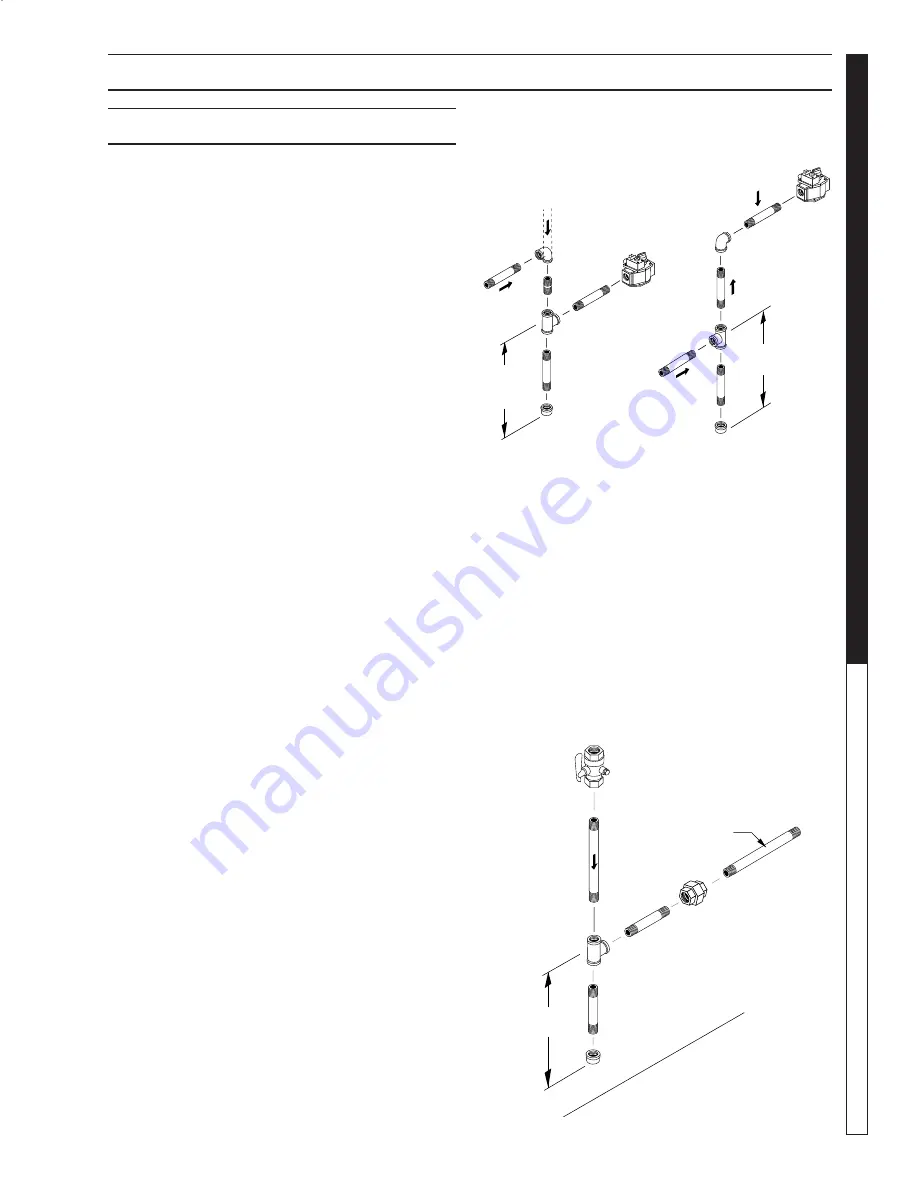
Gas Piping:

Figure 1: DRIP LEG

Sediment trap (drip leg) must be

installed in the supply line.

Install a union in the gas line adjacent to and upstream
from the control manifold and downstream from the
manual main shut-off valve. A 1/8" NPT plugged tap-
ping accessible for test gauge connection shall be in-
stalled immediately upstream of the gas supply con-
nection for the purpose of determining the gas supply
pressure to the burner, and to prevent damage to gas
valve.

If a manual gas shut off valve is not in the gas supply
line within six feet of the machine and in an accessible
location, one shall be installed.

Figure 2: UNION LOCATION

Manual

Shut-Off Valve

1/8" NPT Plugged

Pressure Gauge

Port Location

Union

Control Manifold

Tee

Flow

3" (7.62 mm)

Minimum

Floor Level

Pipe
Cap

To

Gas Valve

1/4" Test Port

(6" - 14 W.C.

or 1/2" PSIG)

Gas

Valve

Gas

Valve

Drop

3" (7.62 mm)

Minimum

3"

(7.62 mm)

Minimum

Summary of Contents for HNG-3530

Page 1: ...For technical assistance or the SHARK dealer nearest you call 1 800 771 1881 or visit our website at www shark pw com 97 610 OPERATOR S MANUAL HNG 4020 HNG 3530 HNG 5030 HNG...

Page 2: ......

Page 3: ...17 Troubleshooting 18 19 Maintenance Service 20 23 Heating Coils 20 Propane Gas 21 Burner Features 21 22 BurnerTroubleshooting 22 23 Preventative Maintenance Schedule Oil Change Record 24 Hose Spray...

Page 4: ...model and serial numbers will be found on a decal attached to the pressure washer You should record both serial number and date of purchase and keep in a safe place for future reference 97 610 97 615...

Page 5: ...utility company or the selling distributor for specific details To comply with the National Electrical code NFPA 70 and provide additional protection from risk of electric shock this pressure washer...

Page 6: ...pro pane fuel 21 This equipment is designed to run on vapor fuel Do not use liquid fuel Have a quali fied serviceman install and service your equipment 22 Never expose a spark or flame where unburned...

Page 7: ...Pressure Hose Connect one end to water pump discharge nipple and the other end to spray gun Wand Quick Coupler Pulling the brass collar back allows the insertion of pressure nozzle Note If trigger on...

Page 8: ...97 610 97 6152 REV 7 04 OPERATOR S MANUAL PRESSURE WASHER 8 INSTALLATION 9 57 I D 49 0 38 3 8 High Pressure Out 11 3 4 27 1 2 44 1 4 Gas In 1 1 2 NPT M 3 0 Fresh Water In 1 0 GHF 1 1 4...

Page 9: ...to be piped to the burner and a fan installed to bring the air into the area 4 Do not locate near any combustible material Keep all flammable material at least 20 feet away Allow enough space for ser...

Page 10: ...t f e z i S e p i P n o r I 2 1 4 3 0 1 9 3 3 3 2 8 9 6 0 2 5 9 2 2 9 9 7 4 0 3 3 4 8 1 4 5 8 3 0 4 7 7 5 1 8 9 2 3 0 5 8 9 3 1 3 2 9 2 0 6 7 6 2 1 9 4 6 2 0 7 5 6 1 1 7 3 4 2 0 8 4 8 0 1 7 6 2 2 0 9...

Page 11: ...tight construction and has a ventilating fan which may be used for exhaust ing air outdoors or has a vented exhaust it is rec ommended that combustion air be supplied to the en closed room through int...

Page 12: ...b h g i e n a m o r f r e i l p p u s s a g r u o y l l a c y l e t a i d e m m I s n o i t c u r t s n i s r e i l p p u s s a g e h t w o l l o F e n o h p t n e m t r a p e d e r i f e h t l l a c...

Page 13: ...rward until se cure STEP 2 Pull the spring loaded col lar of the wand coupler back to in sert your choice of pressure nozzle CAUTION Never replace nozzles without engaging the safety latch on the spra...

Page 14: ...dial and turn to full ON Push pump switch ON or turn to pump position and pull the trigger on the spray gun allowing cold water to flow To activate the gas control valve for hot water push the burner...

Page 15: ...ly to surface at low pressure for best results limit your work area to sections approximately 6 feet square and always apply detergent from bottom to top Allow detergent to remain on surface 1 3 minut...

Page 16: ...and insert into one gallon of fresh clean water Pull trigger on spray gun and siphon wa ter for one minute STEP 2 Turn push burner switch to OFF position Open spray gun allowing water to cool Then tu...

Page 17: ...r e p s b L 3 2 4 7 8 4 r o p a V t F u C r e p U T B 3 6 5 2 9 3 3 d i u q i L l a G r e p U T B 7 4 5 1 9 2 3 0 2 0 1 d i u q i L b L r e p U T B 1 9 5 1 2 1 2 2 1 2 d i u q i L b L r e p t F u C 7...

Page 18: ...s valve repair replace Faulty flame sensor Test sensor wiring repair replace LOW OPERATING PRESSURE Faulty pressure gauge Install new gauge Insufficient water supply Use larger garden hose Clean filte...

Page 19: ...l l a t s n I s e n i l t n e g r e t e d n i e l o H e l o h r i a p e R d e g g u l p t e k s a b r e n i a r t S n a e l c d n a e v o m e R e s o o l e v l a v r o t c e l e s n o s n o i t c e n...

Page 20: ...n open at all times High Limit Hot Water Thermostat For safety each machine is equipped with an adjust able thermostat In the event the temperature of the wa ter should exceed its operating temperatur...

Page 21: ...ures when extra heat is needed Exterior regulators are needed to control the system Propane bottles are not included with the machine A high pressure regulator should be installed on the pro pane bott...

Page 22: ...CE TERM TERM TERM TH TP TH TP MILLIVOLT OPERATOR TERMINAL PANEL Check Test To Test Connect Meter Leads To Terminals Switch Flow Burner Contacts Meter Reading Should Be A Complete System 2 3 Closed 100...

Page 23: ...duced To correct a Clean and tighten switch leads and connec tions b Shorten switch lead wires and or replace with heavier gauge wire c Cycle switch rapidly to clean contacts D Automatic Pilot Dropout...

Page 24: ...l l a u n n a r o s r u o h 0 0 5 y r e v e n e h t s r u o h 0 5 t s r i f r e t f A r e t l i F r e n r u B n a e l C y l l a u n n A l i o C g n i t a e H m o r F t o o S r e n r u B e v o m e R y...

Page 25: ...5 5 Green 5030 3010 4020 1 4 12805555 Nozzle SAQCMEG 4005 5 White 5030 3010 4020 1 5 2 3 4 1 ITEM PART NO DESCRIPTION QTY 5 4 12805000 Nozzle SAQCMEG 0005 Red 3520 1 4 12805015 Nozzle SAQCMEG 1505 Yel...

Page 26: ...Panel Pg 34 For Detail See Float Tank Pg 31 Steam Valve Option For Detail See Burner Assembly Illus To Detergent Valve 73 69 68 65 66 74 79 70 76 75 57 51 53 72 77 71 62 61 26 80 81 78 55 56 6 82 63 8...

Page 27: ...6 41 44 43 98 46 47 28 35 38 36 9 20 23 24 34 22 25 30 29 28 26 32 33 37 42 27 90 91 6 2 1 14 17 18 19 21 8 50 3 4 6 96 10 11 15 6 45 12 13 58 52 26 62 60 93 94 95 97 91 28 27 5 GPM Machines Steam Val...

Page 28: ...Reducer 1 2 x 1 4 1 28 2 1089 Hose Barb 1 4 Barb x 1 4 Pipe 90 1 w Steam Option 2 29 2 9000 Clamp Screw 4 3 ITEM PART NO DESCRIPTION QTY 30 2 1037 Tee 1 4 Branch Male Steam Option 1 32 2 0051 Nipple 1...

Page 29: ...90 1016 Bolt 3 8 x 1 NC HH 8 80 95 07163126 Cover Control Panel Logo 1 95 07163115 Cover Control Panel Remote 1 81 11 0353 Label Control Panel Logo 1 11 0354 Label Control Panel Remote Logo 1 11 0508...

Page 30: ...k Plastic Universal Float 1 5 2 0151 Plug Float Tank 1 ITEM PART NO DESCRIPTION QTY 6 2 1062 Elbow 1 2 JIC x 1 2 90 1 2 1024 Elbow 1 2 Street 301007 1 2 10062 Nipple Modified Close 3 16 1 7 2 11041 Co...

Page 31: ...6152 REV 7 04 31 PRESSURE WASHER OPERATOR S MANUAL BURNER ASSEMBLY 19 28 5 4 3 14 15 23 22 13 9 10 20 10 24 11 9 12 5 4 8 4 5 2 5 6 1 16 17 7 25 26 30 18 31 29 21 32 Elec Ignition Only 21 32 Elec Igni...

Page 32: ...rew 10 x 1 2 TEK 4 16 95 07163097Cover Burner Access 20 Coil 1 17 90 19942 Screw 10 32 x 3 4 Hex Wash SL Mach Blk 2 18 10 99032 Label Pilot Light Hole 1 10 99077 Label Pilot Light Warning 1 ITEM PART...

Page 33: ...WASHER OPERATOR S MANUAL CONTROL PANEL EXPLODED VIEW Steam Valve Option Steam Valve Option Detergent Remote Operating System For Internal Detail See Electrical Box Pages 36 38 40 9 13 12 15 10 10 7 8...

Page 34: ...4 6 Nozzle See Page 21 1 7 2 30152 Valve Metering 1 4 Hose 1 8 4 02080000 Tube 1 4 x 1 2 Clear Vinyl 10 ft 9 2 1905 Strainer 1 4 w Check Valve 1 10 2 9040 Clamp Hose UNI 46 54 3 11 2 30151 Valve Flow...

Page 35: ...Pages 7 6 0504 Block Terminal 4 Pole 1 8 Contactor See Specifications Pages 9 Overload See Specifications Pages 10 6 1401590 Valve Deter Less Solenoid Remote 1 6 140160 Solenoid Coil 120V Remote 1 11...

Page 36: ...97 610 97 6152 REV 7 04 OPERATOR S MANUAL PRESSURE WASHER 36 TIME DELAY ELECTRICAL BOX EXPLODED VIEW GROUND 11 17 18 1 5 4 6 12 10 20 3 7 9 2 8 14 16 15 13 Detergent Valve Remote 19 3 5 Remote Only...

Page 37: ...See Specifications Pages 9 Overload See Specifications Pages 10 6 1401590 Valve Deter Less Solenoid Remote 1 6 140160 Solenoid Coil 120V Remote 1 11 2 1089 Hose Barb 1 4 Barb x 1 4 Pipe 90 Remote 2 I...

Page 38: ...7 610 97 6152 REV 7 04 OPERATOR S MANUAL PRESSURE WASHER 38 AUTO START ELECTRICAL BOX EXPLODED VIEW 11 17 18 1 5 4 6 12 10 14 16 15 13 Detergent Valve Remote 3 7 9 2 8 19 21 20 19 22 3 23 5 Remote Onl...

Page 39: ...RT NO DESCRIPTION QTY 10 6 1401590 Valve Deter Less Solenoid Remote 1 6 140160 Solenoid Coil 120V Remote 1 11 2 1089 Hose Barb 1 4 Barb x 1 4 Pipe 90 Remote 2 12 2 9000 Clamp Hose UNI 46 54 Remote 2 1...

Page 40: ...4 5 1018 10 230V 3ph 60Hz 2BK57H 5 405057001Hx1 3 8 503007C GM5030 5 1915 5 40506701 2BK67H 24MM 5 512024 5 1018 10 460V 3ph 60Hz 2BK57H 5 405057001Hx1 3 8 Pump Pulley Pump Bushing Motor Voltage Motor...

Page 41: ...138 BX36 2 5 604036 6 4013 6 5013 6 60111 1 AMP 6 02294 8 10 6 0229810 503007C 5 511138 BX36 2 5 604036 6 4007 6 5011 6 60111 1 2 AMP 6 02295 8 10 6 0229810 Bushing Belts Belt Motor Motor Trans Primar...

Page 42: ......

Page 43: ...buildup rust corrosion or thermal expansion 4 Damage to components from fluctuations in electrical or water supply 5 Normal maintenance service including adjustments fuel system cleaning and clearing...

Page 44: ...Form 97 610 Revised 7 04 Printed in U S A...

Reviews: