Instruction ManualInstruccion Manual
Manuel D’instruction
EURO-PRO Operating LLC
: 4400 Bois Franc, St. Laurent, Quebec, H4S 1A7 , Tel.: 1 (800) 361-4639
www.euro-pro.com
Model / Modelo / Modèle
612C
Page 1: ...Instruction Manual Instruccion Manual Manuel D instruction EURO PRO Operating LLC 4400 Bois Franc St Laurent Quebec H4S 1A7 Tel 1 800 361 4639 www euro pro com Model Modelo Modèle 612C ...
Page 2: ......
Page 3: ...appliance with any air openings blocked Keep ventilation openings of the sewing machine and foot controller free from accumulation of lint dust and loose cloth 5 Keep fingers away from all moving parts Special care is required around the sewing machine needle 6 Always use the proper needle plate A wrong needle plate can cause the needle to break 7 Do not use bent needles 8 Do not pull or push the ...
Page 4: ...sión reparación o ajuste eléctrico o mecánico 4 Nunca opere la máquina de coser si alguna de sus aberturas para aire está obstruida Mantenga las aberturas de ventilación y el control de pie sin acumulaciones de pelusa polvo y sin telas sueltas 5 Mantenga los dedos alejados de las piezas móviles Tenga cuidado especial alrededor de la aguja de coser 6 Siempre use la placa adecuada para la aguja La p...
Page 5: ...ies d air sont obstruées Assurez vous que les ouvertures de la machine à coudre et de la pédale sont libres de toute accumulation de fibres de poussière et de tissu 5 Gardez les doigts éloignés des pièces en mouvement Faites preuve de grande prudence à proximité de l aiguille de la machine à coudre 6 Utilisez toujours la plaque à aiguille appropriée Une plaque à aiguille incorrecte peut causer le ...
Page 6: ...Bobbin Thread Adjusting the Needle Thread Tension Lower Thread Tension Upper Thread Tension SECTION 3 BASIC SEWING Choosing Your Stitch Pattern Reverse Stich Sewing Straight Stitch Sewing Basic Zigzag Overcasting Stitch Multiple Zigzag Stitch Blind Hem Stitch Using the Hemmer Foot Using the Zipper Foot Using the Buttonhole Foot Corded Buttonhole SECTION 4 CARE OF YOUR MACHINE Cleaning the Feed Dog...
Page 7: ...ja Disminución de la tensión del hilo Tensión del hilo superior SECCIÓN 3 COSTURA BASICA Escogiendo su patrón de puntada Costura en reversa Costura con puntada recta Costura basica en zigzag Puntada de hilvanado Puntada zigzag múltiple Puntada para dobladillo invisible Usando la pata para dobladillos Usando la pata para cierres Usando la pata prensora para ojales Ojales con cordón SECCIÓN 4 CUIDAD...
Page 8: ...Ajustez la tension du fil d aiguille Diminuez la tension du fil Augmentez la tension du fil SECTION 3 COUTURE DE BASE Choisir votre point décoratif Couture point arrière Couture point droit Zigzag de base Point de surjetage Point zigzag multiple Point d ourlet invisible Utilisation du pied ourleur Utilisation du pied pour fermeture à glissière Utilisationdu pied pour boutonnière Boutonnière cordée...
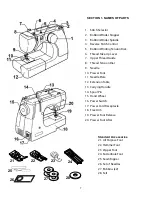
Page 9: ... Upper Thread Guide 8 Thread Tension Dial 9 Needle 10 Presser Foot 11 Needle Plate 12 Extension Table 13 Carrying Handle 14 Spool Pin 15 Hand Wheel 16 Power Switch 17 Power Cord Receptacle 18 Free Arm 19 Presser Foot Release 20 Presser Foot Lifter 21 22 23 24 25 26 27 28 21 All Purpose Foot 22 Hemmer Foot 23 Zipper Foot 24 Buttonhole Foot 25 Seam Ripper 26 Set of Needles 27 Bobbins x2 28 Felt ...
Page 10: ...ur boutonnière 25 Découseur 26 Jeu d aiguilles 27 Bobines x2 28 Feutre SECCIÓN 1 NOMBRE DE LAS PARTES 1 Selector de puntada 2 Freno de devanado de la bobina 3 Eje de devanado de la bobina 4 Control de costura inversa 5 Disco tensor del devanador de la bobina 6 Palanca receptora 7 Guía del hilo superior 8 Ajuste de tensión del hilo 9 Aguja 10 Pata prensora 11 Placa del aguja 12 Extensión 13 Mango d...
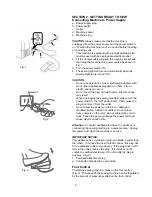
Page 11: ...rn the power switch to the Off position first Then grasp the plug to remove it from the outlet Do not allow the power cord to be cut damaged modified pulled twisted or bundled Do not place heavy objects on the cord Do not subject the cord to heat These things may damage the power cord and cause electric shock or fire Attention Consult a qualified electrician if in doubt as to connecting the sewing...
Page 12: ...ande de pied pour faire partir la machine à coudre Fig 3 Il est possible de contrôler la vitesse de la machine en variant la pression sur la commande de pied SECCIÓN 2 PREPARACION PARA COSER Conectando la máquina a la alimentación a Enchufe de la fuente de alimentación b Llave de encendido c Tomacorriente d Conector de la máquina e Enchufe de la máquina CUIDADO Siempre verifique que la máquina est...
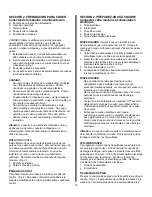
Page 13: ...Press the presser foot release lever on the back of the foot holder The presser foot will drop To Attach 1 Place the new presser foot so that the pin on the top of the foot lines up directly below the groove of the foot holder Fig 2 2 Lower the foot holder to lock the foot in place Extension Table g Extension table h Tab i Hole To Detach the Extension Table 1 Pull the extension table away from the...
Page 14: ...cher la tablette extensible 1 Poussez l extension jusqu à ce qu elle se mette en place 12 Elevador de la pata prensora a Elevador de la pata prensora b Posición normal superior c Posición más alta El elevador de la pata prensora levanta y baja la pata prensora Puede levantarla hasta 1 4 0 6 cm más arriba que la posición normal superior para quitar fácilmente la pata prensora o para poder colocar t...
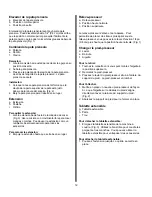
Page 15: ...a needle is bent place the flat side of the needle onto a flat surface i e needle plate or glass Fig 3 The gap between the needle and the flat surface should be consistent Never use a bent or blunt needle because a damaged needle can cause permanent snags or runs in knits fine silks and silk like fabrics Selecting Needle and Thread For general sewing use needle size 11 or 14 A fine thread and need...
Page 16: ...nant dans le sens contraire des aiguilles d une montre Fig 1 4 Retirez l aiguille de la vis de serrage 5 Insérez une nouvelle aiguille b dans la vis de serrage en vous assurant que le côté plat de l aiguille est face à vous Fig 1 Au moment d insérer l aiguille poussez aussi loin que possible d 6 Resserrez la vis de serrage de l aiguille a en la tournant dans le sens des aiguilles d une montre AVER...
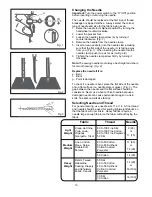
Page 17: ... the spool and guide the thread around the thread guide e 5 Pass the thread between the tension disks f 6 Thread the bobbin by passing the thread through the hole in the bobbin g from the inside to the outside Wind the thread a few times by hand around the empty bobbin in a clockwise direction 7 Place the bobbin on the bobbin winder spindle h 8 Push the bobbin winder spindle to the right h 9 Press...
Page 18: ...ette d puis relâchez le clapet Le boîtier devrait se refermer en position lorsque le clapet est relâché Devanado de la bobina Para sacar el soporte del carrete 1 Saque la extensión de la máquina de coser jalándola hacia la izquierda 2 Abra la tapa del transportador a jalando la pestaña del lado izquierdo de la tapa hacia abajo Fig 1 3 Levante la aguja hasta su posición más alta girando la manivela...
Page 19: ...m of the guide plate c Firmly draw the thread up along the left channel and slip the thread into the slit of the thread take up lever from right to left and down into the take up lever eye d 6 Slide the thread behind the needle bar thread guide on the left e 7 Thread the needle from front to back f Drawing Up the Bobbin Thread Fig 12 1 Raise the presser foot and hold the needle thread lightly with...
Page 20: ... d aiguille b 4 Tirez environ 6 pouces 15 cm sur les 2 fils sous le pied presseur c Enhebrado de la Máquina Enhebrando el hilo superior Fig 1 Advertencia Verifique que la máquina esté apagada antes de enhebrarla 1 Coloque el carrete en la clavija del carrete con el hilo saliendo en sentido horario a 2 Levante la palanca receptora hasta su posición más alta girando la manivela en sentido contra hor...
Page 21: ... thread c Right side top side of fabric d Wrong side under side of fabric To adjust the tension turn the tension dial up to loose and down to tighten e To loosen f To tighten The tension requires adjustment depending on Stiffness and thickness of fabric Number of fabric layers Type of stitch Tension is too tight If the bobbin thread shows through on the right side top side of the fabric turn the t...
Page 22: ... de bobine c Endroit du tissu dessus d Envers du tissu dessous f Tournez vers le bas pour resserrer Ajustando la tensión del hilo de la aguja Tensión del hilo Nota La tensión del hilo de la bobina ha sido ajustada en la fábrica y normalmente no hace falta ajustarla otra vez Disminución de la tensión del hilo Para verificar la tensión del hilo de la bobina quite el soporte de la bobina con la bobin...
Page 23: ...la antes de seleccionar el tipo de puntada Costura en reversa La costura en reversa se utiliza para trabar el final de la costura y para reforzar algunas zonas Al final de una costura presione la palanca de costura en reversa y presione levemente el pedal de control Fig 2 Haga algunas puntadas en reversa Suelte la palanca de postura en reversa y la máquina volverá a coser hacia adelante SECTION 3 ...
Page 24: ...e reverse stitch lever and sew several reverse stitches first and then release the reverse stitch lever and start sewing forwards At the end of the seam repeat the process again Fig 2 Changing Sewing Directions 1 Stop the sewing machine at the point where you wish to change the directions with the needle still in the fabric Fig 3 2 Raise the presser foot and turn the fabric to line up to its new d...
Page 25: ...lques points Relevez la commande de pied et retirez le tissu Fig 2 Costura con puntada recta La puntada recta es una de las puntadas más usadas y versátiles a Selector de puntada A C b Tensión delhilo de la aguja 2 6 c Pata prensora Pata multiuso 1 Seleccione la puntada recta A C Fig 1 2 Ajuste la tensión del hilo de la aguja entre 2 6 Fig 1 3 Verifique que la pata multiuso esté colocada en la máq...
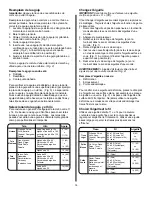
Page 26: ...eed naturally Fig 2 Note To obtain better zigzag stitches the upper tension should be slightly less than when sewing straight stitches Overcasting Stitch a Stitch selector F b Needle thread tension 1 4 c Presser foot All purpose foot This stitch is useful in garment construction and in finishing raw edges of any sewing project Start overcasting from about 1 8 0 3 cm inside the raw corner of a seam...
Page 27: ...EMENT Attention de ne pas couper les points en enlevant la marge de couture Costura básica en zigzag La puntada en zigzag es otra puntada muy versátil Puede ser una puntada utilitaria para coser un botón hacer un ojal dobladillos hilvanados remiendos y zurcidos También se puede usar para decorar bordes apliques y trabajos de corte o como puntada decorativa a Selector de puntada D F b Tensión del h...
Page 28: ...ando visible 0 7 cm del borde del dobladillo Fig 2 5 Levante la pata prensora y coloque la tela de modo que la aguja cuando esté en su posición extrema izquierda apenas perfore el borde del doblez Fig 2 6 Cuando termine de coser el dobladillo presione entre si ambos lados de la tela cosida El lado de arriba de la tela debe mostrar únicamente las puntadas invisibles Fig 2 Nota En telas pesadas que ...
Page 29: ...veces unos 3 mm 1 8 y cosa 4 o 5 puntadas para asegurarlo 6 Jale del hilo levemente hacia atrás 7 Inserte la aguja en la tela levante la pata prensora y guíe el pliegue dentro del rollo de la pata para dobladillos Fig 2 8 Jale suavemente el borde de la tela hacia usted y baje la pata prensora 9 Comience a coser guiando la tela dentro del rollo sosteniéndola hacia arriba y levemente hacia la izquie...
Page 30: ...ire el hilo superior e inferior hacia atrás y baje la pata 6 Para coser el lado izquierdo del cierre vaya guiando el borde de la pata para cierres a lo largo de los dientes del cierre haciendo las puntadas a través de la prenda y de la cinta del cierre Fig 2 7 De vuelta la tela y cosa el otro lado del cierre de la misma forma en que lo hizo con el lado izquierdo Fig 3 Utilisation du pied pour ferm...
Page 31: ...raw the upper thread to the backside of the fabric and knot the upper and lower thread together Place a pin just before the bartack at each end to prevent cutting the bartacks Cut the opening with the seam ripper Note When sewing a buttonhole at the edge of a fabric set the sliding buttonhole foot as illustrated and sew in reverse Corded Buttonhole 1 With the buttonhole foot raised hook the filler...
Page 32: ... la garniture pour la serrer Enfilez le bout dans une aiguille à repriser puis tirez vers l envers du tissu et coupez le Fig 6 Usando la pata prensora para ojales a Selector de puntada b Tensión del hilo de la aguja 1 5 c Pata prensora Pata para ojales Comenzando a coser 1 Quite la pata multiuso y reemplácela por la pata para ojales Fig 1 2 Marque cuidadosamente el largo del ojal en la tela 3 Colo...
Page 33: ...e bobbin case and remove it from the machine 3 Open the hook race ring holders and remove the hook race ring Fig 4 4 Remove the hook 5 Clean the shuttle race with a brush and a soft dry cloth a Bobbin case b Hook race ring holders c Hook race ring d Hook e Shuttle race f Center pin g Notch To oil the shuttle race 1 Before assembling the shuttle race oil the shuttle race using a few drops of fine q...
Page 34: ...enant les crochets dans leur position 4 Réinsérez la boîte à cannette dans la machine SECCIÓN 4 CUIDADO DE SU MÁQUINA Nota Apague la llave de encendido y desenchufe la máquina antes de limpiarla o de realizar cualquier tipo de mantenimiento No desarme la máquina de ninguna otra forma que no esté indicada en esta sección Limpieza del mecanismo alimentador de tela 1 Quite la aguja y la pata prensora...
Page 35: ...n un lugar con mucha humedad cerca de una fuente de calor o bajo la luz directa del sol Limpie el exterior de la máquina con un trapo suave y jabón delicado Lubricación de la máquina Coloque algunas gotas de aceite fino para máquina de coser en los puntos indicados por las fechas del dibujo Fig 2 Quite el tornillo Quite la cubierta Lubrique los puntos indicados por las fechas Si la máquina se util...
Page 36: ...wards the back 3 Tighten the needle clamp screw 4 Loosen the upper thread tension 5 Choose a needle to suit the fabric and the thread 6 Always turn the hand wheel to lift the needle before turning the pattern selector dial Seams gather or pucker 1 The thread tension is too tight 2 The machine is not threaded correctly 1 Loosen the upper thread tension 2 Rethread the sewing machine Note When sewing...
Page 37: ...la lado plano 5 Quite el carrete de hilo y vuelva a enrollarlo 6 Reemplace la aguja 1 Quite y vuelva a colocar el porta bobina y jale del hilo El hilo debe salir fácilmente 2 Verifique la bobina y el porta bobina 3 Limpie el porta bobina 4 Cambie la bobina 1 Quite la aguja y vuelva a instalarla lado plano hacia atrás 2 Coloque una aguja nueva 3 Escoja una aguja adecuada para el hilo y la tela util...
Page 38: ...est coincé dans le crochet fileur 2 La machine n est pas branchée 3 Le bouton de l embrayage est désengagé pour l enfilage de la canette 1 Renfilez la machine 2 Diminuez la tension du fil chiffre plus faible 3 Choisissez une aiguille plus grosse 4 Retirez et réinsérez l aiguille côté plat 5 Retirez la bobine de fil et enroulez le fil 6 Remplacez l aiguille 1 Retirez et réinsérez l étui à canette e...
Page 39: ...cific legal rights and you may also have other rights which vary from province to province EURO PRO Operating LLC will at its option repair or replace this sewing machine free of charge if it fails to operate according to specifications due to factory defects in materials or workmanship within one year from date of purchase For 25 years from date of purchase EURO PRO Operating LLC will repair or r...
Page 40: ... también tener otros derechos los que varían de estado a estado EURO PRO Operating LLC a su criterio reparará o reemplazará su máquina de coser sin cargo alguno si deja de funcionar de acuerdo con las especificaciones debido a un defecto de fabricación o de materiales dentro del término de un año a partir de la fecha de compra Durante 25 años desde la fecha de compra EURO PRO Operating LLC reparar...
Page 41: ...er d un état ou d une province à l autre À sa discrétion EURO PRO Operating LLC réparera ou remplacera cette machine à coudre sans frais si elle ne fonctionne pas selon les spécifications suite à une défectuosité matérielle ou de main d oeuvre dans l année suivant la date d achat Pour 25 ans à compter de la date d achat EURO PRO Operating LLC réparera ou remplacera les pièces de la tête de machine...