Instruction Manual for Spirit & Spirit Tab-Tension Series In-Ceiling Electric
Appendix A: Adjusting the Screen Limits
We only recommend that experience AV installers adjust the motor limits of the projection screen.
The upper limit should never be adjusted - it controls the point at which the screen stops
retracting into the case and is factory-set to flush. Improperly adjusting the limits of the motor will
cause damage to the screen and motor and will void all warranty.
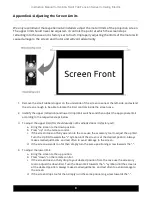
1. Remove the small rubber stopper on the underside of the screen case near the left-side, and extend
the screen enough to be able to locate the limit controls inside the screen case.
2. Identify the upper (retraction) and lower (drop) limit switches and then adjust the appropriate limit
according to the respective steps below.
3. To adjust the upper limit (this should usually not be adjusted since it is factory-set):
a. Bring the screen to the down position.
b. Press “up” on the remote control.
c. If the screen does not fully ascend into the case use the accessory tool to adjust the up limit.
Turn the Up limit towards the “+” symbol until the screen is at the desired position. Always
make small adjustments, and test often to avoid damage to the screen.
d. If the screen ascends too far then simply turn the same positioning screw towards the “-“.
4. To adjust the lower limit:
a. Bring the screen to the up position.
b. Press “down” on the remote control.
c. If the screen does not fully drop to your desired position from the case use the accessory
tool to adjust the down limit. Turn the Down limit towards the “+” symbol until the screen is
at the desired position. Always make small adjustments, and test often to avoid damage to
the screen.
d. If the screen drops too far then simply turn the same positioning screw towards the “-“.
9


