


6
7
22" WALL OPENING
26"
WALL OPENING
24"
36"
71
2"
21
2"
1"
1"
5"
35
1 2
"
16" CENTERED
UNIT
OUTLINE
A/V & POWER
CONNECTIONS
WALL BRACKET INSTALLATION
Verify all on-site conditions.
•
Reference the dimensions from this
•
sheet to properly locate the
interlocking brackets on the
mounting surface.
Use the supplied hardware and
•
instructions to securely fasten the
loose interlocking brackets to the
mounting surface.
If applicable, connect all A/V and
•
power cords and confirm unit is
operating properly.
Hang unit onto mounting surface
•
and ensure the interlocking
brackets are securely engaged.
Note:
When possible, it is recommended
•
to secure the supplied hardware
into the framing members of the
mounting surface.
However, due to desired placement
•
of the unit, it may not be possible
to use the framing members for
mounting.
In this case, secure the supplied
•
toggle bolts to minimum ½-inch
thick drywall.
Directions for installing the toggle
•
bolts are included in the fastener
packet.
SHEET
3
PROPRIETARY AND CONFIDENTIAL
THE INFORMATION CONTAINED IN
THIS DOCUMENT IS THE SOLE
PROPERTY OF THE MANUFACTURER.
ANY REPRODUCTION IN PART, OR AS
A WHOLE, WITHOUT THE WRITTEN
PERMISSION OF MANUFACTURER, IS
PROHIBITED.
DIMENSIONS ARE IN INCHES
TOLERANCES
FRACTIONAL 1/8 [3mm]
ANGULAR: MACH 1.0
ANGULAR: BEND 1.0
TWO PLACE DECIMAL .03 [.8mm]
THREE PLACE DECIMAL .015 [.4mm]
Date Created
so0195R
Sales Order / Inv. Number
S-R-2436-19.5UB-E2-NI
Item
Revised Date
B
1
4" VENT GAP
MIRROR SURFACE
INTERFACE PLATE
MIRROR-POLISHED STAINLESS
STEEL GLASS-MOUNTING CLIPS
DETAIL B
SCALE 1:3
MOUNTING
SURFACE
INTERLOCKING
WALL BRACKETS
A/V & POWER
CONNECTIONS
19-inch High-Definition LCD
Screen Size (Diagonal): 19-inch
Format: 16:9
Brightness: 700 cd/m2
Viewing Angle: 170° Horizontal/Vertical
Contrast: 4000:1
Response Time: 6ms
Native Resolution: 1920 X 1080
Backlight: LED
Menu Languages: English, French, Spanish
Tuner:
ATV: NTSC
Digital: ATSC/QAM
Video:
75 Ohm Coaxial Antenna X 1
Composite Video, Audio L, Audio R (RCA plugs) X 1
Component YPbPr (RCA plugs) X 1
VGA 15-pin D-sub Female X 1
HDMI Type A X 2
USB Type A X 1
S-Video Mini 4-Pin DIN X 1
Audio:
Amplified Internal Speakers: 2 X 5W
Amplified Output for External Speakers: 2 X 5W
Amplified Output: Terminal Block
Constant Line Output: 3.5mm Jack X 2
Control:
RS232 9-pin DB9 Female X 1
IR IN: 3.5mm Jack X 1
IR OUT: 3.5mm Jack X 4
Power:
Input: 110-240 VAC, 50-60Hz, 1.5A
Type A NEMA Plug
Requires GFCI Protected Outlet
SHEET
2
PROPRIETARY AND CONFIDENTIAL
THE INFORMATION CONTAINED IN
THIS DOCUMENT IS THE SOLE
PROPERTY OF THE MANUFACTURER.
ANY REPRODUCTION IN PART, OR AS
A WHOLE, WITHOUT THE WRITTEN
PERMISSION OF MANUFACTURER, IS
PROHIBITED.
DIMENSIONS ARE IN INCHES
TOLERANCES
FRACTIONAL 1/8 [3mm]
ANGULAR: MACH 1.0
ANGULAR: BEND 1.0
TWO PLACE DECIMAL .03 [.8mm]
THREE PLACE DECIMAL .015 [.4mm]
Date Created
so0195R
Sales Order / Inv. Number
S-R-2436-19.5UB-E2-NI
Item
Revised Date
Steel Glass-Mounting Clip
Mirror-Polished Stainless
SCALE 1 : 2
MIRROR CLIP DETAIL
16
3
"
16
1
1"
"
36"
24"
10"
5"
4"
4"
16"
21"
19" LCD
VIEWABLE
SCREEN
1" LIFT-OFF CLEARANCE REQUIRED
1116"
34"
1716"
Sales Order / Inv. Number
Item and Description
Revised Date
Reseller
SHEET 1
SIGNATURE
AND DATE
REQUIRED
DATE:
SIGNATURE:
NOTE:
PLEASE SIGN AND DATE THIS PAGE BEFORE RETURNING TO SEURA. ONLY THIS PAGE NEEDS TO BE
RETURNED. BY RETURNING THIS SHEET, YOU ARE AGREEING TO ALL DIMENSIONS SHOWN ON ALL DRAWING
SHEETS. FOR CUSTOM UNITS, WE WILL NOT START THE BUILD PROCESS WITHOUT AN AUTHORIZED SIGNATURE.
FOR DRAWINGS THAT REQUIRE REVISIONS: SEND THE REVISIONS TO SEURA ON THE ORIGINAL DRAWINGS.
DO NOT SIGN UNTIL ALL REQUIRED DIMENSIONS ARE VERIFIED AND ACCEPTED.
AFTER THE DRAWINGS ARE UPDATED, A REVISED DRAWING PACKAGE WILL BE RE-SENT FOR SIGNATURE.
DIMENSIONS ARE IN INCHES
TOLERANCES
FRACTIONAL 1/8 [3mm]
ANGULAR: MACH 1.0
ANGULAR: BEND 1.0
TWO PLACE DECIMAL .03 [.8mm]
THREE PLACE DECIMAL .015 [.4mm]
PROPRIETARY AND CONFIDENTIAL
THE INFORMATION CONTAINED IN
THIS DOCUMENT IS THE SOLE
PROPERTY OF THE MANUFACTURER.
ANY REPRODUCTION IN PART, OR AS
A WHOLE, WITHOUT THE WRITTEN
PERMISSION OF MANUFACTURER, IS
PROHIBITED.
www.seura.com
1.800.95.SEURA
PH. 920.857.9069
FAX 920.857.9490
Date Created
so0195R
S-R-2436-19.5UB-E2-NI
24" (W) x 36" (H) Recessed TV Mirror with Ultra-Bright 19" TV and Enhanced Glass
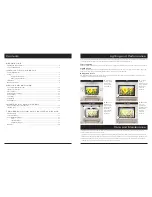
Display Requirements
Operation and Storage Requirements
The ambient temperature for operating the device is between 41 to 122 degrees Fahrenheit. Do not install the device in the proximity of heat sources,
such as heating pipes, heaters, furnaces or other devices that radiate heat. Mount the device in such a way that it is protected against moisture.
Trouble free operation is ensured up to 75% air humidity. To prevent fire or electric shock, never allow liquids to enter the unit. The product must be
stored in dry and well-ventilated rooms, without extreme temperature fluctuations. Heat sources and aggressive active substances may not be stored
in the proximity of the device. The required storage temperature is 32° F - 140° F at an air humidity of 5 - 85% RH non-condensing. The device must be
stored in the complete packaging, as delivered.
Installation Environment
Avoid direct light or sun exposure, direct proximity to heat sources, outdoor installation. The product is specifically designed for indoor use only. There
is the danger of fire and of electric shock and damage to the device if it is operated outdoors. Do not place any heat sources such as radiators and
heat registers, etc. near the monitor. To reduce eye strain, avoid installing the Séura Television Mirror against a bright background such as a window.
Position the monitor at the height of your eye level. Position the monitor directly in front of you at a comfortable viewing distance.
Installation
Have this product installed by qualified personnel only. Use the mounting systems which are specified or recommended by Séura. Install the product
in a way that it is fixed properly and take care that children are not exposed to danger. Please take extra care during installation, avoid impacts. Before
cabling your monitor, check that the power is off. To avoid any possibility of electric shock, always connect your equipment to properly grounded
outlets. Use of power cords or adapters other than those provided may cause fire or malfunction. Place this product as close to the power socket as
possible. Leave enough space to insert and remove the power plug on demand. Even if you switch off the product with your remote control, power is
not cut off unless the power cord is unplugged.
The device may only be operated with the provided power adapter. The rated voltage is indicated on the product label. The device is factory-set to
the optimal operating voltage (see Technical Specification). Use only power cords and plugs that are suitable for your local electrical outlets. Install
the power cords in such a way that it does not obstruct anyone. Ensure furthermore that the cable is not clamped and that it cannot be pulled out
accidentally from the power adapter. Do not install the power cords in the proximity of heating elements and never place heavy items on the cable or
power adapter. Do not modify or arbitrarily repair the power cords.
CAUTION
Do not use any power cords or adapters other than those provided with this product! Use of power cords or adapters other than those provided
with this product may cause fire, electric shock or malfunction. If several kinds of power cords are provided with this product, use the one that fits
your power socket. Do not let the adapter hang down while using. Do not cover or wrap the adapter. Leave space around the adapter to prevent
overheating. The individual components can be destroyed, if the polarity is reversed or an incorrect connection is used. A goodwill replacement is not
possible in such cases, since each device is submitted to meticulous quality inspections prior to shipping. The connecting plugs must be attached in
such a way that the connector is held firmly. Have trained technical personnel install the electrical facilities necessary for mounting. The power adapter
must be installed in ventilated areas due to heat emission. Connect the power cord to a grounded outlet. Never cut or damage the power cord.
Please disconnect the device from the power adapter in the following cases:
1. The device is out of use for a lengthy period.
2. The device malfunctions or displays other unusual features, necessitating maintenance work.
3. During a thunderstorm.
Please plan the positioning of the power adapter and the source cables before proceeding with the structural measures and positioning of the Séura
Television Mirror. Observe the protection zones when placing the power adapter! For in-wall applications please bear in mind that the power adapter
has to be placed beyond the inset due to heat emission. Optional 50’ adapter extension cables may be purchased from Séura.
NOTE
The power adapter should be adequately secured to prevent it from becoming unstable and/or falling. Make sure the power source circuits are properly
grounded. Use the supplied power cord in order to connect it to the power source. If your installation requires a different power cord, be sure to use an
officially approved power cord displaying the mark of the safety agency that defines the regulations for power cords in your country. Please consider
that the AC outlet for the power adapter is placed within reach of the Séura Television Mirror and should be easily accessible in case it needs to be
powered off.
Install the unit in a dry environment where the operating ambient temperature will not exceed 40°C / 104°F. Also, don’t position the power adapter on
top of the Séura monitor system in order to prevent thermal overload. Ensure that your installation complies with your national and local safety rules.
Any servicing, adjustment, maintenance or repair must be performed only by service-trained personnel.
Ensure the power adapter is installed in an accessible location, to access it easily in case of a defect. If you choose to place the power adapter in a
separate space, take care that ventilation is present, because the power adapters need convection cooling for stable working conditions.
When placing the power adapter in a fully enclosed space, make sure the air flow around the sides and top of the power adapter is not restricted.
According to a common rule of thumb please calculate the length of the power adapter plus an additional gap of at least 100mm all around for DC 12V
power adapters and 200mm for DC 24V power adapters.
Setup
Before using the device please check the following contents of the box for completeness:
10 . 5 | 19 . 5 | 2 7. 5
U s e r M a n U a l
Television Mirror
T V s I z e s 10 " 19 " 2 7 "
w w w.seura .com
Television Mirror
Manual and Custom Drawing
Package
Waterproof
IR Remote
Control
RS-232
Adapter
Composite
Adapter
YPbPr
Adaper
Mounting
Hardware
2010 Remote Redesign
Final
w a t e r p r o o f
last
ok
enter
channel
volume
cc
guide
mute
sleep
zoom
input
display
menu
exit
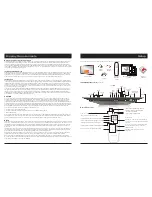
Input/Output Overview
19” TV Shown
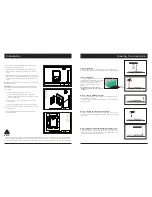
Remote Functions
2010 Remote Redesign
Final
w a t e r p r o o f
last
ok
enter
channel
volume
cc
guide
mute
sleep
zoom
input
display
menu
exit
Power On / Off
Menu Controls
Press “Menu” to launch On Screen Display menu
Use arrows and “Ok” to navigate menu and make
selections
Press “exit” to close the On Screen Display menu
“Mute” turns on or off all audio output
“Sleep” designates power off after a specified time
“Zoom” configures ratio and appearance of picture
“Input” designates displaying content source
“Display” displays input and resolution information
Use Volume arrows to increase or decrease
volume level
Use Channel arrows to increase or decrease
channel selection
“Guide” displays available EPG (Electronic
Program Guide) when using tuner input
“CC” turns on/off subtitles
“Last” recalls last channel viewed
Numerical selection for channels and settings
Mirror
TV Chassis
Internal/External
Speaker Selector
RS232
Input
S-Video
RF Coaxial
Antenna
USB
IR Input
Audio Line
Out
VGA
Input
HDMI 1
Input
HDMI 2
Input
Power Adapter
Input
Speaker Out
Audio
Line
Out
PC
Audio In
Composite
YPbPr
IR Output
TOP VIEW