background image

SCAN DURATION: Duration for scanning one port

Options are 3 seconds, 5 seconds, 10 seconds, 15 seconds, 20 seconds, 30 seconds, 40 seconds, 60 

seconds. Move the highlight bar to an option and press [Enter] to select it.

OSD ACTIVATING HOTKEY: Select OSD activating hotkey


•   [Ctrl] [Ctrl] Set hotkey as [Ctrl] [Ctrl].


•   [Scroll] [Scroll] Set hotkey as [Scroll] [Scroll].


•   [Shift] [Shift] Set hotkey as [Shift] [Shift].


•   [Alt] [Alt] Set hotkey as [Alt] [Alt].

Move the highlight bar to an option and press [Enter] to select it.

SET PASSWORD: Set new password.

First enter old password, then enter new password and confirm it. The new password is set. If error occurs, 

the screen will remind users.

CLEAR THE NAME LIST: Clear the names of port list.

You need to enter password to clear the names of port list.

RESTORE DEFAULT VALUE: Restore settings to default value. 

You need to enter password to Restore settings to default value.

Note: The user password will also be cleared, and the factory password will not.

LOCK CONSOLE: Lock the console.

You cannot switch or scan after you lock the console (including switch by push button on the panel or OSD). 

You need to enter password to set.

Note: After Locking the console, you can also unlock the console by this option. It also needs password 

verification.

www.serveredge.com.au        | 18    |

Summary of Contents for SED-KLVGA-0117

Page 1: ...CD KVM Console Rack Drawer User s Manual RoHS Features and functions may be added or changed after the manual was written Please visit our website to download the latest version of manual for referenc...

Page 2: ...IONS 8 14 KVM Operation 8 Before Use 8 During Use 8 After Use 9 Hot Plugging 9 Power On Off and Reboot 9 Assembling Disassembling 10 Standard Rack Installation 11 12 Single Stage Installation 13 Casca...

Page 3: ...use one KVM platform to manage all the computers connected to it There s no need for each computer to have its own keyboard mouse and monitor thus saving valuable rack space www serveredge com au 2 F...

Page 4: ...A 17 LCD KVM Console Rack Drawer 16 Port KVM USB PS2 VGA 19 LCD KVM Console Rack Drawer 16 Port KVM USB PS2 VGA 19 LCD KVM Console Rack Drawer Single Port USB PS2 VGA With IP Access 19 LCD KVM Console...

Page 5: ...edle or a ballpoint pen into the hole to restore the IP module to default setting 2 RJ45 Port CAT5e 6 6a UTP can be plugged into this port for establishing a connection with the the LAN including the...

Page 6: ...www serveredge com au 5 Dimensions 17 inch model 19 inch model...

Page 7: ...e 1 1 1 1 1 PACKAGE CONTENTS ITEM Q TY USB and PS 2 Cable All VGA port For KVM Keyboard mouse and monitor VGA Keyboard Mouse Standard USB PS 2 Interface Cable Type Application Type KVM Port PC or Serv...

Page 8: ...www serveredge com au 7 AC Power Cable 3 Plugs of National Standard 100 240V All Cable Type Note Voltage Range Machine Type KVM Power Cable AC Power Cable...

Page 9: ...e connected correctly During Use Pull the KVM completely out of the cabinet the rail guides will automatically lock and the power will turn on Release front lock As shown below To open the front panel...

Page 10: ...nnected and disconnected without powering off Please follow the steps below When hot plugging PC port 1 The connecting cable must be plugged into the port from which it is pulled out 2 Plug the mouse...

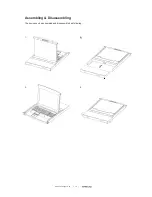
Page 11: ...Assembling Disassembling The device can be assembled and disassembled as following 3 4 1 2 www serveredge com au 10...

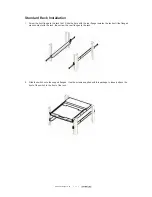
Page 12: ...rear flange towards the rack until the flanges make contact with the rack then screw the rear flanges to the rack 2 Slide the switch onto the support flanges Use the screws supplied with this package...

Page 13: ...the rear attachment sliding brackets along the slide bars until they contact the rear of the switch 4 Use the screws supplied in the box to attach the bars to the rear of the switch www serveredge co...

Page 14: ...ther USB or PS 2 not both video cables into their respective ports on the computer 3 Plug the power adapter cable into the switch s power jack then plug the power adapter into an AC power source 4 Rep...

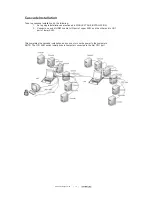
Page 15: ...LE STAGE INSTALLATION 2 Connect one end of HDB15 cable to IN port of upper KVM and the other end to OUT port of lower KVM This completes the cascade installation and you can turn on the power to the c...

Page 16: ...ervisor password which is admin OSD Navigation To dismiss OSD press Esc To move up and down through the list one line at a time use the Up and Down Arrow Keys If there are more list entries than what...

Page 17: ...you to switch directly to a port either by keying in the port s name or its port number To use NAME method move highlight bar to NAME press Enter input name of a port then press Enter to confirm To us...

Page 18: ...in screen with the newly formulated list displayed F4 QV QV function can select port as Quick View Move the highlight bar to a port press F4 an icon of up triangle appears Press F4 again the icon disa...

Page 19: ...then enter new password and confirm it The new password is set If error occurs the screen will remind users CLEAR THE NAME LIST Clear the names of port list You need to enter password to clear the na...

Page 20: ...after it is initialized As signal and power transfer both need custom cables please use matching cables as unmatched cables may cause system work improperly or even damage the device Keep it in a spa...

Reviews: