background image

18

4.1.2

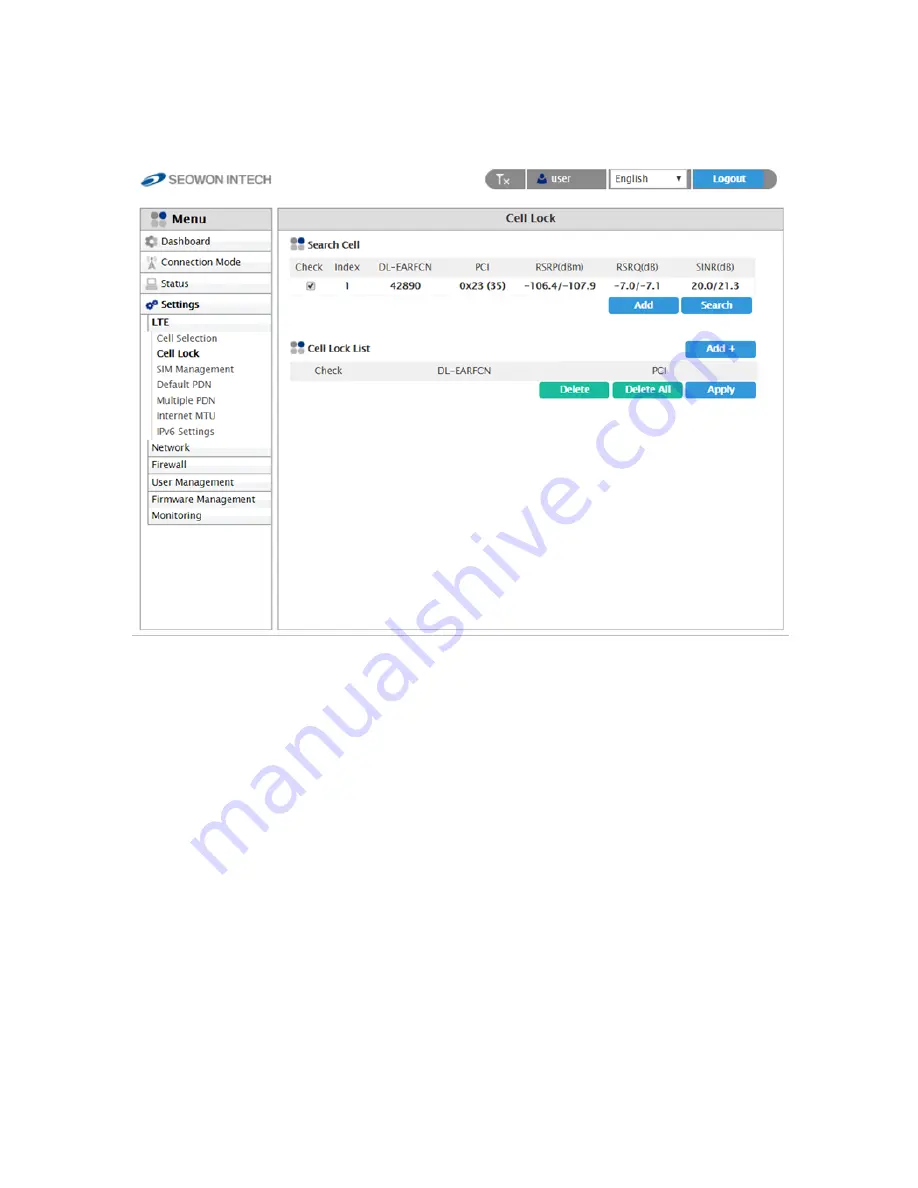
 Cell Lock

  Select “

Settings

” 

 “

LTE

” 

 “

Cell Lock

” from the left menu.

  You can add current cell to lock or delete cell to unlock in the list.

  You can manually add cell by clicking “

Add+

” button.

  Finish setup by clicking the “

Apply

” button.

Summary of Contents for SLC-120T42OGA

Page 1: ...mmunication needs at home and at the office Note Please note that it performs the best with the accessories which are contained in the package and the manufacturer will not be responsible for defects...

Page 2: ...1 x Gigabit Ethernet RJ45 LAN port 1 x Mini USIM Card Slot 1 x Reset button LED Indicators Power Sharing with Signal Strength Signal Strength 5 LEDs with 1 color 5 Level display Operating Temperature...

Page 3: ...d the following Step 1 Remove the two Bolt M3 from the outdoor CPE Remaining 6 screws are enclosed in the mounting kits as Washer 4ea 3 4 2 1 5 6 7 8 9 One Bracket Mounting Bar 2ea Mounting U Bolt 2ea...

Page 4: ...below 1 Remove the cap 2 Put A B Cap and Aluminum plate to cable line in order 3 Plug the cable line into the LAN hole of outdoor CPE 4 Connect A and B in order 5 Lastly connect Cap to Aluminum plate...

Page 5: ...ws Bolt M3 8ea Step 5 Attach item 1 to the back side of the device using item 4 as shown Insert item 5 into item 4 before installing Step 6 Install the device to pole using item 2 and 3 tighten the br...

Page 6: ...the Outdoor CPE to its original factory default settings Step 7 Adjust the device using the different position on the bracket Check the LED light 1 5 RESET Button When the device turned On Press the r...

Page 7: ...is connected to a Outdoor CPE The purpose of Outdoor CPE setup is to connect the Outdoor CPE to the Internet Please refer to the Outdoor CPE Setup chapter Safety precaution Do not allow the PSE adapte...

Page 8: ...he Local Area connection of your Internet Proto col TCP IP properties In a Windows environment Click Start button Click Control Panel Click Network and Inter net Connection Click Network Connection Ri...

Page 9: ...mask and Gateway which are automatically assigned to your PC If the host can reach the device using the ping command the device has successfully attached Run cmd Verify IP address Note PCs connected...

Page 10: ...ne is user for both User Name and Password You can change the Password after logging in User Name and Password are case sensitive Log in to Web Interface Note The Web Interface can be accessed by ente...

Page 11: ...11 1 Dashboard Setup on the web page Select Dashboard from the left menu You can see the Mobile Network LTE Network Firewall Monitoring and Firmware Information...

Page 12: ...n Mode Select Connection Mode from the left menu You can select operation mode Auto or Manual You can see the status of Connect Manager Start LTE Connection by clicking Connect or stop by clicking Dis...

Page 13: ...13 3 Status 3 1 LTE Select Status LTE from the left menu You can see the LTE Information Status and Statistics by clicking each tab...

Page 14: ...14 3 2 Network Select Status Network from the left menu You can see the WAN LAN status and Lease Status Table...

Page 15: ...15 3 3 Device Details Select Status Device Details from the left menu You can see the device time and device information...

Page 16: ...16 3 4 Device Performance Select Status Device Performance from the left menu You can see the system performance such as CPU memory UL DL data rate and firewall status...

Page 17: ...Selection 4 Settings Select Settings LTE Cell Selection from the left menu You can change the mode Full Band or Frequency You can see the status of band and you can change the band Check the box and c...

Page 18: ...Lock Select Settings LTE Cell Lock from the left menu You can add current cell to lock or delete cell to unlock in the list You can manually add cell by clicking Add button Finish setup by clicking th...

Page 19: ...is enabled to match the current status If you SIM card is locked PIN Status shows PIN ENABLED NOT VERIFIED Then you should enter the PIN code and click the Verify button After success unlock PIN then...

Page 20: ...tings LTE Default PDN from the left menu You can set the PDN data such as APN Authentication Type and PDN type IPv4 IPv6 Put in the data to box then click Apply button If you set wrong data the device...

Page 21: ...4 1 5 Multiple PDN Select Settings LTE Multiple PDN from the left menu You can set the multiple PDN data for IMS admin App service Select Cid check Enable put in the data to box then click Apply butt...

Page 22: ...22 4 1 6 Internet MTU Select Settings LTE Internet MTU from the left menu You can change the internet MTU size Put in the data to box then click Apply button...

Page 23: ...can Enable or Disable IPv6 function by selecting the list You can set DHCPv6 Auto configuration mode by selecting the list You can set DNS Server Address Mode to Auto or Manual After selecting the eac...

Page 24: ...24 4 2 Network 4 2 1 Switch Select Settings Network Switch from the left menu You can select Switch Mode to NAT or BRIDGE Finish setup by clicking the Apply button...

Page 25: ...rver Setting IP address is used in the LAN cable that the device manages Setup IP address in Gateway IP Address Gateway Subnet Mask text boxes Initial Value is 192 168 1 1 255 255 255 0 and only the l...

Page 26: ...from the left menu Configure DMZ Demilitarized Zone Select whether or not to enable the DMZ function You can set Redirect ICMP To The Host and Exclude Web Server Port Set the IP address to have all p...

Page 27: ...nu Configure Port Forwarding Enter the Name Select one of the listed Protocols BOTH TCP UDP Enter Start Port End Port Destination IP and Destination Port Click the Add button when you finished You can...

Page 28: ...Triggering Enter the Name Select one of the Port Type RANGE or SINGLE Select Trigger Protocol and Open Protocol ALL TCP UDP Enter Trigger Port Range and Open Port Range Click the Add button when you...

Page 29: ...elect Settings Network VPN Configuration from the left menu You can set VPN mode by selecting GRE L2TP or PPTP After selecting the mode put in the data to all boxes Then click Add button Finish setup...

Page 30: ...t Settings Network VPN Passthrough from the left menu The device support 2 types of service PPTP Service L2TP IPSEC Service Select the type s of VPN pass through to use with the checkboxes Finish setu...

Page 31: ...ect Settings Network UPnP from the left menu Select whether or not to Enable the Universal Plug Play function Finish setup by clicking the Apply button When UPnP Client is connecting it will appear on...

Page 32: ...desirable service quality class can be set Setup download speed in Download kbps text box By selecting Upload and Download in the list you can adjust each speed Setup IP address mask protocol port and...

Page 33: ...NS from the left menu Set the DDNS environment If you want to set the DDNS check Enable in the checkbox to enter necessary inputs After entering all the necessary information for DDNS Setting finally...

Page 34: ...set other firewall rules as Ping HTTP HTTPS login and Multicast Filter If you want to use SIP ALG function check enable and type port number in the box For filter set up select the filter item IP MAC...

Page 35: ...ement 4 4 1 Account Select Settings User Management Account from the left menu Set the password to be given to the administrator who manages the device Enter the new password Finish setup by clicking...

Page 36: ...36 4 4 2 Language Select Settings User Management Language from the left menu Select the Language Finish setup by clicking the Apply button...

Page 37: ...anagement Restore Default from the left menu To initialize all configurations the device click Apply button If you want to save remove or reset this configuration click the button The device will rebo...

Page 38: ...38 4 4 4 Reboot Select Settings User Management Reboot from the left menu To reboot by software click Apply button The device will reboot automatically and it takes about 60 seconds...

Page 39: ...ou want to set the NTP Client select Enable Set the Time Server Select the Time Zone Select If you want to set the Daylight Saving check Enable Daylight Saving If you want to set the duration of Dayli...

Page 40: ...Select Settings User Management Remote Management from the left menu You can set HTTP Server port and HTTPS Server port If you want to set https server check Enable and type Port Number Finish setup b...

Page 41: ...t 4 5 1 Software Select Settings Firmware Management Software from the left menu Select the firmware file by clicking the Browse button To start the firmware update click Update button The device will...

Page 42: ...Select Settings Monitoring Iperf from the left menu You can use iperf by clicking the Enable button Set the all data in the field Finish setup by clicking the Apply button Whenever you want to see th...

Page 43: ...lect Settings Monitoring Diagnostic from the left menu Configure the Ping If you want to test ping enter IP Address to IP Address URL Set the all data in the field Click the Apply button to test The r...

Page 44: ...e route enter IP Address to IP Address URL Select the Set Maximum TTL and Set the number of queries at each TTL If you want to see report consisting of IP Address check the Report IP Address Only Clic...

Page 45: ...ice support 2 types of log System log and Kernel log Configure System log Check Enable in System log Enable Disable Check System log in View System Log Click Refresh button or Clear button for each ac...

Page 46: ...eration of base and fixed stations This equipmentis subject ti the registrations rules of Section 90 1331 for restrictions on the operation of base and fixed stations It can only be sold marketed to l...

Page 47: ...L 82 31 428 9531 FAX 82 31 428 9537 E mail sales seowonintech co kr www seowonintech co kr en The content in this document can be modified without prior notice for improving performance or function of...

Reviews: