


Installing the sensor cable
FlexZone Product Guide
Page 45
Installing armored FlexZone sensor cable
FlexZone armored sensor cable (P/N G6FG0200) is comprised of FlexZone sensor cable encased
in a flexible, protective 13 mm (1/2 in.) aluminum conduit.
•
Handle armored cable carefully to prevent twisting, bending, kinking, jerking, or stretching the
cable. Take extra care when deploying armored cable around curves and corners. Mishandling
the cable can damage the jacket, and adversely affect the sensor cable.
•
The smallest allowable bend radius for armored sensor cable is 15 cm (6 in.).
•
DO NOT subject armored cable to excessive tension (max. 3.4 kg, 7.5 lb).
•
Armored cable comes in 150 m (492 ft.) and 220 m (722 ft.) lengths. You can splice two
sections of armored together to create a 300 m (985 ft.) cable.
•
Use armored condulet fittings to protect cable splices and terminations (see
•
If you must move armored cable after dispensing the cable on the ground, carefully move it in
5 m (16 ft.) lengths, to prevent cable damage.
•
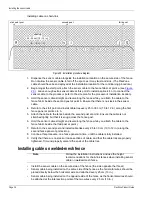
Use stainless steel cable ties, or wire ties to secure the armored cable to the fence fabric.
•
Secure armored cable tightly to the fence fabric at the midpoint of the chain-link. Do not attach
the cable at the junction of two fence links.
•
Keep the ends of the armored sensor cable clean and dry.
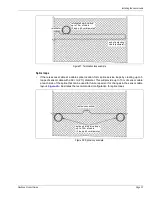
Figure 50: Gate disconnect assembly
Note
Armored FlexZone sensor cable must be conditioned before it is
attached to the fence (see
FlexZone sensor cable conditioning on page
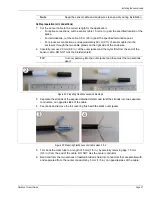
cable tie
female disconnect
female cap
splice kit (X 2)
male disconnect
male cap
cable tie
gear clamp
gear clamp
bracket
disconnect
assembly
protective rubber cover


