


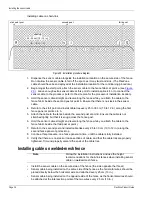


Installing the sensor cable
FlexZone Product Guide
Page 27
3. Check the ends of the cable to verify that the center conductor is free to retract or extend
(i.e., the center conductor is straight and the cable end is not pinched, flattened, twisted, bent,
or distorted). If an end is damaged enough to prevent the free movement of the center
conductor, cut off the damaged section and re-strip the cable.
4. At both ends of the cable, tie a loop through a 2.5 cm (1 in.) piece of the black jacket, to
prevent the center conductor from retracting into the cable during the conditioning procedure.
Cable conditioning procedure (part 2 - cable flossing)
Pull the cable by the black jacket to remove any slack and then use a “flossing” motion to pull the
center conductor back and forth to ensure the center conductor is floating freely over the full length
of the sensor cable.
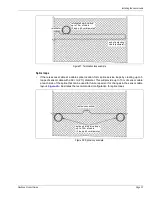
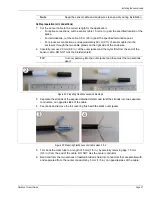
1. The first person begins by holding the cable by the black jacket with one hand and applying
light pulling tension to the center conductor with the other (see
).
The second person holds the cable by the black jacket and allows the center conductor to
move freely (no tension applied).
The first person stops pulling when they encounter an
increase in resistance or the center conductor can be pulled no further.
Figure 15: Securing the center conductor
Note
Initially, there may be resistance as well as some “stretching” as the
center conductor is freed inside the cable (i.e., the center conductor
pulls out at one end but remains the same length at the other). Once the
center conductor moves back and forth easily so that pulling it out
15 cm (6 in.) at one end causes it to retract 15 cm at the other end, the
conditioning is complete.
Note
You can hear the motion of the floating center conductor as it rattles
when you tap a properly conditioned sensor cable.
Note
Maintain a firm grip and consistent pulling tension, and keep the sensor
cable taut and in-line during the cable conditioning procedure.
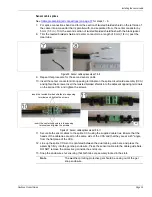
Figure 16: FlexZone cable conditioning (part 2 cable flossing)
black outer jacket
use the loop to apply tension to the center conductor
second person
first person
hold the cable and apply light
hold the cable by the black jacket
pulling tension to the center conductor
(apply no tension)


