background image

INTRODUCTION

11

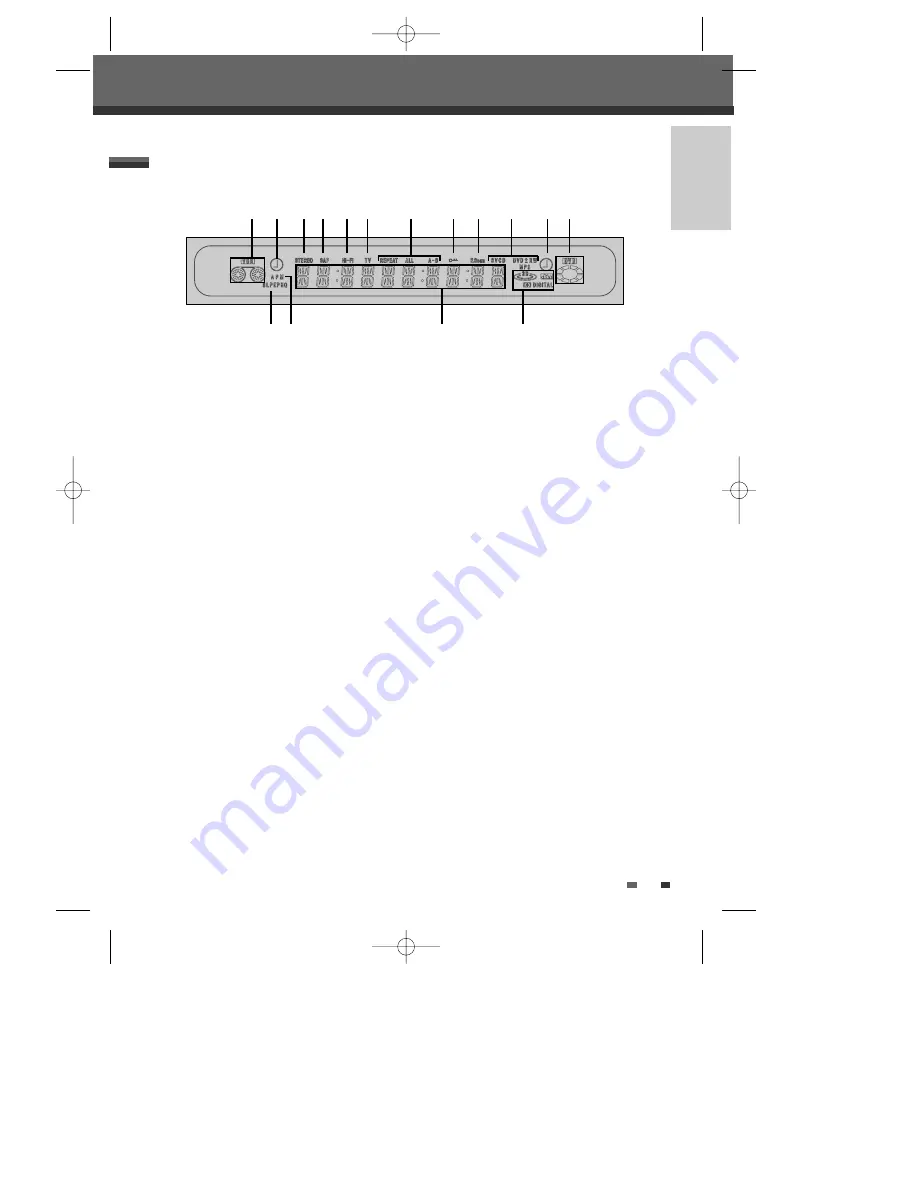
Identification of Controls

Front Panel Display

!

Indicates a VHS tape is inserted in the VCR deck. 

@

Circle : Indicates the VCR is recording. 
Clock : Indicates a VCR Timer Recording is set.

#

Indicates that a stereo broadcast is being
received.

$

Indicates when a Second Audio Program (SAP)
broadcast is being received.

%

Indicates when the DVD RVCR is playing
or recording a tape with Hi-Fi sound.

^

Indicates the DVD RVCR is in TV mode
(as set by the TV/VCR button).

&

Indicates the current Repeat mode.

*

Indicates when the DVD RVCR is locked.

(

Indicates when the DVD RVCR is
outputting the video signal in Progressive Scan
mode.

)

Disc Type indicators

Indicates the type of disc loaded.

1

Circle : Indicates a DVD+R(+RW) is recording.
Clock : Indicates a DVD Timer recording is set.

2

Indicates a disc is inserted in the DVD deck.

3

Indicates the current Recording mode.

4

Indicates AM or PM.

5

Front Panel Display Message

Indicates clock, total playing time, elapsed time,
remaining time, title number, chapter/track
number, channel, VCR counter, etc.

6

DTS: Indicates a DVD is playing with a DTS
soundtrack.
Dolby : Indicates a DVD is playing with a Dolby
Digital soundtrack.

! @

# $ % ^

&

* (

)

1 2

3 4

5

6

DF-L72G1N-LS(GB)  04.7.1 3:21 AM  페이지11

Summary of Contents for SV294

Page 1: ...DF L72G1N LS GB 04 7 1 3 21 AM 페이지A ...

Page 2: ... s attention to Article 820 40 of the National Electric Code U S A The code provides guidelines for proper grounding and in particular specifies that the cable ground shall be connected to the grounding system of the building as close to the point of the cable entry as practical CAUTION This DVD Recorder VCR employs a Laser System To ensure proper use of this product please read this owner s manua...

Page 3: ...ill not occur in a particular installation If this product does cause harmful interference to radio or television reception which can be determined by turning the product off and on the user is encouraged to try to correct the interference by one or more of the following measures Reorient or relocate the receiving antenna Increase the separation between the product and receiver Connect the product...

Page 4: ...nience receptacles and the point where they exit from the product 11 Only use attachments accessories specified by the manufacturer 12 Use only with the cart stand tripod bracket or table specified by the manufacturer or sold with apparatus When a cart is used use caution when moving the cart product combination to avoid injury from tip over 13 Unplug this product during lightning storms or when u...

Page 5: ... 30 Various PREFERENCE Settings 32 System Information 34 Restore Defaults 34 On Screen Display Overview __________________35 SETUP DVD Playback _________________________________38 VCR Playback _________________________________41 Other Disc Playback __________________________43 PLAYBACK Basic Recording________________________________45 Recording from TV 45 One Touch Record OTR 46 Checking the Recor...

Page 6: ...ding layer this process can be repeated more than a thousand times What is a DVD R Unlike a DVD RW disc a DVD R write once DVD can only be written to once If it is not finalized after a recording further recordings can be added to it Old recordings can be deleted but they can no longer be overwritten The deleted recordings titles are marked deleted title Before a DVD R can be played in a DVD playe...

Page 7: ...ed a number enabling you to easily locate the track you want Which discs you can use The following discs can be used in your DVD Recorder VCR Playback and recording DVD RW Digital Versatile Disc ReWritable DVD R Digital Versatile Disc Write Once Playback only DVD Video Digital Versatile Disc DVD R DVD Recordable These discs can only be played back if the recording was made in Video mode and the re...

Page 8: ...me programs are broadcast with a main and a SAP Secondary Audio Program audio channel You can record either the main audio or the SAP audio Restrictions on Video Recording You cannot record copy protected video using this DVD Recorder VCR Copy protected video includes DVD Video discs and some satellite broadcasts If copy protected material is encountered during a recording recording will pause or ...

Page 9: ...solution Do not use strong solvents such as alcohol benzine or thinner as these might damage the surface of the unit To obtain a clear picture The DVD Recorder VCR is a high tech precision device If the optical pick up lens and disc drive parts are dirty or worn the picture quality will be poor Regular inspection and maintenance are recommended after every 1 000 hours of use This depends on the op...

Page 10: ...temperature increase inside the car Cleaning Discs Fingerprints and dust on the disc can cause poor picture quality and sound distortion Before playing clean the disc with a clean cloth Wipe the disc from the center outward Do not use strong solvents such as alcohol benzine thinner commercially available cleaners or anti static spray intended for older vinyl records Notes on Discs About the Symbol...

Page 11: ...ps to previous chapter VCR Rewinds the tape during Stop mode Press during Play mode for fast reverse picture search FF DVD Skips to next chapter VCR Advances the tape during Stop mode Press during Play mode for fast forward picture search 1 DVD VCR Toggles control between the DVD deck and the VCR deck 2 Front Panel Display Shows the current status of the DVD Recorder VCR 3 CH Scans up or down thro...

Page 12: ... Indicates when the DVD Recorder VCR is locked Indicates when the DVD Recorder VCR is outputting the video signal in Progressive Scan mode Disc Type indicators Indicates the type of disc loaded 1 Circle Indicates a DVD R RW is recording Clock Indicates a DVD Timer recording is set 2 Indicates a disc is inserted in the DVD deck 3 Indicates the current Recording mode 4 Indicates AM or PM 5 Front Pan...

Page 13: ...titles of DVD R RW discs Confirms menu selections œ Selects menu options CH Selects channels Accesses DVD disc menus Selects numbered options in menus Selects TV channels Manually adjusts tracking Starts recording Press repeatedly to set the recording time For more details Refer to One Touch Record OTR on page 46 Starts playback Pauses playback or recording temporarily Press again to exit Pause mo...

Page 14: ...age Repeats the current chapter track title or the entire disc Repeats playback between two points A and B Press and hold for 3 seconds to switch between Progressive Scan and Interlace Scan mode Searches for a specific title or a chapter Progressive Scan Mode If your TV supports Progressive Scan you can view high quality video by setting the DVD Recorder VCR to Progressive Scan mode If your TV doe...

Page 15: ... Connect to your antenna or cable TV outlet RF OUT TO TV Connect to a TV with an RF coaxial input COAXIAL Digital Audio Out Connect to an amplifier with a coaxial digital audio input S VIDEO OUT Connect to a TV with an S Video Input Rear panel 14 Identification of Controls S VIDEO OUT OUT DIGITAL AUDIO OUT AUDIO OUT COMPONENT OUT LINE 2 AUDIO VIDEO L R L R COAXIAL Y Pb Pr RF OUT ANT IN DVD VCR OUT...

Page 16: ...o your TV and other equipment Use only one of the connections described below Whichever TV connection you use will work with all input sources Please refer to the manuals for your TV VCR stereo system or other devices as necessary to make the best connections For better sound reproduction connect the DVD Recorder VCR s AUDIO OUT jacks to the audio in jacks of your amplifier receiver stereo or audi...

Page 17: ...ing an S Video cable S 2 Connect the Left and Right AUDIO OUT jacks from the DVD Recorder VCR to the left right audio in jacks on your TV using the supplied audio cables A Component Video Connection 1 Connect the COMPONENT PROGRESSIVE VIDEO OUT jacks on the DVD Recorder VCR to the corresponding input jacks on your TV using a Y Pb Pr cable C if the Component Video jacks Y Pb Pr are available on you...

Page 18: ...VIDEO OUT jacks on the DVD Recorder VCR to the corresponding in jacks on your TV using an optional Y Pb Pr cable C 2 Connect the Left and Right AUDIO OUT jacks from the DVD Recorder VCR to the left right audio in jacks on your TV using the supplied audio cables A Be sure to set the DVD Recorder VCR to Progressive Scan mode by pressing and holding P SCAN for 3 seconds or changing the Scan Mode in t...

Page 19: ...order VCR MPEG 2 Dolby Digital and DTS Check the receiver manual and the logos on the front of the receiver Connecting an Amplifier Receiver Due to the DTS Licensing agreement the digital output will be in DTS digital out when DTS audio stream is selected If the audio format of the digital output does not match the capabilities of your receiver the receiver will produce a strong distorted sound or...

Page 20: ...er equipment connect the LINE1 or LINE2 jacks on the DVD Recorder VCR to the audio video out jacks on your external component using optional audio video cables Connecting Optional Equipment OUT LINE 2 AUDIO VIDEO L R RF OUT ANT IN DF L72G1N LS GB 04 7 1 3 21 AM 페이지19 ...

Page 21: ...n Initial Installation Installation Please select your language to begin auto install procedure English Spanish French Instructions Enter Confirm Setup Exit Move Installation Please select disc menu language Default English Spanish French Italian Japanese Chinese Instructions Enter Confirm Setup Exit Move Installation Please select disc play back audio language Default English Spanish French Itali...

Page 22: ...during Initial Installation you should repeat this procedure Initial Installation Installation Please select disc play back subtitle language Default English Spanish French Italian Japanese Chinese Off Instructions Enter Confirm Setup Exit Move Installation What type of signal are you using Cable TV Antenna Detect Automatically Instructions Enter Confirm Setup Exit Move Installation Searching for ...

Page 23: ...n Tuning Band 1 Press SETUP The Setup menu appears 2 Use œ to select Installation 3 While Installation is selected press to select TV CATV 4 Press ENTER to move to the second level 5 Use to select TV or CATV then press ENTER TV If you are using a standard antenna to receive channels CATV If you are using basic cable to receive channels INSTALLATION Settings Initial Setup Initial Setup Installation...

Page 24: ...above to make sure that Tuning Band is set correctly TV or CATV Add Remove Channels This feature allows you to manually add or delete channels from your channel list 1 Follow steps 1 2 as shown under Tuning Band 2 Use to select Add Remove Channels 3 Press ENTER The Channel Edit menu appears 4 Use to select a channel then toggle the add delete selection by pressing ENTER 5 Press SETUP to exit the C...

Page 25: ...ing the RF Out connection to your TV 1 Follow steps 1 2 as shown under Tuning Band 2 Use to select Modulator Out 3 Press ENTER to move to the second level 4 Use to set the Modulator Out channel to CH3 or CH4 5 Press ENTER to confirm Installation TV CATV CATV Auto Channel Search Add Remove Channels Modulator Out CH3 Set Clock Instructions Enter Confirm Setup Exit Move Select Output Channel CH3 CH4 ...

Page 26: ... 4 hrs disc or SLP Low Quality 6 hrs disc 1 Press SETUP The Setup menu appears 2 Use œ to select Recording Options 3 While Recording Options is selected press to select DVD Record Quality 4 Press ENTER to move to the second level 5 Use to to select the desired Record Quality HQ SP EP or SLP 6 Press ENTER to confirm your selection then press SETUP to exit the menu RECORDING OPTIONS Settings Recordi...

Page 27: ...age OSD Language English Menu Language Default Subtitle Language Default Audio Language Default Instructions Enter Confirm Setup Exit Move Select OSD Language English Spanish French Language OSD Language English Menu Language Default Subtitle Language Default Audio Language Default Instructions Enter Confirm Setup Exit Move Select Menu Language Default English Spanish French Language OSD Language ...

Page 28: ... reduced flickering If you are using the COMPONENT PROGRESSIVE VIDEO OUT jacks but are connecting the DVD Recorder VCR to a standard analog television set Scan Mode to Interlace If you are using the COMPONENT PROGRESSIVE VIDEO OUT jacks for connection to a TV or monitor that is compatible with a Progressive Scan signal set Scan Mode to Progressive Follow the same procedure as TV Aspect Ratio to ch...

Page 29: ...other equipment with a Dolby Digital or DTS decoder Dynamic Range While watching DVD movies you may wish to compress the dynamic range of the audio output the difference between the loudest and quietest passages This allows you to listen to a movie at a lower volume without losing clarity of sound Set Dynamic Range to Low or High for this effect Follow the same procedure as Digital Output to set t...

Page 30: ...w the same procedure as Digital Output to change the Tape Play Back option Audio Digital Output Off Dynamic Range Off Virtual Surround Off VCR Reception Stereo Tape Play Back Hi Fi Instructions Enter Confirm Setup Exit Move Select VCR Reception Stereo Mono SAP Audio Digital Output Off Dynamic Range Off Virtual Surround Off VCR Reception Stereo Tape Play Back Hi Fi Instructions Enter Confirm Setup ...

Page 31: ...all scenes with the same rating or lower will be played Higher rated scenes will not be played unless an alternative scene is available on the disc The alternative must have the same rating or a lower one If no suitable alternative is found playback will stop You must enter the 4 digit password or change the rating level in order to play the disc 30 Initial Setup Preference Video Audio Parental Co...

Page 32: ...s ENTER 4 The Change Password submenu appears Enter your current 4 digit password then press ENTER 5 Enter a new 4 digit password then press ENTER Re enter the new password to confirm press ENTER Parental Control Set Parental Level Off Change Password Instructions Enter Confirm Setup Exit Move Change Password Current Code Enter New Code Confirm Code _ _ Instructions Setup Exit Master Password If y...

Page 33: ...and select the desired title in the DVD s disc menu Auto Clock Auto Clock enables the DVD Recorder VCR to set the clock automatically whenever it is in Standby mode plugged in but powered off Follow the same procedure as AutoPlay to set the Auto Clock status Preference Video Audio Parental Controls Auto Play Auto Clock VCR Instructions Enter Confirm Setup Exit Move Preference Video Audio Parental ...

Page 34: ...To Search and press ENTER a submenu appears Use to change the time counter number and press REW or FF Preference Video Audio Parental Controls Auto Play Auto Clock VCR Instructions Enter Confirm Setup Exit Move VCR Index Search Go To Search Instructions Enter Confirm Setup Exit Move VCR Index Search Go To Search Instructions Enter Confirm Setup Exit Move Index Search Press REW or FF to begin searc...

Page 35: ... buttons to select Yes and press ENTER System Information 34 Initial Setup System Information helps service personnel identify key firmware information about your DVD Recorder VCR in case service is required System Info Chipset EP Set 1 0 Main Build DR3 1 0 2 Micom Software 0 0 0 DVD Navigation 1 0 0 Instructions Enter Confirm Setup Exit Move Restore Defaults Restore Defaults If you select this fu...

Page 36: ...ot available While watching TV press DISPLAY to display remove the on screen display If no rewritable DVD disc is inserted you would see a screen like the following If a DVD R or DVD RW disc is inserted the disc information is displayed at the first key press If you press DISPLAY again then the TV information is displayed Displaying Disc Information Displaying TV Information Changing TV Channels S...

Page 37: ...is poor quality when set to Stereo you can often improve it by changing to Mono When an external input is selected the audio channel can be switched only to Stereo Title Shows the current title number and total number of titles and skips to the desired title number 1 Press DISPLAY during playback The on screen display appears on the TV screen 2 Use to select the Title icon on the on screen display...

Page 38: ...ears on the TV screen 2 Use to select the Audio icon on the on screen display Press ENTER to display a submenu 3 Use to change the numbers 4 Press ENTER to confirm Subtitle Shows the current subtitle language and changes the setting 1 Press DISPLAY during playback The on screen display appears on the TV screen 2 Use to select the Subtitle icon on the on screen display Press ENTER to display a subm...

Page 39: ...E or MENU to return to the Disc menu If the Parental Level feature is set and the disc is below the current Parental Level setting the 4 digit code must be entered and or the disc must be authorized see Set Parental Level on page 30 The DVD Recorder VCR will not play discs with Region codes different from the DVD Recorder VCR The Region code for this DVD Recorder VCR is 1 one Unless stated otherwi...

Page 40: ...unction does not work in PAUSE mode PLAYBACK The Camera Angle icon is displayed on the TV screen when alternate angles are available Changing the Audio Language Press AUDIO and then press AUDIO repeatedly during playback to hear a different audio language or audio track Subtitles Press SUBTITLE and then press SUBTITLE repeatedly during playback to select among all available subtitle languages Came...

Page 41: ...r and press ENTER to confirm Disc Menus Many DVDs contain Disc menus that allow you to access special features To open a Disc menu press MENU Then use the 0 9 buttons to directly select the desired options or use the buttons to highlight your desired selection and press ENTER 1 Press MENU The Disc menu is displayed 2 To exit the Disc menu press STOP or TV VIEW Title Menus 1 Press TITLE If the curr...

Page 42: ...op playback The STOP icon appears on the TV screen If the tape reaches the end before STOP is pressed the DVD Recorder VCR will automatically stop rewind and eject the tape Playing a VHS Tape Auto Tracking The automatic tracking function adjusts the picture to remove snow or streaks It works in the following cases When a tape is played for the first time When the tape speed SP SLP changes When str...

Page 43: ... picture vibrates vertically stabilize it by using the TRACKING buttons on the remote control If the DVD Recorder VCR is left in Still mode for more than 5 minutes the DVD Recorder VCR will automatically enter Stop mode to protect the tape and video heads 2 To return to normal playback press PLAY Slow Motion 1 Press SLOW for Slow Motion playback 2 Press SLOW and SLOW repeatedly to adjust the Slow ...

Page 44: ...OP Audio CD MP3 PLAYBACK Press REPEAT to repeat a track file and press again to repeat the whole disc If the disc contains JPEG files as well as MP3 files you can change the Play mode to display JPEG image files by pressing TITLE On the MP3 CD menu you can display the folders on the disc Use œ to select the folder icon on the MP3 CD menu then press ENTER or PLAY You can also display just the track...

Page 45: ...g TITLE When a CD contains both MP3 files and JPEG files the default Play mode is JPEG image files The DVD Recorder VCR can playback up to 1000 files per disc MP3 files encoded below 64kbps are not supported You can enjoy a slide show while listening to MP3 music files 1 Prepare a CD which includes both MP3 and JPEG files 2 Insert the CD and play an MP3 file 3 Press TITLE while playing the MP3 fil...

Page 46: ...Stereo and the Monitor Audio will also be in Stereo If you set the audio channel to SAP but no SAP channel is broadcast the main audio Mono or Stereo will be recorded 5 Press REC once Recording will start The REC indicator lights on the front panel display Recording continues until you press STOP or the disc is full To record for a fixed length of time see One Touch Record on the next page 6 Press...

Page 47: ... PAUSE to put the unit in Pause mode Then select the desired channel on the DVD Recorder VCR and press PLAY PAUSE again to resume recording You cannot record on the VCR deck and DVD deck at the same time While the VCR is recording DVD playback is possible However while the DVD is recording all VCR functions are disabled One Touch Recording allows you add recording time in fixed increments at the t...

Page 48: ...mes SP 7 Press DVD VCR again to start copying 8 Stop the Copy Process To stop copying at any time press STOP You must stop the Copy process manually when the DVD movie ends or the unit may replay and record over and over again RECORDING 47 One Touch Copy DVD to VHS Basic Recording If the DVD you are attempting to copy is copy protected you will not be able to copy the disc It is not permitted to c...

Page 49: ...d Quality 2 hrs disc EP Average Quality 4 hrs disc SLP Low Quality 6 hrs disc 7 Press VCR DVD again to start copying 8 Stop the Copy Process To stop copying at any time press STOP Copying will stop automatically when the VHS tape ends One Touch Copy VHS to DVD If the VHS videotape you are attempting to copy is copy protected you will not be able to copy the tape It is not permitted to copy Macrovi...

Page 50: ... List 6 Timer indicator will light or blinking Power Off the DVD Recorder VCR to start the Timer Recording Note The Timer indicator lights on the front panel display when the DVD Recorder VCR is ready for the Timer Recording The tape timer indicator is blinking if any of the following meets if no recordable tape is inserted Both the disc and tape timer indicators are blinking if tape and disc time...

Page 51: ...ble when The DISC Protect setting is set to ON There are already 49 titles recorded on the disc If the disc is damaged the recording may not complete successfully even if the Check field shows Rec OK Timer Recording Troubleshooting You can clear a Timer Recording any time before the recording actually starts Use to select the program you want to erase on the Timer Recorder List then press ENTER to...

Page 52: ...Q High Quality 1 hr disc SP Standard Quality 2 hrs disc EP Average Quality 4 hrs disc or SLP Low Quality 6 hrs disc VCR SP Standard Play SLP Super Long Play 3 times SP 5 Press REC once Recording will start The REC indicator lights on the front panel display Recording continues until you press STOP or the disc is full To record for a fixed length of time see One Touch Record on page 46 6 Press STOP...

Page 53: ...e the whole disc press ENTER 7 To confirm select Yes To cancel select No If you select Yes and press ENTER all the contents of the disc will be lost 52 If you load a blank DVD R RW disc it will be initialized formatted to enable recording Do not start recording until disc initialization is complete If you load a DVD RW that has already been used you can record a program immediately DISC Initialize...

Page 54: ...t disc status Locked or Unlocked 6 You can change the disc status by selecting Yes and pressing ENTER 7 The Changing Disc Status bar will appear This process takes a few seconds 8 After the process is finished the menu disappears automatically Lock Unlock Disc Press Enter to lock the disc This prevents future disc operations or recordings Instructions Enter Confirm Lock Unlock Disc Disc is unlocke...

Page 55: ...nu 3 Press and select Finalize for a DVD R or Make Compatible for DVD RW 4 Press ENTER as shown on the screen 5 Select Yes using and press ENTER to finalize the disc or make the disc compatible if it is a DVD RW 6 Press ENTER again 7 Press SETUP to go to the top disc menu Make Compatible Press Enter to make any previous title editing compatible with your DVD player Instructions Enter Confirm Make ...

Page 56: ...er the name of the disc CLR Clear the disc name SP Space DEL Delete a character SAVE Save the disc name 7 Press ENTER again 8 To save the name of the disc select SAVE and press ENTER Change Disc Name Problem This disc is locked It cannot be renamed ok Instructions Enter Confirm Move Change Disc Name MY DVD CLR SP DEL SAVE 1 2 3 4 5 6 7 8 9 0 A B C D E F G H I J K L M N O P Q R S T U V W X Y Z Ente...

Page 57: ...the title 4 Select Yes and press ENTER to confirm 5 The Erase Title progress bar will be displayed This may takes several seconds 6 After erasing is complete the erased title remains as an empty title Title Menu 56 Editing You can erase titles on DVD RW discs only Play Title Press Enter to begin playback of title Instructions Enter Confirm Erase Title Press Enter to erase this title Instructions E...

Page 58: ...new title until the end of the disc For DVD RW The last blank title Allows you to record your new title until the end of the disc The last recorded title Allows you to record over your last recorded title and then stop Allows you to record over your last recorded title and continue recording until the end of the disc Allows you to append your new recording to the end of your last recording Others ...

Page 59: ... ENTER Edit Chapters You can add a chapter marker anywhere in a title during playback Once the chapter is marked you can use the chapter search feature as described above You can add delete chapter markers or delete all chapter markers in a title 1 Use to select Edit Chapters 2 Press ENTER to display the submenu 3 Use to select one of the various chapter marker functions Add Delete or Delete All 4...

Page 60: ... allows you to split a title into two titles 1 Use to select Split Title 2 Press ENTER to display the submenu 3 Use to select Yes if you prefer to split the title 4 Press ENTER to confirm It may take a few minutes to split the title Editing DVD Edit Title 1 of 2 Chapter 1 of 11 Edit Chapters Hide Chapter Change Index Picture Split Title Instructions Enter Confirm Setup Exit Move DVD Edit Title 1 o...

Page 61: ...deleted with the CH Add Del feature Antenna or cables are loose Wrong Tuning Band is selected in the DVD Recorder VCR Setup menu Camcorder is off Plug the power cord into the wall outlet securely Select the appropriate video input on the TV so the picture from the DVD Recorder VCR appears on the TV screen Connect the video cable securely Turn on the TV Select the correct input mode on the audio re...

Page 62: ... V In jacks DVD Recorder VCR Audio Video Out is not selected for viewing at the TV DVD Recorder VCR s TV audio channel is set to SAP or MONO The remote control is not pointed at the remote sensor of the DVD Recorder VCR The remote control is too far from the DVD Recorder VCR There is an obstacle in the path of the remote control and the DVD Recorder VCR The batteries in the remote control are dead...

Page 63: ...gged into an AC power outlet with the power on This will help prevent condensation When condensation has occurred wait a few hours for the DVD Recorder VCR to dry before using it Moisture Condensation Troubleshooting Moisture condensation can occur In locations where moisture condensation may occur DF L72G1N LS GB 04 7 1 3 22 AM 페이지62 ...

Page 64: ...ead Hi Fi helical scan azimuth system Timer 12 hour display type with AM PM Tape speed SP 33 35 mm sec SLP 16 67 mm sec EP 11 12 mm sec Tape width 12 7 mm Rewind time less than 2 minutes T 120 Antenna 75 ohms VHF UHF VHF output signal Channel 3 or 4 Switchable Channel coverage VHF 2 13 UHF 14 69 CATV 1 125 4A A W W 1 W 84 A 5 A 1 Frequency range 20Hz to 20kHz Signal to noise ratio 43 dB Dynamic ra...

Page 65: ...cal Specifications Outputs VIDEO OUT 1 Vp p 75 Ω sync negative RCA jack x 1 S VIDEO OUT Y 1 0 V p p 75 Ω negative sync Mini DIN 4 pin x 1 C 0 286 V p p 75 Ω COMPONENT VIDEO OUT Y 1 0 V p p 75 Ω negative sync RCA jack x 1 PROGRESSIVE SCAN Pb Pr 0 7 V p p 75 Ω RCA jack x 2 Audio output digital audio 0 5 V p p 75 Ω RCA jack x 1 Audio output analog audio 1 1 Vrms 1 kHz 6 dB 600 Ω RCA jack L R x 2 RF O...

Page 66: ...P N 97P95600N0 C6 DF L72G1N LS GB 04 7 1 3 22 AM 페이지65 ...

Reviews: