background image

GLT Application User Manual 


SENSIT Technologies, LLC   


10 


4.3


Users Menu 

1.


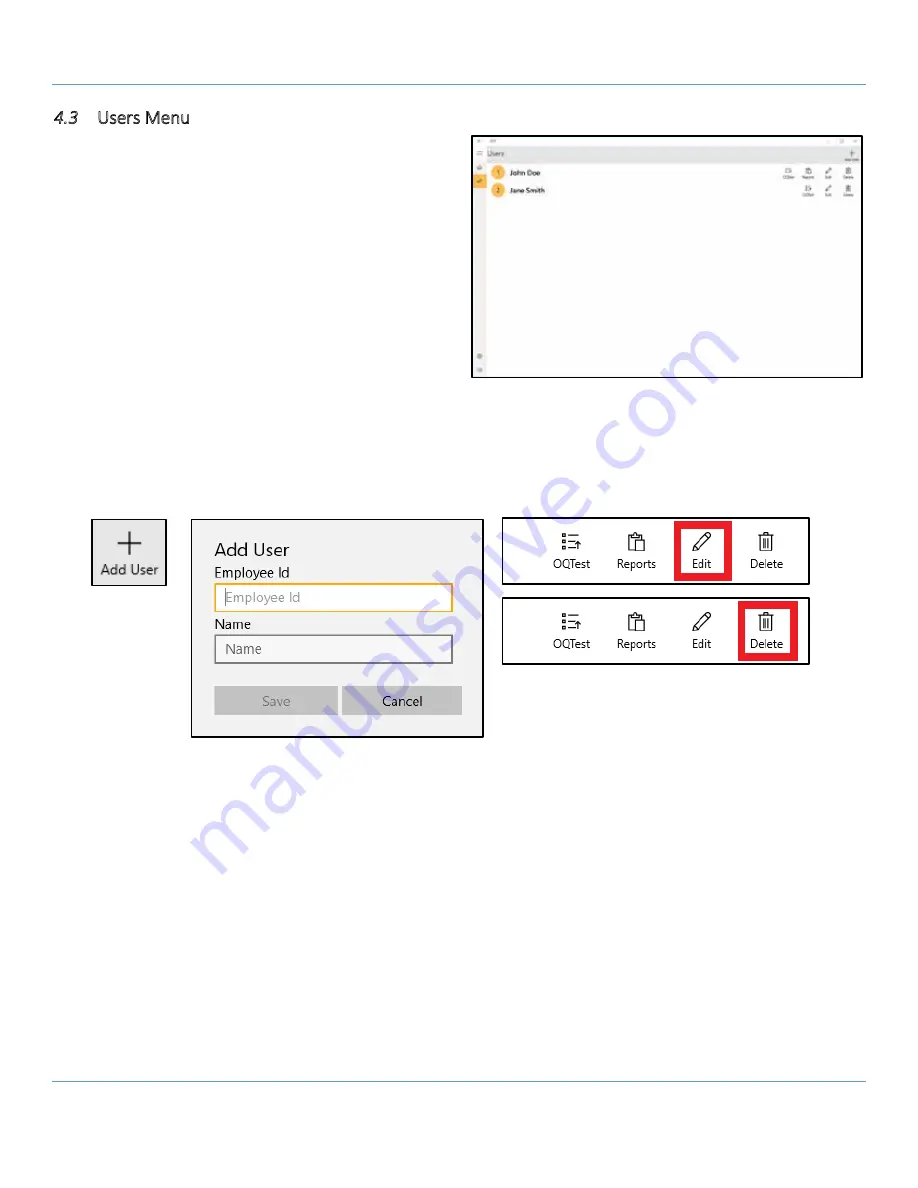
On the left side of the application, select the icon 

for the Users menu.  This menu allows the trainer 

to add and remove users, and create and view 

reports.  A list of created users will be displayed in 

order of creation as well as options for each user.  

Note:  the reports icon will only appear if there are 

generated/saved reports for that user. 

2.


To add a user, select the Add User icon in the upper 

right corner of the display. 

3.


A box will appear, prompting the user to enter an 

employee ID and name.  After this data has been 

entered, select save to add the user.  The new user 

will appear on the main display in the users menu.  Each instrument may be assigned to a user. 

4.


To edit user information, select the edit icon for the appropriate name. 


The same data entry box will appear, allowing the user to update or change the saved information. 

5.


To delete a user, select the delete icon on the right side of the screen for the appropriate name. 

6.


The OQ test and reports options will be covered in the next section. 


7.


Users can be archived from the User menu by completing the following sequence: 1) Press “Select” in the upper 

right corner, 2) Select the user to be archived, 3) Press “Archive”. Choose “Yes” when prompted to archive the 

user. The chosen user will be removed from the Users menu and added to the Archived User tab in the Settings 

menu. 


Summary of Contents for GASLESS LEAK TRAINER

Page 1: ...M A N U A L 851 Transport Drive Valparaiso IN 46383 8432 Phone 888 473 6748 219 465 2700 Fax 219 465 2701 Email info gasleaksensors com Web www gasleaksensors com S U P P O R T S S E N S I T G O L D...

Page 2: ...1 1 Multiple Instrument Support 6 4 1 2 Pairing a New Instrument 6 4 2 USER INTERFACE 8 4 3 USERS MENU 10 4 4 OQ TEST REPORTS 12 4 4 1 Performing an OQ Test 12 4 4 2 Generating a Report 13 4 5 SETTING...

Page 3: ...se which allows for well organized data and easy retrieval and backup The Sensit instrument used with the GLT system is a fully functional unit with all of the same features as a standard one per the...

Page 4: ...iners by both name and employee ID number Ability to assign instruments to specific users OQ operator qualification testing and reporting with the ability to customize questions 6 hour battery life wi...

Page 5: ...up process a screen will be displayed alerting the user to connect the GLT software to the instrument Pressing any button on this screen will skip this process and boot the instrument into monitoring...

Page 6: ...and other effects The instrument does not have the ability to detect and display gas in this mode only commands and simulated gas readings sent by the trainer Note The instrument must be restarted in...

Page 7: ...powered off or the X button in the upper right of the screen is selected 4 1 2 Pairing a New Instrument If bought as a paired system tablet and instrument s together there should be no need to pair t...

Page 8: ...lower left of the screen Select the GLT app icon from the middle of the screen 11 Resume the start up process as normal Refer to step 4 from section 4 1 Disabling Bluetooth Support Service 12 From the...

Page 9: ...ing mode FLOW BLOCK sends a flow block command to the instrument BATT LOW sends a low battery command flag to the instrument A 300 second countdown will begin SET CAL DUE flags the instrument for cali...

Page 10: ...MODE Slide bars allows the trainer to change concentrations of gas displayed on the instrument NOTE not available in monitoring mode Training module gives basic information on various displays and te...

Page 11: ...d select save to add the user The new user will appear on the main display in the users menu Each instrument may be assigned to a user 4 To edit user information select the edit icon for the appropria...

Page 12: ...igned to a user To do so select the assign user icon from the devices screen A box will appear to select a user Select the appropriate user followed by the OK button The user s name will appear under...

Page 13: ...tion 4 3 1 Navigate to the user menu tab by selecting the icon on the left side of the application 2 To the right of each user s name and ID number will be a set of options including OQTest and Report...

Page 14: ...ted by date and time in descending order 3 To generate and view a report select the HTML icon The report will be opened in either Microsoft Edge or whatever the default browser is set to 4 From there...

Page 15: ...2 When the delete icon is selected a dialog box appears asking the user to confirm 3 When the add icon is selected a text entry box appears where the question text can be entered Select save when done...

Page 16: ...ion button When selected it will open a File Explorer window in that directory The backup will be a data base file db with the following format GLTDD_Mon_YYYY_HH_MM_SS where D Mon Y represent the date...

Page 17: ...menu If this does not resolve the issue try to repair re initialize the Bluetooth connection section 5 1 1 below If this still does not resolve the issue contact Sensit for assistance 5 1 1 Repairing...

Page 18: ...ensit for further assistance 6 Software Update As of software revision 4 0 6 the GLT application may be updated through the Windows Store and does not need to be sent in to Sensit to be updated If you...

Page 19: ...GLT Application User Manual SENSIT Technologies LLC 18 7 Notes...

Page 20: ...t This warranty gives you specific legal rights and you may have other rights which vary from state to state Sensit Technologies LLC 851 Transport Drive Valparaiso Indiana 46383 USA Tel 219 465 2700 F...

Reviews: