background image

  Appendix B - Parameters list of embedded WEB server

NETfon SIP - Administrator Guide  723142009-A0-GB

22

 9.2.  SIP Parameter WEB pages

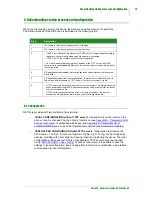
Select the link <SIP Parameters> from home page, to open the following links:

Parameters

Codec Priority

Codec Disabled

Parameters Updates

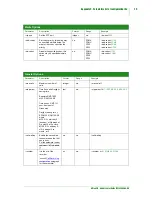
Each link open a WEB page and the description of the parameters is written in the following tables.

      9.2.1.   Parameter

Fields

Descriptions

Call Waiting

Enable/disable the Call Waiting feature.
It controls the 

incoming call to a SIP user “on the phone”

:

if the service is disabled

, the caller receives the <486 BUSY> message;

if the service is enabled

, the called can answer by pressing the button 

corresponding to the LED flashing green (

e.g. Line2

) and the previous call will be 

automatically placed on hold.

N. VoiceMail

Enter the telephone number to call the Voice Mail service.

Display name

Enter the Caller ID name sent out when making a call.

Local port 

Enter the number of SIP port (default: 5062)

Warning!


The change causes the restart of the phone.

RTP port

Enter the number of  RTP port (default: 4000).

Warning!


The change causes the restart of the phone.

Log Level

For future use

Log Cons. Level

For future use

Summary of Contents for NETFON 100

Page 1: ...AdministratorGuide NETfon 100 300 500 SIP ...

Page 2: ...ves Tel 39 052350161 Tel 39 0861772511 28935 Mostoles Madrid fax 39 05235016333 fax 39 0861772555 Tel 34 916160825 e mail info selta it e mail info seltatel it fax 34 916657759 web site www selta it web site www seltatel it e mail selta selta es web site www selta es SELTA RESERVES THE RIGHT TO MODIFY THE CONTENTS OF THIS MANUAL WITHOUT NOTICE AND DECLINES ALL RESPONSIBILITY FOR ANY ERROR OR OMISS...

Page 3: ...nu 17 8 1 SETTINGS menu 17 8 2 SIP SETTINGS menu 18 9 Appendix B Parameters list of embedded WEB server 19 9 1 General Address Book Settings 19 9 1 1 Settings 20 9 1 2 Saving local telephone book 21 9 2 SIP Parameter WEB pages 22 9 2 1 Parameter 22 9 2 2 Codec Priority 23 9 2 3 Codec Disabled 23 9 2 4 Parameters Updates 24 10 Appendix C Parameters list of configuration file 25 10 1 Description of ...

Page 4: ...Index NETfon SIP Administrator Guide 723142009 A0 GB II ...

Page 5: ...is treated in the following documents published by SELTA spa NETfon 100 SIP User Guide code 723142005 A0 LM NETfon 300 SIP User Guide code 723142006 A0 LM NETfon 500 SIP User Guide code 723142007 A0 LM To properly configuring NETfon phone following the logical sequence of operations described in this guide is recommended starting from installation and then moving on configuration and firmware upgr...

Page 6: ...e Ethernet interface of the telephone and the other termination in the network port of the PC 3 External power supply connector optional If the Ethernet switch doesn t supply power the telephone must be connected to the main power by an external power supply output 6Vdc 1A Connect the power supply exit to the special jack on the back of the telephone and the plug to a 230V a c 50Hz socket 4 Handse...

Page 7: ...ng on configuration the features for which they are set up start To correcly connect the DSS module see the image below and the connectors description The maximum number of optional DSS modules is 2 48 programmable buttons in total No Description 1 DSS expansion module connector Connect the DSS module to another one max two expansion modules each NETfon 2 Telephone connector Connect the DSS module...

Page 8: ...ely you can also customize administrator s password in one operation simultaneously valid for all telephones equipment involved in the procedure The procedure is described in Centralized administrator s password setting paragraph Two customizations to meet the different needs of users the administrator will decide to apply the procedure that best meets their needs Sequence of operations from the p...

Page 9: ...pe new password 6 To send the customization click on Apply button 7 To exit the WEB Server click on Logout button Sequence of operations from configuration file See Appendix C Parameters list of configuration file table General Options parameter password admin Sequence of operations from the phone menu 1 Press menu enter button to enter the programming local menu scroll the menu up to SETTINGS and...

Page 10: ... exit the WEB Server click on Logout button Sequence of operations from configuration file NOT APPLICABLE Sequence of operations from the phone menu 1 Press menu enter button to enter the programming local menu scroll the menu up to SETTINGS and press menu enter button to confirm 2 Scroll the menu items up to SUBNET MASK and press menu enter button to confirm 3 Enter the administrator s password d...

Page 11: ...he fourth press menu enter and then return to the Settings menu 9 Scroll the menu items up to TFTP SERVER ADDRESS and press menu enter button to confirm 10 Enter new IP address The screen displays the following data Pay attention The cursor is positioned at the start of New Value and if you press menu enter now you will confirm the empty value in this case treat it as any other value To switch fro...

Page 12: ...ddress in the opened web page WARNING The TFTP SERVER address cannot be set from WEB server only from telephone s local menu see TFTP server Address parameter 7 To send the customization click on Apply button The change causes the restart of the phone 8 To exit the WEB Server click on Logout button Sequence of operations from configuration file NOT APPLICABLE ...

Page 13: ...r new IP address of SIP Server The screen displays the following data Pay attention The cursor is positioned at the start of New Value and if you press menu enter now you will confirm the empty value in this case treat it as any other value To switch from the first block of numbers to second and so on until the fourth press menu enter and then return to previous menu 7 Scroll the menu items up to ...

Page 14: ...of the phone 2 Enter the administrator s password default 1234 and click LOGIN button 3 Select the link Advanced setup 4 Select the link Accounts 5 Select the link Account 1 Account 2 6 Enter the IP address of SIP Server the Username max 6 digits registered on SIP Proxy and the Password max 6 digits registered on SIP Proxy default equal to username 7 To send the customization click on Apply button...

Page 15: ...s from WEB pages NOT APPLICABLE Sequence of operations from configuration file 1 It is possible to upgrade only the Firmware sotfware component automatically Configuring ora controllo sw parameter of configuration file every day at the time specified 00 23 plus a random offset from 0 to 45 minutes the phone automatically will verify the presence of VersNETfonSIP file on TFTP server VersNETfonSIP f...

Page 16: ... minutes The upgrade causes the restart of the phone Sequence of operations from WEB pages 1 Perform a login to embedded WEB server from browser entering the IP Netfon Address 2 Enter the administrator s password default 1234 and click LOGIN button 3 Click on the link System 4 Click on the link Firmware upgrade 5 Select the Firmware component from Update method and the default filename of the comp...

Page 17: ... menu it is possible to save file settings in local configuration Every change from local menu or embedded web interface will be applied to local configuration Step Description 1 The firmware of the phone applies the VLAN settings 2 The firmware of the phone applies the network settings 3 If DHCP is ON default the discovery of DHCP server begins and automatically ip address subnet mask gateway and...

Page 18: ... for this purpose Step Description 1 On SIP server add an account that will be used to set the administrator s password of all telephones simultaneously and also to verify it 2 Provide first account number cfg configuration files with an account for CHECK PASSWORD ADMIN without password parameter See below an extract of configuration file where an example of account for CHECK PASSWORD ADMIN is poi...

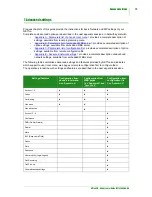
Page 19: ...iguration file Appendix E Advanced network settings provides a complete description of advanced network settings available from embedded WEB server The following table summarizes advanced settings and features provided by NETfon and indicates which support to use local menu web pages or remote configuration file to configure them The operations to realize such settings and features are described i...

Page 20: ...Advanced settings NETfon SIP Administrator Guide 723142009 A0 GB 16 ...

Page 21: ...the phone is connected to Subnet Mask Subnet Mask that togheter with the IP Address of the phone identify the network to which the telephone is connected to DHCP Enable disable the automatic configuration of the network settings Gateway IP Address Gateway IP address to reach the Call Agent correctly TFTP server Address IP Address of TFTP server from which download the configuration file and the fi...

Page 22: ...ashing green e g Line2 and the previous call will be automatically placed on hold N VoiceMail Enter the telephone number to call the Voice Mail service Display name Enter the Caller ID name sent out when making a call Local port Enter the number of SIP port default 5062 Warning The change causes the restart of the phone RTP port Enter the number of RTP port default 4000 Warning The change causes t...

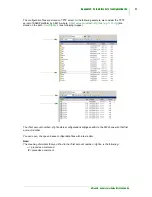
Page 23: ...ed in place of the local configuration file Perform a login to embedded WEB server from browser entering the IP address of the phone and then enter the administrator s password default 1234 and click LOGIN button Select the link Advanced setup to open the following home page Next paragraphs are dedicated to those WEB server pages that still have not found space in this guide and consequently have ...

Page 24: ...a contact 1 Select the contact you want to modify from the list of the Address Book 2 Modify the Name and or the Telephone number of the entry selected 3 Click on Modify button and automatically the configuration will be send to the phone and its Local Telephone Book will be updated Sequence of operations to DELETE a contact 1 Select the contact you want to delete from the list of the Address Book...

Page 25: ... on EXPORT button to open the CSV file with the list of all the contacts present in the address book 2 Select File from main menu and then Save as give a name to the file and save it Sequence of operations to IMPORT contacts from CSV files 1 Click on BROWSE button to select the CSV file with saved contacts 2 Click on IMPORT button to open the CSV file with the list of the contacts and check them ...

Page 26: ...call to a SIP user on the phone if the service is disabled the caller receives the 486 BUSY message if the service is enabled the called can answer by pressing the button corresponding to the LED flashing green e g Line2 and the previous call will be automatically placed on hold N VoiceMail Enter the telephone number to call the Voice Mail service Display name Enter the Caller ID name sent out whe...

Page 27: ...hange the default order select a data and press or keys to move it up and down Warning a The change causes the restart of the phone b Codecs disabled desappear from the list so consult next paragraph Codec Disabled to display the codec disabled Fields Descriptions Codec Disabled Display the list of Codec disabled and allows to include exclude codec from the Codec Order see previous paragraph Warni...

Page 28: ...can EXPORT the local configuration file compressed from phone and IMPORT the same file unzipped in phone file system Fields Descriptions Export Click EXPORT button to save the phone s local configuration file config_completo gz in a PC local folder config_completo gz is a compressed file Import Click IMPORT button to write unzipped local configuration file config_completo in phone file system ...

Page 29: ...tep 10 to configure each user account 5 Scroll the menu items up to SIP SERVER and press menu enter button to confirm 6 Enter new IP address of SIP Server The screen displays the following data Pay attention The cursor is positioned at the start of New Value and if you press menu enter now you will confirm the empty value in this case treat it as any other value To switch from the first block of n...

Page 30: ...ering the IP address of the phone 2 Enter the administrator s password default 1234 and click LOGIN button 3 Select the link Advanced setup 4 Select the link Accounts 5 Select the link Account 1 6 Enter the IP address of SIP Server the Username max 6 digits registered on SIP Proxy and the Password max 6 digits registered on SIP Proxy default equal to username 7 To send the customization click on A...

Page 31: ...here first account number cfg files e g 1191 cfg are stored on the path root tftpboot see following images The first account number cfg file stores configuration settings specific to the SIP phone with that first account number You can open change and save configuration files with a text editor Note The meaning of simbols that you ll find in the first account number cfg file is the following prece...

Page 32: ...d text alphanumeric characters password 112233 publish Enable presence publication for this account by sending PUBLISH request to the registar Put the parameter under comment to disable it n a n a publish proxy Set the URL of proxies to build initial route set for all requests using this account This option may be specified multiple times The URL MUST have lr parameter sipurl lr n a proxy sip 26 2...

Page 33: ...CMU General Options Parameter Description Format Range Example max calls Maximum number of calls integer n a max calls 32 ntp param Time Zone and Daylight saving time Example GMT 1EDT M3 5 0 2 M10 5 0 3 Time zone GMT 1 1 hour from east of Greenwich Daylight saving time EDT M3 5 0 2 M10 5 0 3 where M3 5 0 2 start day 0 sunday of 5th week of 3rd month at 2 o clock M10 5 0 3 end day 0 of 5th week of ...

Page 34: ...ckup prefix number of the system to which the phone is connected to Call pickup can be realized with TT_BUDDY key integer and asterisk up to 6 digits and asterisk call pickup code 416 ora controllo sw Every day at the same time the phone automatically verify the presence of fw version on TFTP server and if newer it starts the upgrade procedure hour format hh 00 23 ora controllo sw 22 password admi...

Page 35: ...sto etichetta Valid only for NETfon 500 and DSS with display Associate a label to a function key Valid for the following function TT_SEQUENCE TT_BUDDY TT_QUEUE TT_PARK TT_FORWARD For the function TT_SEQUENCE and TT_BUDDY the label represents also the name displayed on the screen when you press the key in place of the selected number text alphanumeric characters Space not allowed tasto funzione TT_...

Page 36: ...tipoblf Setting up TT_BUDDY function it is the type of monitor to be executed TT_BLF monitor busy or idle state TT_BLF_ADVANCE monitor busy idle or ringing state the ringing state is signalled by led blinking TT_BLF_RING monitor busy idle or ringing state the ringing state is signalled by led blinking and acoustic warning Valid for the following function TT_BUDDY n a TT_BLF TT_BLF_ADVANCE TT_BLF_R...

Page 37: ... hold tasto funzione TT_L2 next function TT_CONFERENCE The TT_CONFERENCE function key sets up a conference already having two calls in progress one of which on hold With one call in progress and the recorder parameter configured the conversation can be recorded by pressing the TT_CONFERENCE button Led off Conference off Green led blinking slowly Conference in progress Red led blinking slowly Recor...

Page 38: ...T_BLF_RING next tastofunzione TT_SEQUENCE The TT_SEQUENCE function key execute a pre programmed selection automatically the selection can be complete or open if ends with E letter the user has to complete the selection n a tasto funzione TT_SEQUENCE tasto buddy numtel 247E tasto etichetta 247 next tastofunzione TT_QUEUE The TT_QUEUE function key program a key where incoming calls are signalled The...

Page 39: ...n concerning the use of such feature by users and any operation to handle the feature offered is treated in the following documents published by SELTA spa NETfon 100 SIP User Guide code 723142005 A0 LM NETfon 300 SIP User Guide code 723142006 A0 LM NETfon 500 SIP User Guide code 723142007 A0 LM WARNING a TFTP server is required b The second method of provisioning is required see Understanding star...

Page 40: ...l conversations will be recorded automatically Step Description 1 On TFTP server add one configuration file e g 2000 cfg for Login Logout consoles containing the following parameters Add login logout parameter between the first account parameters Add as last account the account for CHECK PASSWORD ADMIN without password parameter see Centralized administrator s password setting paragraph 2 From the...

Page 41: ...0 49 registrar sip 26 244 60 49 reg timeout 60 proxy sip 26 244 60 49 lr realm username 247230 password 620110 next account Backup account same username as main account and registration on other server it is used for outgoing calls if the registration of first account fails Account 2 GROUP id sip 247200 26 244 60 49 registrar sip 26 244 60 49 reg timeout 60 proxy sip 26 244 60 49 lr realm username...

Page 42: ...he registration has success you can enter the local programming menu of the phone log level 3 app log level 3 local port 5062 no tcp rtp port 4000 add codec G729 add codec PCMA add codec PCMU add codec G723 dis codec G723 max calls 32 ntp param GMT 1EDT M3 5 0 2 M10 5 0 3 call waiting recorder auto recording visual domain ntel voicemail 100300 voicemail exchange mwi geomant display name PETRONGARI...

Page 43: ...the phone tasto 3 tasto funzione TT_MUTE next tastofunzione tasto 4 tasto funzione TT_CONFERENCE next tastofunzione tasto 5 tasto funzione TT_DONOTDISTURB next tastofunzione tasto 6 tasto funzione TT_SEQUENCE tasto buddy numtel 247E tasto etichetta 247 next tastofunzione tasto 8 tasto funzione TT_QUEUE tasto tipo queue ID_QUEUE tasto queue account id 3 tasto etichetta CODA_0 next tastofunzione ...

Page 44: ... 26 2 213 84 tasto buddy numtel 247218 tasto buddy tipoblf TT_BLF tasto etichetta RAFFAELLO next tastofunzione This is the first programmable key of the DSS module independently from NETfon type 100 300 500 tasto 10 tasto funzione TT_FORWARD tasto buddy uri sip 247231 26 2 213 84 tasto buddy numtel 247230 tasto etichetta DEV_dir next tastofunzione ...

Page 45: ...LITY OF SERVICE and press menu enter button to confirm 3 Enter the administrator s password default 1234 and press menu enter button to confirm 4 To disable the parameter 802 1p Q priority VLAN select DEACTIVATE or EXIT not to make changes The meaning is the following if enabled Incoming tagged Ethernet packets are untagged and outgoing Ethernet packets are tagged if disabled Incoming tagged Ether...

Page 46: ...LAN priority enter a possible value from 0 to 7 This field indicates the 802 1p user priority 8 To assign a VLAN ID enter a possible value from 1 to 4094 This field identifies the VLAN to which the frame belongs 9 To send the customization click on Apply button Warning Before passing to the next operation wait for few minutes Wait until the process is complete do not reset or turn off the phone 10...

Page 47: ...AN PC IP Phone ports VLAN ID value from 1 to 4094 This field identifies the VLAN to which the frame belongs 8 To send the customization click on Apply button Warning Before passing to the next operation wait for few minutes Wait until the process is complete do not reset or turn off the phone 9 To exit the WEB Server click on Logout button Sequence of operations from configuration file NOT APPLICA...

Page 48: ...C IP Phone ports acceptance filtering rule related to the identifier in the VLAN ID field It is applied to all the data frames received on the LAN PC IPP ports and determines whether a received frame that contains the VLAN ID is accepted or not on that port Select DENY or ACCEPT from the drop down list 7 Configure the LAN PC IP Phone ports egress filtering rule for VLAN ID It controls if outgoing ...

Page 49: ...rity 5 while ToS is equal to 0 This configuration performs the generation of tagged packets from the phone IEEE 802 1q enabled with VLAN Priotity 5 and VLAN ID 50 and only RTP packets have ToS 0 In case you connect a PC without QoS service to PC port of NETfon s embedded switch but the outgoing packets from PC port are required to have 802 1q tag e g VLAN ID 150 and priority 2 program the phone sw...

Page 50: ...red you have to configure the VLAN Setting web page Configure two rules VLAN ID 50 untag towards each port but LAN port so to avoid to send packets tagged 50 to PC port VLAN ID 150 tag only LAN port to allow tagging VLAN ID of outgoing packets from LAN port and coming from PC port 12 2 Quality of Service DSCP parameter ...

Page 51: ...tions from WEB pages 1 Perform a login to embedded WEB server from browser entering the IP address of the phone 2 Enter the administrator s password default 1234 and click LOGIN button 3 Select the link Advanced setup 4 Select the link QoS 5 Select the link Extended QoS Settings 6 To enable disable the parameter DSCP Tos Priority select Yes No respectively 7 To assign a priority to the parameter D...

Page 52: ...ocal telephone book and Parameters Updates paragraphs respectively Wait until the download process is complete do not reset or turn off the phone Sequence of operations from the phone menu NOT APPLICABLE Sequence of operations from WEB pages 1 Perform a login to embedded WEB server from browser entering the IP address of the phone 2 Enter the administrator s password default 1234 and click LOGIN b...

Page 53: ...ss will take several minutes The upgrade causes the restart of the phone Sequence of operations from WEB pages 1 Perform a login to embedded WEB server from browser entering the IP Netfon Address 2 Enter the administrator s password default 1234 and click LOGIN button 3 Click on the link System 4 Click on the link Firmware upgrade 5 Select the firmware component from Update method Rootfs Kernel UB...

Page 54: ...Appendix E Advanced network settings NETfon SIP Administrator Guide 723142009 A0 GB 50 ...

Reviews: