background image

20

2


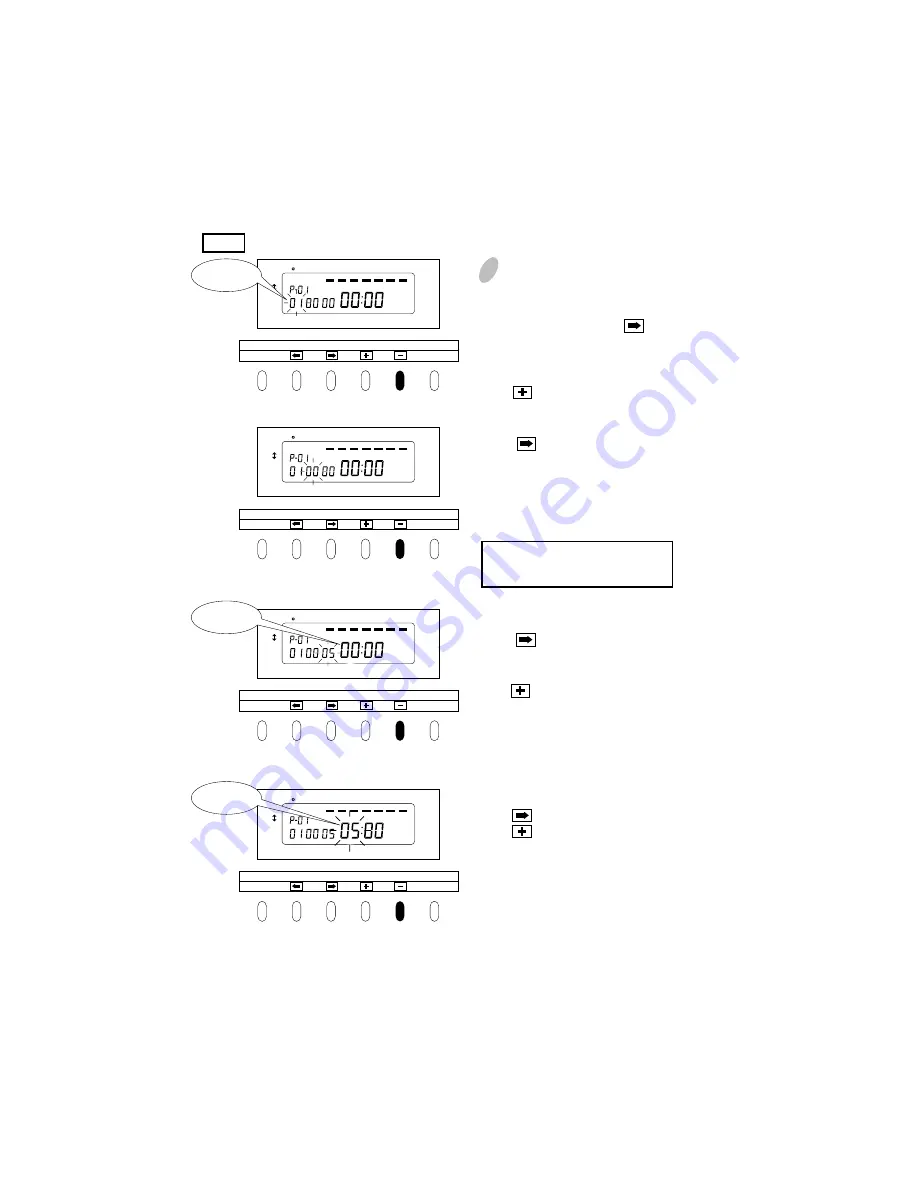
To set P-01 (shown in the table 

above)

(1) Print color

With "P-01" flashing, press       once.  

The print color indication flashes at the 

lower left of the display.  "00" 

represents "print in black."

Press        and change the digits to "01" 

to be set at "print in red." 

(2)External time signal

Press     once.  The external time 

signal indication flashes. "00" 

represents "disabled (no setting) ".

Leave the digits as they are since no 

setting is necessary for the P-01 

program.

(3)Print column

Press       once.    The  print  column 

indication flashes. "01" represents 

"Column 1".

Press      and change the digits to "05" 

to set "print in Column 5".

(4)Time

Press     the hour indication flashes.  

Press        to change the digits to  "05" 

to set "05:00".

To enable an external time signal, 

select "01".

DAY ADV.TIME

D.S.T

PROGRAM

EXT.ALARM

SET

PAY ENDING

SELECT

YEAR

RED/BLK.

MONTH
EX.ALM

DAY

COL.

HOUR

MINUTE

SECOND/CARD

DATE/TIME

SU 

12Hr. TU

SA

FR

TH

WE

MO

1/60

1/100

DAY ADV.TIME

D.S.T

PROGRAM

EXT.ALARM

SET

PAY ENDING

SELECT

YEAR

RED/BLK.

MONTH
EX.ALM

DAY

COL.

HOUR

MINUTE

SECOND/CARD

DATE/TIME

SU 

12Hr. TU

SA

FR

TH

WE

MO

1/60

1/100

DAY ADV.TIME

D.S.T

PROGRAM

EXT.ALARM

SET

PAY ENDING

SELECT

YEAR

RED/BLK.

MONTH
EX.ALM

DAY

COL.

HOUR

MINUTE

SECOND/CARD

DATE/TIME

SU 

12Hr. TU

SA

FR

TH

WE

MO

1/60

1/100

Print in red

Print in

column 5

05:00

DAY ADV.TIME

D.S.T

PROGRAM

EXT.ALARM

SET

PAY ENDING

SELECT

YEAR

RED/BLK.

MONTH
EX.ALM

DAY

COL.

HOUR

MINUTE

SECOND/CARD

DATE/TIME

SU 

12Hr. TU

SA

FR

TH

WE

MO

1/60

1/100

P-01

Summary of Contents for QR-550

Page 1: ...QUARTZ TIME RECORDER OPERATION MANUAL...

Page 2: ...nd limits No part of this publication may be reproduced stored in a retrieval system or transmitted in any form or by any means mechanical photocopying recording or otherwise Replace battery with TOSH...

Page 3: ...ing and Card Setting the Date and the Time 1 60 or 1 100 printing the 12 24 HOUR format Setting the Day Advance Time Setting the Daylight Saving Time D S T Setting the Time Table Program Setting Numbe...

Page 4: ...ock hazards Do not damage break or modify the power cord Do not put a heavy object on yank or forcefully bend the cord either These may damage the cord possibly resulting in a fire or electric shock I...

Page 5: ...he cord may be damaged possibly leading to a fire or electric shock Remove the line cord plug from the outlet before transferring the unit or it may damage the cord possibly leading to a fire or elect...

Page 6: ...cords in prevents punching failure or error It has selectable three pay periods weekly bi weekly or monthly pay period system Monthly card automatically sense the front or back of the card therefore a...

Page 7: ...H FR SA Day of the week indication Current time AM or PM 3 BEFORE USING TIME RECORDER Accessories Operation Manual Wall mount fittings Ribbon cassette Keys Card slot Display Control button Panel cover...

Page 8: ...mask and the print head Slide the latch on the lower side of the cassette into projections on the unit Then let the cassette snap into place When having difficulty inserting the ribbon insert it whil...

Page 9: ...danger that the unit may come off etc 1 Install the two larger screws into a wall 10 cm 3 94 apart Be sure to keep about 3 mm 0 12 of the screw head out of the wall 2 Mount the wall mount fittings as...

Page 10: ...t Just insert a time card The card is then automatically pulled in printed and then ejected The unit is designed to print in black on the first column when no time table program is set Usually it is n...

Page 11: ...s using the display and control buttons at the panel house Panel house Control button Display Be sure to make settings with the power on Make sure to press SET at the completion of each setting Conten...

Page 12: ...t on the display and the card type at the right The card type for monthly closing is 00 3 or to select date desired Example If closing date is the 20th every month set the digits on the left at 20 4 C...

Page 13: ...the display at 02 5 Check the settings on the display and press SET Use Weekly Cards for weekly closing The day of the week and time are recorded on the card Weekly Closing DAY ADV TIME D S T PROGRAM...

Page 14: ...of the display at 09 5 Check the settings on the display and press SET Use bi weekly cards for bi weekly closing The day of the week and time are recorded on the card Bi Weekly Closing DAY ADV TIME D...

Page 15: ...indication is automatically reset at 00 DAY ADV TIME D S T PROGRAM EXT ALARM SET PAY ENDING SELECT YEAR RED BLK MONTH EX ALM DAY COL HOUR MINUTE SECOND CARD DATE TIME SU 12Hr TU SA FR TH WE MO 1 60 1...

Page 16: ...ng between 1 60 or 1 100 5 Check the settings on the display and press SET Example of printing In the case of 14 58 1 60 indication 14 58 1 100 indication 14 98 DAY ADV TIME D S T PROGRAM EXT ALARM SE...

Page 17: ...d button from the left DAY ADV TIME to light up 2 Press or to cause digits to flash and then press or to select the desired time Example If the day advance time is 7 30 a m adjust the digits to 07 30...

Page 18: ...on the last day of the summer time period it loses one hour and returns to 2 00 a m 2 Setting D S T Example Start date Sunday March 25 2001 End date Sunday October 28 2001 If set as the above the unit...

Page 19: ...its to flash and then press or to select the desired time Example If your D S T starts on March 25 2001 adjust the digits to 01 03 25 2 Check the settings on the display and press SET Now the setting...

Page 20: ...ust the digits to 01 10 28 2 Check the settings on the display and press SET Now the setting is completed How to Cancel D S T Settings Place the unit to the D S T start date setting mode as described...

Page 21: ...advance time 05 00 12 00 Next day 05 00 Day advance time 05 00 12 00 09 00 17 30 Next day 05 00 Signal Print in red in Column 5 Print in red in Column 6 Print in black in Column 1 Print in red in Colu...

Page 22: ...AM EXT ALARM SET PAY ENDING SELECT YEAR RED BLK MONTH EX ALM DAY COL HOUR MINUTE SECOND CARD DATE TIME SU 12Hr TU SA FR TH WE MO 1 60 1 100 Day of the week to be set Print color 00 Black 01 Red Time t...

Page 23: ...ication flashes Press to change the digits to 05 to set 05 00 To enable an external time signal select 01 DAY ADV TIME D S T PROGRAM EXT ALARM SET PAY ENDING SELECT YEAR RED BLK MONTH EX ALM DAY COL H...

Page 24: ...gh Saturday have to be cancelled DAY ADV TIME D S T PROGRAM EXT ALARM SET PAY ENDING SELECT YEAR RED BLK MONTH EX ALM DAY COL HOUR MINUTE SECOND CARD DATE TIME SU 12Hr TU SA FR TH WE MO 1 60 1 100 00...

Page 25: ...e the same steps described above to erase the bars for the remaining days of the week After erasing the bar under SA press SET The P 01 indication stays lit up completing the P 01 program setting 3 To...

Page 26: ...NDING SELECT YEAR RED BLK MONTH EX ALM DAY COL HOUR MINUTE SECOND CARD DATE TIME SU 12Hr TU SA FR TH WE MO 1 60 1 100 DAY ADV TIME D S T PROGRAM EXT ALARM SET PAY ENDING SELECT YEAR RED BLK MONTH EX A...

Page 27: ...ial setting To erase program settings Press SELECT to cause PROGRAM to light up Make the desired program No flash The button switches among programs in order starting from P 01 Select the desired prog...

Page 28: ...when External time signal is set in the time table program The duration is factory set at 5 seconds The EXT ALARM button stays lit up during its setting operation For the number of seconds 1 through 3...

Page 29: ...etting To restore all the settings to factory shipped state push the reset switch with a pointed object Be careful Resetting will erase all the settings made by users For setting see 5 Setting Reset s...

Page 30: ...U shaped cut provided on the lid 1 Unscrew the screw fixed on the bottom of the unit to remove the lid 2 Insert two wires for an external time signal while pushing the upper part of the terminal boar...

Page 31: ...3 Hook the lid to close and secure it with the screw 1 Unscrew the screw that holds the lid of the battery compartment in the lower right hand corner of the back of the unit 2 Insert the battery conn...

Page 32: ...does not work in printing The card is not pulled in properly The card forwarding motor or sensor does not operate properly Printing cannot be performed The print head motor or sensor does not operate...

Page 33: ...C 50 60Hz 0 12A 220 240VAC 50 60Hz 0 12A Dot matrix in black and red Automatic pull and eject automatic judgment of face and back Five years of cumulative power failure hours after the date of shipmen...

Page 34: ...31 Front Side Reverse Side 1 2 10 TIME CARD SPECIFICATIONS 1 Monthly Card S Card double sided Note Recommended paper thickness 0 45 0 05mm...

Page 35: ...32 2 Weekly Card 3 Bi Weekly Card...

Page 36: ...Q0070 6120 2 0107 40A01S Printed in Japan...

Reviews: