


Guardian Field Support Manual – Section 2
33
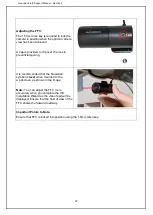
Adjusting the Mounts:
The Sensor Mount has 4 points of
movement to allow the flexiblility to achieve
optimum sensor placement.
The T20 security Torx is to be used for the
screws on the Sensor Mount. You can
partially lock the sensor in place as finer
movements can be made using the ‘locking
teeth’. When you have the final position,
you can hard lock the ICS to the mount.
The ICS must be placed as level as possible
in the final position (note – the ICS can be
mounted horizontally (0°) or vertically (90° -
the camera is rotated in a clockwise
direction with the camera button facing
down) to allow more optimal placement in-
cab.
Once you have adjusted the mount, tighten
the 4 locking bolts to ensure the sensor is
secure and won’t move with normal vehicle
operation.
Do not overtighten the screws
as there is
a risk that the mount may fracture. The
screws should be tightened ‘finger’ tight.
If you have to remove any parts of the
bracket, ensure that the plastic teeth are
aligned before tightening as the teeth may
break if not correctly aligned.
Summary of Contents for G2-SY-CON2
Page 1: ...FIELD SUPPORT MANUAL Guardian Generation 2 Gen2 ...
Page 7: ...FIELD SUPPORT MANUAL Section 1 Introduction to Guardian Generation 2 ...
Page 29: ...1 FIELD SUPPORT MANUAL Section 2 Installation of Guardian Generation 2 ...
Page 100: ...Guardian Field Support Manual Section 2 72 ...
Page 103: ...Guardian Field Support Manual Section 2 75 The vehicle can be turned off ...