


Guardian Field Support Manual – Section 2
29
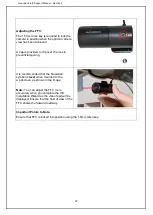
The Fasteners can be tightened up at both
the ‘head’ and ‘foot’ of the bolt.
The bolt can also be grabbed in place to
hold the Mounting Pan allowing you to
organise washers and nuts (see image).
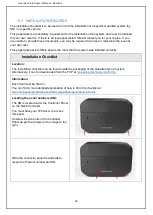
Adjusting the Mounts:
The mounting pan separates into 2 parts.
On the Mounting Pan, unscrew the T20
screws anti-clockwise to allow the 2 parts to
separate. The two parts can be removed
completely, or just loosened to allow the
Controller Unit to be removed. The T20
screws are ‘captured’ which means that they
won’t fall out from the locking plate when
unscrewed.
You will need to ensure that each
component has sufficient cabling to reach
the Mounting Pan (as the Controller will be
mounted inside the Mounting Pan at the end
of the hardware installation).
The 2 parts will be secured together once
the Controller is inserted at the end of the
install.
Important Points to Note:
You should secure the Mounting Pan first to ensure your cabling will reach the Controller once
the hardware installation is complete.
Summary of Contents for G2-SY-CON2
Page 1: ...FIELD SUPPORT MANUAL Guardian Generation 2 Gen2 ...
Page 7: ...FIELD SUPPORT MANUAL Section 1 Introduction to Guardian Generation 2 ...
Page 29: ...1 FIELD SUPPORT MANUAL Section 2 Installation of Guardian Generation 2 ...
Page 100: ...Guardian Field Support Manual Section 2 72 ...
Page 103: ...Guardian Field Support Manual Section 2 75 The vehicle can be turned off ...