SecurityMan LCDDVR4 User Manual Download Page 70

64

Always On Top

Select 

Always On Top

 to put the Vx4SLPlayer window on top of all other win

-

dows on the desktop. If this option is not selected other windows application(s) 

can cover over the Vx4SLPlayer window.  


Playback

Please reference playback on page 47 above for detail. 
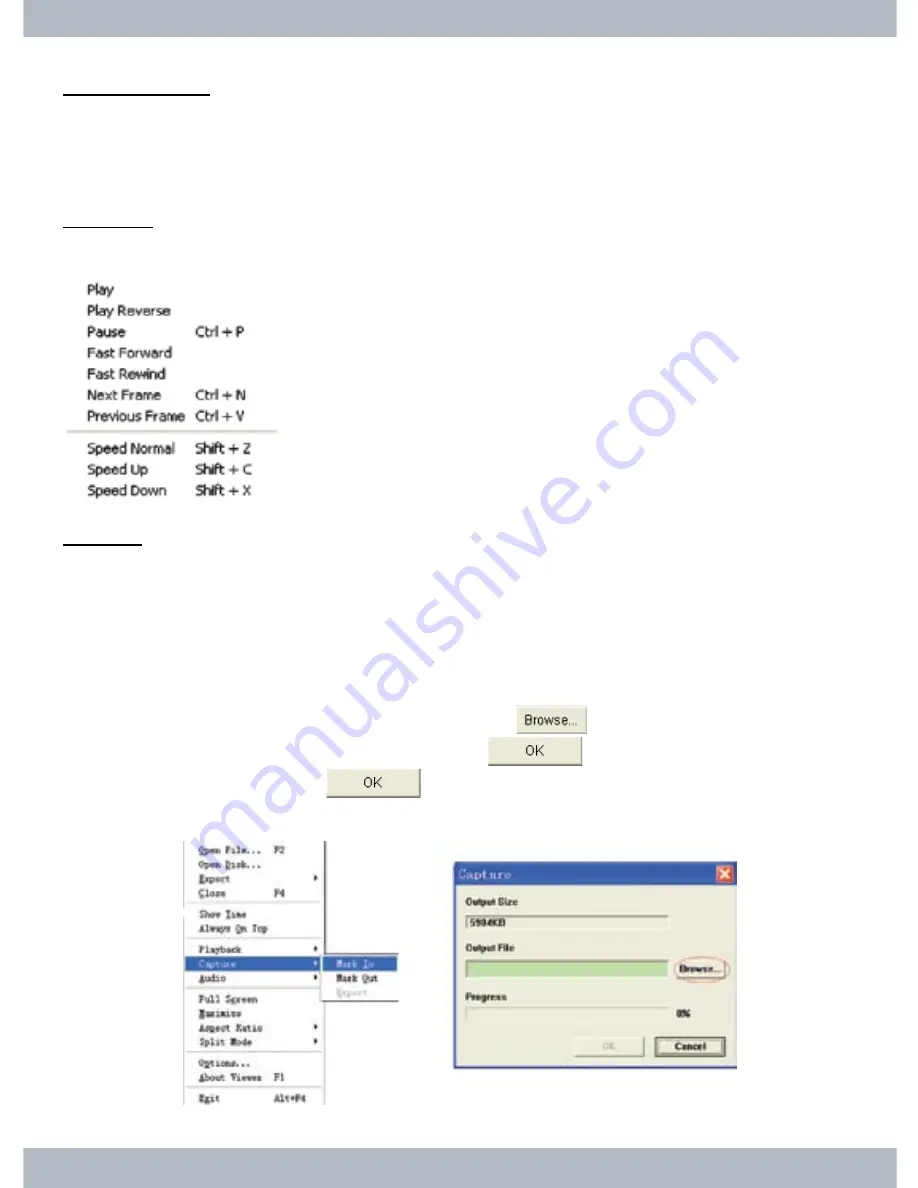
Capture

Capture

 is use to shorten the video clip into a shorter segment clip, VVF to VVF 

file.    To 

Capture

 shorter clip; pause playback, drag 

Play Bar

 to desire start time 

and select 

Mark In

 under 

Capture

 in the 

Contextual Menu

.  Then drag Play Bar 

forward to a desire end time, select 

Mark Out

 under 

Capture

 in the 

Contextual 

Menu

 and 

Export

 under 

Capture

 will become selectable for execution as illus-

trated below.  Select 

Caption\Export 

from the 

Contextual Menu

 to proceed and 

Capture

 window will appear.  Next, click on  

 to locate where to save the 

file, give it a file name (VVF), click 

OK

, and 

  again to begin rendering.  

Upon completion, click on  

 to finish and exit out of Export Complete 

window.

Summary of Contents for LCDDVR4

Page 1: ...LCDDVR4 User s Manual 2 IN 1 4 CHANNEL DIGITAL VIDEO RECORDER AND 10 2 LCD MONITOR Available models with hard drive LCDDVR4 80 with 80GB SATA HD LCDDVR4 320 with 320GB SATA HD...

Page 2: ...ted warranty shall commence from the date of purchase SecurityMan products warranty is not transferable and is limited to the original purchaser If the product is found to be defective then as your so...

Page 3: ...FRONT PANEL REAR PANEL SIDE PANEL RC REMOTE CONTROL GETTING STARTED HARDWARE SETUP HARD DISK DRIVE INSTALLATION EXTERNAL MONITOR INSTALLATION CAMERA INSTALLATION SENSOR INSTALLATION ALARM INSTALLATIO...

Page 4: ...MERATE RECORD QUALITY RECORD SCHEDULE ALARM ALARM DURATION BUZZER DURATION EVENT REC DURATION SENSOR MOTION DETECTION SCREEN BORDER AUTO SEQUENCE VIDEO ADJUSTMENT AUDIO SYSTEM HARD DISK SETUP OVERWRIT...

Page 5: ...ETUP PTZ MODE ICON FUNCTION WINDOW ATTENTION F W UPGRADE LOAD SETUP DEFAULT SEARCH PLAYBACK PLAYBACK CONTROLS USING FRONT PANEL OR REMOTE CONTROL RC PLAYBACK CONTROLS USING MOUSE BACKUP TO USB MEMORY...

Page 6: ...E OR F4 SHOW TIME ALWAYS ON TOP PLAYBACK CAPTURE AUDIO FULL SCREEN MAXIMIZE ASPECT RATIO SPLIT MODE ABOUT VIEWER OR F1 EXIT OR ALT F4 APPENDIX RECORD TIME SPECIFICATIONS SYSTEM CONNECT MAP DIAGRAM COM...

Page 7: ...CD DVR combo design 10 2 flat panel LCD color monitor with desktop and wall mountable base Easy to use 4 ch duplex DVR simultaneous playback record 2 ch audio inputs and 1 ch audio output Recording sp...

Page 8: ...seconds to turn ON OFF the LCD monitor Press MENU Power button to get to the LCD menu and press it again to browse through the display menu options 2 UP In the LCD menu press the UP button to browse...

Page 9: ...rowse the picture sub menu and press the buttons to increase decrease the value or parameter of the sub menu The manufacture default value for BRIGHT CONTRAST and COLOR is set at 50 percent The maximu...

Page 10: ...ault volume level is set at 27 percent Press the MENU POWER button 4 more times from the AUDIO menu to exit out from the LCD Menu options Function Press the MENU POWER button 3 times to get to the FUN...

Page 11: ...rnatively it can be change between AUTO NTSC SECAM and PAL video format check your country code for video standard Press the MENU POWER button 3 more times from the FUNCTION menu to exit out from the...

Page 12: ...minutes with an increment of 10 minutes the default value is 0 SLEEP is a countdown timer the time that take for the LCD monitor to automatically turn off not the DVR The TIME mode can be setup by fi...

Page 13: ...tton once In the menu mode CH1 CH2 and CH3 CH4 buttons are use browse and change parameter settings respectively Press CH1 again or press the QUAD button to get back to quad split screen view 2 REC bu...

Page 14: ...oggle between the fast forward speeds press the FWD button once twice or 3 times during playback to fast forward the video footage Press the PLAY button at anytime to exit out from FF mode and get bac...

Page 15: ...s use to select and or change the value in main menu or sub menu setting 11 PWR HDD IR are light indicators and IR for the remote control Color light indicator and their meanings a PWR Solid green lig...

Page 16: ...tion Input AC 100 240V 50 60Hz 1 5A Output DC 12V 5 0A positive inside 2 AUDIO OUT 1x RCA interface connection to an audio input speaker mono source Use to transfer both live and playback audio outpu...

Page 17: ...485 The first two terminals from left to right is the RS485 power line ports use for protocols camera RS485 two terminals are and Only two protocols are supported Pelco P or Pelco D protocols camera w...

Page 18: ...panel consists of a USB port use for backup purposes and update firmware The USB port is dedicated for backup purposes only alternatively USB mice will be compatible and will not function through thi...

Page 19: ...ull screen Move up PTZ Move cursor up FF frame by frame Select CH2 full screen Move down PTZ Move cursor down REW frame by frame Select CH3 full screen Move left PTZ Move cursor left or Reduce value S...

Page 20: ...rminals Plug the power adapter into the back of the DVR and the other end plugs into an electrical outlet Power on the DVR by switching the main power ON located at the lower left corner of the back p...

Page 21: ...tep 2 Secure the hard drive to the HDD bracket with the provided HDD screws 4x Then connect the Power and Data cable of the DVR to the SATA hard drive Step 3 Slips the HDD bracket back into its slot a...

Page 22: ...4 of the DVR located in the rear Plug the camera power to the camera and the other end into an electrical outlet Connection diagram illustrated below Note Camera using RCA interface connection requir...

Page 23: ...s power use the power from the sensor device plug the power jack into the sensor and then plug the other end of the power adapter to an electrical outlet Generally there are three different types of s...

Page 24: ...ovides 1 internal switch for sounding alarm when the sensor is acti vated The switch is open at normal state a wiring diagram is illustrated below When the alarm is activated the switch becomes close...

Page 25: ...to boot into dos mode scanning for new hard disk drive If new hard drive is detected it will prompt to configure or format before the system gets to the user interface window To proceed and format th...

Page 26: ...fter the initial boot the DVR advance to the user interface screen The user interface consists of 4 channel QUAD view along with the channel number disk use percentage date and time display as shown b...

Page 27: ...in name password and accounts level for each account users Only one system Admin account per a system a second Admin account cannot be created Be sides the Admin account up to 3 additional accounts ca...

Page 28: ...t right enter buttons on the remote control or front panel to browse select Select Enter to save and accept the account login name Select the Password option from the Login screen and the password win...

Page 29: ...re is turn OFF Setup menu button Logout of Setup Icon menu The logout button will not show in the Setup Icon menu window if the Password feature is set to ON or if the auto sequence is set to ON If is...

Page 30: ...emote control For detail diagram of the front panel and remote control button description go to page 7 and 12 of the manual respectively Front panel and remote controls is common and can be use throug...

Page 31: ...left red arrow to reduce the brightness level and click on the right red arrow to increase the brightness level of the image Or press the left and right arrow of the front panel or remote control to...

Page 32: ...TE Select the Record FrameRate from the Record Setup menu to access the record frame rate setting as illustrated in the picture below The default Record FrameRate setting is 30fps frame per second tot...

Page 33: ...ick on the mouse at any time to exit out from Record FrameRate setup menu RECORD QUALITY In the Record setup menu browse down to Record Quality and the red arrows will appear Press the Select Enter bu...

Page 34: ...The time interval from 0 to 24 hours and Sunday to Saturday setting is a matrix designed for a full week of scheduling Manual record setting is the systems default setting in which the bars are color...

Page 35: ...and ready to be masked press the Select Enter button once on the front panel or RC to mask the selected area to Time Schedule red bar press Select Enter button again to mask Motion Schedule green bar...

Page 36: ...It can be set to OFF system default 05 seconds 10 seconds 15 seconds 20 seconds 25 seconds 30 seconds or CON T continuous To set the alarm output to last 20 seconds please set 20 seconds After 20 sec...

Page 37: ...on the CH3 decrease value CH4 Select Enter increase value buttons on the front panel RC or mouse click on the red arrows Press Menu ESC or right click mouse anytime to exit out of Alarm setup menu EVE...

Page 38: ...r recording Press Menu ESC or right click mouse anytime to exit out of Alarm setup menu MOTION DETECTION From the Alarm setup menu browse to Motion Detection using front panel remote control or hover...

Page 39: ...ht motion area of detection using the front panel or RC remote control move the cursor to a desire point in the image press the Select Enter button once next use the CH2 DOWN and then CH4 button on th...

Page 40: ...nnels or borderless display AUTO SEQUENCE In the Screen setup menu select Auto Sequence The Auto Sequence is use to setup Sequential time intervals which value can be set to OFF Default setting and fr...

Page 41: ...just synchronize and centralize the video screen To synchronize the video screen select the Video Adjustment and then press the CH1 CH2 CH3 CH4 on the front panel or RC to move up down right left as d...

Page 42: ...audio recording if Mute is set to ON or mute Next adjust volume for the speaker by moving the Volume leverage up or down system de fault is 25 1 4 The Volume controls both the live audio streaming and...

Page 43: ...rd disk filled up FORMAT HDD When new hard drive is first installed into the LCDDVR4 system the DVR initially formatted the hard drive Use Format HDD to reformat the hard disk only in special cases su...

Page 44: ...the formatting process and then follow by a HDD was formatted window to complete the formatting process as illustrated below If the Admin password is incorrect a Wrong password window will appear stat...

Page 45: ...e deleted however the administrator s account name and administrator s account password can be change Up to 3 user accounts Operator Guest can be created Account In the Account menu press CH1 CH2 CH3...

Page 46: ...ols Click Enter when finish Level After the user account and user password has been setup press the CH1 CH2 CH3 CH4 using the front panel RC or hover the mouse over the cubical s under Level and a pin...

Page 47: ...and then press Select Enter using the front panel RC or left mouse click to change the Operator or Guest login password as illustrated above A current password must be input first follow by the new pa...

Page 48: ...ge the time display format move cursor to Format and then press the Select Enter using the front panel RC or left mouse click on the red arrows There are three time display format YYYY MM DD default Y...

Page 49: ...ng up and down the Event List notice the Start End time display at the bottom which shows the Start time of the file and the End time of the file Below the Start End time is Page information the maxim...

Page 50: ...ed whether it is Pelco D or Pelco P as other protocols is not supported Finally change the Baudrate according to the PTZ requirement setting Here is an overview on how PTZ Setup should be configured C...

Page 51: ...rds and downwards Ch3 Ch4 Move the dome leftwards and rightwards increase decrease value STOP Stop the dome REW FWD Zoom Pause Play Focus Mouse function Left Mouse button Click the icon or to adjust v...

Page 52: ...mode Attention Once the Auto scan is activated to automatically scan through all the preset posi tions the STOP button in PTZ mode must be press to exit out from Auto scan mode Just by exiting out fr...

Page 53: ...dministrator login can reset the LCDDVR4 to the system default setting To Load Setup Default ensure admin login select Load Setup Default from the Setup menu and input the system administrator passwor...

Page 54: ...layback Press the FWD Z button to fast forward and press the REW Z button to rewind during playback There are three levels of fast forwarding and three levels of rewinding playback speed as follow FF1...

Page 55: ...t click on the channel image to view each channel in full screen display and left click again on the full screen display for QUAD split screen view Right click anywhere on the playback screen to bring...

Page 56: ...RC or simply left mouse click on the End Time to increase the time to backup Notice the Size field will increase each time the End Time field is selected or clicked on 5 Next hover down to USB Copy f...

Page 57: ...for backup 7 When the backup is completed press or click on Exit to exit out of Backup to USB window and back to live display screen as shown below 8 Finally remove the USB memory stick from the side...

Page 58: ...or right mouse click on the mouse at anytime to exit out from the Language window LOGOUT Logout is use to log user out of the system so that other user accounts can login For example if the system adm...

Page 59: ...Exit and then press Select Enter using the front panel RC or left mouse click to exit out from the Setup window and a confirmation exit window will appear as shown below To Exit and save the changes...

Page 60: ...Step 1 Put the software included in the CD into the CD ROM drive Step2 Go to the CD ROM drive titled LCDDVR4 Player root directory and double click on Vx4SLPlayerSetup exe to start the software insta...

Page 61: ...55 Click Next Click Next...

Page 62: ...56 Check Create a desktop icon and then click Next Step 4 Click on Install to start the installation process as illustrated below...

Page 63: ...on Finish as shown below SOFTWARE UNINSTALLATION To uninstall PC player software go into c Program Files VxViewer folder and then double click on unins000 exe and click on Yes and follow through to u...

Page 64: ...58 PC PLAYBACK Software Basic and Playback Double click the icon located on the desktop to execute PC play back software and the GUI Graphic User Interface window will appear as shown below...

Page 65: ...mize Window 16 Close Program The LCDDVR4 backup files are in VVF file format which is a proprietary format not standard format and can only be playback using the software provided To playback VVF file...

Page 66: ...e Mute On Off button as circled in the picture above to playback with audio or without audio sound When mute is Off use the Volume scroll bar to adjust the volume level as desire Click on the Pause bu...

Page 67: ...in playback mode Contextual Menu To access the Contextual Menu right mouse click anywhere on the Vx4SLPlay er window and the Contextual Menu will appear as shown below Open File F2 To playback the ba...

Page 68: ...window give it a file name and click Save click to select Video Compression recommend ed Full Frames Uncompressed click OK and finally click on to start the conversion process Once the percentage reac...

Page 69: ...t Show Time to display the time and date of each cameras in the upper right hand corner of the screen Deselect Show Time to disable the time and date display stamp Note It is recommended to select Unc...

Page 70: ...horter clip pause playback drag Play Bar to desire start time and select Mark In under Capture in the Contextual Menu Then drag Play Bar forward to a desire end time select Mark Out under Capture in t...

Page 71: ...40 x 448 default or 640 x 544 aspect ratio display for play back Split Mode Select Split1 or Split 4 default to toggle between single camera full screen and Quad camera full screen display Options Opt...

Page 72: ...lay different date time format Click under Path for still capture to select a folder location to store snapshoot images default C VxCapture Click on to accept and exit out from Options setup window Ab...

Page 73: ...al 16 3 3 24 96 Low 13 2 7 30 120 30fps default High 26 2 8 28 112 Normal default 16 1 6 50 200 Low 13 1 3 62 248 15fps High 26 1 3 62 248 Normal 16 0 8 100 400 Low 13 0 7 114 456 PAL 50fps High 26 4...

Page 74: ...AL Max 50fps total 25fps each ch Record Mode Manual Rec Time schedule Motion detection Sensor Rec Motion detection and both Sensor Motion detection Resolution Display NTSC 720 x 480 PAL 720 x 576 Reco...

Page 75: ...ware update Remote Control 38KHz IR PS 2 Mouse 3 Button Optical Mouse Power Input 100 240VAC Out put DC12V 5A positive inside Dimensions L x W x H 290 x 230 x 70 mm 11 4 x 9 x 2 8 Not including bracke...

Page 76: ...the following A If backup fail Use a computer to reformat the flash drive or thumb drive as FAT32 file system avoid using FAT16 file system format B If backup fail Plug in the flash drive to the DVR...

Page 77: ...re resetting the DVR ie IP address Subnet Gateway etc 4 When motion and sensor time schedule is active will manual recording contin ues to operate Yes manual recording will continue to operate even wh...

Page 78: ......

Reviews: