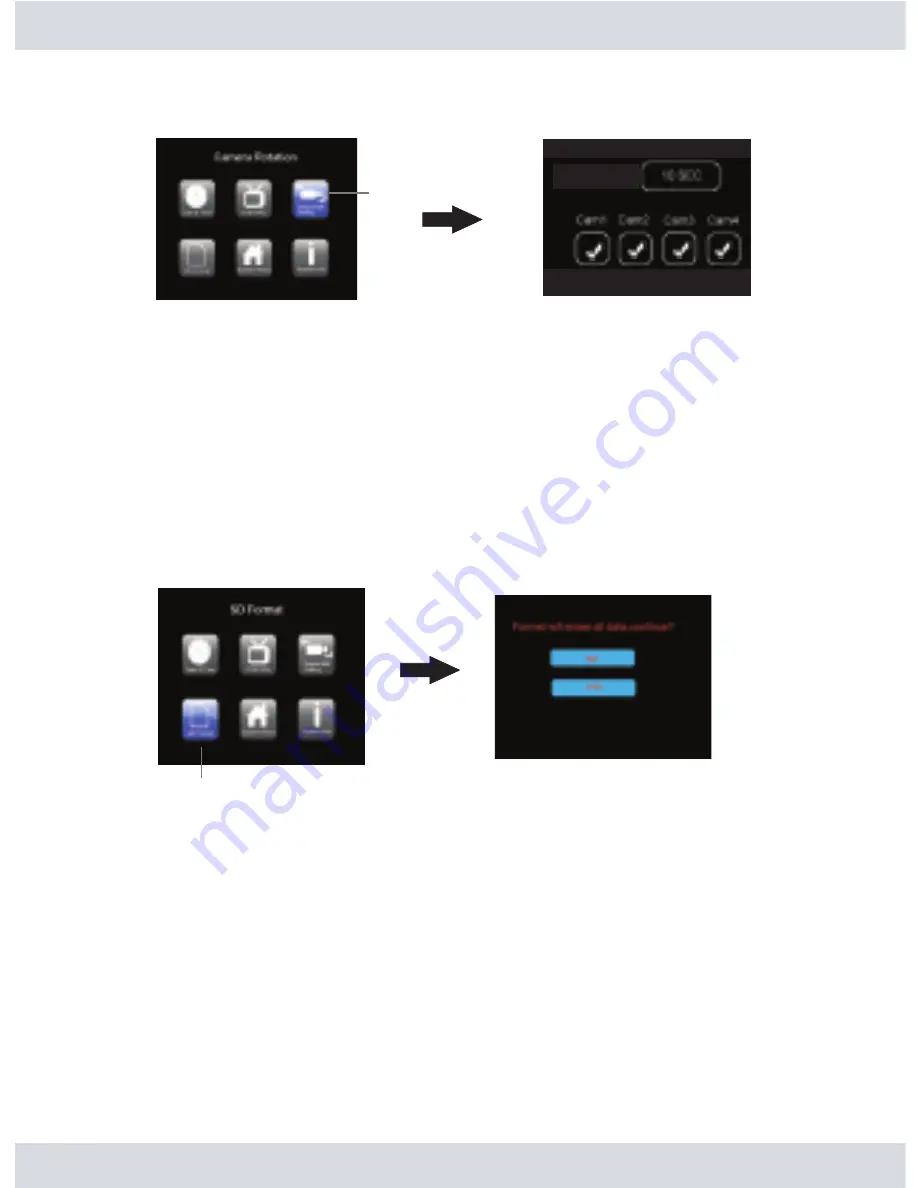
SecurityMan DigiAir-SD User Manual Download Page 18


SD Format

Camera Rotation

In the 

System Setting

 highlight and press the 

OK 

button on the 

Camera Rotation

 as shown below.


The 

Auto Sequence

 is use to setup the camera sequential rotation period between cameras.  The 

default 

Auto Sequence

 is set to 

OFF

. To change the value, press the 

UP 

or 

DOWN 

buttons to toggle 

between OFF, 5 sec, 10 sec, 15 sec, 25 sec, or 30 sec.  Press 

OK 

to save and exit out of 

Auto 

Sequence

 or press the 

MENU 

button to exit without changes.  If a time value is selected, there will 

be an

 “A”

 icon showing on the upper right of the screen to indicate that the 

Auto Sequence

 is on.

Note: Auto Sequence will still display pitch black image even if the camera is not present when 

the camera is checked

.  

SD Format

In the 

System Setting 

highlight and press the 

OK 

button on 

SD


Format 

as shown below.

A message stating “

Format will erase all data, continue?

” will appear in red, press the 

UP 

or 

DOWN 

buttons to select 

YES 

or 

NO 

(default) accordingly to proceed with the SD (Secure Digital) formatting 

options. If 

YES 

is selected the entire SD card will be formatted and everything inside will be erase and 

cannot be retrieve.  Highlight 

YES 

and press 

OK 

at anytime to proceed with formatting the SD card or 

press 

MENU 

to exit without formatting.  

NOTE: Please remember to backup all the important data (Video/Picture) first, before attempting 

to format.  ALL DATA WILL BE LOST.

Default Setting

In the

 System Setting

 highlight and press the 

OK 

button on 

System Reset

 as shown below.

Auto Sequence

15

Sequential Setting

Summary of Contents for DigiAir-SD

Page 1: ...DigiAir SD User s Manual Digital Outdoor Wireless Camera System Kit with PIR motion 2 way Audio Night Vision and SD Digital Video Recorder...

Page 2: ...is not transferable and is limited to the original purchaser If the product is found to be defective then as your sole remedy and as the manufacturer s only obligation SecurityMan will repair or repla...

Page 3: ...ing Video System Camera Rotation SD Format Default Setting Version Record Setting Video Setting Motion Record Time Motion recording active in QUAD channel display view Motion recording active in Singl...

Page 4: ...the DigiAir SD an ideal choice for your recording needs The user manual provides important information in instructing to properly use the product and to avoid possible injuries and damages Customers a...

Page 5: ...roduct to carry out any illegal activities such as sneak preview and etc SecurityMan shall not be responsible for any consequences of illegal conducts made by users DO NOT put the plastic package bags...

Page 6: ...mages to the product or the peripheral equipment DO NOT put the camera in quaky paces The camera may be unstable or out of operation if installed improperly Such installation may also cause breakdown...

Page 7: ...ment The obstruction of stumbling block will affect the electromagnetic wave and influence the receiving range Wall tree and other stumbling block might absorb reflect the electromagnetic wave and inf...

Page 8: ...Accessories Receiver Recorder 1 Wireless Camera 1 Antenna 2 Adapter 2 AV cable 1 Bracket 1 User s Manual Screws 3 accessories 5...

Page 9: ...p to32GB not included Rx Sensitivity 81dBm Typical Record Overwrite YES NO Record time Display ON OFF Playback Normal fast forward fast backward pause Detection Sensitivity Max 5meters immune to pets...

Page 10: ...h wireless device s Upgradable by adding 3 more digital wireless cameras only one active channel for recording or integrate up to 3 more DigiAir SD kits ch2 ch3 ch4 Camera features built in infrared L...

Page 11: ...Power Socket Audio Video Output Product Basics 8 Camera SM 60DT Receiver SM 60DR Buttons Function Sun Visor Power Socket...

Page 12: ...r to a monitor or other recorder for backup purposes ie CCTV monitor LCD monitor TV DVR recorder etc Turn on the monitor and change the channel on the monitor to AV input ie LINE1 LINE2 VIDEO1 VIDEO2...

Page 13: ...on to view a split screen of all cameras simultaneously 9 Manual recording Press the REC button to start the recording and the blue RECORD indicator LED will light up to indicate the receiver is in re...

Page 14: ...ar in red at the top left of the screen The New indicator of the receiver will light up and resume motion picture stand by mode Tip In detection mode if there are newly recorded video files the NEW in...

Page 15: ...e Mode The recording feature can be setup in the menu to record Video files or record Picture files the selected Video or Picture icon will display on the user s interface A Video icon indicates that...

Page 16: ...e UP RIGHT and LEFT DOWN buttons is pressed Once the UP RIGHT LEFT DOWN buttons is pressed the volume icon will appear on screen as Rx and Tx with volume levels right above the Date Time on top of day...

Page 17: ...e OK button to save the settings and return to the System Setting screen or press the MENU button to exit without saving Video System In the System Setting highlight and press the OK button on Video S...

Page 18: ...if the camera is not present when the camera is checked SD Format In the System Setting highlight and press the OK button on SD Format as shown below A message stating Format will erase all data cont...

Page 19: ...ault Setting Version In the System Setting highlight and press the OK button on System Info as shown below System Info displays the current version of the software used for both the recorder and the c...

Page 20: ...to save the setting and exit Motion Record Time or press the MENU button to exit without saving Recording session refers to the length of the recording triggered by motion detection Once trigg er a ne...

Page 21: ...s the QUAD button again to pull up single channel display view for other buttons to function normal Manual recording will override motion recording detection under Single full screen display view Sche...

Page 22: ...view to Single channel view for Manual recording When the Date Time Stamp is enabled the system will display the date and time to real time monitoring and the recorded video photo files Press the UP...

Page 23: ...aired a receiver Camera Pairing will automatically override any previous camera on that channel frequency SM 60DT digital wireless cameras are designed to comply with SM 60DR receiver other manufactur...

Page 24: ...d then press the OK button to start the replay Press the MENU button at any time to exit out of the playback window and to get back to the file directory or press the MENU button twice to exit out of...

Page 25: ...may not but third party card reader can always be purchase for integration Video AVI files can be playback using the system default Windows Media Player and JPEG files can be viewed using the system...

Page 26: ......

Reviews: