background image

ScanLogic B22 

Operation Instructions 


*Note: In many cases, the Super Code (ID00) is changed from default and maintained by the safe 
manufacturer as a reset code for your security.  


If you have difficulty resetting the lock, please call SECURAM Tech Support at (805) 988-8088 or email 

[email protected]

. 

 
1.3 Lock and EntryPad Installation
 
Included within your installation kit are (2) shoulder bolts and (3) lock mounting bolts. 


Install the shoulder bolts on the safe door in the pre-drilled holes above and below the spindle 
hole. 


Now insert the lock cable (attached to the EntryPad) through the spindle hole. 


On the backside of the safe door, you will see the lock mounting plate and the predrilled lock 
mounting holes.   


Connect the lock cable to the lock body and position the lock body appropriately on the lock 
mounting plate. 


Ensure that the lock cable is positioned so that it lies in the channel on the back of the lock.  This 
channel is provided to protect the lock cable from damage or crimping during installation. 


Using the provided lock bolts, secure the lock body to the mounting plate. 

 
Note: It is very important to ensure that there is an adequate gap between the lock bolt and the bolt 
work.  This gap must be 0.125”. 
 
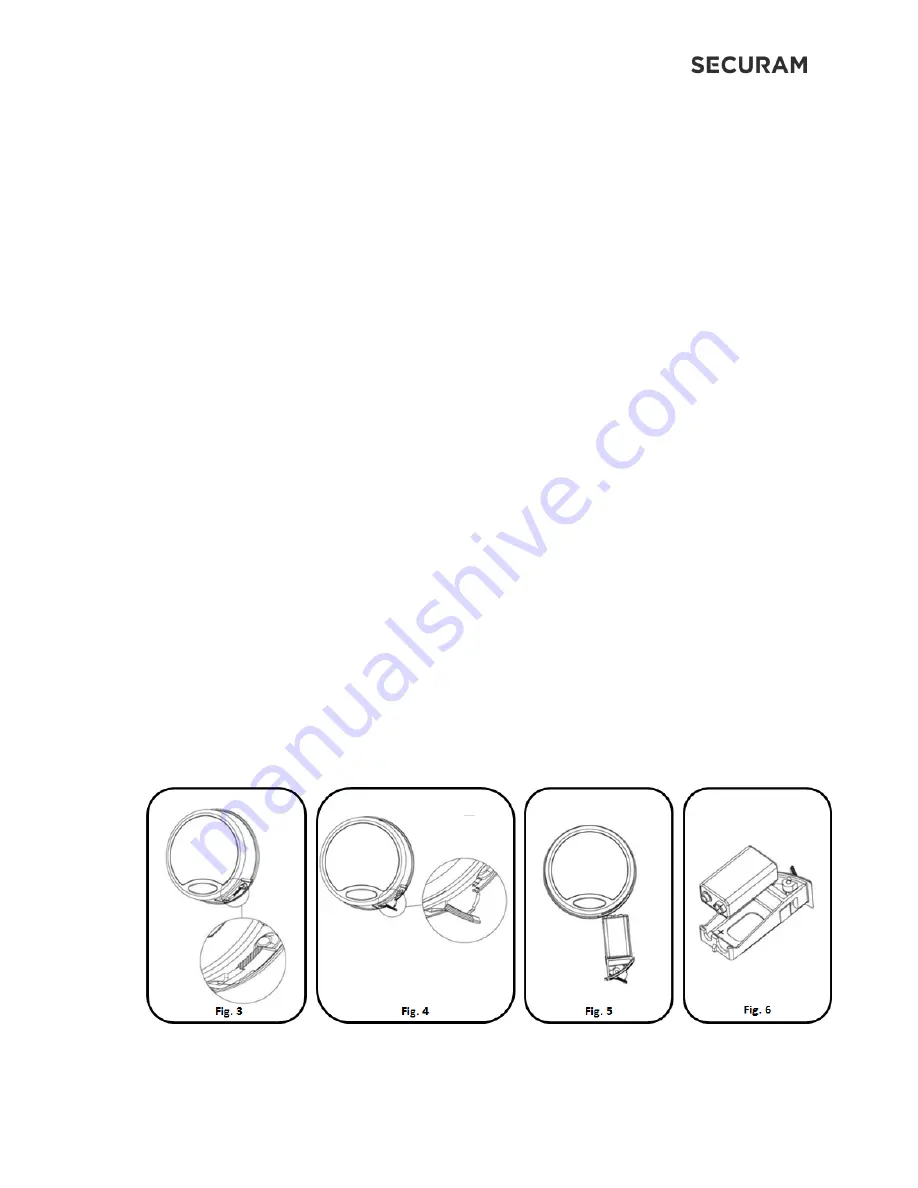
1.4 Installing the Battery – SureLock Battery Compartment (removable battery compartment)


Locate the SureLock Battery Compartment at the 5 o’clock position of the EntryPad.  See Fig. 3. 


Release the latch of the battery compartment, by pulling lever downward.  See Fig 4.  


Pull out the battery compartment from the bottom of the EntryPad. See Fig 5. 


Install a new 9V alkaline battery (Duracell or Energizer brands are recommended) into the 
compartment.  The battery compartment will only receive the battery when the positive and 
negative terminals are oriented correctly.  See Fig. 6 


Put the battery compartment back into the EntryPad.  Push the latch of the battery 
compartment up until it snaps closed.  See Fig. 3 


Summary of Contents for FPC-1701A-B22-II

Page 1: ...4 5 Delete All Users 4 6 Add Finger 4 7 Delete Finger 5 0 Smartphone Management 5 1 Pair Phone 5 2 Delete Phone 6 0 System Identification 6 1 System Info 7 0 Lock Settings 7 1 Factory Reset Firmware 7...

Page 2: ...ry is connected to the Entry Pad Step 2 Ensure the lock cable is disconnected from the lock body Step 3 Locate the Reset Hole on the back of the lock under the QC sticker Step 4 Using a paper clip pre...

Page 3: ...sitioned so that it lies in the channel on the back of the lock This channel is provided to protect the lock cable from damage or crimping during installation Using the provided lock bolts secure the...

Page 4: ...Programmed Lock Status After this initial power up it will check to ensure that the system is communicating correctly The display will read Link with Lock OK If the Display reads Fail to Link with Lo...

Page 5: ...OK button to send the code to the lock Note the additional 3 masking digits can be added before and or after your code 3 0 Set Date and Time 3 1 Set Clock Time Step1 Press the Menu OK button Step 2 At...

Page 6: ...rwise you cannot add new users or pair the lock to the APP The following steps describe the Change Code process Step1 Press the Menu OK button Step 2 At My Menu press the Menu OK button Step 3 The dis...

Page 7: ...u OK button Step 3 The display will prompt you to login Enter a valid Super or Manager Code and press Menu OK or place an enrolled finger on the fingerprint scanner Step 4 After logging in the screen...

Page 8: ...10 System will verify that code has been saved The new code is now enrolled and available to be used to open the lock 4 3 Enroll New User After Manager2 has been added you can add a User ID03 Step1 P...

Page 9: ...rompt Set Code If you only want fingerprint only you can press Back button to skip Step 8 9 Otherwise press Menu OK to continue set up a code for Manager2 Step 8 Now enter a 6 digit code Step 9 Repeat...

Page 10: ...lect a different user press the or button Step 6 Press the Menu OK button to delete the user You will be prompted to confirm the deletion Step 6 Press Menu OK This User code and fingerprints are now d...

Page 11: ...he fingerprint scanner Step 4 After logging in the screen will show Users Press Menu OK Step 5 Scroll or to the menu selection Delete All Users and press Menu OK Step 6 Press the Menu OK Step 7 Press...

Page 12: ...will show Place 1st Finger but if you have enrolled one fingerprint previously it will show Place 2nd Finger Now please place your finger on the fingerprint scanner until you see Enrolled on the scree...

Page 13: ...he ScanLogic B22 uses a smartphone to allow for remote management and control Download the SECURAM app on the App Store for iPhones or on the Google Play Store for Android 5 1 Pair Phone This feature...

Page 14: ...e is used to remove any mobile device connected to the system Step1 Press the Menu OK button Step 2 At My Menu press the Menu OK button Step 3 The display will prompt you to login Enter a valid Super...

Page 15: ...s the Menu OK button Step 2 Press the button to the menu selection System Info Step 3 Press Menu OK and the screen will display information about the system This menu selection can be accessed within...

Page 16: ...ttings and press Menu OK Step 6 The screen will now show Factory Reset press Menu OK Step 6 Press Menu OK to confirm Step 7 The screen will prompt the following and complete the factory reset 7 2 Show...

Page 17: ...s in its internal memory 7 3 Enable Disable Vibration Sensor The ScanLogic B22 has a built in vibration sensor The vibration sensor will send a notification to the app in the event that the safe is be...

Page 18: ...Note When alarming use of a valid code to open the lock will cancel the vibration alarm on the APP 7 4 Security Level The ScanLogic B22 has the ability to be set in two different security modes as fo...

Page 19: ...o enable Vibration Sensor There are five levels of vibration sensitivity with Level 1 requiring the least amount of movement to trigger the alert and Level 5 requiring most movement to trigger the ale...

Page 20: ...rt Hub is too weak causing issues with lock management and operation from the app you may want to either move the Smart Hub closer to the safe lock or set the Battery Efficiency to LOW power consumpti...

Page 21: ...easure to ensure that all data is protected The Encryption Key is set during the manufacturing process with a default encryption key value This value can be changed using the Encryption Key Set menu s...

Page 22: ...deciphered to generate a One Time Use Reset Code When entered into the ScanLogic B22 safe lock the lock and EntryPad are reset to factory default and the system is recovered Once used the OTC One Tim...

Page 23: ...se the following procedure is to be followed System Recovery would be required in a number of circumstances such as All Managerial User Codes have been lost or forgotten The system is unresponsive to...

Page 24: ...Pads with a fingerprint scanner and or LCD screen the safe lock operates in digital mode The ScanLogic B22 is a digital system and can be paired with any SECURAM safe lock body Note The pairing of the...

Page 25: ...ScanLogic will not sound or beep when it resets When a button is pressed the LCD will report Link with Lock OK This indicates that the lock is now in digital mode and has been successfully paired and...

Page 26: ...pt you to login Enter a valid Super or Manager Code and press Menu OK or place an enrolled finger on the fingerprint scanner Step 4 Press the or to select the user you want to delete and finally press...

Page 27: ...B22 II Input 9 V Alkaline Battery Working Current 1 5A Standby Current 80 uA Battery Lifetime 1 Year 10 openings day User Number 3 Support System Android and above IOS and above Wireless Standard WIFI...

Page 28: ...ponsible for compliance could void the user s authority to operate the equipment NOTE This equipment has been tested and found to comply with the limits for a Class B digital device pursuant to Part 1...

Page 29: ...he handset kept 0mm from the body To maintain compliance with FCC RF exposure requirements use accessories that maintain a 10mm separation distance between the user s body and the back of the handset...

Page 30: ...s are protected by a 12 month warranty against Manufacturer s defects This warranty is applicable for 12 months from the Date of Manufacture or 12 months from the Date of Consumer Purchase if the prod...

Reviews: