background image

   SECO-LARM


ELECTROMAGNETIC LOCK


 4 


SECO-LARM U.S.A., Inc.


Door Frame 

Door  

Template 

1.


Read this installation manual thoroughly. A clear understanding of the product and this 
manual will make installation much easier. 

2.


The electromagnetic lock is designed for indoor use ONLY. 

3.


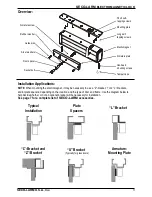
The most suitable mounting location for the electromagnetic lock may require the use of 
additional 

SECO-LARM

 accessories such as Z-brackets, L-brackets, and/or spacer plates. 

Please see the diagram on page 3 to decide if a particular application requires any mounting 
accessories. See page 7 for a complete list of 

SECO-LARM

 accessories. 

4.


Do not run power wires and signal wires in the same conduit as this may cause interference. 

5.


Do not install a diode in parallel with the electromagnetic lock as this may cause a delay 
when releasing the door as well as cause residual magnetism. 

6.


The best location to install the electromagnetic lock is on the inside of the door that is being 
secured with the wiring concealed in the frame to prevent tampering with the unit. 

1.


Fold the mounting template along the dotted line to 
form a 90-degree angle. 

4.


Drill two holes in the frame and 

three holes in the door as shown 
on the template. 

5.


Use a hammer to lightly tap the 

guide pins into the guide pin 
holes on the armature plate. 

2.


Close the door. Find a mounting location on the door 

frame near the upper free-moving corner of the door, 
or as close as possible to the upper corner of the 

door frame opposite the hinges. 


3.


Place the template against 

the door and frame. Mark 
where the holes are to be 

drilled. 


Installation: 

Installation Notes: 


Door Frame 

Door 

Door Frame 

Ideal 
Mounting 

Location 

Summary of Contents for E-941SA-600

Page 1: ...en Q sticker represent RoHS compliant products Electromagnetic Lock E 941SA 600 600 lb 272kg E 941SA 1200 1200 lb 545kg With LED Bond Sensor E 941SA 600PQ 600 lb 272kg E 941SA 1K2PQ 1200 lb 545kg Manu...

Page 2: ...List 1 x Mounting plate 1 x Electromagnet 1 x Armature plate 1 x Armature screw 2 x Steel washers 1 x Rubber washer 1 x Door spacer 1 x Sexnut bolt 2 x Guide pins 4 x Long self tapping screws 2 x Sho...

Page 3: ...r Steel washers Hex head mounting screws NOTE When mounting the electromagnet it may be necessary to use a Z bracket 1 or 2 L brackets and or plate spacers depending on the location and the type of do...

Page 4: ...in parallel with the electromagnetic lock as this may cause a delay when releasing the door as well as cause residual magnetism 6 The best location to install the electromagnetic lock is on the insid...

Page 5: ...anti spin guide pins are in the two guide pin holes Mounting Plate Armature Plate 90 The rubber washer will be sandwiched between the two metal washers Armature screw Guide pins 6 Depending on the ty...

Page 6: ...le from SECO LARM SK 1123 SQ SD 7202GC PEQ Long self tapping screws Position a jumper over the two middle pins for 24VDC operation Position two jumpers on all four pins for 12VDC operation Voltage Sel...

Page 7: ...ss Door U Brackets E 941S 1K2 ZRQ Right side Z Bracket for E 941DA 1K2P E 941D 1K2 P for E 941DA 1K2P Additional Models E 941S 1K2 HQ E 941S 600 HQ Armature Plate Holders Description NOTE Connect swit...

Page 8: ...ographical errors Copyright 2010 SECO LARM U S A Inc All rights reserved This material may not be reproduced or copied in whole or in part without the written permission of SECO LARM SECO LARM U S A I...

Reviews: