background image

10

Scorpion 40 Installation Manual, Rev. A


Mounting an internal Scorpion 40

You can install an internal Scorpion 40 drive horizontally or
vertically (on its side).

Mounting the drive in a 3.5-inch drive bay

Mount the drive in a 3.5-inch drive bay and secure it using
two M3.0 metric screws on each side of the drive. Do not use
screws longer than 4 mm or you may damage the drive. As
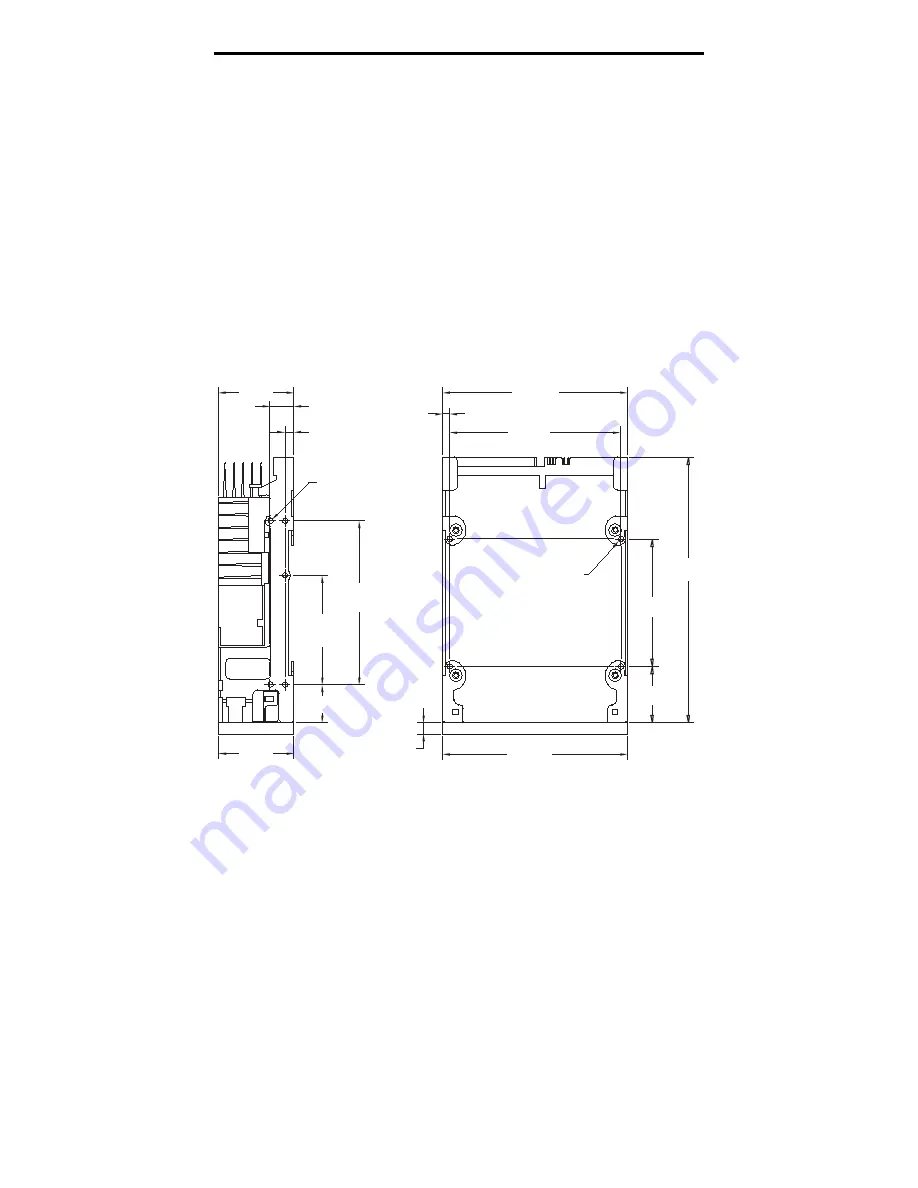
shown in Figure 3, the 3.5-inch drive has four screw holes on
the bottom and five on each side.

Figure 3
Mounting holes for Scorpion 40 drive in 3.5-inch
configuration (without mounting brackets)

41.3 mm

(1.63 in)

101.6 mm

(4.00 in)

101.6 mm

(4.00 in)

94.0 mm

(3.70 in)

3.8 mm (0.15 in)

13.0 mm (0.51 in)
2 places

5.0 mm (0.196 in)
2 places

90.0 mm

(3.54 in)
2 places

70.0 mm

(2.75 in)

6.0 mm

(0.24 in)

31.0 mm

(1.22 in)

146.0 mm

(5.75 in)

41.2 mm

(1.62 in)

60.0 mm

(2.36 in)
2 places

21.0 mm (0.83 in)

2 places

Side View

Bottom View

M3.0 x 4 deep min.

(10 places)

M3.0 x 4 deep min.

(4 places)

Note: Tolerance for all dimensions is 0.25mm (0.01 in)

Summary of Contents for Scorpion 40

Page 1: ...Scorpion 40 Installation Manual Publication 10005601 001 October 1999...

Page 2: ...Scorpion 40 DDS 4 Tape Drive Installation Manual...

Page 3: ...arks or trademarks of their owners Seagate makes no Warranty of any kind with regard to this document Seagate shall not be liable for any errors contained herein or indirect special incidental or cons...

Page 4: ...ng the Scorpion 40 18 Loading a cartridge 18 Unloading a cartridge 19 Initializing a blank cartridge 19 DDS cartridge compatibility 20 Write protecting a cartridge 20 LED codes 21 Cleaning the tape he...

Page 5: ...try to correct it by taking one or more of the following measures Reorient or relocate the receiving antenna Increase the separation between the computer and the receiver Connect the computer into an...

Page 6: ...he Scorpion 40 supports the following SCSI interfaces 68 pin Ultra2 SCSI LVD 68 pin SCSI Wide single ended 50 pin SCSI 2 requires 68 to 50 pin single ended adapter such as Seagate PN 10006520 001 Note...

Page 7: ...y its edges and avoid direct contact with any electronic components If you need to put the drive down lay it on top of the antistatic bag or place it inside the bag Installation Overview Internal driv...

Page 8: ...the Scorpion 40 are listed below SCSI ID 6 Media Recognition System MRS checking enabled Parity checking enabled Data compression enabled Power on self test diagnostics enabled Host operating system W...

Page 9: ...ttings shown SCSI ID 6 parity checking enabled and termination power disabled Pins Function 1 2 SCSI ID bit 0 3 4 SCSI ID bit 1 5 6 SCSI ID bit 2 7 8 SCSI ID bit 3 9 10 Parity checking 11 12 Terminati...

Page 10: ...necessary by placing a jumper across pins 11 and 12 Note The internal Scorpion 40 does not provide SCSI termination and therefore should not be installed as the last device in a SCSI chain See SCSI te...

Page 11: ...is disabled If dip switch 2 is ON the default setting then SCSI commands can be used to enable or disable hardware data compression To prevent hardware data compression from being enabled or disabled...

Page 12: ...operating systems as described starting on page 25 of this manual The default setting for all four of these switches is ON SCSI Wide Narrow switch 9 Switch 9 enables or disables SCSI Wide operation o...

Page 13: ...3 the 3 5 inch drive has four screw holes on the bottom and five on each side Figure 3 Mounting holes for Scorpion 40 drive in 3 5 inch configuration without mounting brackets 41 3 mm 1 63 in 101 6 m...

Page 14: ...rive brackets have four screw holes on the bottom and six on each side Figure 4 Mounting holes for internal Scorpion 40 in 5 25 inch configuration with mounting brackets 41 3 mm 1 63 in 31 5 mm 1 24 i...

Page 15: ...connected to an LVD or single ended wide SCSI bus Note The Scorpion 40 will not work in a SCSI 1 environment Connecting to a 68 pin Wide SCSI or LVD bus To connect the drive to an LVD or SCSI wide bu...

Page 16: ...the chain Figure 6 Two SCSI termination examples for internal Scorpion 40 SCSI Controller termination enabled Scorpion 40 Tape drive SCSI device SCSI device termination enabled termination disabled n...

Page 17: ...14 Scorpion 40 Installation Manual Rev A Figure 7 Drive power connector on internal Scorpion 40 Power connector pin 4 5V pin 3 GND 5V return pin 2 GND 12V return pin 1 12V...

Page 18: ...Data compression enabled Power on self test diagnostics enabled Host operating system Windows 95 98 NT 2000 Termination power supplied to the SCSI bus Note Some of these configuration settings can be...

Page 19: ...computer or to another SCSI device Turn off your computer and all SCSI devices Then attach a SCSI cable from the host adapter or from another unterminated SCSI device to the Scorpion 40 Note The Scorp...

Page 20: ...ination disabled Internal SCSI device termination enabled Example 1 SCSI termination in a system that has only external SCSI devices External SCSI device Example 2 SCSI termination in a system that ha...

Page 21: ...on the front of the drive Loading a cartridge Seagate DDS drives have a front loading cartridge bay for easy operation The drive bay door opens automatically when a cartridge is inserted Figure 10 sh...

Page 22: ...tridge Several seconds may elapse between the time you press the eject button and the time the cartridge is ejected Do not power down the tape drive or the host computer during this time Figure 11 Loc...

Page 23: ...using the following DDS cartridges Model M34000 DDS 2 120 meters 4 Gbyte native capacity Model STDM24G DDS 3 125 meters 12 Gbyte native capacity Model STDM40 DDS 4 150 meters 20 Gbyte native capacity...

Page 24: ...e has been operating for at least 25 hours for DDS 1 or DDS 2 media or for at least 50 hours for DDS 3 or DDS 4 media Use only a Seagate approved cleaning cartridge to clean the drive If the Clean LED...

Page 25: ...LED functions as follows If the Drive LED is ON continuously the drive is reading or writing the tape that is SCSI or tape activity is present If you push the eject button while the Drive LED is ON yo...

Page 26: ...DS 1 and DDS 2 or 50 hours DDS 3 or DDS 4 Flashing Slowly The internal error rate threshold has been exceeded and cleaning is required Flashing The cleaning cartridge in the drive has exceeded is usef...

Page 27: ...ata cartridge How to clean the tape heads To clean the tape heads on your drive use only a Seagate qualified DDS cleaning cartridge Seagate offers a cleaning cartridge part number 25883 001 available...

Page 28: ...tem configuration dip switches on the bottom of the internal Scorpion 40 Note If the drive is to be used with an operating system other than those described here these switches should be left in their...

Page 29: ...uration for the Novell environment Before using the Scorpion 40 in a Novell environment set the operating system dip switches as shown below 1 2 3 4 5 6 7 8 9 0 O N To configure the drive for various...

Page 30: ...odify the file etc ddr dbase as follows 1 Look through the file and locate the database entry for the DEC TLZ07 DAT drive 2 Copy this entry and paste it later in the file taking care to maintain the f...

Page 31: ...ion The cam_data c file should be modified as shown below 1 Look through the file to locate the database entry for the TLZ07 RDAT drive 2 Make a copy of this entry and paste it later in the file takin...

Page 32: ...define statement for the Seagate drive like the one shown below define ST_TYPE_SEAGATE_DAT value This statement should be added after the last ST_TYPE_ define statement in the file value should be th...

Page 33: ...y with the Scorpion 40 add the following lines to the file st conf in the directory kernel drv tape config list SEAGATE DAT 05573 XXX Seagate DAT Drive SEAGATE_DAT SEAGATE_DAT 1 0x2c 0 0xd639 4 0x00 0...

Page 34: ...to use the Scorpion 40 you must modify the file var sysgen master d scsi as described below 1 Edit the file var sysgen master d scsi and add the following entry DATTAPE TPDAT 7 12 SEAGATE DAT 05573 D...

Page 35: ...CAN_BSR MTCAN_APPEND MTCAN_SETMK MTCAN_PART MTCAN_PREV MTCAN_SYNC MTCAN_SPEOD MTCAN_CHKRDY MTCAN_VAR MTCAN_SETSZ MTCAN_SILI MTCAN_SEEK MTCAN_CHTYPEANY MTCAN_COMPRESS minimum delay on i o is 12 minutes...

Page 36: ...artup Alternatively you could manually rebuild the kernel using the autoconfig command see the autoconfig man page for details then reboot the system again to bring the changes into effect Troubleshoo...

Page 37: ...sysgen master d scsi Switching Hardware Compression Irix 6 x provides support for software switching of hardware compression through the use of different device drivers Drivers including a c in the de...

Page 38: ...he instructions then click on OK 7 SAM may detect that your HP UX kernel lacks the drivers necessary to make use of your new tape drive If so within the Device Driver Check window read the message and...

Page 39: ...configure AIX using the SMIT utility use the following procedure 1 Enter SMIT at the Tape Drive menu by typing smit tape 2 Select Add a tape drive 3 Select the type of tape drive you will be adding Us...

Page 40: ...un SMIT device files will have been created for your new tape drive Typical filenames are listed below dev rmt0 dev rmt0 1 dev rmt0 2 dev rmt0 3 dev rmt0 4 dev rmt0 5 dev rmt0 6 dev rmt0 7 If you ente...

Page 41: ...dwide These services may include Seagate phone technical support For one on one help you can talk to a technical support specialist during local business hours Before calling note your system configur...

Page 42: ...5 936 1630 Support services in Europe For European customer support and SeaFAX dial the toll free number for your specific country from the table below The Seagate Technical Support FAX number for all...

Page 43: ...en 8 30 A M to 5 00 P M European central time Monday through Friday or send a FAX to 31 20 653 3513 Support services in Asia and the Western Pacific Various technical support services are available fr...

Page 44: ...Scorpion 40 Installation Manual Publication 10005601 001 October 1999...

Reviews: