SCHUNK KSP plus-BWM Series Assembly And Operating Manual Download Page 47


Seal Kit and Parts List 


04.00|1151449 KSPplus-BWM, KSP-LHplus-BWM |en 
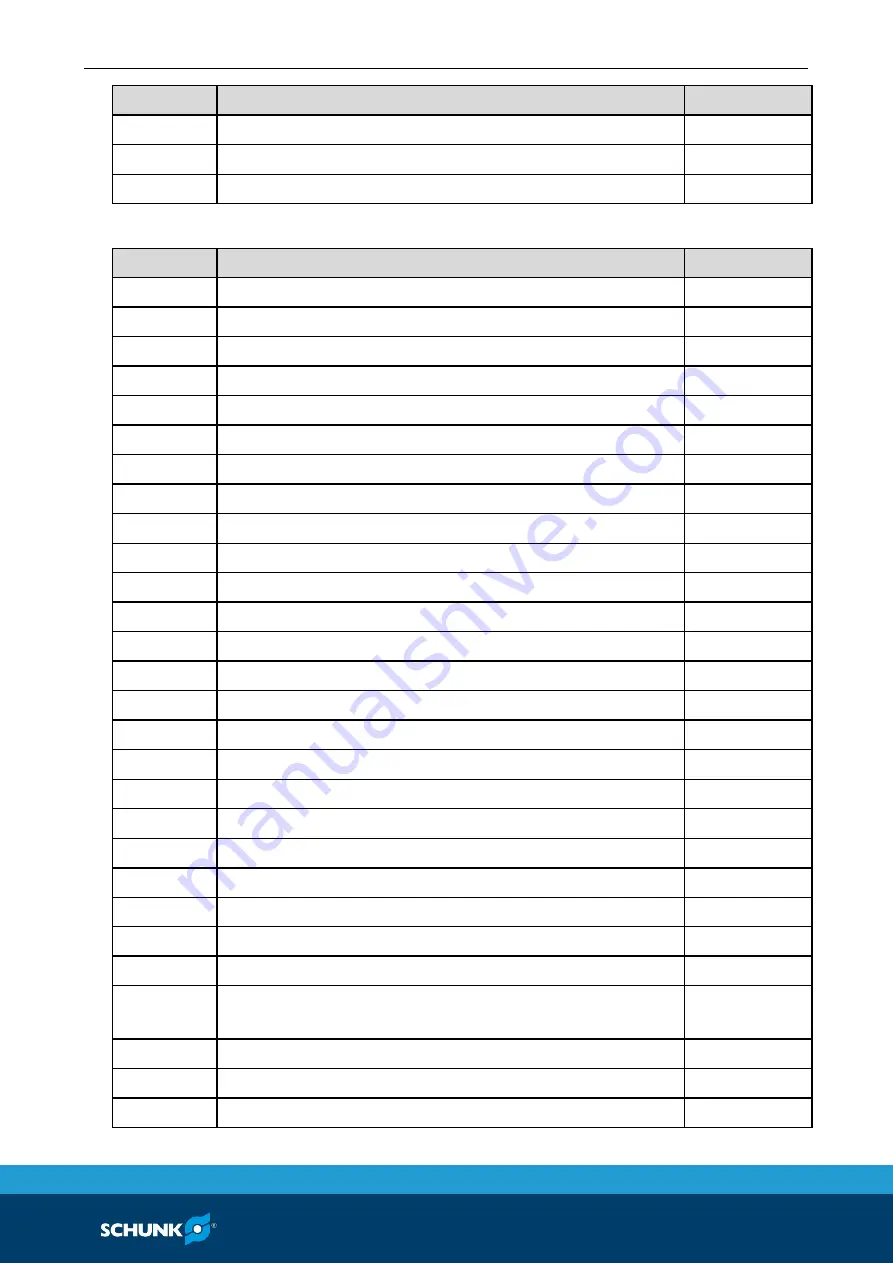
47 


Item 

Designation 

Quantity 

34 

Compression spring 

35 

Cylindrical pin, DIN 7979 - 5 m6 x 24 mm 

45 

O-ring DIN 3771 5.5 x 1.50 


KSP-LH plus 160-BWM


Item 

Designation 

Quantity 

1* 

Body 

2* 

Base jaw 

3* 

Chuck piston 

Cylinder piston 

Cover 

Covering strip 

Covering strip 

8*** 

Plug 

9*** 

Fitting screw 12f7/M10 

10 

Lubrication nipple 

11 

Locking screw 

12** 

Quad-ring 126.59 x 3.53 

13 

Sound absorber 

14 

Screw DEI 4762/10.9 M10 x 25 mm 

15** 

Combined sealing element 

16 

Countersunk screw, DIN EN ISO 4026 M3 x 6 mm 

17** 

O-ring DIN 3771 150 x 2.00 

18*** 

O-ring DIN 3771 12 x 2.00 

19*** 

Screw DEI 4762/10.9 M10 x 40 mm 

20** 

Flat seal 

17 

21 

Countersunk screw, DIN EN ISO 10642/10.9 M5 x 20 mm  15 

22** 

Flat seal 

23 

Set-screw, similar to DIN EN ISO 4026/45H M5 x 4 mm 

25 

Countersunk screw, DIN EN ISO 10642/10.9 M5 x 10 mm  2 

26 

Set-screw, similar to DIN EN ISO 4026/45H M4 x 4 mm 

IN6RD/VZ/PA 

27*** 

Clamping sleeve, DIN EN ISO 13337 DRM. 13 x 18 

31 

Locking bolt 

32 

Unlocking bolt 

Summary of Contents for KSP plus-BWM Series

Page 1: ...Translation of original operating manual TANDEM Clamping Force Block KSP plus BWM KSP LH plus BWM Assembly and Operating Manual Superior Clamping and Gripping...

Page 2: ...erations for the purpose of technical improvement Document number 1151449 Version 04 00 20 07 2020 en H D SCHUNK GmbH Co All rights reserved Dear Customer thank you for trusting our products and our f...

Page 3: ...qualification 8 2 8 Personal protective equipment 9 2 9 Notes on safe operation 10 2 10 Transport 10 2 11 Malfunctions 10 2 12 Disposal 11 2 13 Fundamental dangers 11 2 13 1 Protection during handling...

Page 4: ...hanging jaws from the quick change interface 32 7 Trouble shooting 34 8 Maintenance and care 36 8 1 Disassembling and assembling the clamping force block 37 8 2 Leak test 39 8 3 Testing quick change j...

Page 5: ...al Illustrations in this manual are provided for basic understanding and may differ from the actual product design In addition to these instructions the documents listed under 1 1 2 Page 6 are applica...

Page 6: ...onditions and operating conditions 2 6 Page 8 Observance of the specified care and maintenance instructions 8 Page 36 Parts touching the workpiece and wear parts are not included in the warranty A cyc...

Page 7: ...equipment as a press as a punching tool as a lathe chuck as a drill or as a cutting tool It is used in working environments that are not permissible Workpieces are not properly clamped Safety regulat...

Page 8: ...such as clamping bars or reversible gripping jaws to the changing jaws with the proper torque 4 Page 17 Environmental and operating conditions Required ambient conditions and operating conditions Inco...

Page 9: ...ut the delegated tasks and possible dangers due to improper behaviour Due to its technical training knowledge and experience service personnel of the manufacturer is able to perform the delegated task...

Page 10: ...on and environmental protection regulations regarding the product s application field IMPORTANT Following a longer shutdown period more than approx 6 hours always re tension the clamping device in ord...

Page 11: ...ake appropriate protective measures to secure the danger zone Disconnect power sources before installation modification maintenance or calibration Ensure that no residual energy remains in the system...

Page 12: ...rely solely on the response of the monitoring function to avert danger Until the installed monitors become effective it must be assumed that the drive movement is faulty with its action being depende...

Page 13: ...Directive 2006 42 EC specifically they must have effective technical measures to protect against possible mechanical hazards WARNING Risk of injury from workpiece loss if compressed air or oil pressur...

Page 14: ...falling if the operational environment of the clamping block is not clean e g contaminated with cooling lubricants or oil Ensure that the working environment is clean before starting assembly and inst...

Page 15: ...bility mm 0 01 0 02 0 03 0 01 0 02 0 03 Repeat accuracy mm 0 02 0 02 0 02 0 02 0 02 0 02 max jaw height mm 35 55 70 35 55 70 Weight kg 4 11 6 34 5 4 11 7 34 6 Clamping force is the arithmetic sum of t...

Page 16: ...16 04 00 1151449 KSPplus BWM KSP LHplus BWM en Dimension KSP plus BWM KSP LH plus BWM 100 160 250 N M8 M10 M12 O 15 18 20 P 4 4 5 Q 10 f7 12 f7 14f7 R 11 13 16 S 4 5 6 6 T 5 6 8 U 59 8 71 83 V 69 3 83...

Page 17: ...M16 M18 M20 M22 M24 Admissible torque MA Nm 4 2 7 5 13 28 50 88 120 160 200 290 400 500 Tightening torques to mount top jaws on the TANDEM clamping block screw quality 12 9 Screw size M4 M5 M6 M8 M10...

Page 18: ...tional mounting screws on the base jaw The changing jaw is locked in place by a spring actuated failsafe mechanism The retentive function of the conical lock bolt ensures the jaw is always locked in p...

Page 19: ...anism The lock bolt also moves back out NOTE Be sure to only apply moderate force when turning the hexagonal screwdriver Do not strengthen the spring actuated jaw locks with additional force from the...

Page 20: ...between the changing jaws Changing jaw type WTG The WTG changing jaw can be used with clamping bars and reversible gripping jaws to clamp raw parts The reversible gripping jaws and clamping bars are s...

Page 21: ...f hardenable 16MnCr5 Workpiece specific adjusting possible by machining under clamping pressure Bore holes and clamping contours can be made to order WTR changing jaw Designation WTR 100 WTR 160 WTR 2...

Page 22: ...5 9 kg Sample workpiece clamping with WTR changing jaw WTG changing jaws Hard and drilled with bore hole grid as supporting jaw for SEI 6x reversible clamping inserts and STG clamping bars Mounted to...

Page 23: ...ID 0402311 0402312 0402313 suitable for sizes KSP LH plus 100 BWM KSP LH plus 160 BWM KSP LH plus 250 BWM A 47 76 118 B 55 90 140 C 25 36 46 D 18 28 5 46 d D1 6 7 5 9 5 d D2 10 15 20 L1 30 56 96 L2 9...

Page 24: ...ts and clamping bars come with mounting screws Only use the mounting screws included at the specified torque when assembling 4 Page 17 WTG changing jaw accessories Designation SEI 100 M6 SEI 160 M8 SE...

Page 25: ...ly before putting it into operation Make sure there are no leaks in the line system Regularly check the motion kinematics of the jaw change inter face locking mechanism to make sure they can be easily...

Page 26: ...s face downwards Surface X is parallel to the guideway of the base jaws 2 so the clamping block can be aligned on the machine table Assembling the clamping block Assembly with clamping sleeves Assembl...

Page 27: ...ss of air pressure caused by damaged pneumatic lines Always make sure the connections are tight and use appropriate protection covers to protect the pneumatic hoses and lines from hot chips and fallin...

Page 28: ...ng force block The oiler should be no more than 2 meters from the coupling point The clamping force block has two more base connections V for direct lubrication through the machine table These connect...

Page 29: ...e 17 Remove the locking screws from the pneumatic connections on the base plate Connect the diaphragm pressure switch and set the switch to the required minimum pressure Inserting the changing jaws A...

Page 30: ...Assembly 30 04 00 1151449 KSPplus BWM KSP LHplus BWM en Locking in place without tools...

Page 31: ...own with a hexagonal screwdriver This is done by applying a one quarter counter clockwise turn at one of the side access points Once the jaw is inserted into the interface and positioned the locking k...

Page 32: ...change interface The jaws can be removed in two ways 1 Two handed Unlock the jaws with a one quarter counter clockwise turn from the hexagonal screwdriver at one of the side access points At the same...

Page 33: ...BWM en 33 2 One handed Feed the hexagonal screwdriver through the hole in the changing jaw and unlock it directly from above The tool drives the lock bolt down and simultaneously can be used to tip t...

Page 34: ...pairs or disassemble clamping system and repair using original SCHUNK spare parts 8 1 Page 37 Piston rod or piston rod screw connection broken overload Send clamping system to SCHUNK for repairs or di...

Page 35: ...tion s Chips or dirt between covering strip and base jaws Unscrew the covering strip item 7 and remove chips and dirt Clamping force getting weaker Possible cause Solution s Clamping block not sealed...

Page 36: ...east once a month or every 10 000 clampings lubricate the guides on the two frontal or the two lateral lubricating nipples with LINOMAX 200 or equivalent lubricant For this purpose the chuck jaws shou...

Page 37: ...acing wearing parts e g seals for sealing kit lists see 9 Page 42 adhere to the following order 1 Pressurize the clamping force block at 6 bar until the jaws are in the OPEN position 2 Actuate the dis...

Page 38: ...ews item 21 need to be removed To take off the cover item 5 screw two screws into the outer threaded holes for size 100 BWM two M3 x 25 screws for size 160 BWM two M5 x 25 screws for size 250 BWM two...

Page 39: ...allation position for the base jaws and the chuck piston Make sure no parts fall out when installing the base jaw units 27 Connect the clamping system to the air supply and move the jaws to the OPEN p...

Page 40: ...Release the torque on the screwdriver and see if the kinematics reset automatically and the lock bolt rises completely up Check the motion kinematics multiple times in alternating fashion 4 Check the...

Page 41: ...N Risk of injury from screwdriver slipping Pressing on the lock bolt with the hexagonal screwdriver without a changing jaw in place can result in injury from the screwdriver slipping Never press on th...

Page 42: ...Designation Quantity 12 Quad ring 72 62 x 3 53 1 15 Combined sealing element 1 17 O ring DIN 3771 93 x 2 00 1 18 O ring DIN 3771 9 x 2 00 4 20 Flat seal 13 22 Flat seal 2 50 O ring DIN 3771 6 x 1 50...

Page 43: ...ping sleeve DIN EN ISO 13337 DRM 11 x 16 2 54 O ring DIN 3771 6 x 1 50 2 KSPplus 160 BWM KSP LH plus 160 BWM Item Designation Quantity 8 Plug 4 9 Fitting screw 12f7 M10 2 18 O ring DIN 3771 12 x 2 00...

Page 44: ...10 9 M8 x 20 mm 1 15 Combined sealing element 1 16 Countersunk screw DIN EN ISO 4026 M3 x 6 mm 4 17 O ring DIN 3771 93 x 2 00 1 18 O ring DIN 3771 9 x 2 00 4 19 Screw DEI 4762 10 9 M8 x 35 mm 4 20 Fl...

Page 45: ...3 53 1 13 Sound absorber 1 14 Screw DEI 4762 10 9 M8 x 20 mm 1 15 Combined sealing element 1 16 Countersunk screw DIN EN ISO 4026 M3 x 6 mm 4 17 O ring DIN 3771 93 x 2 00 1 18 O ring DIN 3771 9 x 2 00...

Page 46: ...3 1 13 Sound absorber 1 14 Screw DEI 4762 10 9 M10 x 25 mm 1 15 Combined sealing element 1 16 Countersunk screw DIN EN ISO 4026 M3 x 6 mm 4 17 O ring DIN 3771 150 x 2 00 1 18 O ring DIN 3771 12 x 2 00...

Page 47: ...w 2 12 Quad ring 126 59 x 3 53 1 13 Sound absorber 1 14 Screw DEI 4762 10 9 M10 x 25 mm 1 15 Combined sealing element 1 16 Countersunk screw DIN EN ISO 4026 M3 x 6 mm 4 17 O ring DIN 3771 150 x 2 00 1...

Page 48: ...nipple 4 11 Locking screw 2 12 Quad ring 209 14 x 3 53 1 13 Sound absorber 1 14 Screw DEI 4762 10 9 M12 x 30 mm 1 15 Combined sealing element 1 16 Screw DIN EN ISO 7984 M4 x 8 mm 4 17 O ring DIN 3771...

Page 49: ...ering strip 1 8 Plug 4 9 Fitting screw 14f7 M12 2 10 Lubrication nipple 4 11 Locking screw 2 12 Quad Ring 209 14 x 3 53 1 13 Sound absorber 1 14 Screw DEI 4762 10 9 M12 x 30 mm 1 15 Combined sealing e...

Page 50: ...VZ PA 1 27 Clamping sleeve DIN EN ISO 13337 DRM 16 x 22 2 31 Locking bolt 2 32 Unlocking bolt 4 33 Unlocking bolt 2 2 34 Compression spring 2 35 Cylindrical pin DIN 7979 6 m6 x 32 mm 1 Individual com...

Page 51: ...Drawings 04 00 1151449 KSPplus BWM KSP LHplus BWM en 51 Drawings for size 160 for sizes 160 250 Centering with clamping sleeves Centering with fitting screws 10...

Page 52: ...Drawings 52 04 00 1151449 KSPplus BWM KSP LHplus BWM en Clamping jaw interface design...

Page 53: ...umber 0405203 0405223 0405205 0405225 0405303 0405323 0405305 0405325 0405503 0405523 0405505 0405525 The partly completed machine may not be put into operation until conformity of the machine into wh...

Page 54: ...vant 1 1 Essential Requirements 1 1 1 Definitions X 1 1 2 Principles of safety integration X 1 1 3 Materials and products X 1 1 4 Lighting X 1 1 5 Design of machinery to facilitate its handling X 1 1...

Page 55: ...X 1 6 5 Cleaning of internal parts X 1 7 Information 1 7 1 Information and warnings on the machinery X 1 7 1 1 Information and information devices X 1 7 1 2 Warning devices X 1 7 2 Warning of residua...

Reviews: