background image

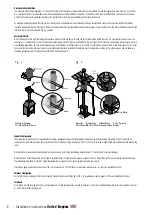
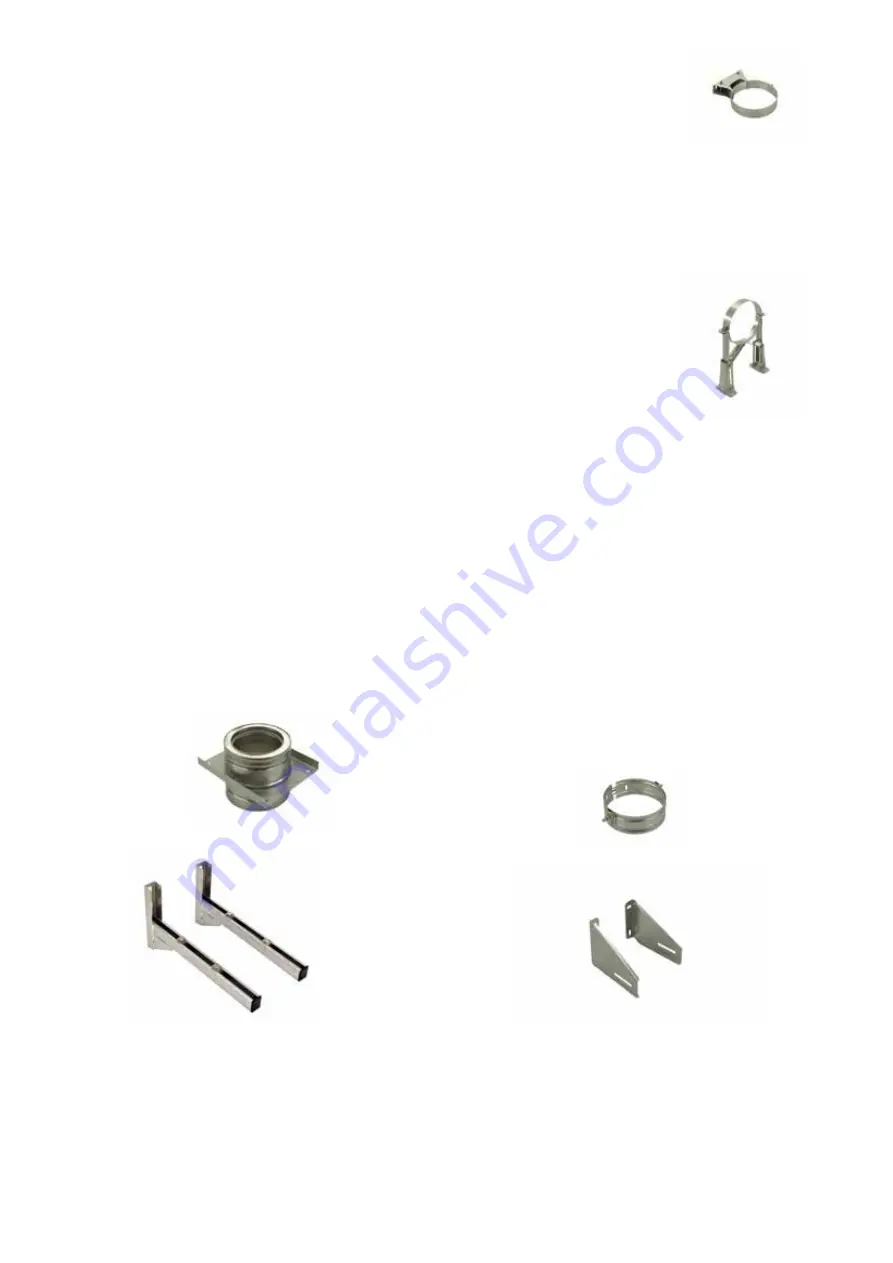
Wall Band (50-90mm)

Internal and External Application
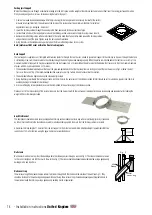
The wall band is supplied in two parts, a stainless steel bands which fits tightly around the outside of the chimney and a stainless steel back 
bracket�
1�  Once the position of the support has been determined, secure the back bracket to the wall with a method of fixing to ensure adequate 

attachment and support�

2�  The stainless steel band is then positioned around the chimney section and secured with the nut and bolt provided to the bracket�
3�  The wall bracket provides lateral stability only, it is NOT load bearing and is to be positioned at 2 metre centres�

Adjustable Back Bracket (90-200/190-300/290-400mm)

Internal and External Application
The adjustable wall bracket is supplied in two parts, two stainless steel adjustable legs, and a frame which fits thightly around the outside of the 
chimney�
1�  Once the position of the support has been determined, secure the legs to the wall with a method of fixing to ensure adequate attachment and 

support�

2�  Determine the amount of extension required and secure the back bracket of the wall band in place onto the adjustable section�
3�  Fasten the strengthening back frame in place using the bolts provided�
4�  With the back frame in place, locate the rear portion of the band onto the back bracket, the outer part of the band is then positioned around 

the chimney section and secure with the nuts and bolts provided�

5  The adjustable wall band provides lateral stability only, it is NOT load bearing and is to be positioned at 2 metre centres�

Adjustable Plate/band

The wall support is designed to be used internally or externally to provide either initial or intermediate support for the vertical chimney� It is used in combination with wall 
brackets� The female socket on the pipe attached to the underside of the plate should be pushed down onto the preceding pipe and the joint secured using the locking band 
provided� The top plate is then attached to the wall brackets using the bolts provided through the fixing slots in the top plate� The bolts should then be tightened firmly�

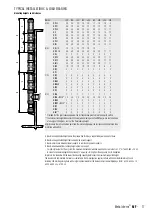
For maximum height of chimney see load bearing details, please refer to tables and diagrams on page 17�

Wall Brackets

Once the position of the support has been established in relation to the chimney route, secure wall brackets to the wall using expansion bolts to ensure adequate attachment 
and support�

13

Metaloterm

®


MF

 -

Summary of Contents for Metaloterm MF

Page 1: ...0 0 0 0 C M Y K 0 91 76 6 C M Y K 0 0 0 100 C M Y K 0 15 95 0 C M Y K 0 90 80 5 C M Y K 100 70 0 5 C M Y K 0 0 0 0 C M Y K 0 90 86 0 C M Y K 0 0 0 100 C M Y K 0 100 100 0 C M Y K 0 12 100 5 C M Y K 0 100 100 0 C M Y K 0 0 0 0 C M Y K 100 0 100 45 C M Y K 0 0 0 0 C M Y K 0 100 100 0 Installation instructions United Kingdom 100 400mm Internal Diameter Twin Wall Insulated Chimney System for wood burn...

Page 2: ...iameter Chimney Route Connection to Draught Diverter Direct Connection Appliance to System Chimney Distance to Combustibles page 8 Enclosures Shafts Support Components page 8 Chimney Termination Terminals INSTALLATION INSTRUCTIONS page 9 Jointing System Standard Chimney Sections Individual Components OFFSET DIMENSIONS page 11 FIRESTOP COMPONENTS page 12 OUTLET SITING page 16 TYPICAL INSTALLATIONS ...

Page 3: ...N 1856 1 T450 N1 D V3 L50040 G60 In free air In combustible shaft with ventilated fire stop For full information please see p 8 Distance to Combustibles Section Manufactured under a Quality Management Scheme approved to ISO 9001 4 Hour Fire Rating to BS 476 20 Certified for corrosion resistance on gas oil and solid fuel by MPA and Tüv EN 1856 2 T200 P1 W V2 L50040 O10 EN 1856 2 T200 H1 W V2 L50040...

Page 4: ... has been no damage Do not use damaged components Build the chimney up through the previous designed route which should be as straight as possible PRIOR TO INSTALLATION Ventilation It is very important that sufficient air for combustion and ventilation is provided to the room containing the appliance to enable correct and efficient working of the appliance and chimney system Reference should be ma...

Page 5: ...ts this distance will be as declared by the chimney manufacturer Connecting Flue Pipe Route Single wall connecting flue pipes should only be used to connect appliances to a Chimney They should not pass through any roof space partition internal wall or floor except to pass directly into a chimney through a wall of the chimney Connecting flue pipes should be located as to avoid igniting combustible ...

Page 6: ... 225 square 9 x 9 FlexibleTwin Wall Chimney Liner Chimney Wall Support Bracket Swept Elbow Sweep access Tee Piece Single Wall to Flex Connector 450mm MAX Measured from back of appliance to flue liner Wall Support Measured from back of connecting flue pipe to outside surface of chimney Tee Cap for Debris Collection Cleaning Access Twin Wall Chimney System Solid Wall Inspection Bend Wall Sleeve Trim...

Page 7: ...r For minimum distance for this configuration check manufacturers distance to combustibles For minimum distance for this configuration check manufacturers distance to combustibles to combustibles Measured from back of appliance to outside surface of chimney Measured from back of appliance to liner of masonry chimney Twin Wall Chimney System 300 Wall Support Tee Cap for Debris Collection Cleaning A...

Page 8: ...ns This can be achieved by boxing in the chimney in habitable rooms or by the use of a protective wire mesh frame minimum height of 1 mtr in roof spaces etc In all cases the minimum distance to any combustible material including loft insulation must be respected according to the table on page 3 and any enclosure should be ventilated using the appropriate ventilated fire stops see page 12 Support C...

Page 9: ...ections on each and of the main chimney components In all cases joints should be held securely in place using the locking band which is supplied with all components The sealing ring in the inner wall must remain in its position and must not be damaged during connection of the elements Make sure the welded seams of the connecting sections are in line Note Joints must NOT occur within floor or ceili...

Page 10: ...om one diameter to the next diameter e g 130mm to 150mm The component is fitted in the same way as a standard pipe length and should be secured with the locking band provided Adjustable Pipes They are used with standard components to achieve an exact length on site and avoid on site cutting of components 1 Calculate the length required 2 Remove insulation as required to achieve the correct length ...

Page 11: ...00 373 350 150 460 225 590 350 806 582 1209 400 125 467 400 175 553 250 683 375 900 607 1302 45 45 Ø X Y Ø X Y X Y X Y X Y 100 99 239 100 170 310 276 416 453 593 781 921 130 106 256 130 177 327 283 433 460 610 788 938 150 113 273 150 184 344 290 450 467 627 795 955 180 120 290 180 191 361 297 467 474 644 803 973 200 127 307 200 198 378 304 484 481 661 810 990 250 141 341 250 212 412 318 518 495 69...

Page 12: ...es from the outer wall of the chimney This distance must be a minimum of 60mm for solid fuel applications 2 Lower the chimney section through the opening in the floor and secure to the next section of pipe 3 Locate the two halves of the support plates around the chimney section and secure to the joists using screws or bolts 4 Remove the self drilling screws which are fastened to the clamp band The...

Page 13: ...place onto the adjustable section 3 Fasten the strengthening back frame in place using the bolts provided 4 With the back frame in place locate the rear portion of the band onto the back bracket the outer part of the band is then positioned around the chimney section and secure with the nuts and bolts provided 5 The adjustable wall band provides lateral stability only it is NOT load bearing and is...

Page 14: ...op of the plate Tighten using the nuts and bolts provided 5 Using the holes in the clamp band as a guide fasten the three self drilling screws to the system Note Joints must NOT occur within the floor or ceiling joists Roof Support The roof support is supplied as a kit complete with two side plates for fixing to the roof trusses a band to give lateral support to the chimney as it passes through th...

Page 15: ...lashing leaving a gap large enough to allow for ventilation whilst ensuring that the cone is protected from rain ingress The joint between the storm collar and the outer case of the flue should then be sealed with a mastic sealant which is purchased separately Storm Collar This item is used in conjunction with the Metaloterm range of flashings and is purchased separately The storm collar should be...

Page 16: ... boundary Note 3 At or within 600mm above the ridge At least 2300mm horizontally from the nearestpointontheweathersurfaceand a at least 1000mm above the highest point of intersection of the chimney and the weather surface or b at least as high as the ridge At least 1000mm above the top of the opening At least 600mm above any part of the adjacent building within 2300mm A B C D Outlet siting for Sol...

Page 17: ...30 25 20 20 17 10 10 9 MFT 87 30 30 30 25 25 20 15 15 12 MFT 90 30 30 30 25 25 20 15 15 12 MFI 30 30 30 25 25 20 15 15 12 MFTI 30 30 25 20 20 17 10 10 9 MFTR 30 30 30 25 25 20 15 15 12 MFTRS 30 30 30 25 25 20 15 15 12 MFNL 30 30 30 25 25 20 15 15 12 B m MFOL1 2 10 10 10 10 10 10 MFOH 2 4 40 40 40 35 35 25 20 17 17 MFSA 5 5 5 5 5 5 5 5 5 MFAPO 40 40 40 35 35 25 20 17 17 MFAPU 40 40 40 35 35 25 20 1...

Page 18: ... can get into the body and cause damage to health Larger fibres or fragments of fibres can cause irritation itching of the skin the upper airways and the eyes PROTECTION MEASURES AND SAFE PRACTICE Avoid contact with the skin After finishing work rinse off dust with water and change your clothes wash exposed areas of skin thoroughly with soap and if necessary use a skin care product Eye Protection ...

Page 19: ... that there is no build up of any deposits in the flue way of the connecting flue pipe or system chimney Fuel Storage and Usage Where solid fuels are being used correct storage is critical and fuels must be kept dry Wood must be seasoned prior to use with a maximum moisture content of 20 Only approved fuels should be used Refer to HETAS list for details on www hetas co uk The fuel used must be sui...

Page 20: ...www metaloterm com Schiedel Metaloterm B V Oude Veerseweg 23 4332 SH Middelburg The Netherlands www metaloterm com ...

Reviews: